
 This online help page is dedicated to the SurgeONE.ai Admin Portal and its associated functionalities. SurgeONE.ai is a user-friendly and secure platform for setting up rules and making entries related various activities that can come under the regulatory compliance umbrella - such as recording of securities trading activities, reporting of gifts provided, political contributions made, complaints reporting, etc.
1. Logging in as SurgeONE.ai Administrator
Enter the administrator credentials and land directly on the Companies tab so you can immediately start governance tasks without extra navigation. The login flow includes multi-factor authentication and session controls that protect admin access while allowing secure sign-ins. Role-based UI controls are applied at login so only admin-specific actions (for example, Entities, Companies, and Partners management) are visible.
Successful authentication takes you directly to the Companies tab of the SurgeONE.ai admin portal with the Entities menu selected on the left so you can immediately begin governance and onboarding activities.
- Let us assume that your designated role is SurgeONE.ai Administrator and you have navigated to the SurgeONE.ai Login page.
- Enter the registered email address of admin user account in the Email ID field.
- Enter the password in the Password field.
- Click on the Login button below it. Successful authentication takes you directly to the Companies tab of the SurgeONE.ai admin portal with the Entities menu selected on the left so you can immediately begin governance and onboarding activities.
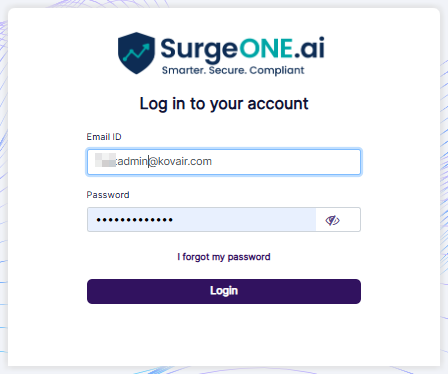 Fig: 1 - Logging in as SurgeONE.ai Admin user
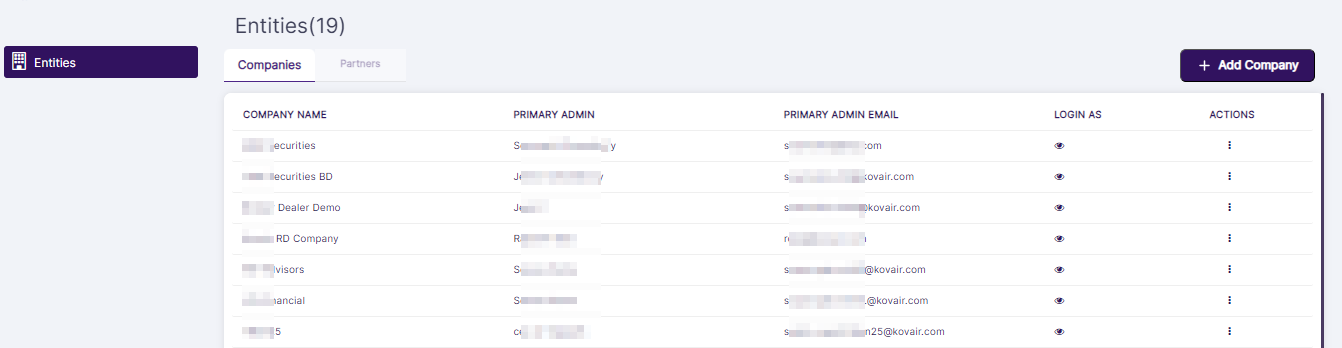
Fig: 2 - Companies tab
1.1. Creating a New Company
The Create Company functionality gathers company name, primary admin name and email, and a one-click Enable Vendor AI toggle feature so the company is provisioned consistently and reproducibly. Built-in validations block duplicate company names and admin emails, preventing identity collisions and eliminating later reconciliation work for support teams. Sending the activation link both creates the company and triggers an email workflow so the assigned primary admin can complete password setup and MFA, enabling immediate governance handover. The created company appears in the grid so admins can confirm details and assign partners or associate partners right away.
Creating a company provisions a new customer or subsidiary in the SurgeONE.ai admin portal, assigns a default Company / Branch Admin user, and optionally enables the Vendor AI automation for vendor due diligence workflows. The workflow is a single, guided modal that validates inputs before allowing the creation action and triggers an email-based activation flow for the assigned primary admin so the company becomes operational with minimal follow-up.
To create a company perform the following steps:
- Click on the + Add Company button at the top right of the Companies tab. The button opens a modal rather than navigating away, keeping your current grid view in context.
- The following Create Company dialog box loads.
- Enter the applicable name of the new company (that is to be created) in the Company Name field. Use the legal or display name that will appear across the application.
- Enter the first name of the administator (who is to be set) for this new company in the Primary Admin: First Name field. The first and last are required for notifications and audit trails.
- Enter the middle name of the administator (who is to be set) for this new company in the Middle Name field. Entering the middle name is optional.
- Enter the last name of the administator (who is to be set) for this new company in the Last Name field.
- Enter the valid and applicable email address of this administator in the Primary Admin Email field. The entered text must be a valid, deliverable address while the system checks for existing admin accounts and prevents reuse that would create identity conflicts.
- The Enable Vendor AI slider is enabled by default. You can choose to disable the Enable Vendor AI slider.
- Click on the enabled Send Activation Link button to create the new Company.
-
The system will display a success notification at the top.
 Fig: 6 - Success notification
-
The created company gets listed in the grid view.
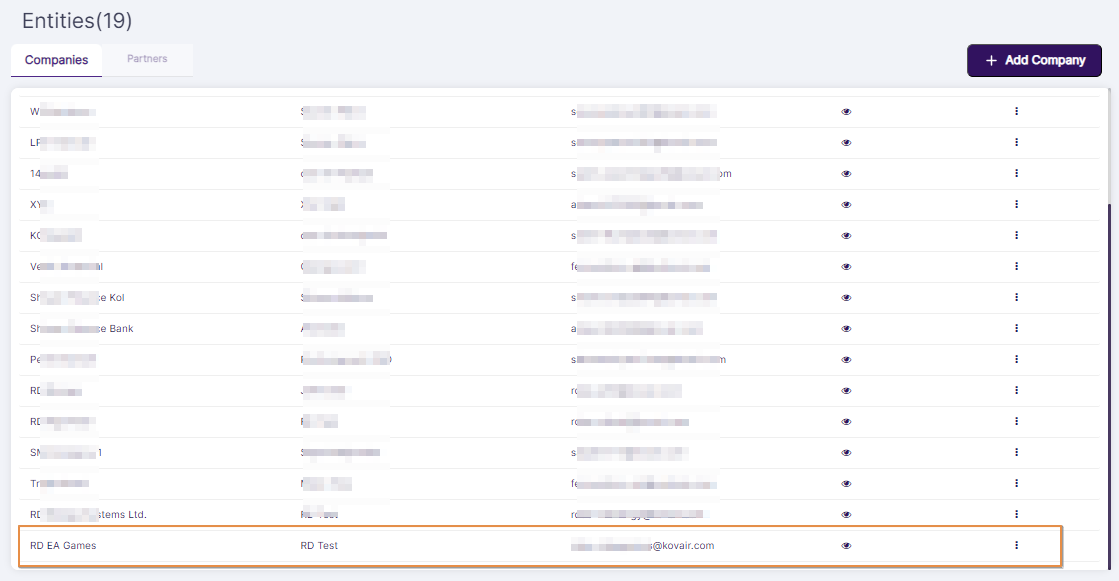 Fig: 7 - Created company visible in grid
- The Send Activation Link button is disabled by default. Only after you enter the requisite details in the mandatory fields, this button gets activated.
- Validation is employed on the Primary Admin Email field to check whether the entered email address is matching with email address of any existing Admin account. If it matches and you click on the Send Activation Link button, the system prompts a tooltip below the field.
- The Enable Vendor AI slider functionality streamlines the vendor assessment process, ensuring accuracy and efficiency while reducing manual effort. When this slider is enabled, AI extracts relevant data from Vendor Due Diligence related documents (i.e. SOC2) provided by the vendor. After extraction, AI automatically fills out the Vendor Due Diligence questionnaire with the information captured from these documents. For more detailed understanding, refer to this.
- This admin user set for the created company is assigned to the default Company / Branch Admin role of that company. An invitation email is triggered by the system to the entered email address to set own admin password.
 Fig: 3 - + Add Company button
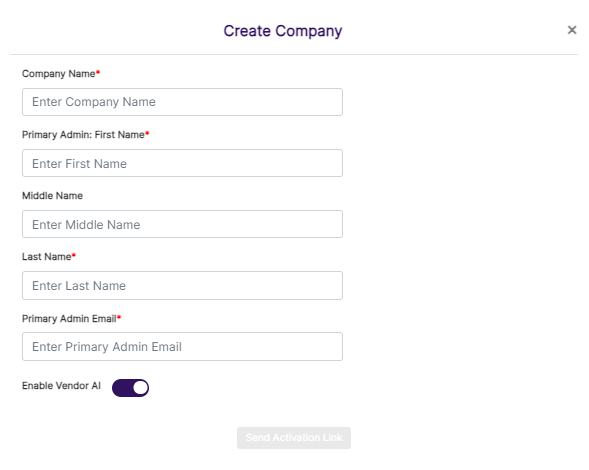 Fig: 4 - Create Company dialog box
There are user input fields labeled as Company Name, Primary Admin: First Name, Middle Name, Last Name and Primary Admin Email along with an Enable Vendor AI slider.
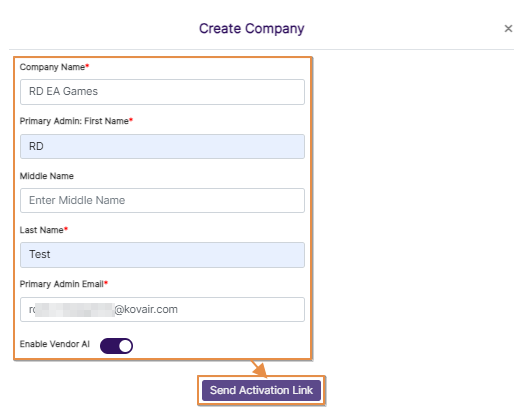 Fig: 5 - Send Activation Link button
 NOTE:
NOTE:
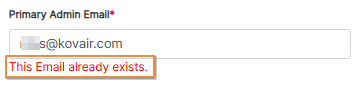 Fig: 8 - Field validations
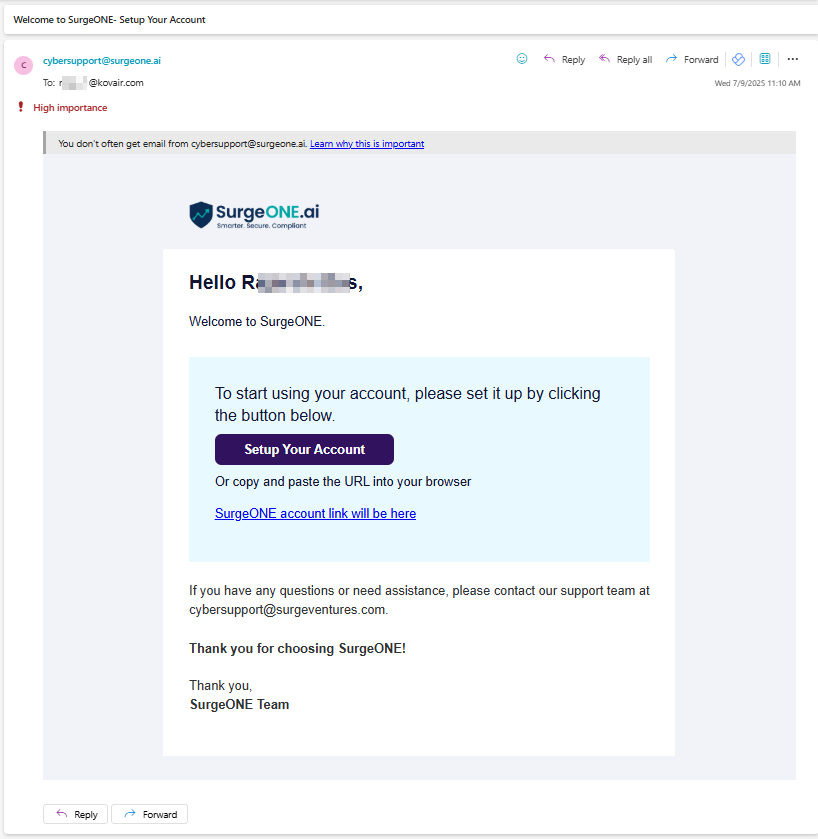 Fig: 9 - Invitation email triggered by the system
1.2. Inviting an Existing User
Invitations are sent from the Companies grid ACTIONS menu and produce one-click activation emails that let recipients set passwords and enable MFA without further admin coordination. The Invite flow validates that the invited email is not already associated with another active admin account, avoiding access conflicts and unnecessary tiggers.
NOTE: There should be atleast one company already created and listed out on the Companies List page. The company should have an user created for it. This initial user of the created company is designated as the default Company / Branch Admin role user of that company and can be invited via an invitation email.
-
Click on the vertical ellipsis
 icon present under the ACTIONS column against an existing company that is listed on the grid view of the Companies tab.
- Click on the expanded context menu option labeled as Invite.
-
The system will display a success notification at the top.
 Fig: 11 - Success notification
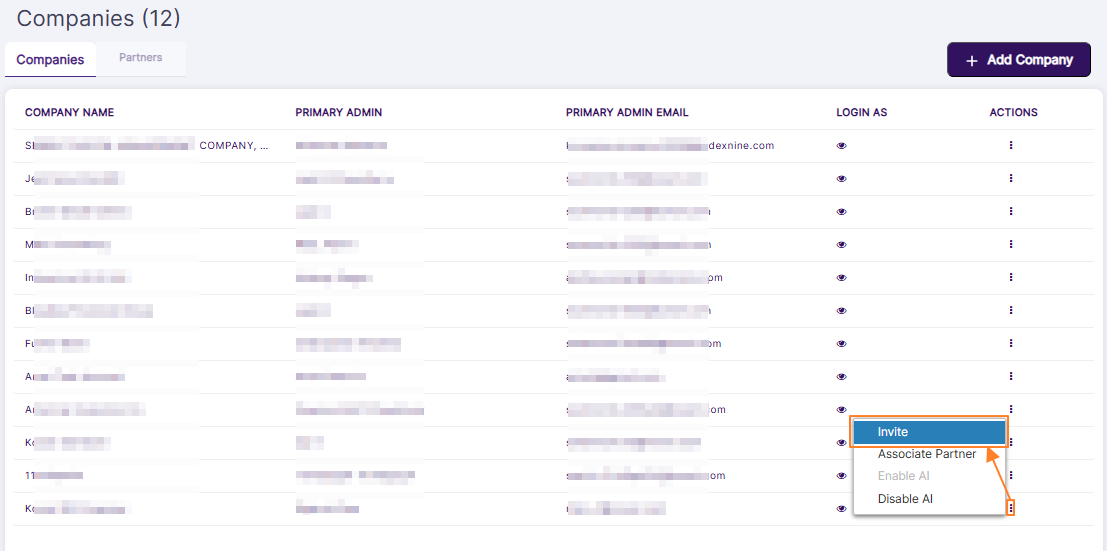 Fig: 10 - Invite context menu
NOTE: An invitation email is triggered by the system to the entered email address to set own custom password.
Fig: 12 - Invitation email triggered by the system
1.3. Associating Partners
Associating partners to companies is done from the Companies ACTIONS menu using a selectable modal so admins can map multiple partners to a company in a single operation. Associations drive permissions and visibility: partners only see their linked companies and partner-related events, which keeps partner access scoped and auditable.
- In SurgeONE.ai master portal, you can click on the vertical ellipsis icon within the ACTIONS column against a row-specific grid view entry of the Companies tab to load the context menu options. Click on the expanded Associate Partner option.
- The following Associate Partner modal window loads. Make appropriate checkbox selections against the listed Partners. The Partners which are created get listed here. Click on the Save button once done. If there are no partners created then you cannot make any selection here.
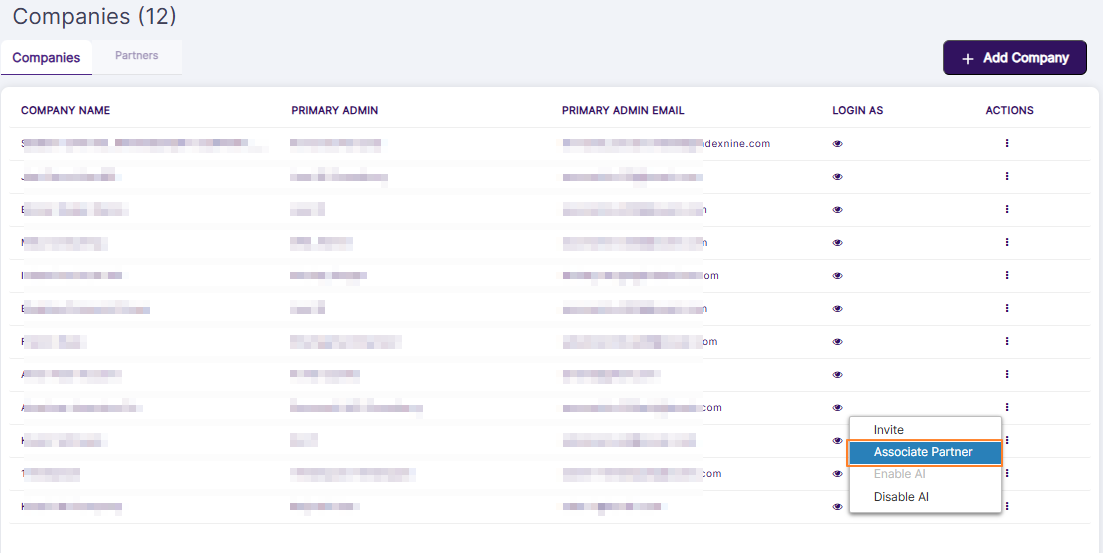 Fig: 13 - Associate Partner menu option
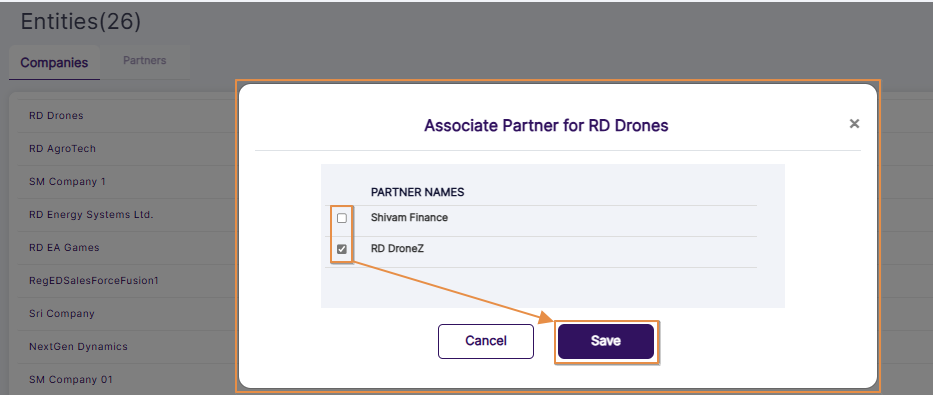 Fig: 14 - Associate Partner modal view
1.4. Enabling Vendor AI
Enabling Vendor AI for a company turns on automated vendor assessment workflows that extract data from uploaded vendor documents and pre-fill VDD questionnaires, significantly reducing manual work for both admins and vendors. The feature updates assignment status from Not Started to In Progress, compiles AI responses into a PDF, and triggers an email to the assigned vendor with the compiled responses for review, creating a transparent handoff. All AI actions are recorded with timestamps and source document references so reviewers can trace how answers were derived during audits. Admins retain control through toggles and review screens so AI assists rather than replaces human judgment on sensitive or compliance-critical questions.
- In SurgeONE.ai master portal, you can click on the vertical ellipsis icon within the ACTIONS column against a row-specific grid view entry of the Companies tab to load the context menu options. Click on the expanded Enable AI option.
- The following Enable AI modal window loads with the Vendor AI slider disabled.
- Enable the slider and click on the Save button.
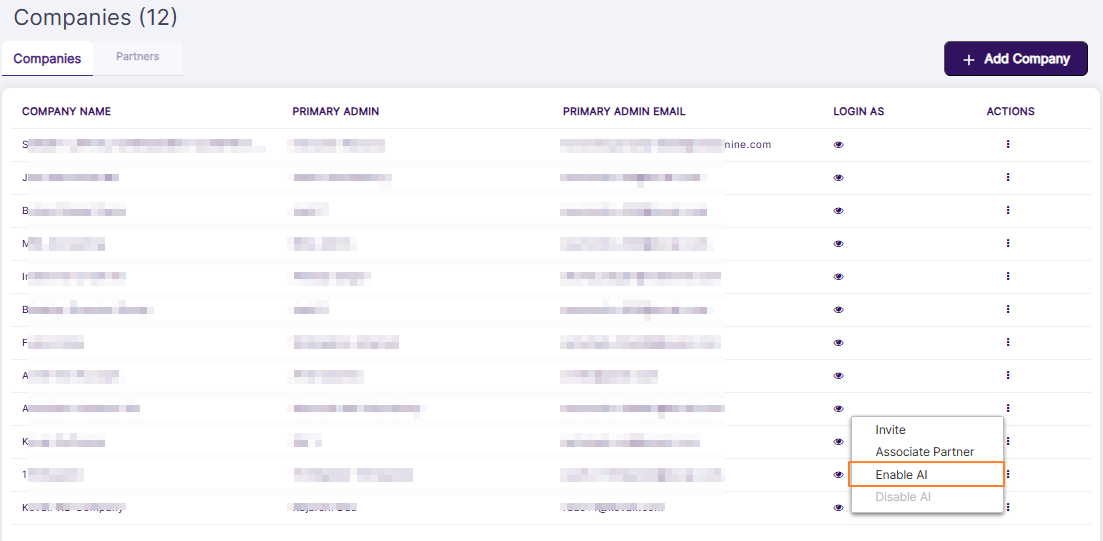 Fig: 15 - Enable AI menu option
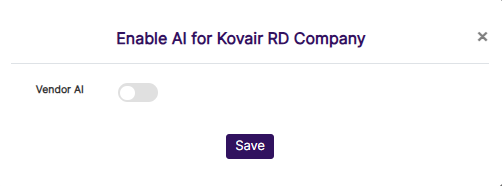 Fig: 16 - Enable AI modal view
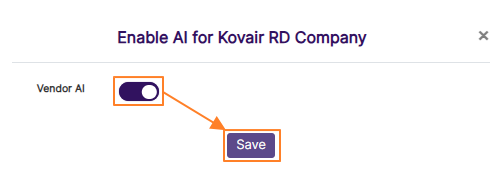 Fig: 17 - Enabling Vendor AI
NOTE: The Enable Vendor AI slider /context menu option functionality present in the Admin SurgeONE.ai master portal when creating or managing a company streamlines the vendor assessment process, ensuring accuracy and efficiency while reducing manual effort. When this slider is enabled, AI extracts relevant data from Vendor Due Diligence related documents (i.e. SOC2) provided by the vendor. After extraction, AI automatically fills out the Vendor Due Diligence questionnaire with the information captured from these documents. For more detailed understanding, refer to this.
- If the Enable Vendor AI slider is enabled for a company, then the vendor assignments which are created and yet to be started by the assigned vendor, will be auto-responded to by the SurgeONE.ai Vendor AI.
- The document(s) which are uploaded during the third stage of the new vendor creation (VENDOR DOCUMENTS tab) will be consumed by the AI for auto-responding to the assigned vendor assessment. AI responds to those questions which can be answered on the basis of the dataset present in the previously provided vendor attachments.
- The Status will get updated from Not Started to In Progress in this case.
- An email will get triggered so that the assigned vendor is notified about this auto-response by the AI.
- A .pdf attachment of the vendor assessment responses will get compiled and emailed to the assigned vendor.
- The assigned vendor needs to review the AI compiled responses from the My VDD page and can make modifications to the AI-provided responses or respond to unanswered questions in order to complete the vendor assessment.
1.4.1. Disabling Vendor AI
Disabling Vendor AI immediately stops automated pre-filling and returns all vendor assessments to manual mode so organizations can preserve human review when required for legal, privacy, or regulatory reasons. The system preserves any AI-generated drafts as versioned artifacts so teams can compare AI suggestions with later human responses and maintain an audit trail. This reversible control supports staged rollouts or conditional automation policies where AI is only used on low-risk vendors or after an initial human vetting.
- In SurgeONE.ai master portal, you can click on the vertical ellipsis icon within the ACTIONS column against a row-specific grid view entry of the Companies tab to load the context menu options. Click on the expanded Disable AI option.
- The following Disable AI modal window loads with the Vendor AI slider enabled.
- Disable the slider and click on the Save button.
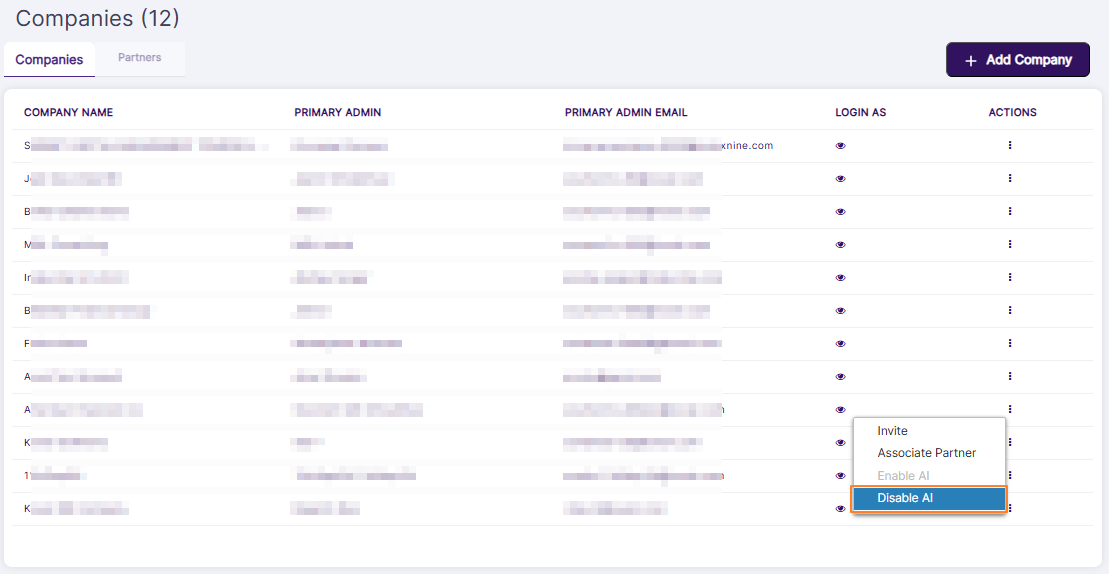 Fig: 18 - Disable AI menu option
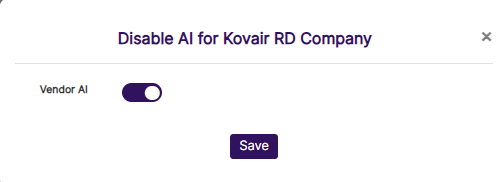 Fig: 19 - Disable AI modal view
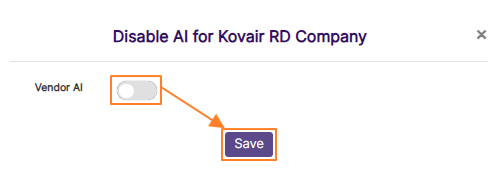 Fig: 20 - Disabling Vendor AI
1.5.1. Setting up a Firm by Masquerading the Company / Branch Admin User Account
After creating a company an admin can immediately masquerade as the assigned Company/Branch Admin to complete the three‑stage setup (business details, enroll users, finalize), enabling turnkey onboarding for the users.
- In SurgeONE.ai master portal, you can click on the + Add Company button of the Companies tab to begin creating a new company.
- Provide the necessary details and click on the Send Activation Link button to create the new company.
- The new company gets listed in the grid view of the Companies tab. Click on the eye icon of the LOGIN AS column.
- The portal admin user will need to specify details about your organization or firm to get started. There are three stages of setting up your organization related details in SurgeONE.ai.
- First the portal admin must provide requisite information related to your business.
- In the next stage, the portal admin may allocate users who can access this created organization in SurgeONE.ai. Admin can skip this stage if admin want to set up users or employees later on.
- Here is the view of the Enroll Users page. By default, the account that was created by the admin user is always listed out here as a row entry of the grid view. The portal admin can proceed to add employee(s), or can skip this activity for later set up. If the portal admin creates an employee, the new employee details get listed in the grid view. The Enroll Users page displays the created users of the organization.
- Click on the Submit button to finalize the organization.
- The portal admin gets navigated to the SurgeONE.ai Dashboard.
- The portal admin can logout of the company using the Logout option.
- The Company / Branch Admin role user can sign up later to set up own password as received via email.
- Here is the view of the redirected password setting page with the password provided and MFA slider enabled.
- The Company / Branch Admin role user can also enter the unique code in the MFA Verification page, as received via email.
- The Company / Branch Admin role user gets redirected to the Dashboard page.
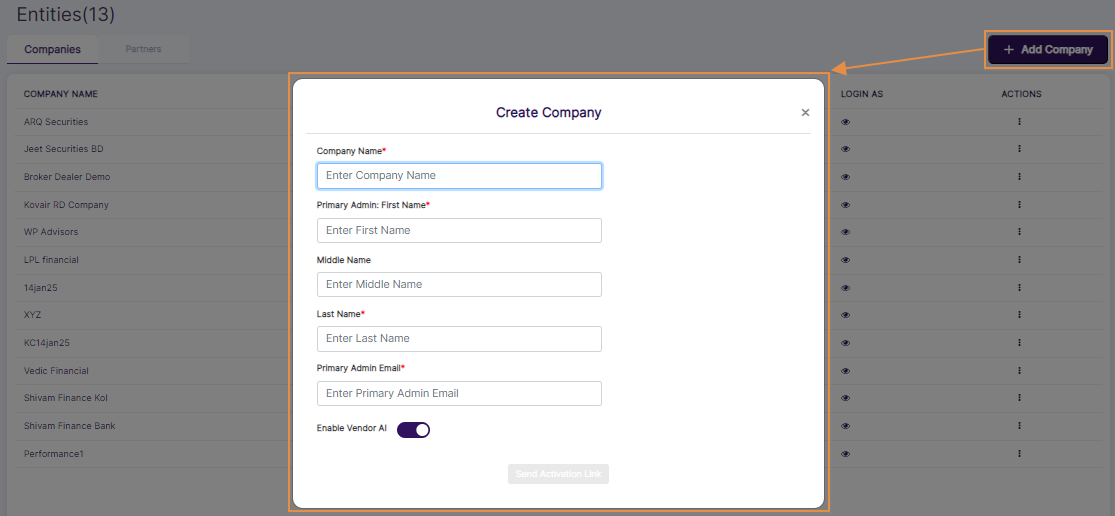 Fig: 21 - Adding Company
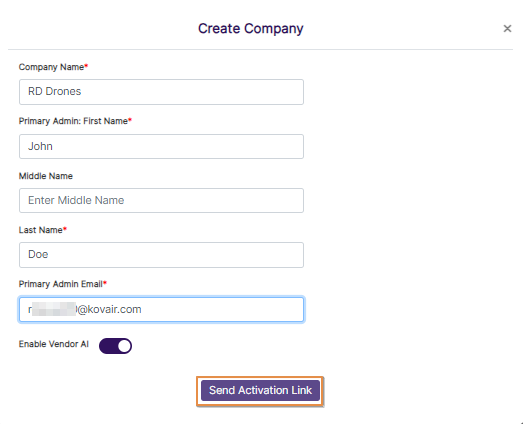 Fig: 22 - Creating Company
 Fig: 23 - LOGIN AS eye icon
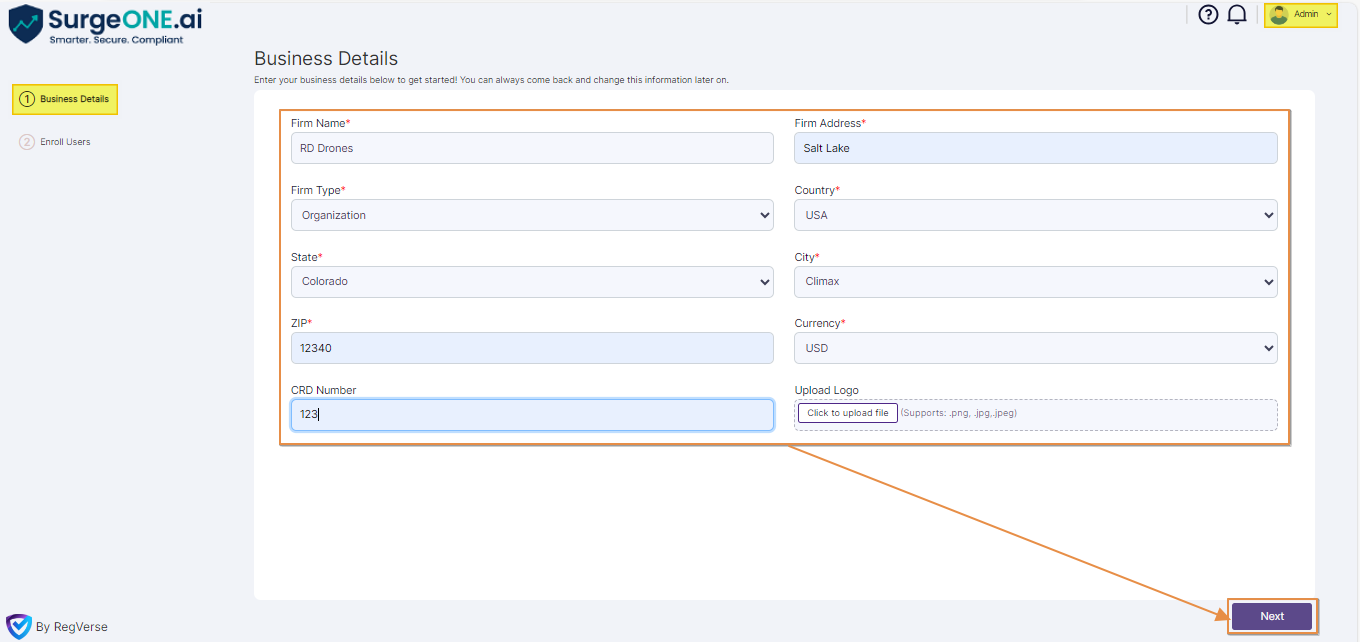 Fig: 24 - Providing business details in first stage
NOTE: For more detailed understanding, refer to this.
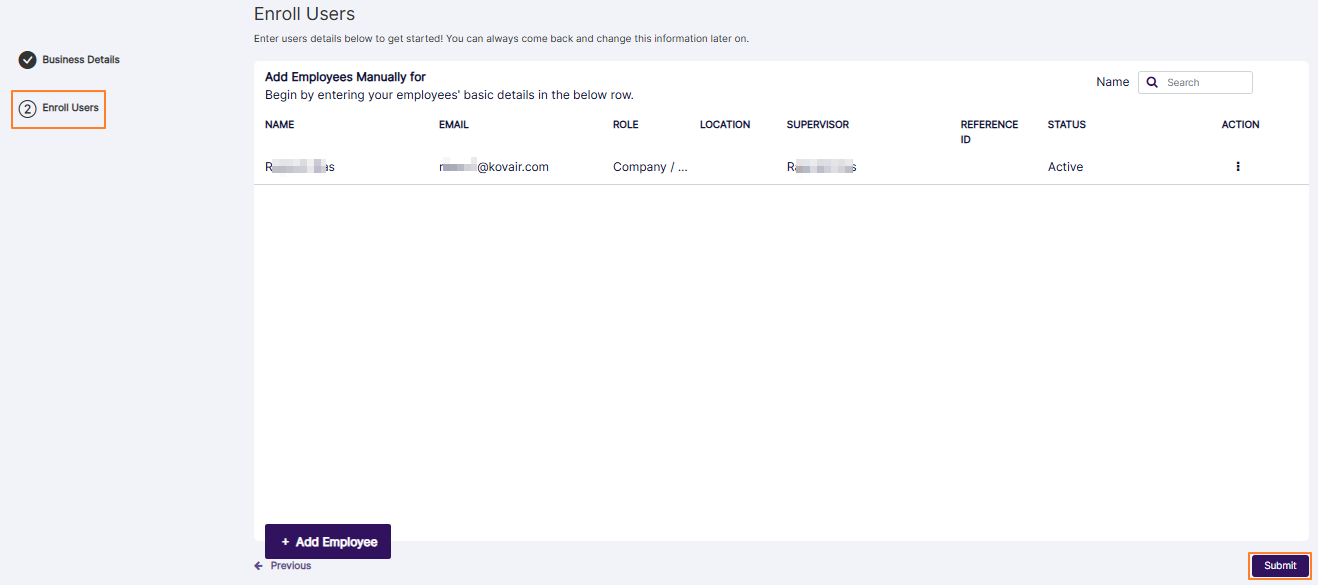 Fig: 25 - Submit button of second stage
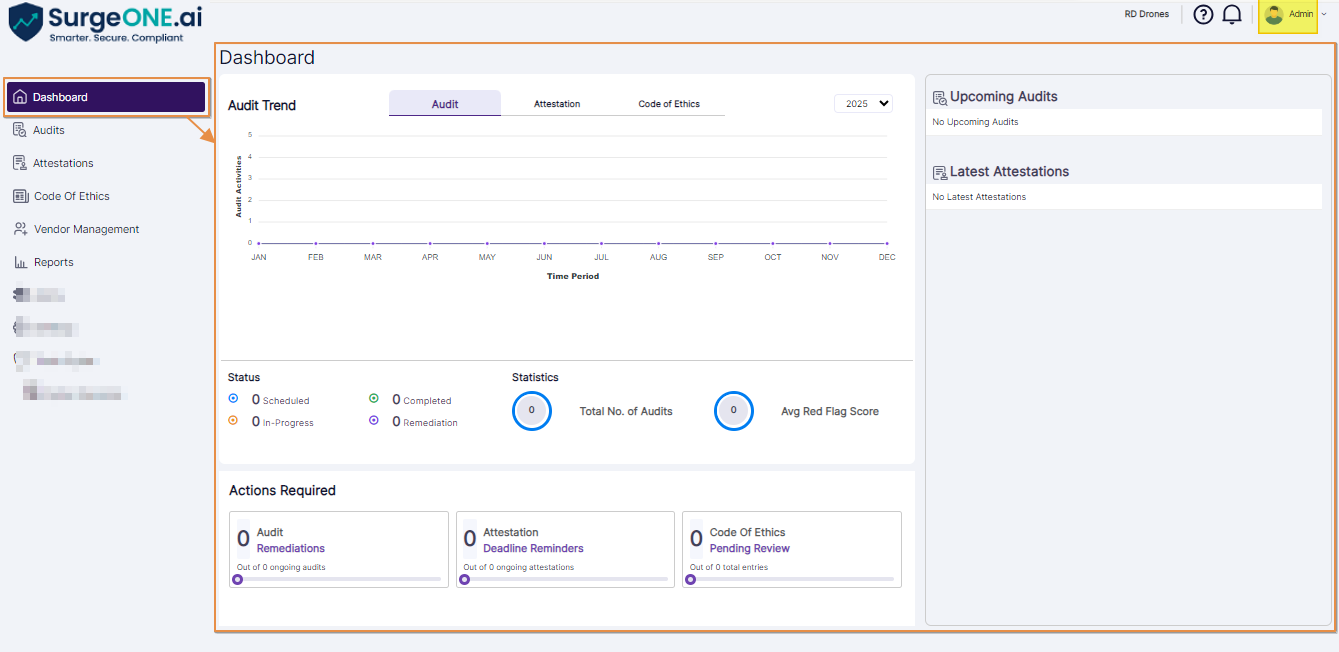 Fig: 26 - Dashboard view after redirection
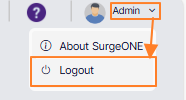 Fig: 27 - Logging out of masqueraded account
Fig: 28 - Received email to set password
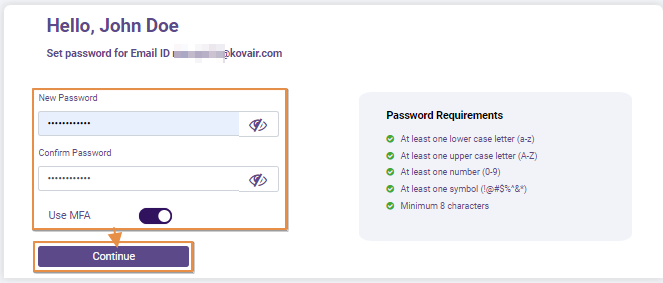 Fig: 29 - Setting login password and enabling MFA
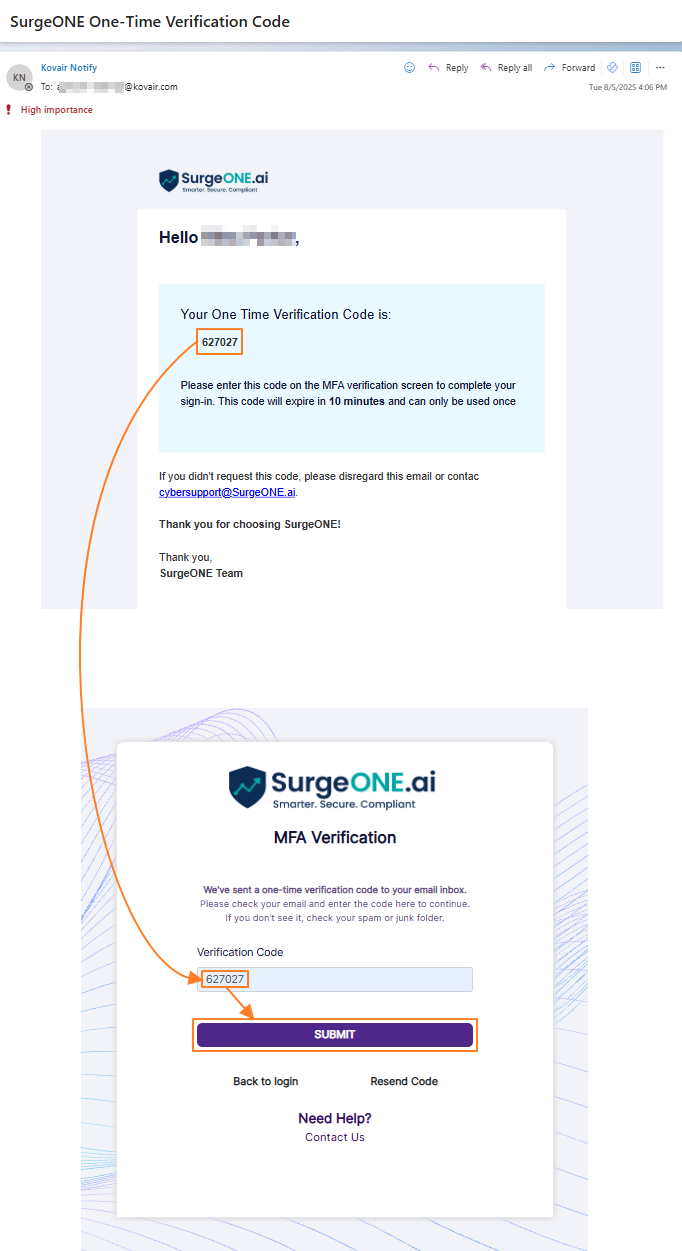 Fig: 30 - Entering MFA code from email in MFA Verification page to login securely
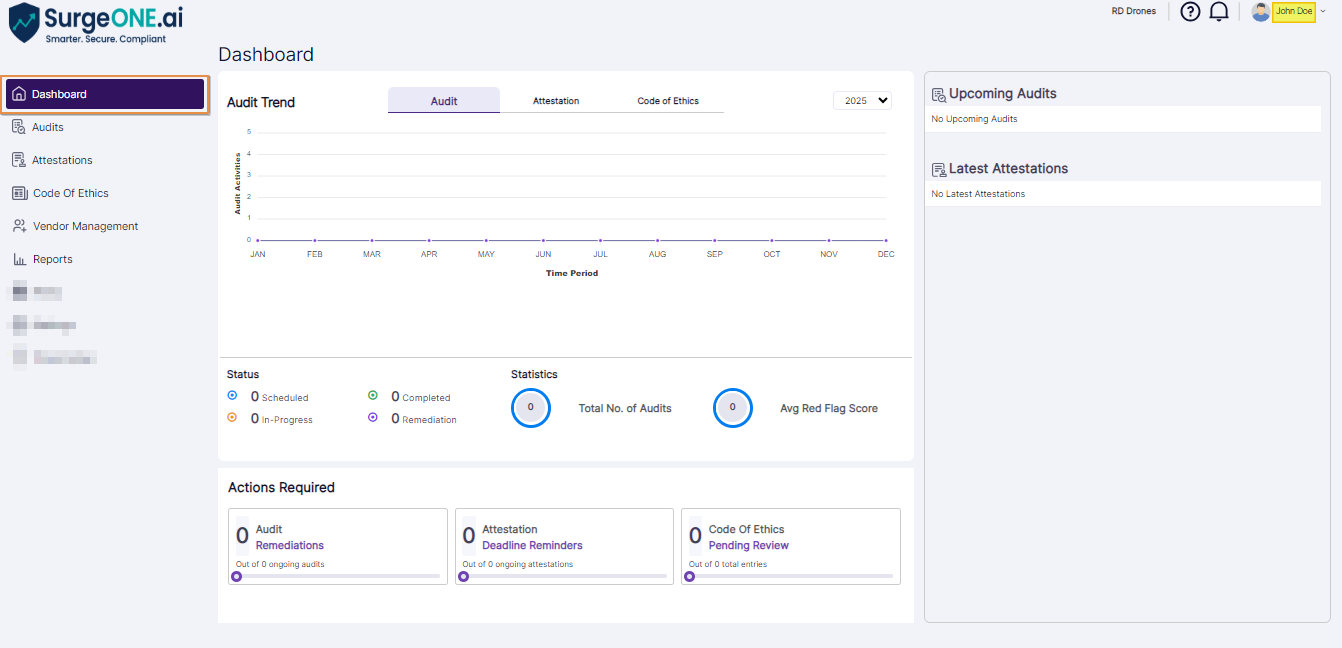 Fig: 31 - Dashboard view after Company / Branch Admin role user logs into SurgeONE.ai
NOTE: More details on the company setup process have been mentioned here.
1.5.2. Masquerading as the Company / Branch Admin User's Account When the Firm is Already Setup in SurgeONE.ai
When a firm already exists, portal admins can impersonate the Company/Branch Admin to validate configuration or reproduce issues and then return to the master portal. This flow enforces privilege checks, issues a time‑limited impersonation token, and redirects to the user dashboard.
- Click on the eye icon of the LOGIN AS column of the Companies tab.
- The portal admin gets navigated to the SurgeONE.ai Dashboard.
- The portal admin can logout of the company using the Logout option.
Fig: 32 - LOGIN AS eye icon
Fig: 33 - Dashboard view after redirection
Fig: 34 - Logging out of masqueraded account
2.1. Feature Description
Partners are created with primary contact details and linked to companies so partner contacts receive scoped access.
- In the SurgeONE.ai master portal, you can click on the Partners tab to navigate to the partner list view.
- The Portal Admin can create Partners as he/she creates Companies. The user needs to click on the + Add Partner button at the top-right. Then the user needs to enter the partner name, the first, middle and last name of the contact person, and the email of the contact person before clicking on the Send Activation Link button.
- The Portal Admin can associate a Partner with one or multiple Companies by clicking on the vertical ellipsis icon of the ACTIONS column, and then on the Associate Company row context menu option.
- Again, a Company can be associated with one or multiple Partners. Use the Associate Partner row context menu option to do so.
- The Portal Admin can view details of a Partner using the More Info option in the Action menu.
- The Portal Admin can view and edit the details of a Partner using the Edit option in the Action menu.
- Multiple users (as Partner Contacts) can be defined against a Partner so that all these individual users will have dedicated logins to access the SurgeONE.ai master portal. While creating a Partner, contacts as its users can be created. For creating any additional users for a Partner, use the Manage Users option in the Action menu.
- Once users are defined under a Partner, they are invited to login into SurgeONE.ai by a welcome email to set their password and activate their account, like the existing functionality for inviting company users for SurgeONE.ai.
- On successful setting of the password, a Partner Contact can log into SurgeONE.ai master portal.
- A Partner Contact can only view those specific companies that are associated with or has been created by him / her.
- A Partner Contact can view only its own record and no other Partner records are visible to him/her.
- A Partner Contact can only create its own specific Companies.
- A Partner Contact will get the functionality LOGIN AS to login to an associated SurgeONE.ai Company portal as an administrator.
- A Partner Contact will get the functionality LOGIN AS in the Partners list as well. On clicking on the LOGIN AS option against a Partner, the system will open a popup and show the list of companies that the selected Partner is associated with. Selecting a Company, the partner will be logging into the site of that company in SurgeONE.ai customer portal.
- Once a Partner Contact logs into the SurgeONE.ai Customer Portal, he / she will be provided with the administrator’s credentials on this company so that the Partner can do all sorts of operations in the SurgeONE.ai application.
- Once a Partner Contact clicks on Logout from the SurgeONE.ai Customer Portal, he / she will be taken back to the SurgeONE.ai master portal, Customers list.
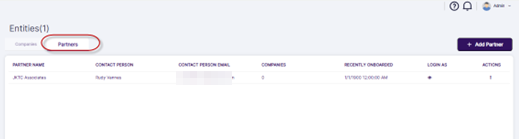 Fig: 35 - Partners tab
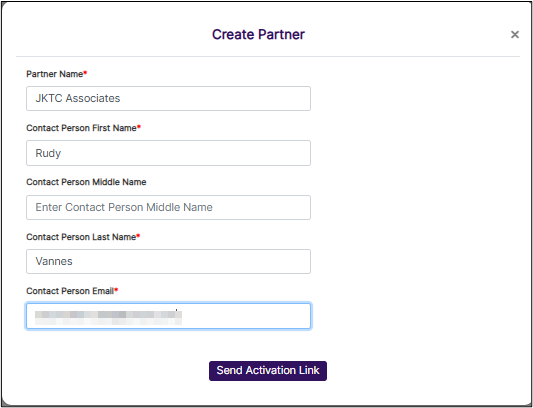 Fig: 36 - Create Partner modal
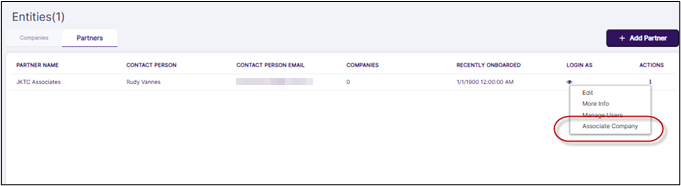 Fig: 37 - Associate Company row context menu option
Existing Companies can be selected using the respective checkboxes and the selections made can be saved.
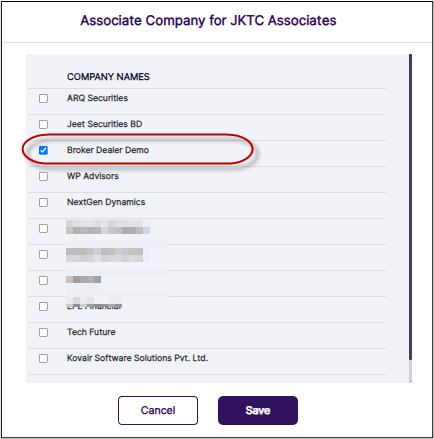 Fig: 38 - Associate Company view
Fig: 39 - Associate Partner menu option
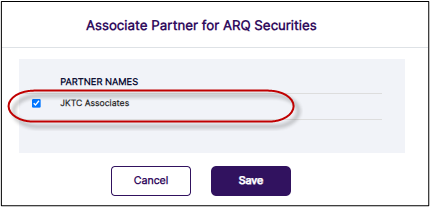 Fig: 40 - Associate Partner view
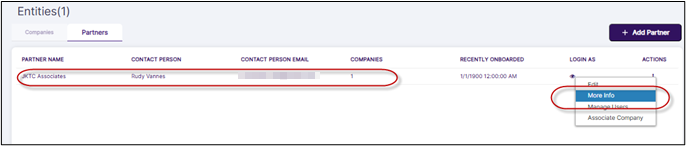 Fig: 41 - More Info option
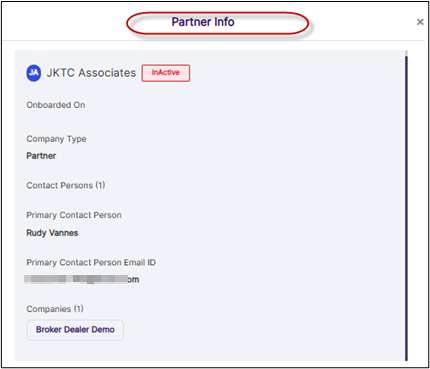 Fig: 42 - Partner Info modal
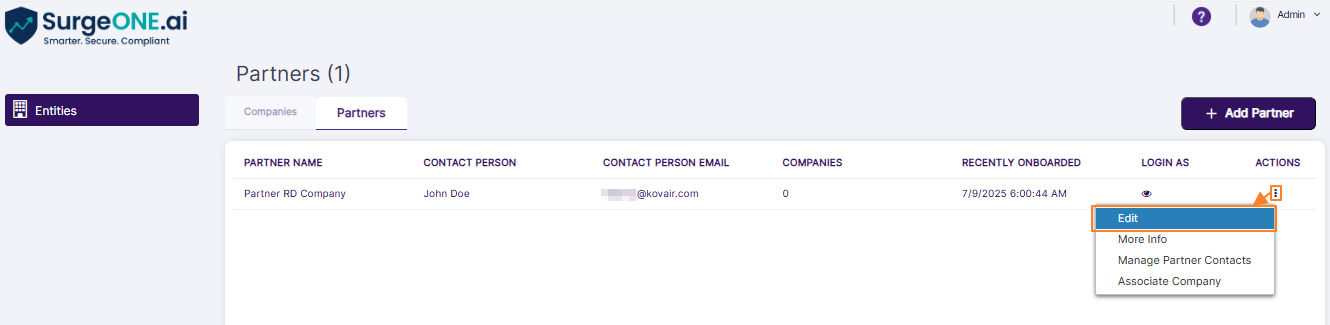 Fig: 43 - Edit option
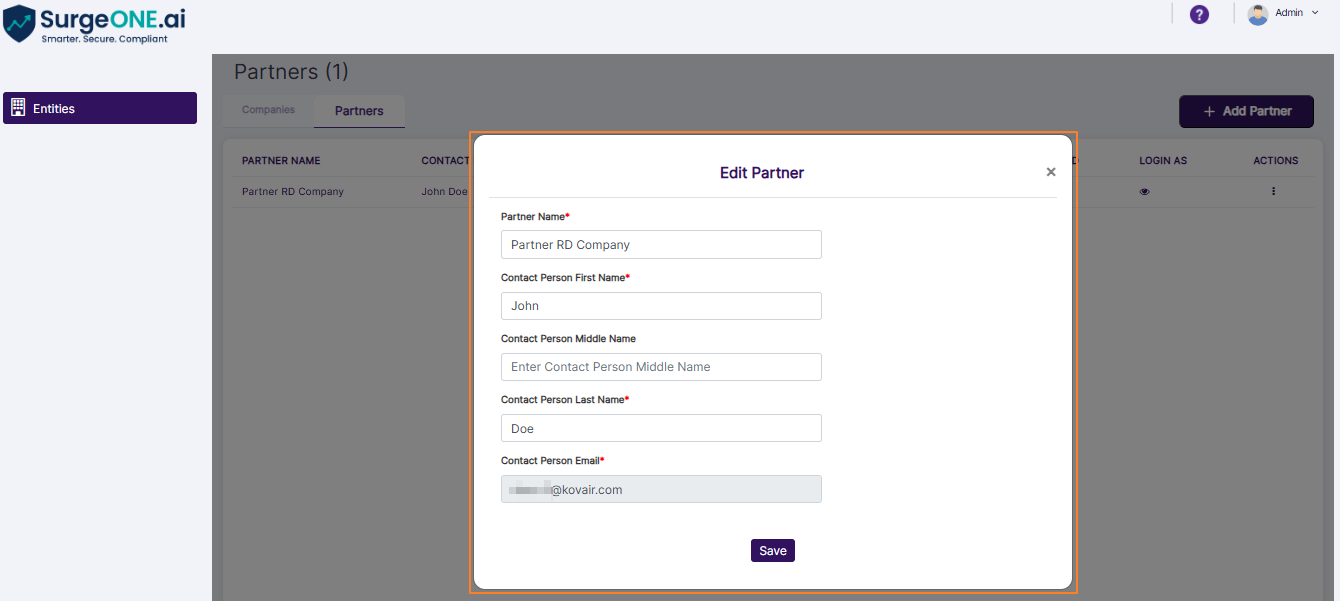 Fig: 44 - Edit Partner modal
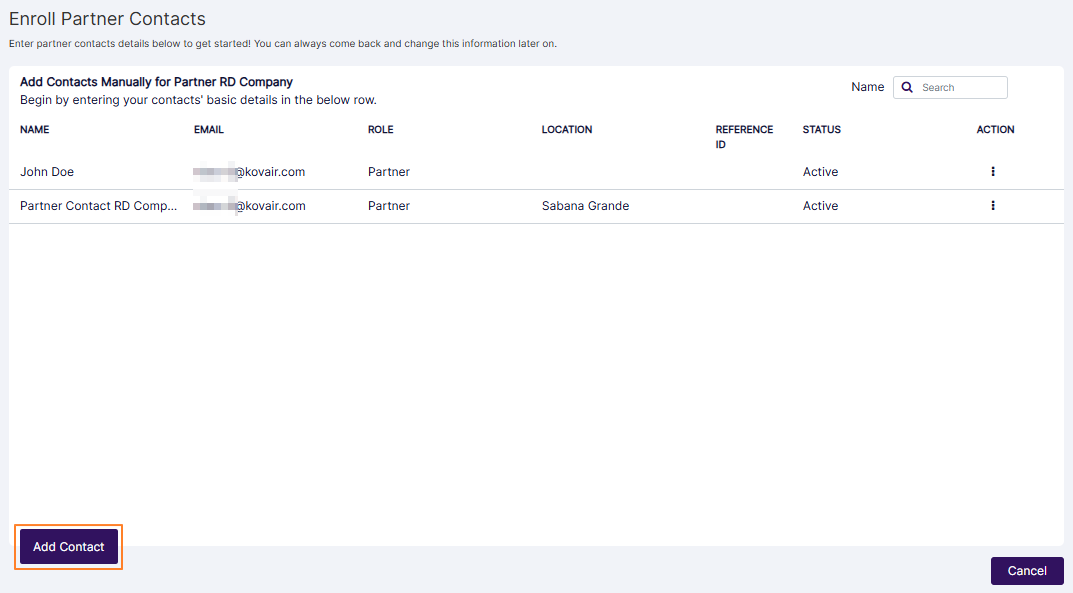 Fig: 45 - Add Contact button
 Fig: 46 - Creating new Partners Contact
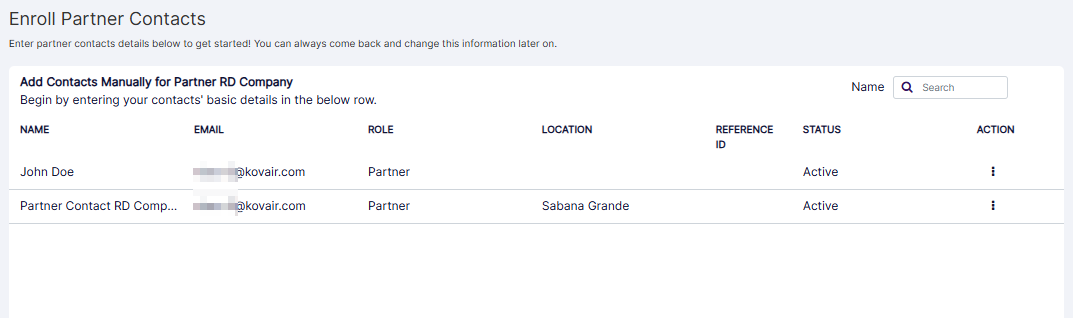 Fig: 47 - Enroll Partners Contact view
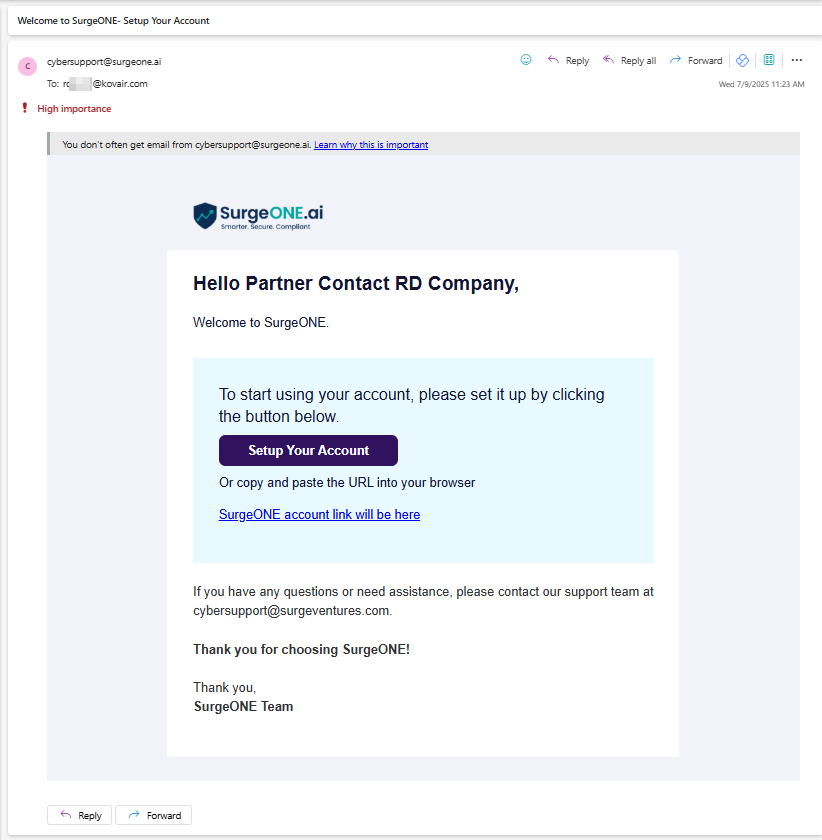 Fig: 48 - Invite email
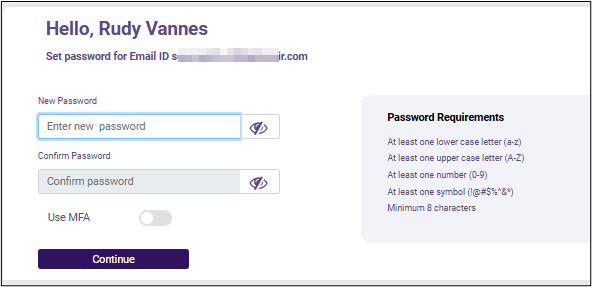 Fig: 49 - Setting login password
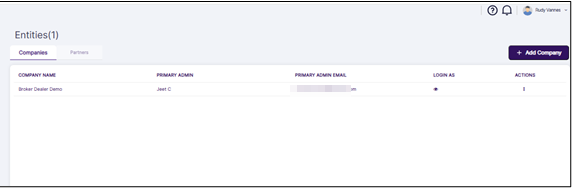 Fig: 50 - Own Company view
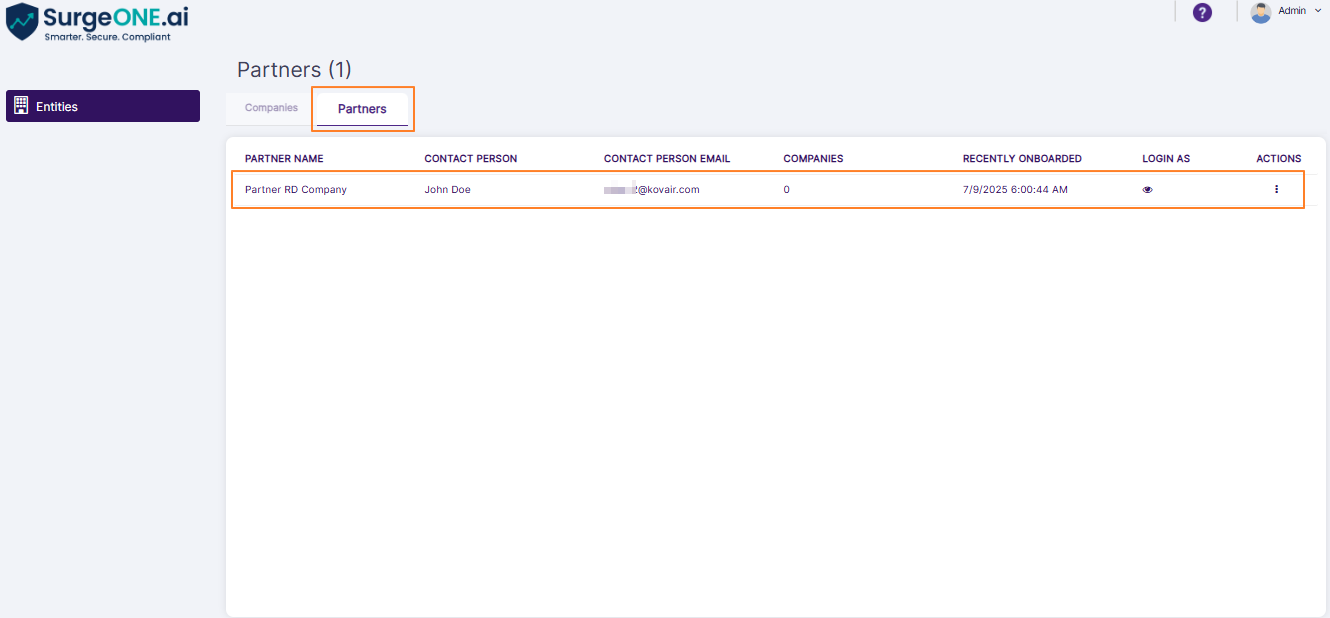 Fig: 51 - Partners view
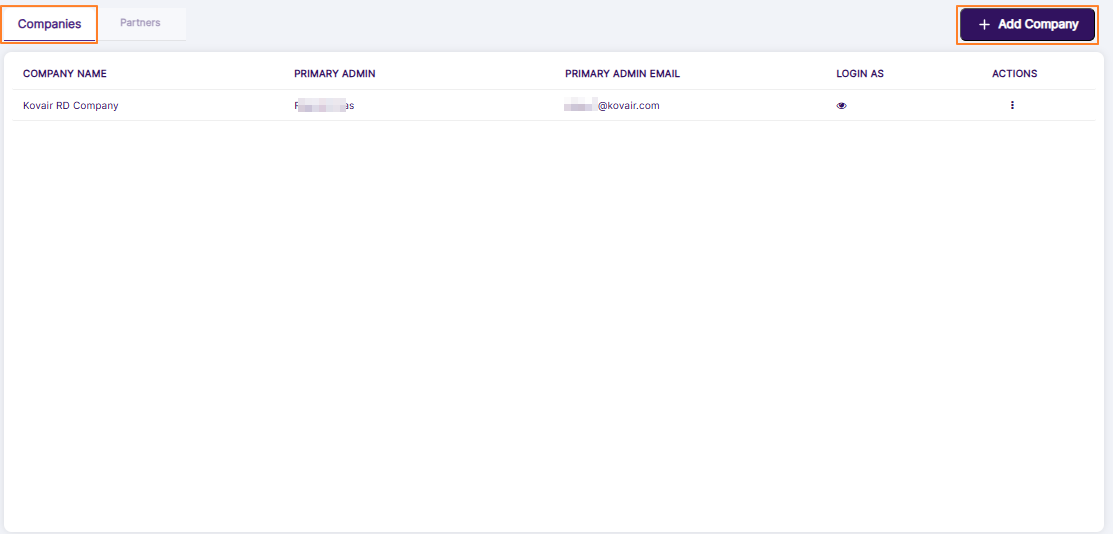 Fig: 52 - Button to create new Company
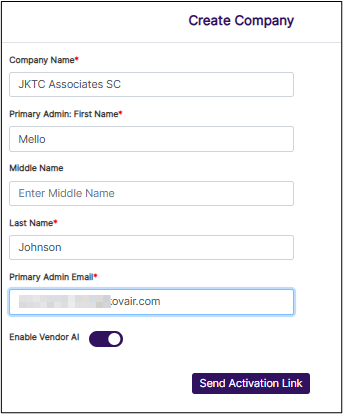 Fig: 53 - Create Company modal
 Fig: 54 - LOGIN AS column eye icon
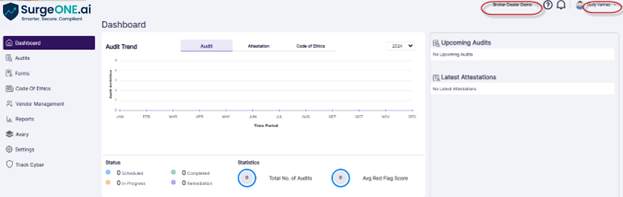 Fig: 55 - Logged in view
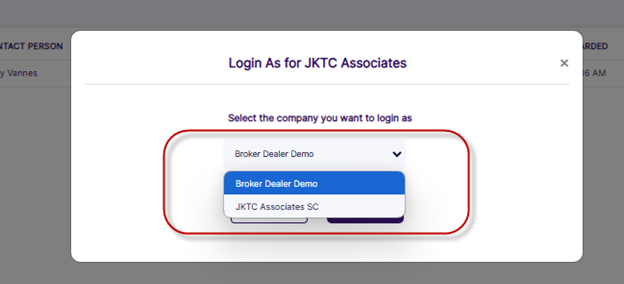 Fig: 56 - Selecting Company to login as
2.2. Understanding the Various Elements of the Partners tab
The grid view, ACTIONS menu, Login As eye icon, and partner creation button work together as a toolkit that enables administrators to manage large, complex environments efficiently while still staying responsive to individual needs.
Grid view: Provides a high-level, structured overview of existing records of partners, allowing admins to scan, filter, and sort through large datasets quickly. This reduces the time spent hunting for information and makes it easier to spot trends or anomalies at scale.
ACTIONS menu: Centralizes common administrative tasks into a single, accessible menu. Instead of navigating through multiple screens
Login As (eye icon): Empowers admins to step into the shoes of a partner or user instantly. This feature enhances responsiveness and builds trust with end users.
Create Partner button: Simplifies onboarding by giving admins a direct, one-click way to add new partners into the system.
Refer to the following screenshot which is marked with numerical values that correspond to the below stated points.
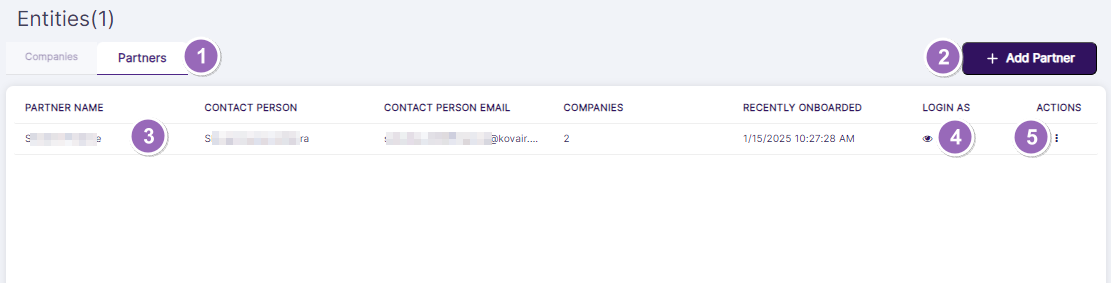
Fig: 57 - Understanding the various elements of the Partners tab
- Partners tab
- + Add Partner button to create a new partner
- Grid view populates the existing partner(s)
- Eye icon to masquerade contact person SurgeONE.ai account
- ACTIONS column contains the toggled row-context menu options
NOTE: The following sub-sections elaborate further to the above-stated points.
2.2.1. Accessing the Partners tab
Click on the Partners tab label to access the tab contents.
2.2.2. Creating a new Partner
The Add Partner modal streamlines onboarding by capturing both partner details and the primary contact information in a single step, while automatically enforcing uniqueness checks on the partner name and email to maintain data integrity. By persisting records, it immediately queues an activation email so the new partner is provisioned without delay. As a result, partners are reliably onboarded, instantly visible in the grid, and ready to engage with the platform from the moment they are created—giving admins both speed and confidence at scale.
- Click on the + Add Partner button at the top right, to proceed to create a new partner for your organization.
- A modal window loads where you need to provide details about this new partner. Enter the name of the new partner in the Partner Name field.
- Enter the name of the contact person for this new partner in the Contact Person First Name, Contact Person Middle Name and Contact Person Last Name fields.
- Enter the email address of the contact person in the Contact Person Email.
- Click on the enabled Send Activation Link button.
- The new Partner gets created and listed in grid view. A success notification also gets prompted.
 Fig: 58 - + Add Partner button
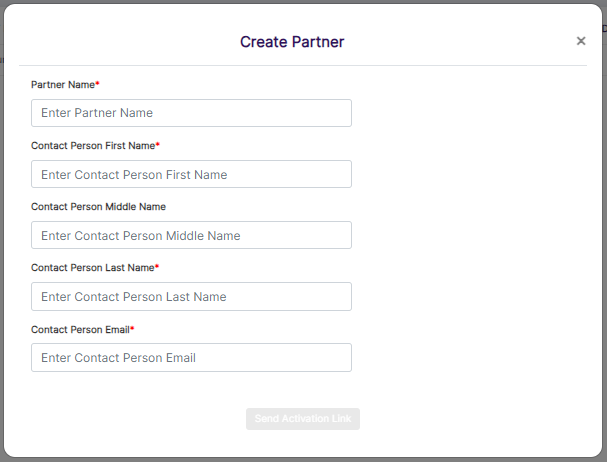 Fig: 59 - Create Partner modal
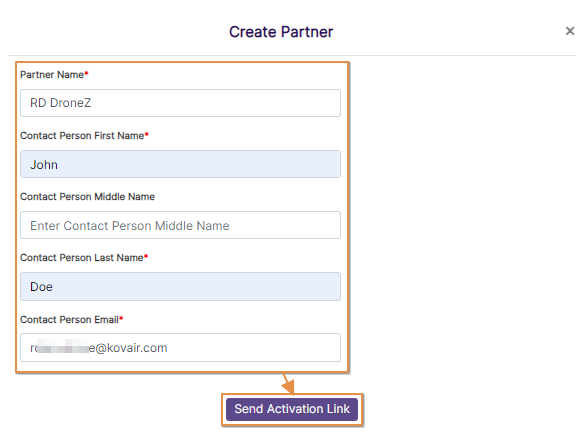 Fig: 60 - Creating new Partner
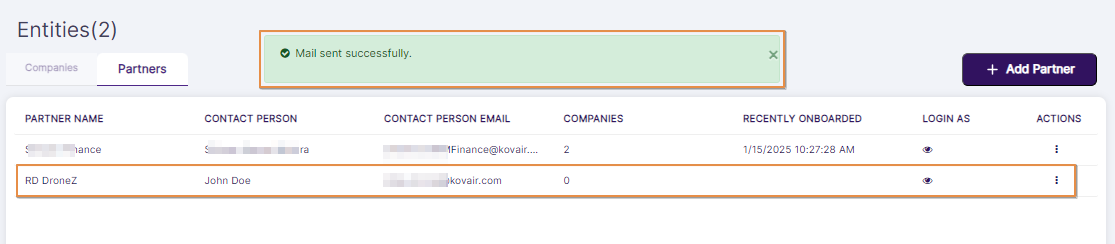 Fig: 61 - New Partner created and listed in grid view and success notification prompted
Here is the view of the received invitation email.
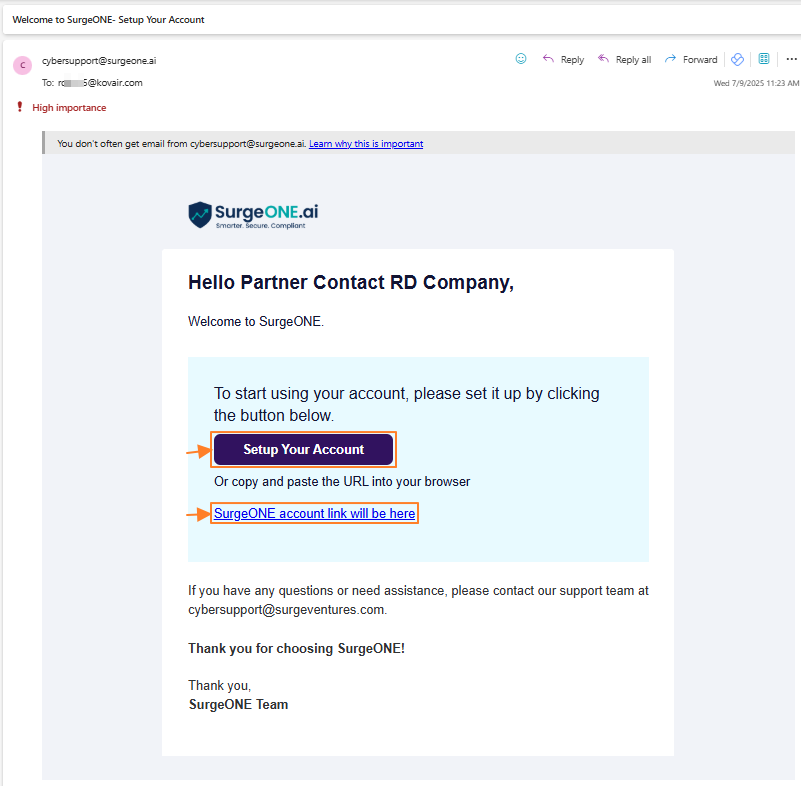 Fig: 62 - View of the triggered invite mail
NOTE:
- When the modal window loads, the Send Activation Link button is disabled. It remains disabled unless all the field validations are satisfied.
- Validation is employed on the partner name. If existing partner name is used to create a new partner, then the system will prompt validation below the Partner Name field.
- Validation is employed on the contact person email address. If existing email address is used to create a new partner, then the system will prompt validation below the Contact Person Email field.
 Fig: 63 - Disabled Send Activation Link button on load
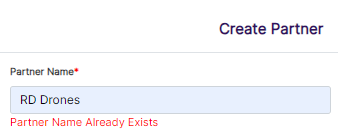 Fig: 64 - Tooltip prompted when partner name is not unique
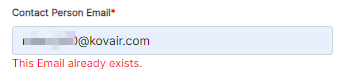 Fig: 65 - Tooltip prompted when contact person email address is not unique
2.2.3. Understanding the Partners Grid View
Columns such as Partner Name, Contact Person, Contact Email, Companies count, Recently Onboarded, Login As, and ACTIONS provide at‑a‑glance partner operations.
The Partners grid view lists out all the existing partners of your organization.
 Fig: 66 - Partners grid view
The following columns populate the grid view:
- PARTNER NAME - Shows the name of the vendor.
- CONTACT PERSON - Shows the contact person of the partner.
- CONTACT PERSON EMAIL - Displays the specified email address of the contact person of the partner. It can be displayed partly or truncated, if the email address in longer than the rendered column area.
- COMPANIES - Shows the numerical count of the total number of the associated companies linked with the partner.
- RECENTLY ONBOARDED - Displays the date-time value of onboarding. Onboarding refers to the three steps required in SurgeONE.ai to setup firm details and access the SurgeONE.ai Dashboard.
- LOGIN AS - Displays the eye icon to masquerade into the Fusion partner firm contact person account.
- ACTIONS - Contains the row context menu options (Edit, More Info, Manage Partner Contacts and Associate Company).
NOTE: The associated functionalities of the ACTIONS column menu options are explained in this sub-section.
2.2.4. Masquerading any Company / Firm Associated With Partner
From a partner row you can select an associated company to impersonate and land on its dashboard, allowing verification of the partner experience or hands‑on setup.
- Click on the eye icon within the LOGIN AS column of the Partners tab.
- The following Login As modal window loads.
- Choose appropriate associated company from the options of the Select the company you want to login as dropdown.
- Click on the Continue button. The SurgeONE.ai master portal admin user gets navigated to the SurgeONE.ai Dashboard view of the chosen company / firm.
- The admin can logout of the company using the Logout option.
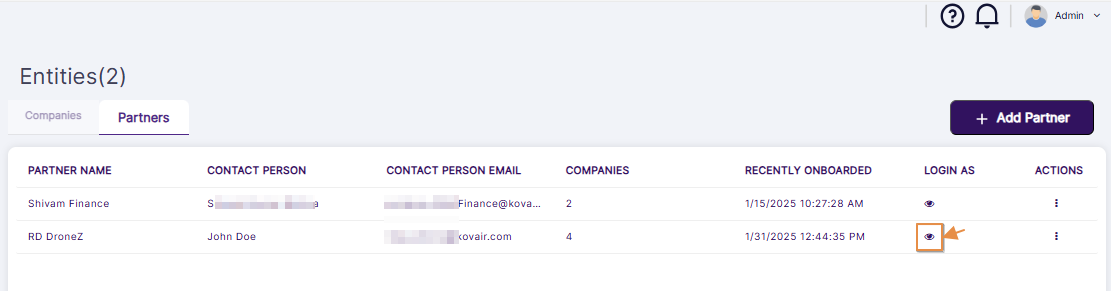 Fig: 67 - LOGIN AS eye icon
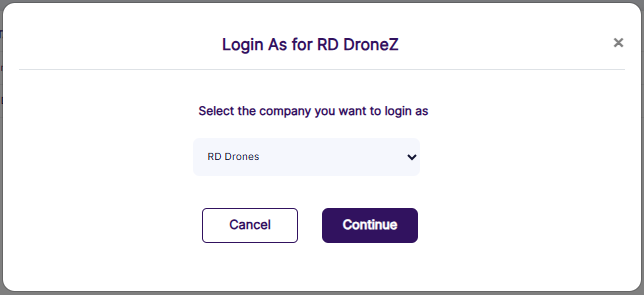 Fig: 68 - Login As modal window
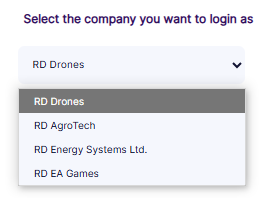 Fig: 69 - Expanded view of the associated companies of the specific partner
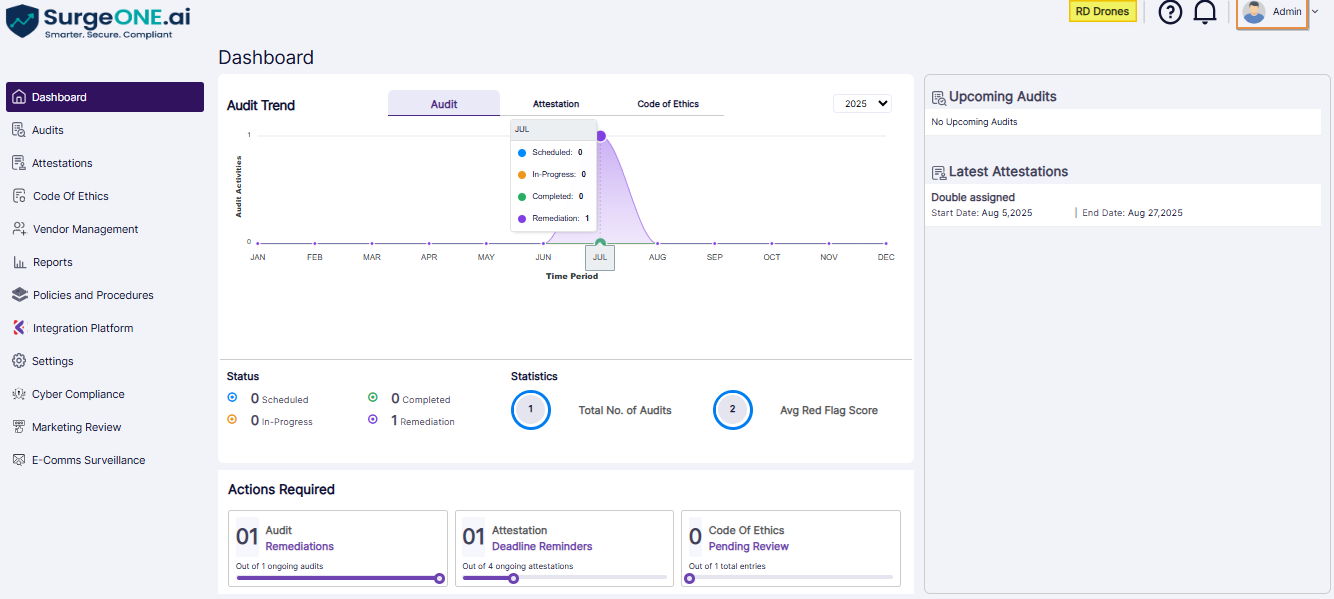 Fig: 70 - Admin user masqueraded into SurgeONE.ai Dashboard view of the chosen firm
Fig: 71 - Logging out of masqueraded account
2.2.5. Using the ACTIONS Column Menu Options
ACTIONS centralizes Edit, More Info, Manage Partner Contacts, and Associate Company so common partner tasks are one click away.
The following sub-sections elaborate on the functionalities associated with the four row-context menu options which are accessible via the vertical ellipsis icon of the ACTION column.
2.2.5.1. Editing a Partner
The Edit modal supports safe updates to partner metadata while locking immutable fields (like contact email) when required.
- Click on the vertical ellipsis icon within the ACTIONS column against a row-specific grid view entry of the Partners tab to load the context menu options. Click on the expanded Edit option.
- The following Edit Partner modal window loads. Make appropriate modifications of the vendor details and click on the Save button.
 Fig: 72 - Edit menu option
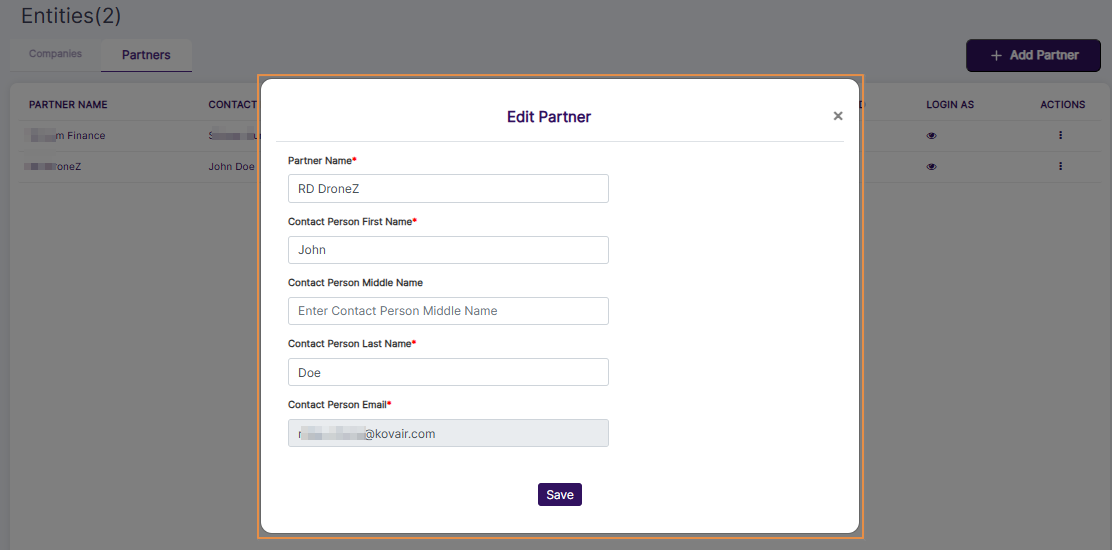 Fig: 73 - Edit Partner modal view
NOTE: You cannot edit the email address as the Contact Person Email field is greyed out.
2.2.5.2. Viewing Partner Information
More Info functionality shows the Partner Info modal window which surfaces read‑only aggregated partner data (status, onboarding datetime, associated companies, contact counts).
- Click on the vertical ellipsis icon within the ACTIONS column against a row-specific grid view entry of the Partners tab to load the context menu options. Click on the expanded More Info option.
- The following Partner Info modal window loads.
- The following fields are displayed:
- Name of the partner
- Partner status
- Onboarded On datetime value
- Company Type
- Number of Contact Persons within parenthesis
- Contact Person details added such as the Primary Contact Person name and the Primary Contact Person Email ID
- Names of the Companies associated with the partner and the total number of associated companies within parenthesis
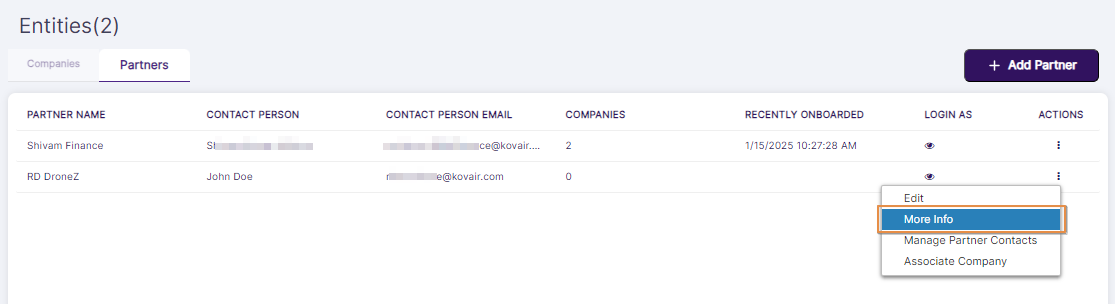 Fig: 74 - More Info menu option
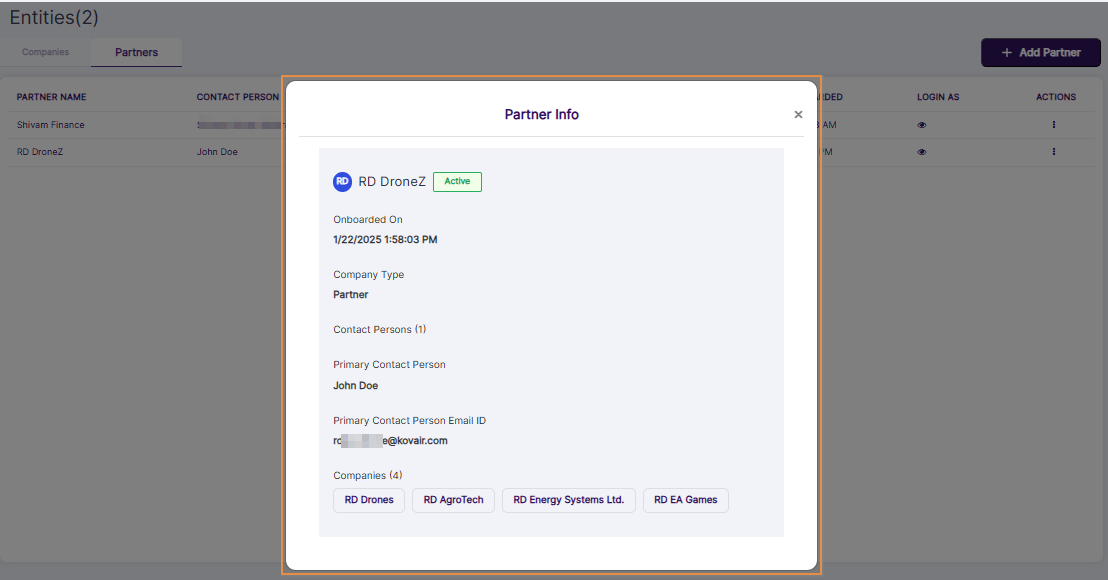 Fig: 75 - Partner Info modal view
NOTE: You cannot make any changes to the displayed field values since you are in this view mode.
2.2.5.3. Managing Partner Contacts
The Enroll Partner Contacts page lets admins add, search, edit, invite, or delete contacts.
- Click on the vertical ellipsis icon within the ACTIONS column against a row-specific grid view entry of the Partners tab to load the context menu options. Click on the expanded Manage Partner Contacts option.
- The following Enroll Partner Contacts page loads.
- The following functionalities are supported in this page:
- Use the Add Contact button to create new Contact(s) manually
- Search for Contacts
- Use the row-context Edit menu option of the ACTION column to edit a Contact
- Use the row-context Invite menu option of the ACTION column to invite a newly created Contact
- Use the row-context Delete menu option of the ACTION column to delete a Contact
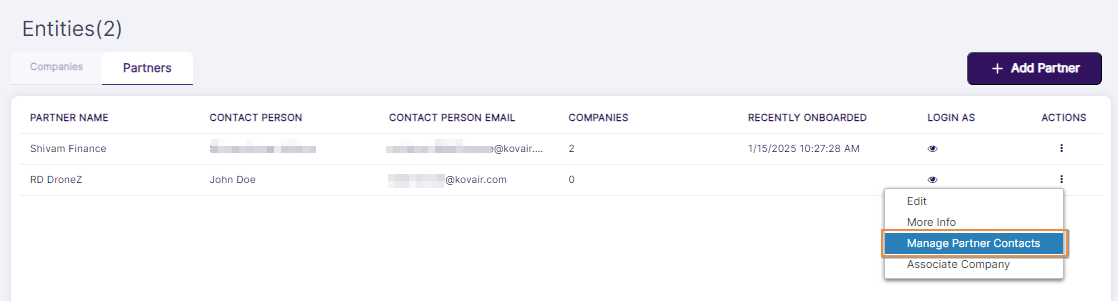 Fig: 76 - Manage Partner Contacts menu option
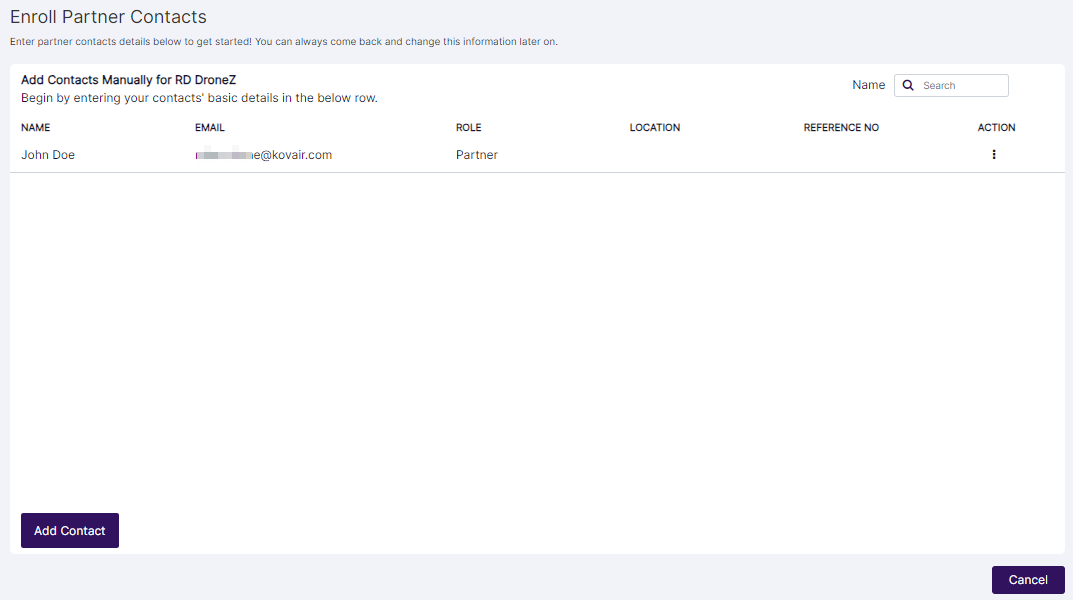 Fig: 77 - Enroll Partner Contacts modal view
NOTE: You can always come back and change this Partner Contacts information later on. The above-stated points are elaborated in the following sub-sections.
2.2.5.3.1. Adding a Partner Contact
The Add Contact form captures personal and address details and lets you send an activation email immediately. This creates partner user accounts reliably and generates an expiring invite token so your partners can onboard themselves fast, reducing admin workload and ensuring contacts are correctly recorded.
- Click on the Add Contact button to begin creating a new Contact. The following Create New Partner Contact modal window loads.
- First Name: Enter the first name of the Contact
- Middle Name: Enter the middle name of the Contact. This is an optional field
- Last Name: Enter the last name of the Contact
- Email ID: Enter the valid email address of the Contact. The invitation email will be sent at this address.
- City: Select the current city of the Contact
- ZIP: Enter the valid zip code of the Contact address
- Enter the required details and click on the Save or Save & Send Activation Link button.
- The Contact gets listed in the grid view of the Enroll Partner Contacts page.
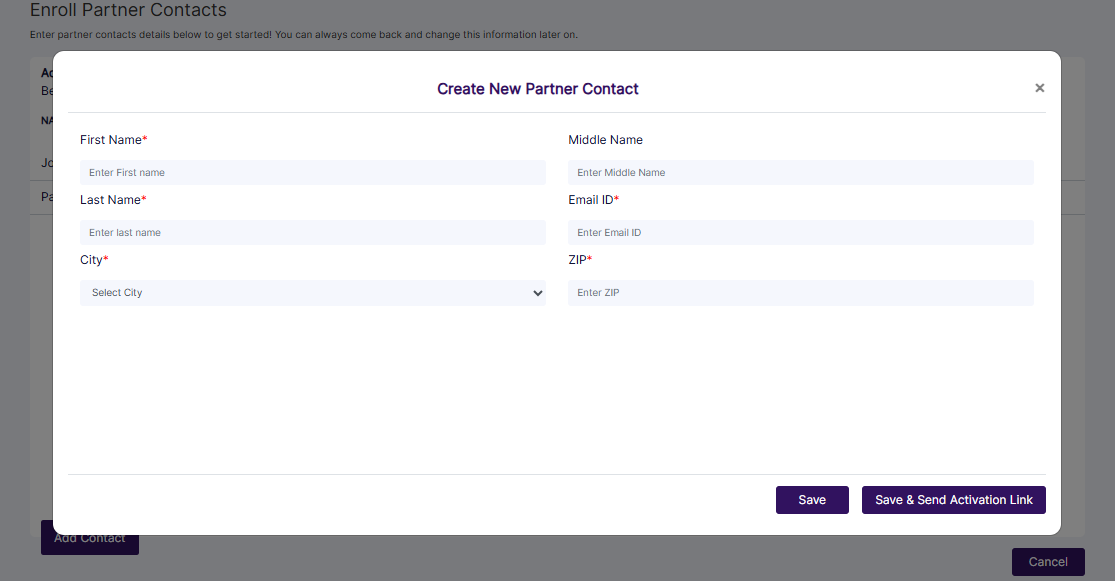 Fig: 78 - Create New Partner Contact modal view
The following fields are present:
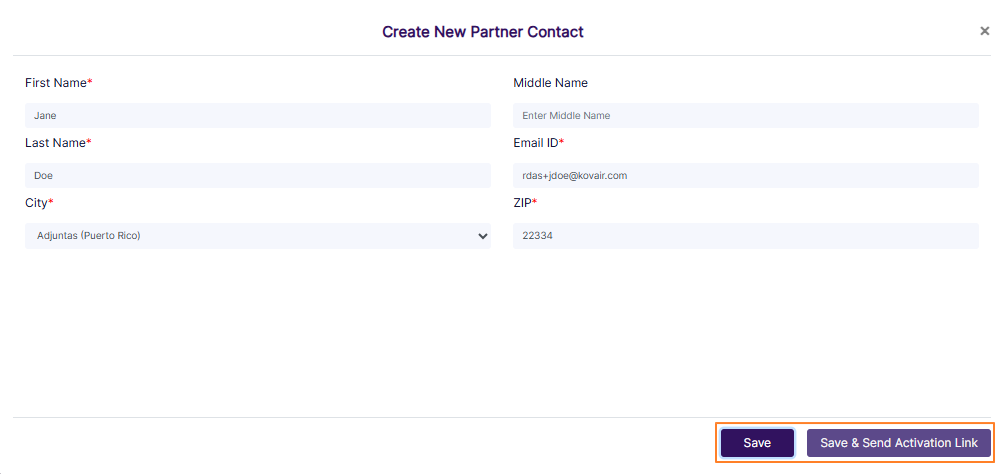 Fig: 79 - Saving Contact details
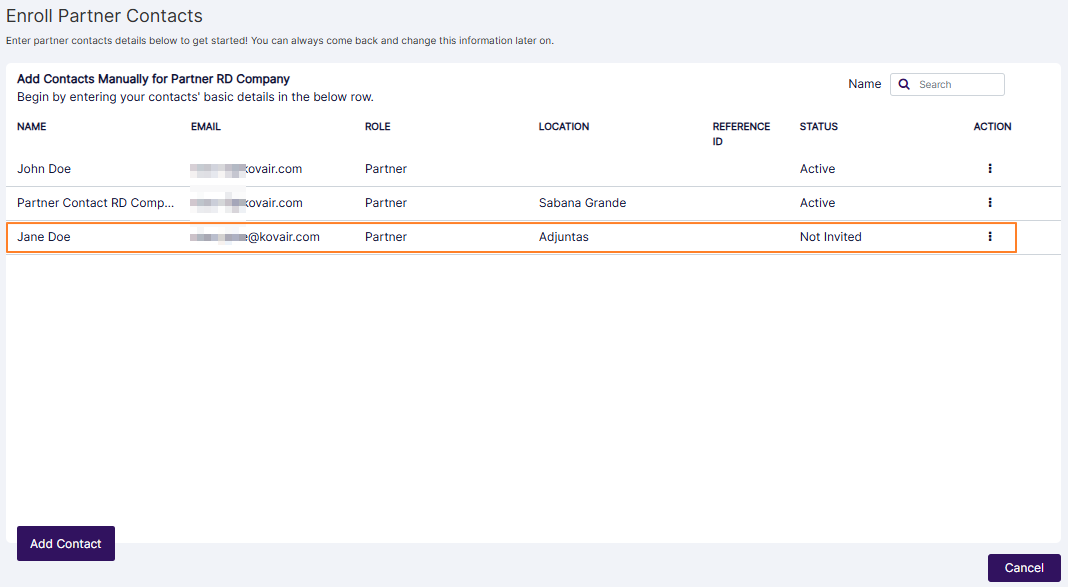 Fig: 80 - New Contact populates the grid view
NOTE:
- The following screenshot displays the various field validations which are applicable.
- The following screenshot displays the email address field validation on duplicate value.
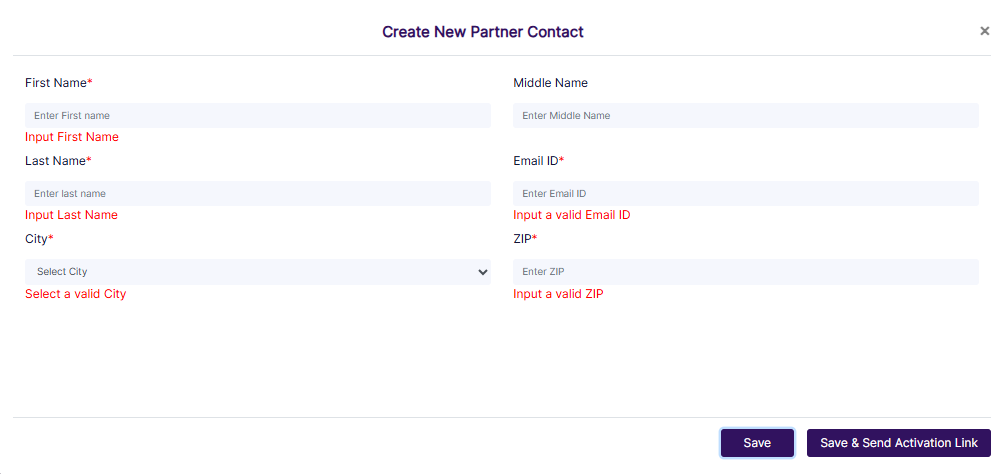 Fig: 81 - Field validations employed
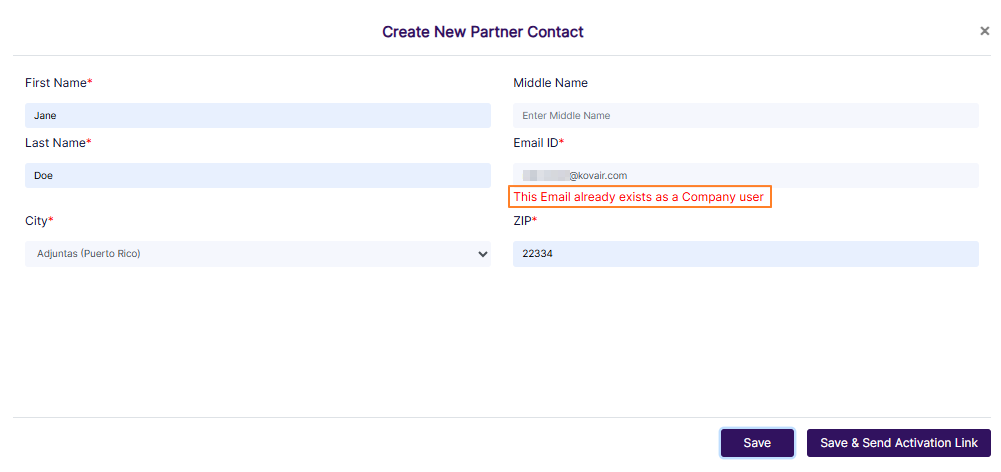 Fig: 82 - Email address validation
2.2.5.3.2. Searching for a Partner Contact
Quick name search finds the right contact in seconds so you can resolve requests and update details without hunting through lists. The search runs against indexed name fields for fast, scalable results while looking up someone.
Enter the name of the Contact based on which you want to execute the search operation by. If matching user is found, it will populate the grid view.
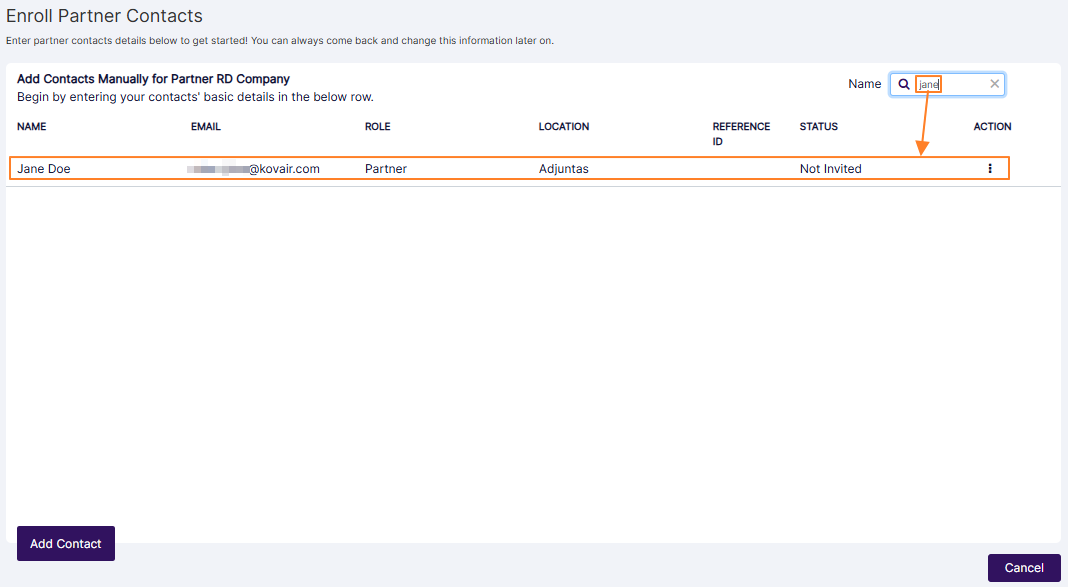 Fig: 83 - Search bar
NOTE: This user search facility operates only on the username (text displayed under the NAME column, and not on the data of any of the other columns.
2.2.5.3.3. Editing a Partner Contact
Update contact details safely while preserving the contact's email identity to update with the latest information.
- Click on the vertical ellipsis icon within the ACTIONS column against a row-specific grid view entry of the Enroll Partner Contacts page to load the context menu options. Click on the expanded Edit option.
- The following Edit Partner Contact modal window loads. Make appropriate modifications of the vendor details and click on the Save or Save & Send Activation Link button.
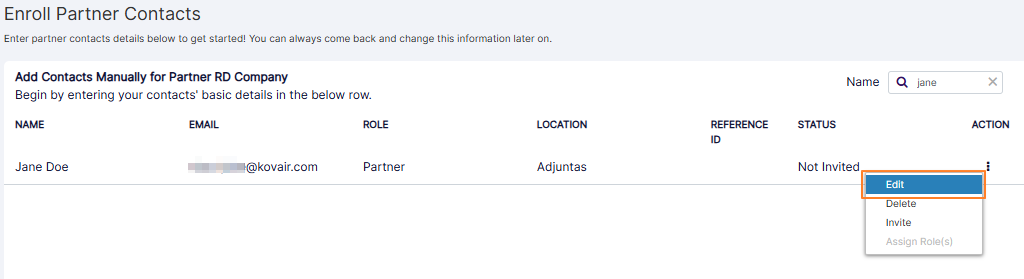 Fig: 84 - Edit menu option
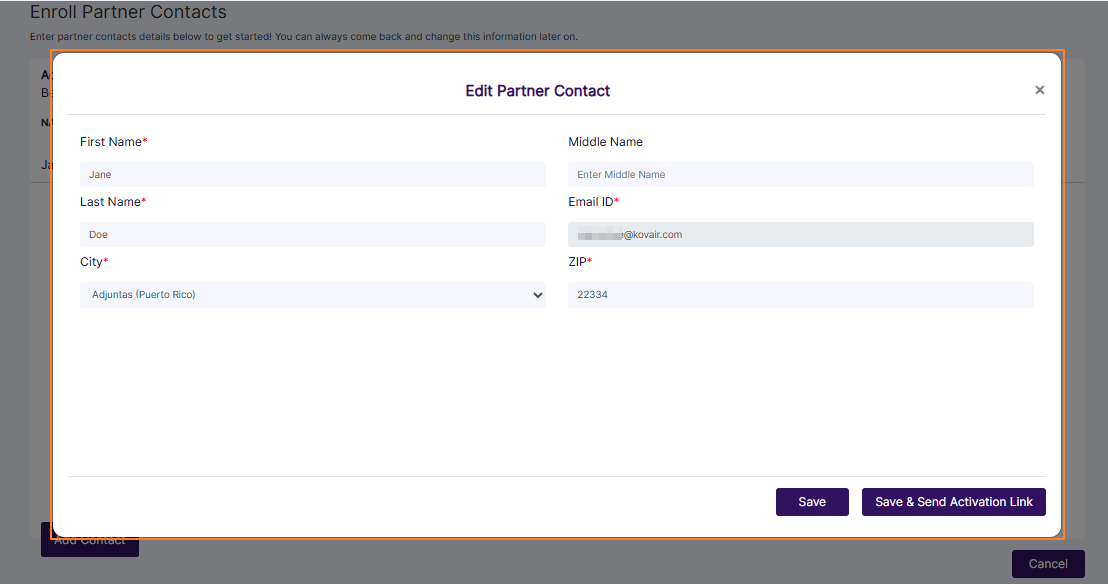 Fig: 85 - Edit Partner Contact modal view
NOTE:
- You cannot edit the email address as the Email ID field is greyed out.
- When you click on the Save & Send Activation Link button, the invite mail gets triggered and a success notification gets prompted.
 Fig: 86 - Success notification
2.2.5.3.4. Inviting a Partner Contact
Send or resend a secure onboarding invite with a single click so contacts can activate themselves immediately. The system generates expiring tokens, records invite events for traceability, and handles idempotency so repeated sends do not create duplicate activations.
- Click on the vertical ellipsis icon within the ACTIONS column against a row-specific grid view entry of the Enroll Partner Contacts page to load the context menu options. Click on the expanded Invite option.
- The invite mail gets triggered and a success notification gets prompted.
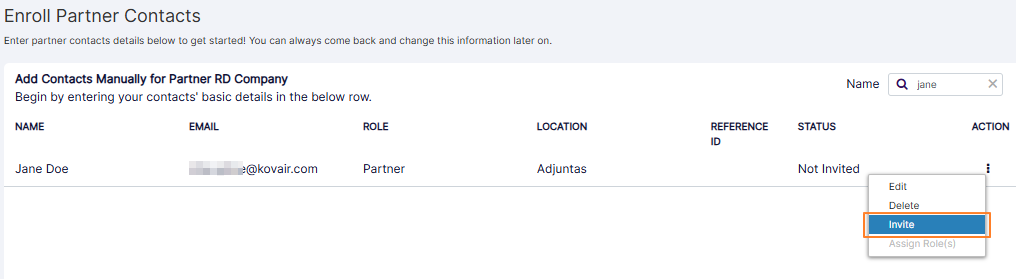 Fig: 87 - Invite menu option
Fig: 88 - Success notification
NOTE:
- The associated UI options and permitted operations of the Partner Contact user account are explained in the Partner Contact user guide.
- After the Partner Contact is invited, the label of the Invite menu option changes to Re-send Invite. Click on it to resend the invitation email.
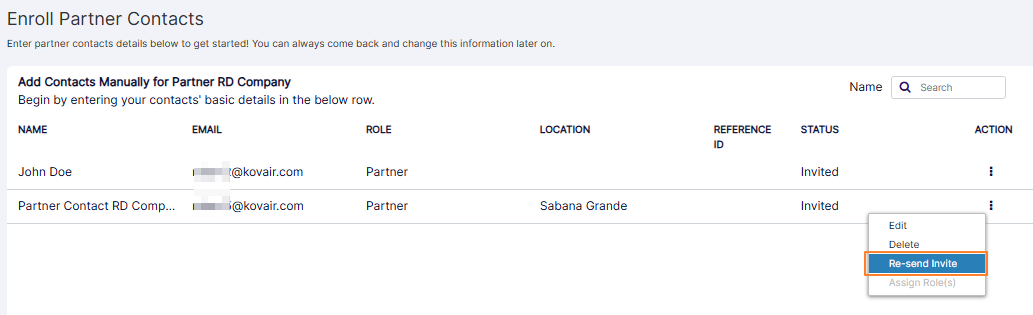 Fig: 89 - Re-send Invite menu option
2.2.5.3.5. Deleting a Partner Contact
Remove non‑onboarded or non-required contacts after providing existing account deletion confirmation.
Perform the following steps to delete a created Partner Contact.
- Click on the row context Delete menu after clicking on the vertical ellipsis icon displayed under the ACTION column.
- After you click on it, the system will prompt a confirmation dialog box. Click on the Yes button to proceed to remove the Partner Contact.
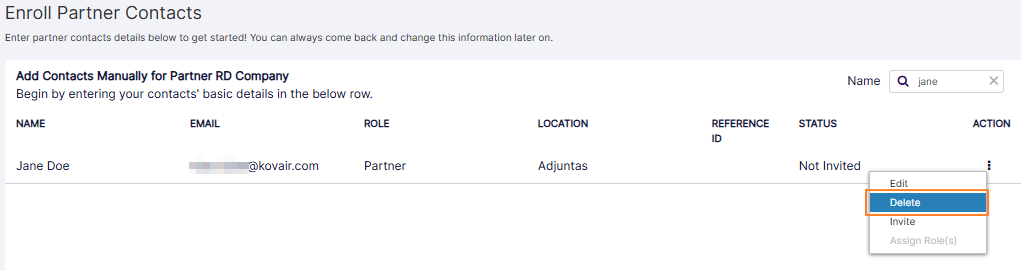 Fig: 90 - Delete menu option
 Fig: 91 - Delete menu option to remove the Partner Contact
NOTE:
- Once the Partner Contact account is onboarded into SurgeONE.ai, the account cannot be deleted.
- Once the Partner Contact account is deleted, the account cannot be restored, and the Contact cannot login to the application.
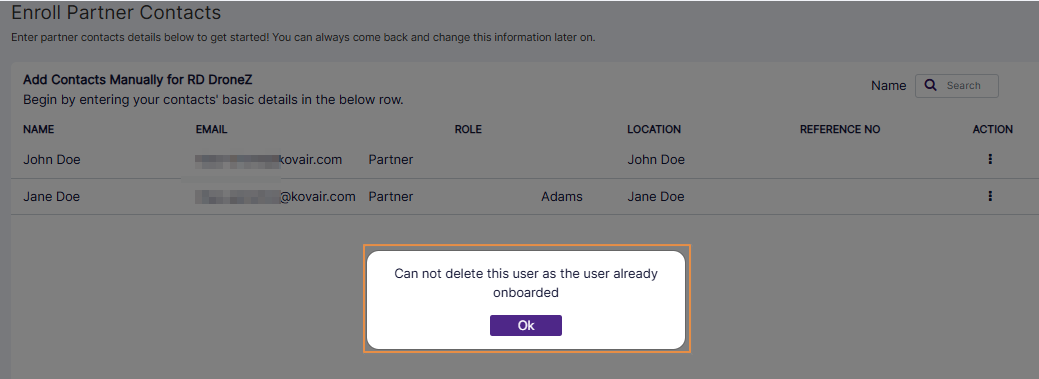 Fig: 92 - Cannot delete onboarded Partner Contact
2.2.5.4. Associating Companies
Link one or more companies to a partner via a simple checkbox modal and see access and counts update instantly so partners only see the firms they should.
- In SurgeONE.ai master portal, you can click on the vertical ellipsis icon within the ACTIONS column against a row-specific grid view entry of the Partners tab to load the context menu options. Click on the expanded Associate Company option.
- The following Associate Company modal window loads. Make appropriate checkbox selections against the listed Companies. The Companies which are created get listed here. Click on the Save button once done.
- Get redirected to the Partners tab view. Notice that the numeric value displayed within the COMPANIES column gets updated as per the Associate Company selections made.
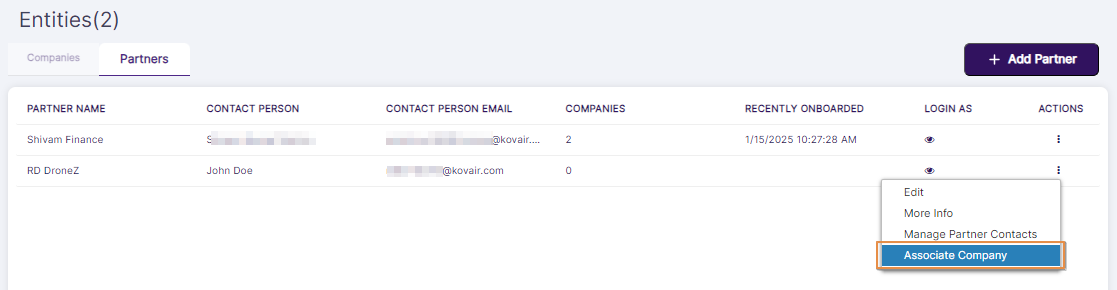 Fig: 93 - Associate Company menu option
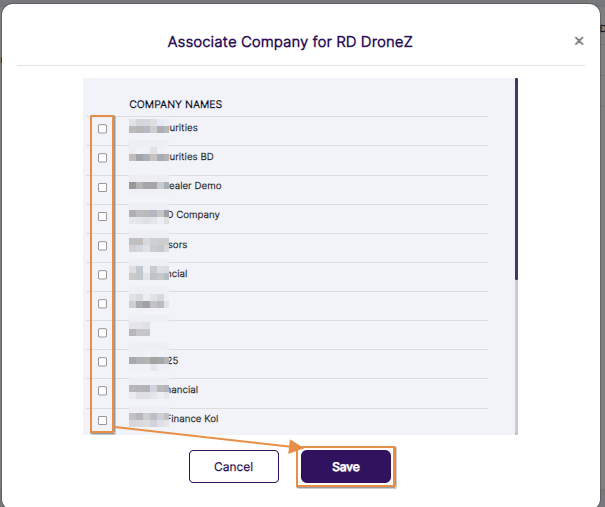 Fig: 94 - Associate Company modal view
 Fig: 95 - Associated Companies count view
3. Using the Top Right Panel
Find page help, system notifications, and alerts always within easy reach. Notifications stream from the event service, along with option to upload own profile picture and the logout facility cleanly invalidates the session token for safe access management.
You can find there are multiple icons provided in the top right panel (to the right of the organization name).
Page Context Help
The first one is the question mark  icon. Click on it to load the page context help.
Notifications Panel
Next to the question mark icon is the notifications  icon.
icon.
User Profile Picture
The third option is the admin user profile picture preview and the logged-in username.
- To set own profile picture, click on the admin user profile picture preview to load the Upload Profile Picture modal window.
- Click on the Choose File button to browse and upload custom profile picture.
- Click on the Upload button to set it as the profile picture.
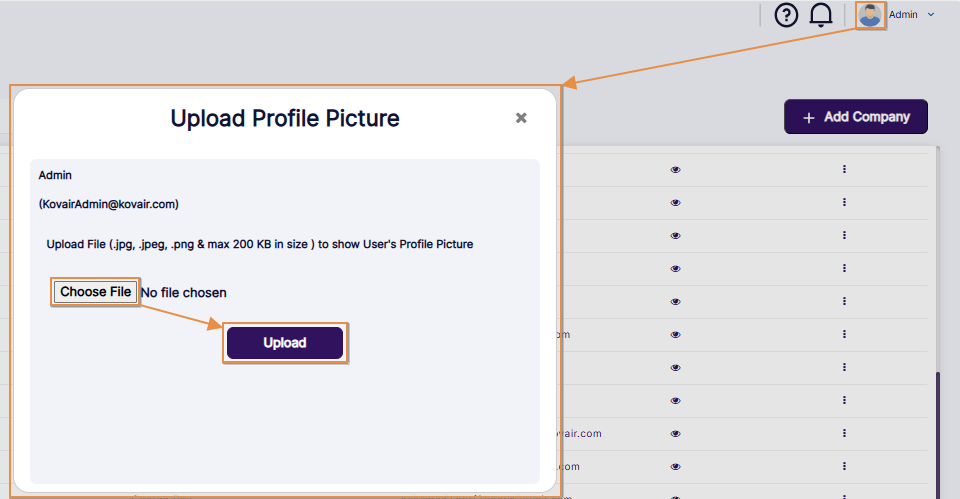 Fig: 96 - User profile picture upload modal window
User Profile Menu
Click on the down arrow  icon beside the name to load the user account context menu.
1. About SurgeONE
Click on the About SurgeONE menu option.
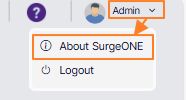 Fig: 97 - User menu expanded view showing the About SurgeONE menu option
The application debug and release versions can be seen. Click on cross  icon to close this view.
 Fig: 98 - SurgeONE.ai application debug and release versions displayed after clicking on the About SurgeONE menu option
2. Logout
Click on Logout option to terminate your logged in session and get redirected to the application login page. You need to login to re-access the application.
Fig: 99 - User menu expanded view showing the Logout button