
 This online help page is dedicated to the SurgeONE Business Details and Enroll Users stages of firm or organization onboarding and their associated functionalities. These are the two stages of getting started in the SurgeONE platform.
1. Getting Started
Let us assume that you have already set your SurgeONE login password and have successfully logged in for the first time.
 NOTE: Refer to this to understand how to set your password if you are yet to set your password or having difficulty in creating one.
After you login into SurgeONE for the first time, you will need to specify details about your organization or firm to get started. There are two stages of setting up your organization related details in SurgeONE.
- First, you must provide requisite information related to your business.
- In the next stage, you may allocate users who can access this created organization in SurgeONE. You can skip this stage if you want to set up users or employees later on.
NOTE: The SurgeONE Portal Admin user, as well as the Partner Contact user, can perform onboarding via the masquerade facility present in the admin portal after creating a company.
2. Providing Business Details
Here is the view of the Business Details page. The details you provide can be edited later on.
The following fields are present:
-
1Org NameText field used to store the official legal name of the firm for identification, branding, and system records across the platform.
-
2Org Address DetailsField used to capture the firm's registered or primary business address, supporting correspondence, compliance, and location-based processing.
-
3Org TypeSelection field used to categorize the organization's business structure (such as RIA, Broker-Dealer, Corporate, or Advisory) to enable relevant workflows and settings.
-
4CountryDropdown used to select one of the system-supported countries, enabling regional formatting, validations, and dependent geographic fields.
-
5StateDropdown used to choose the state or region corresponding to the selected country, supporting accurate address mapping and geographic rules.
-
6CityField used to specify the city of the firm's location for precise address representation and location-based reporting.
-
7ZipField used to capture the postal or ZIP code linked to the firm's address, ensuring proper address validation and region identification.
-
8CurrencyDropdown used to define the firm's default operating currency, enabling standardized financial calculations, reporting, and monetary values across the system.
-
9CRD NumberNumeric field used to store the firm's unique CRD (Central Registration Depository) identifier for regulatory validation and compliance tracking.
-
10Upload LogoFile upload option used to display the organization's branding logo at the top left of the SurgeONE UI.
Now let us illustrate how you can provide the business details.
- By default, a placeholder text is present in the Org Name field. You can edit or remove it to enter the name of your organization.
- Enter the current address of your organization in the Org Address Details field.
- Select the applicable type of firm in the Org Type dropdown.
- Select the country in the Country dropdown. Currently, two options as USA and Canada are available.
- Select the applicable state from the State dropdown options. The options are dependant on the country.
- Select the name of the city the firm is located at in the City dropdown. The options are dependant on the state.
- Enter the valid and unique zip code of your location in the Zip field. It must be a 5-digit numeric value.
- Select the currency in the Currency dropdown. Currently, only the USD option is available.
- Enter the unique identifier assigned to financial professionals registered with the Financial Industry Regulatory Authority (FINRA) in the CRD Number field. It stands for Central Registration Depository number and is used to track the employment, licensing, and disciplinary history of brokers and investment advisers.
- You can also upload the firm logo using the Upload Logo button. The uploaded logo gets displayed at the top left of the SurgeONE UI after onboarding is done.
- Click on the Next button at the bottom right to proceed to the Enroll Users stage.
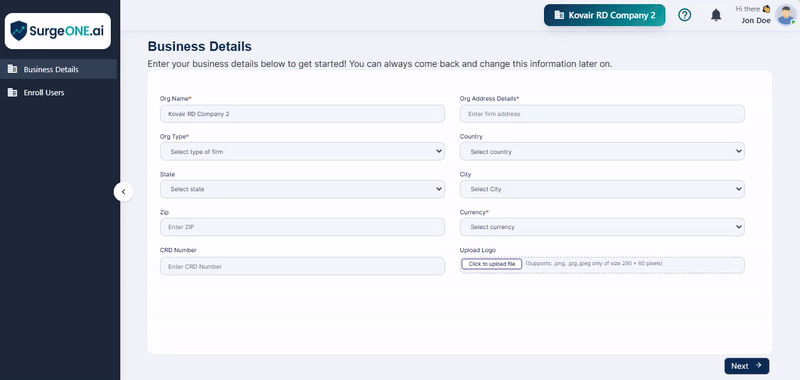 Fig: 1 - Fields of Business Details stage
NOTE: The above figure displays the placeholder text as RD AgroTech. This placeholder string value is fetched from the data that was initially provided as the name of the company at the time of this company creation, by the SurgeONE portal administrator account.
 Fig: 2 - Providing the address of the Firm or Organization
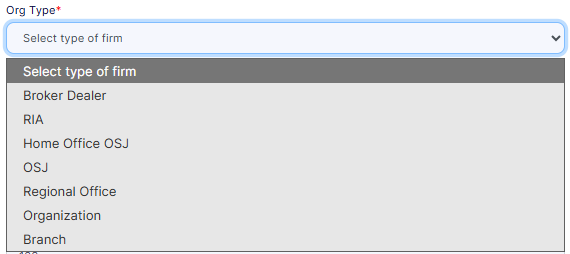 Fig: 3 - Selecting applicable Firm or Organization type
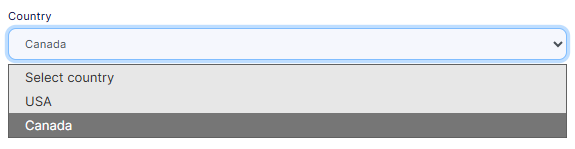 Fig: 4 - Selecting the Country of operation
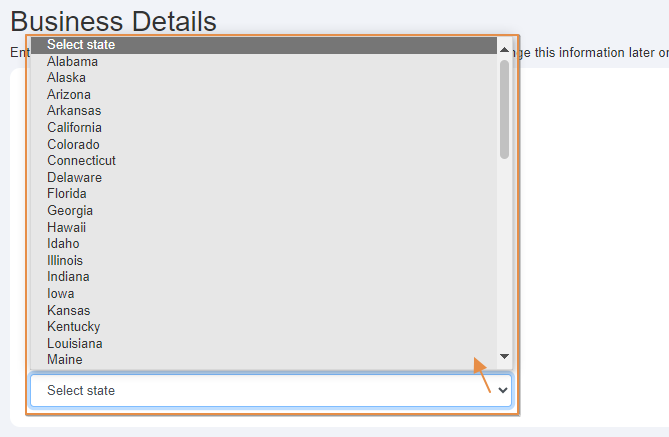 Fig: 5 - Selecting applicable State
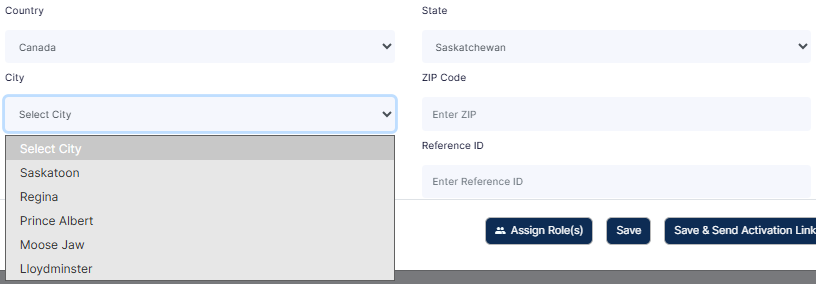 Fig: 6 - Selecting applicable City
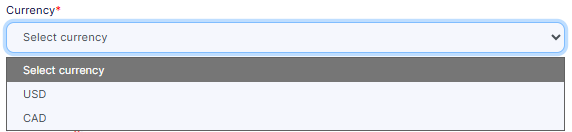 Fig: 7 - Selecting applicable Currency
 Fig: 8 - Entering applicable CRD number value
 Fig: 9 - Button to upload firm logo
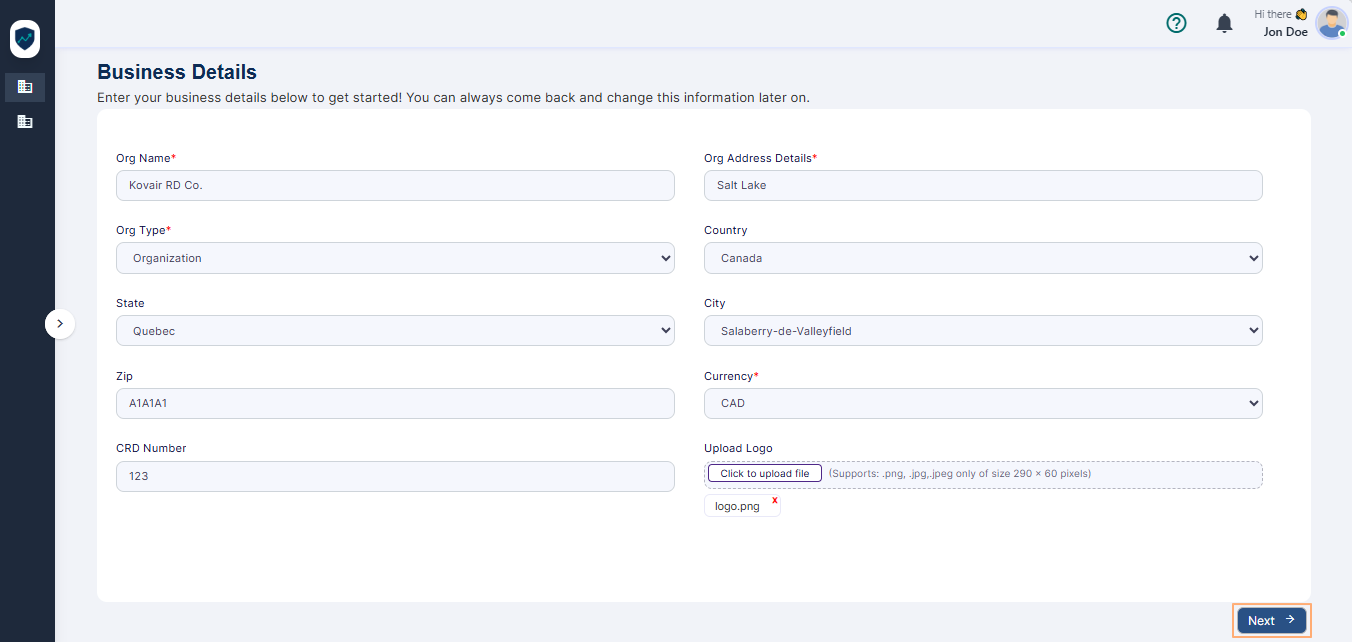 Fig: 10 - Next button to proceed
NOTE:
-
The following fields are mandatory while providing up your business details.
- Org Name
- Org Address Details
- Org Type
- Currency
The following screenshot displays the various validations that are employed for the mandatory fields. - At the left side of the screen, you can notice the current stage you are in.
 Fig: 11 - Fields validations
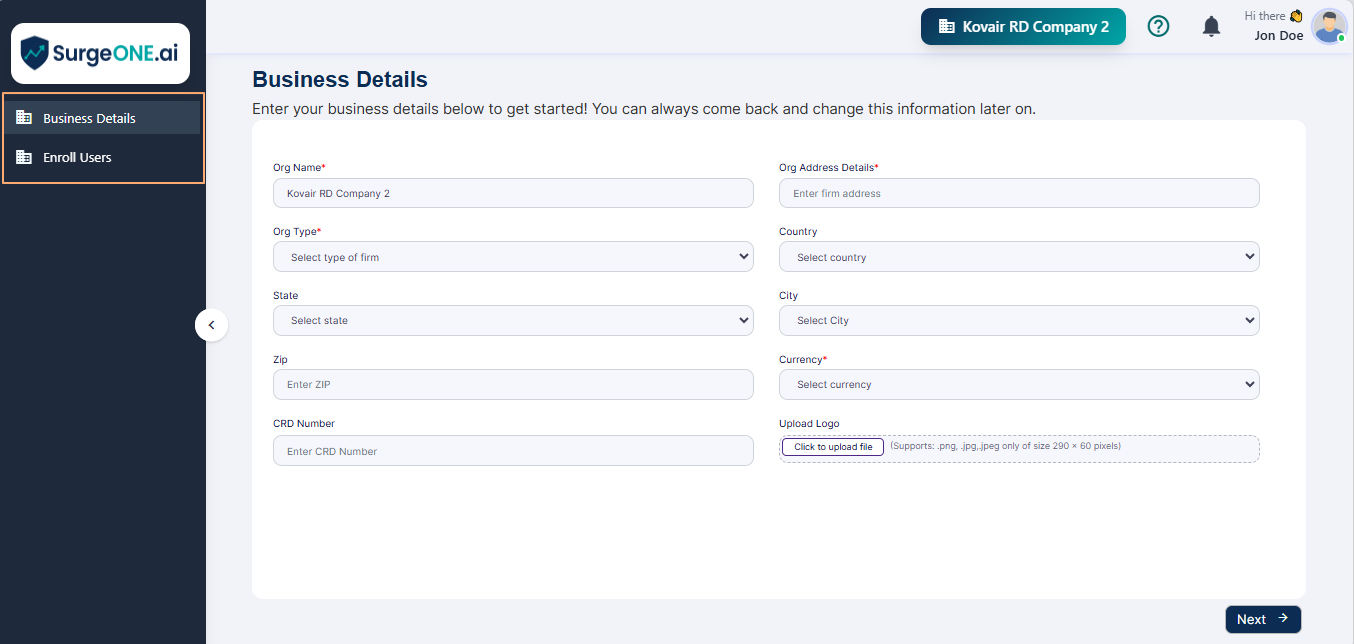 Fig: 12 - Different stages of getting started
3. Enrolling Users
Here is the view of the Enroll Users / Manage Users page. By default, the account that was created by the admin user is always listed out here as a row entry of the grid view.
You can proceed to add employee(s), or you can skip this activity for later set up. If you create an employee, the new employee details get listed in the grid view. The Enroll Users / Manage Users page displays the created users of the organization.
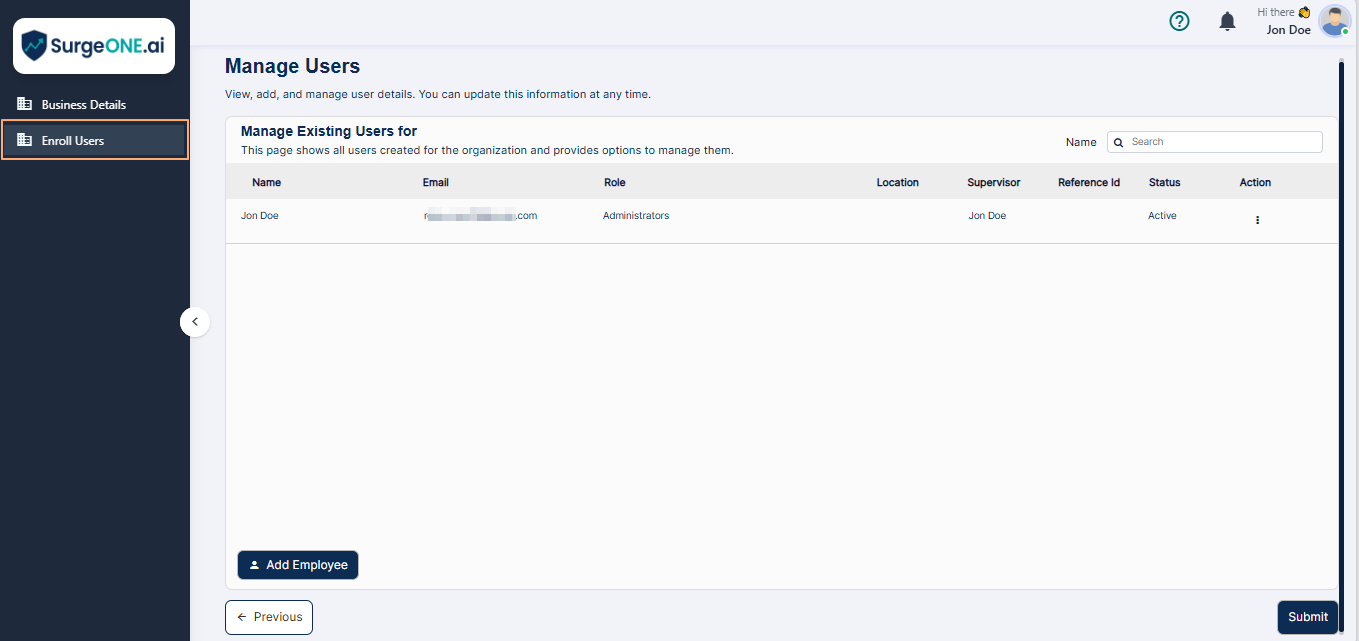 Fig: 13 - Enroll Users stage view
There is a row context menu that can be toggled using the vertical ellipsis  icon displayed under the Action column. The row context menu options Edit, Delete, Invite, Devices & Apps and Assign Role(s) are present. However, for the primary user, that is the Company / Branch Admin Role, the row-context menu options are greyed out, except for the last one.
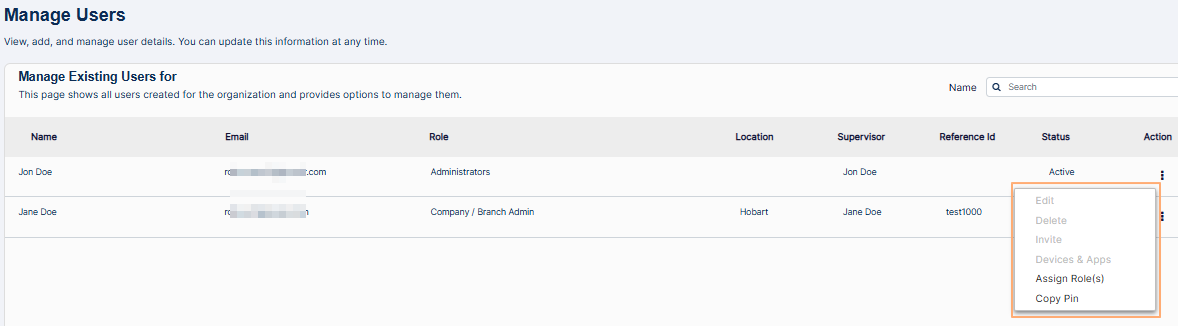 Fig: 14 - Icon to toggle the row context menu options
3.1. Creating New User / Employee
Creating a new employee profile in SurgeONE is a smooth and intuitive experience designed to simplify team onboarding. Just click the + Add Employee button to launch the Create New Employee dialog box, where you’ll enter key details like name, email, city, ZIP code, and if applicable a supervisor or reference ID. The form is flexible, allowing optional fields while ensuring essential data is captured for seamless communication and access.
Click on the + Add Employee button to load the Create New Employee dialog box.
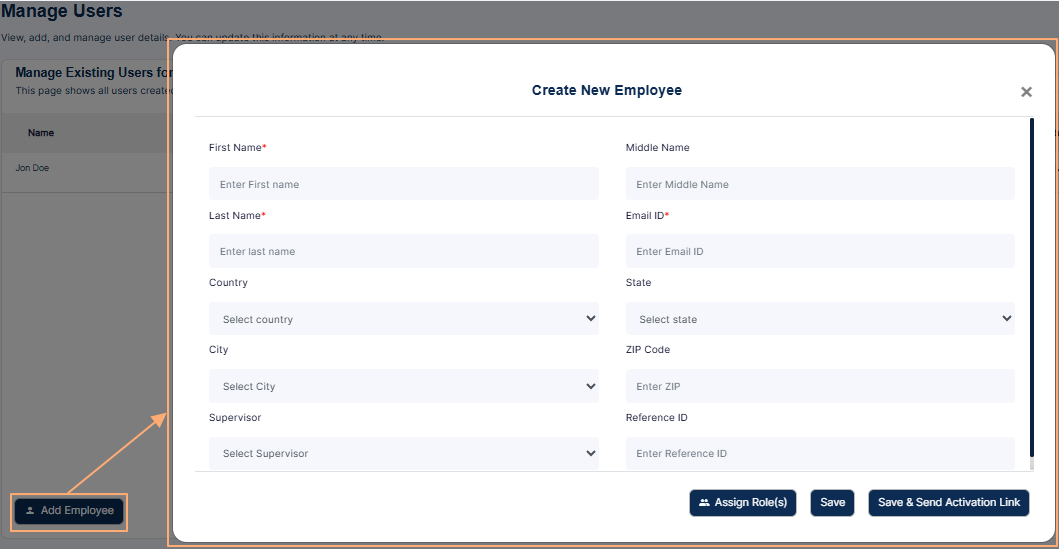 Fig: 15 - Create New Employee dialog box
The following fields are present:
-
1First NameEnter the first name of the employee.
-
2Middle NameEnter the middle name of the employee. This is an optional field.
-
3Last NameEnter the last name of the employee.
-
4Email IDEnter the valid email address of the employee. The invitation email will be sent at this address.
-
5CitySelect the current city of the employee.
-
6ZIP CodeEnter the valid zip code of the employee address.
-
7SupervisorYou can select the current supervisor or manager of the employee. This is an optional field.
-
8Reference IDYou may enter the applicable reference identifier of the employee.
Proceed to perform the following steps to create a new employee:
- Enter the name of the employee in the First Name, Middle Name and Last Name fields, as applicable.
- Enter a valid email address in the Email ID field.
- Select the country in the Country dropdown.
- Select the state in the State dropdown.
- Select the city in the City dropdown.
- Enter a valid 5-digit zip code in the ZIP Code field.
- You can select the current supervisor or manager of this new employee using the Supervisor dropdown. The employee can also be set as own supervisor using the Self dropdown option.
- You can enter appropriate value in the Reference ID field.
- Click on the Assign Role(s) button.
- Ensure that at least one listed role is moved from the Available Roles panel to the Assigned Roles panel. To move listed roles, you can use the buttons provided in the middle of the modal window. The system-defined roles are displayed on the left panel section. Select the applicable role of this new employee out of the designated options provided. Refer to the following four points stated below to understand how to move roles between the panels.
- Right arrow (>) button - Click on it after making checkbox selection(s) of the listed roles of the Available Roles panel to move the selected roles to the Assigned Roles panel. Multiple checkbox selection is permitted. Alternatively, you can also double click on the label to move it, instead of clicking on the right arrow icon.
- Left arrow (<) button - Click on it after making checkbox selection(s) of the listed roles of the Assigned Roles panel to move the selected roles to the Available Roles panel. Multiple checkbox selection is permitted. Alternatively, you can also double click on the label to move it, instead of clicking on the left arrow icon.
- Double right arrow (>>) button - Click on it to move the displayed roles of the Available Roles panel to the Assigned Roles panel. If you have performed a search operation in the Assigned Roles panel and then click on this button, then only the filtered roles will be moved, while the other roles who were not fetched by the search operation, will not be moved.
- Double left arrow (<<) button - Click on it to move the displayed roles of the Assigned Roles panel to the Available Roles panel. If you have performed a search operation in the Assigned Roles panel and then click on this button, then only the filtered roles will be moved, while the other roles who were not fetched by the search operation, will not be moved.
- Click on the Done button to confirm the role assignment.
- Now that the employee details are provided and the role(s) is assigned, click on either one of the Save or the Save & Send Activation Link button to save this new employee, as explained below:
- If you click on the Save button, then the user gets created and needs to be invited for the invitation email to get triggered from the system. The invited user can set password and login to SurgeONE. The new user details get listed in the grid view and can be invited later on. After the user is created, a success notification can be seen.
- If you click on the Save & Send Activation Link button, then the user gets created and the invitation email is triggered from the system. When adding employee during onboarding process and pressing on the Save & Send Activation Link button, the email gets triggered after both the two steps of the onboarding process is completed. The new user details also get listed in the grid view. After the mail is triggered a success notification can be seen.
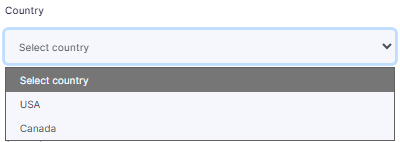 Fig: 16 - Country dropdown
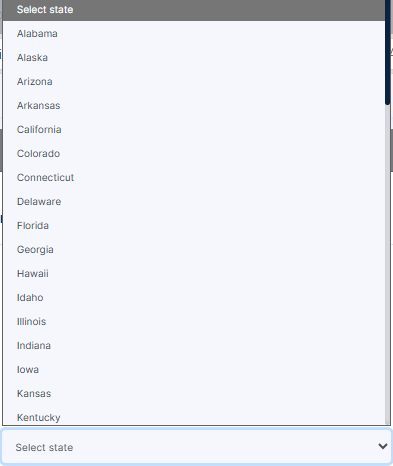 Fig: 17 - State dropdown
Fig: 18 - City dropdown
 Fig: 19 - Supervisor dropdown
Here is the view of the new employee details populated in the respective fields.
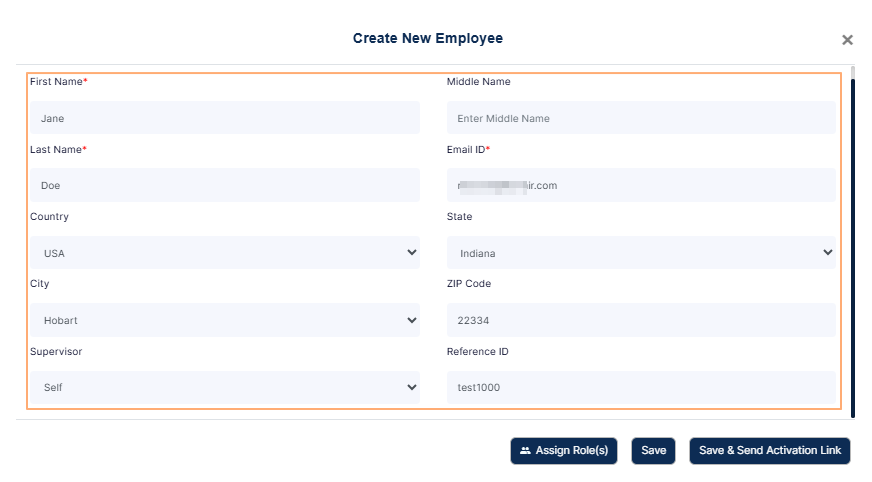 Fig: 20 - New Employee details populated
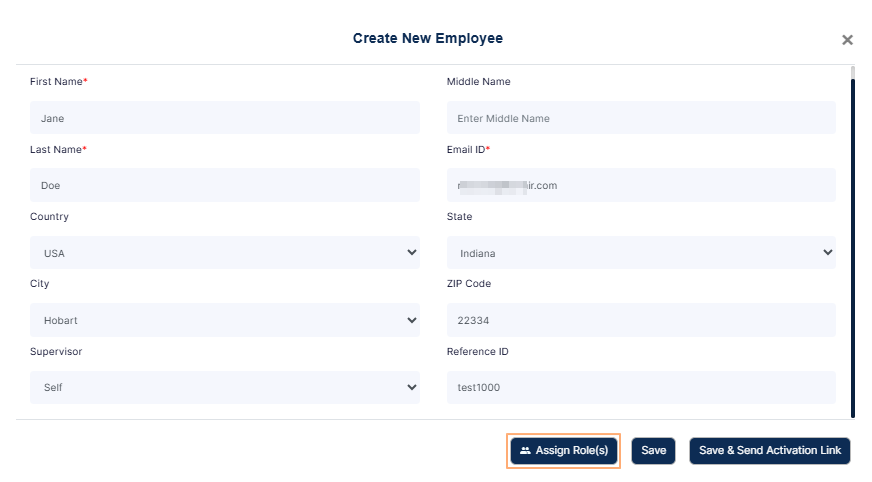 Fig: 21 - Assign Role(s) button
Here is a view of the various roles that are listed.
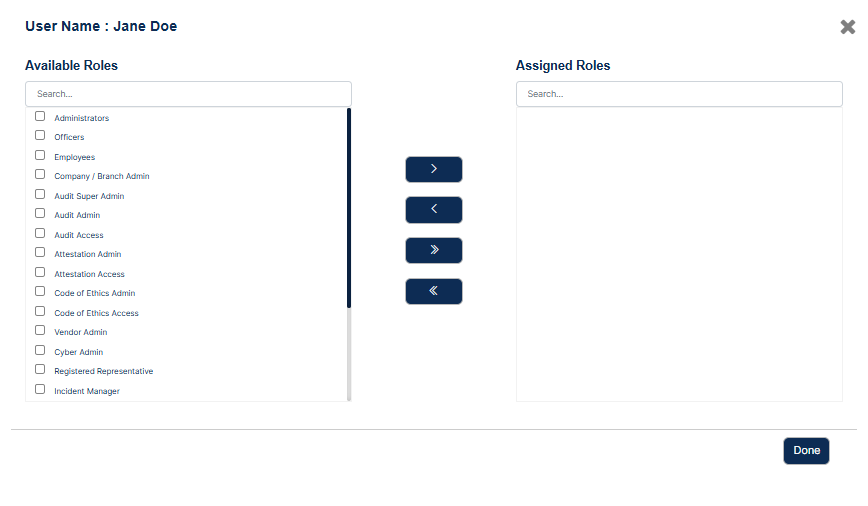 Fig: 22 - View of the System Roles on the left panel
 Fig: 23 - Setting System Roles
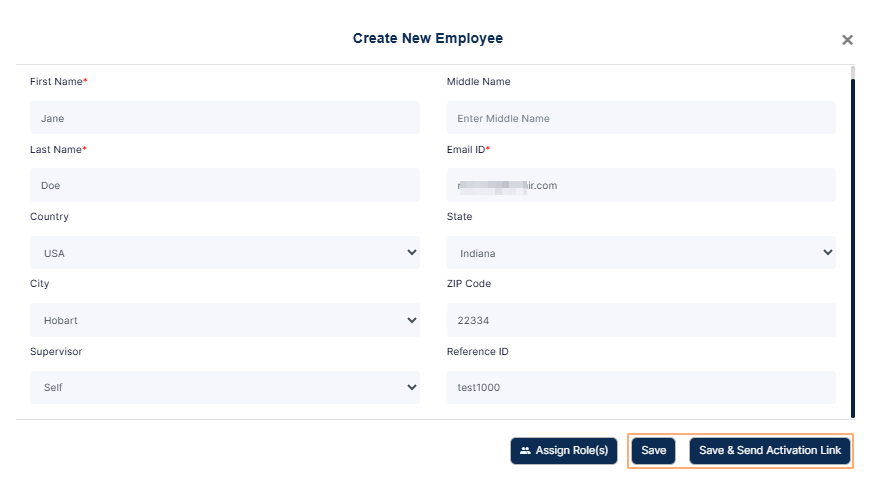 Fig: 24 - Save buttons
Here is the view of the user account which is created using the Save button. The row context menu (toggled using the vertical ellipsis icon) displays selectable Edit, Delete, Invite, Devices & Apps, Assign Role(s) and Copy Pin options.
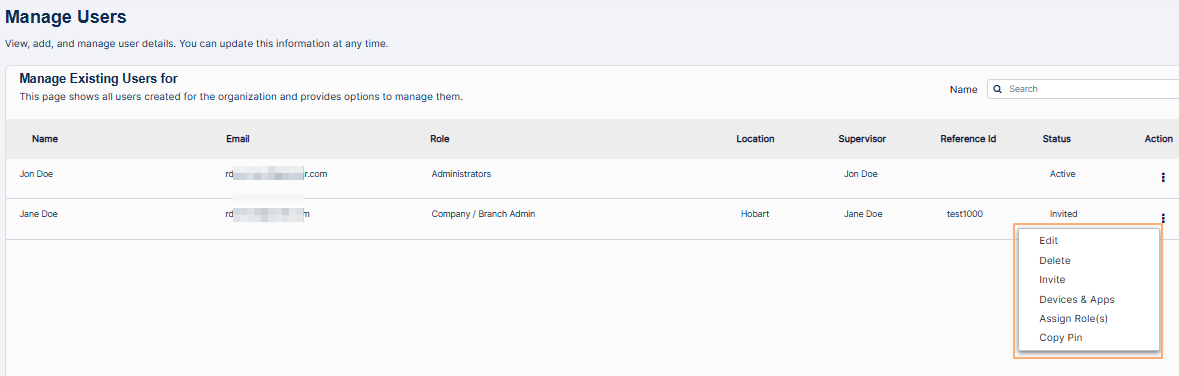 Fig: 25 - Row context menu options of the created employee
Whereas, for the Company / Branch Admin role (primary user), only the Assign Role(s) and Copy Pin menu options are enabled, while the rest are disabled. Refer to the following screenshot:
Fig: 26 - Row context menu options of the Company / Branch Admin role
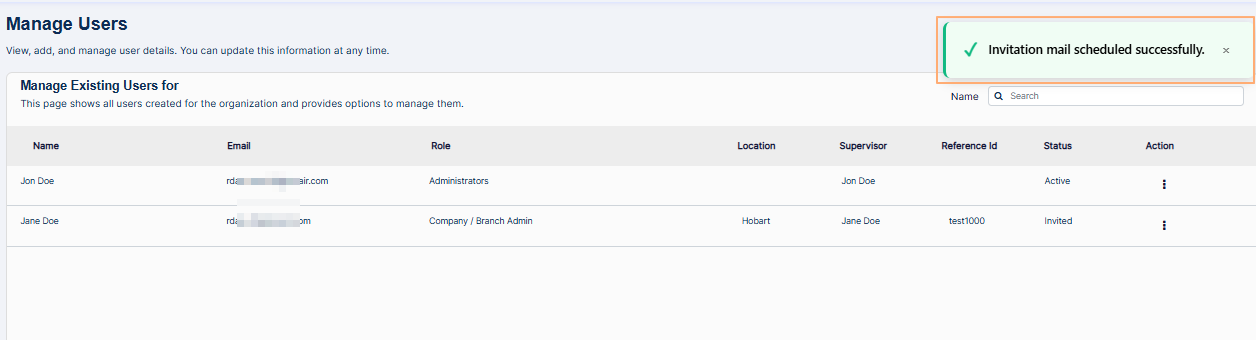 Fig: 27 - Success notification of invite mail trigger
NOTE:
- The following screenshot shows the various field validations that are implemented for creating the new employee.
- You must assign at least one role to the new employee before saving. Otherwise, the system will prompt you to do so.
- You must have at least one role added in the right panel labeled as Assigned Roles to be able to save the assigned role(s). Otherwise, the system will prompt you to do so when you click on the Done button before assigning any role to the new employee.
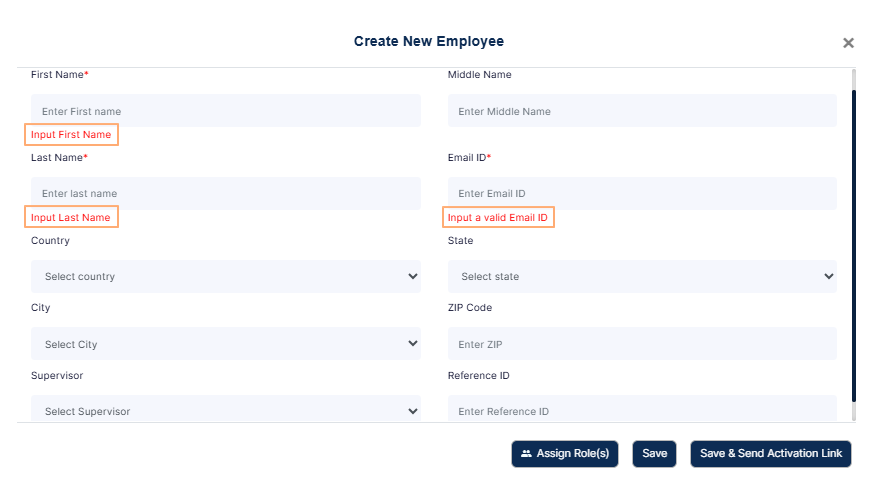 Fig: 28 - Field validations
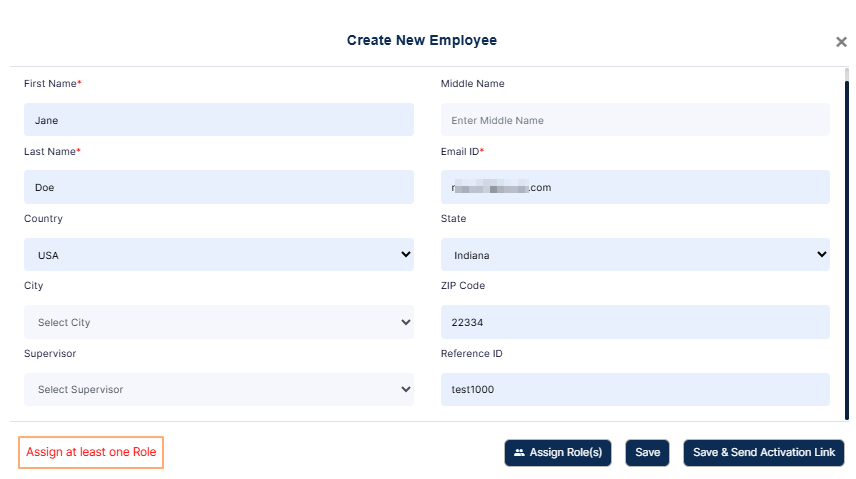 Fig: 29 - Role needs to be assigned to save employee
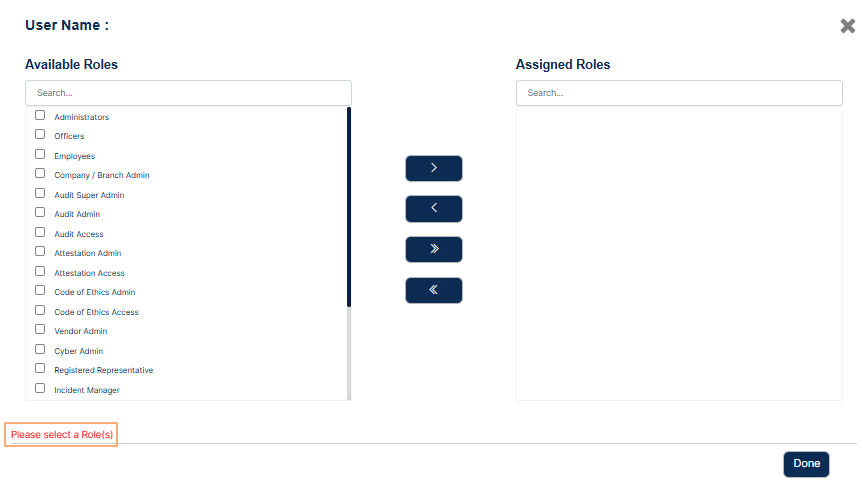 Fig: 30 - Role needs to be selected and moved to the Assigned Roles panel area
3.2. Editing User / Employee
Updating employee details in SurgeONE is refreshingly simple and designed to keep your team data accurate with minimal effort. Just head to the Manage Users grid, click the vertical ellipsis under the Action column, and select Edit from the context menu. This opens the Edit Employee dialog box, where all existing information is pre-filled for easy review. You can tweak any field—except the Email ID, which stays locked to preserve account integrity.
Once your updates are in place, hit Save to store the changes. If the employee has not been invited to join SurgeONE yet, you will also see a button to save and send the activation link. This option not only saves your edits but also sends an invitation email, getting the user onboard instantly. Whether you are refining roles, updating locations, or prepping a new team member for onboarding, editing existing users in SurgeONE is built for speed, clarity, and control.
You can edit a created employee. Click on the row context Edit menu after clicking on the vertical ellipsis icon displayed under the Action column.
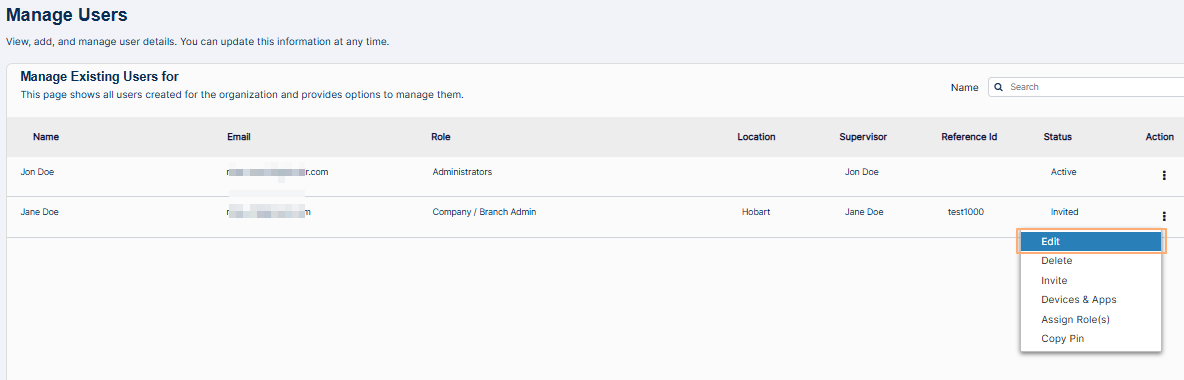 Fig: 31 - Edit option of the row context menu
Here is the view of the Edit Employee dialog box.
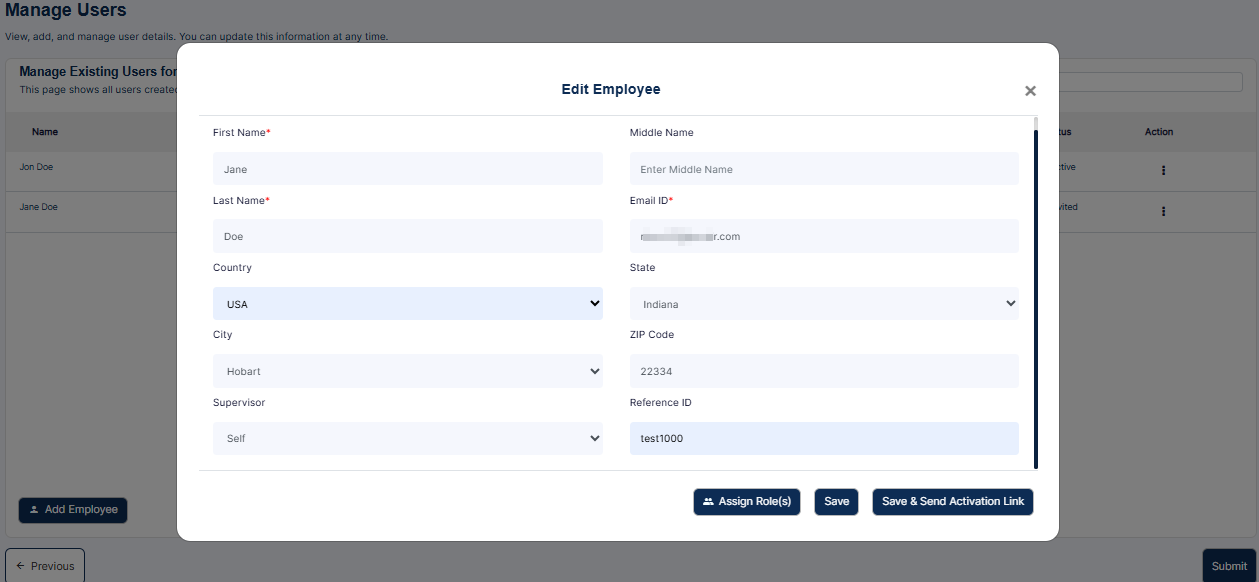 Fig: 32 - Edit Employee dialog box
The existing employee details are populated and can be edited, except for the Email ID field, which is a read-only field.
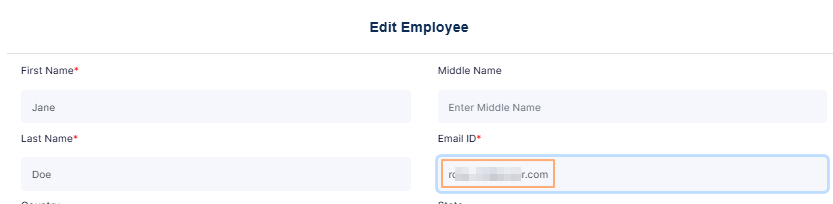 Fig: 33 - Email ID field cannot be edited
If you click on the Save button, then the user details get stored and a success notification can be seen.
 Fig: 34 - Success notification
But, if you click on the Save & Send Activation Link button, then user details get stored, and the invitation email is triggered from the system. After the mail is triggered a success notification can be seen.
 Fig: 35 - Success notification
3.3. Deleting User / Employee
The user deletion feature in SurgeONE.ai is a critical tool for maintaining organizational integrity during role transitions, employee exits, or structural changes. It ensures that user accounts are managed responsibly, with safeguards in place to protect ongoing workflows and prevent disruption.
Perform the following steps to delete a created user while setting up your firm.
- Click on the row context Delete menu after clicking on the vertical ellipsis icon displayed under the Action column.
- After you click on it, the system will prompt a confirmation modal window. Click on the Yes button to proceed to remove the user account.
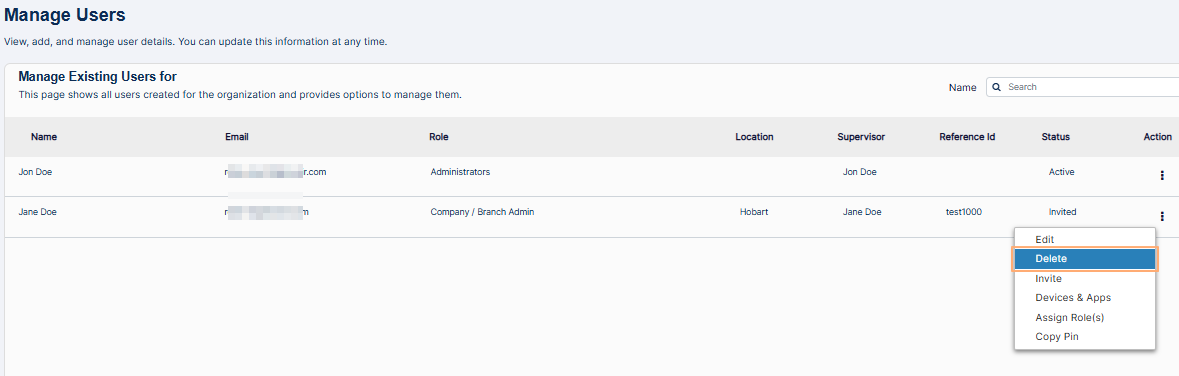 Fig: 36 - Delete option enabled and clicked on
 Fig: 37 - Providing confirmation to delete the user
NOTE:
- Once the user account is deleted, the account cannot be restored, and the user cannot login to the application.
- You cannot delete the primary user account (logged-in user) by using this context menu option. You can click on the row context vertical ellipsis icon and notice that the expanded Delete menu option is greyed out for the logged-in user account who is set for the Company / Branch Admin Role.
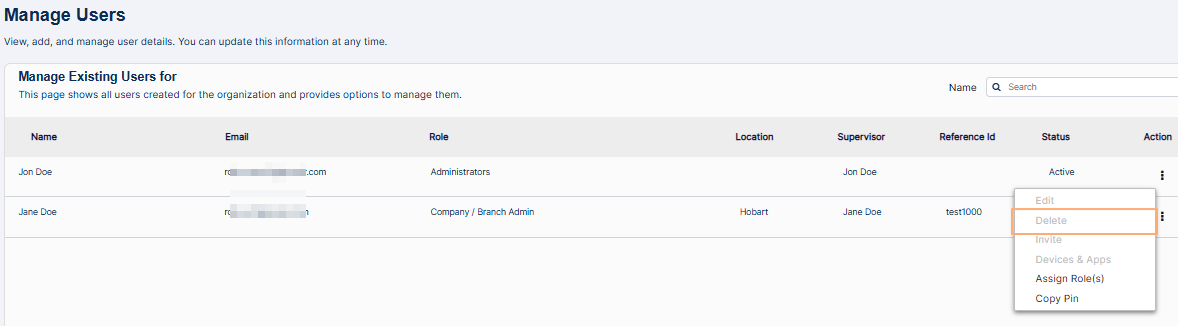 Fig: 38 - Delete option of the row context menu disabled for Company / Branch Admin
3.4. Inviting User / Employee
Inviting users to the SurgeONE platform is a structured and efficient process designed to facilitate seamless onboarding. To invite an individual user, navigate to the Manage Users grid and click the vertical ellipsis icon under the ACTION column. From the expanded context menu, select the Invite option available only for users who have not yet accessed the platform. Upon selection, the Send Invitation to User modal window appears, allowing you to choose between two invitation types: Invite as SurgeONE User or Invite as Other Apps User, with the former selected by default. Clicking the Send Invite button dispatches an email invitation to the user's registered email address. The system then updates the user's status to Invited, and a confirmation notification is displayed.
Additionally, if a user has previously been invited but has not completed the registration process, the Invite option changes to Re-send Invite, allowing you to resend the invitation email. This ensures that all users have the opportunity to activate their accounts and begin using SurgeONE without delay. The invitation workflow is designed to be both comprehensive and user-friendly, supporting effective user management across the organization.
- You can click on the row context vertical ellipsis icon and click on the expanded Invite menu option to invite the account of any existing user of your organization (who is yet to be invited).
- The Send Invitation to User modal window loads.
- The status updates to Invited. The following success notification is displayed.
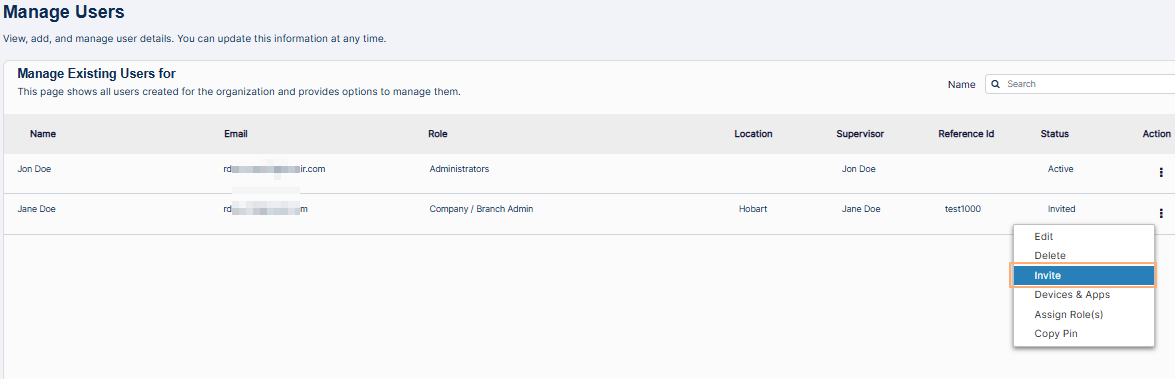 Fig: 39 - Invite option for Inviting user
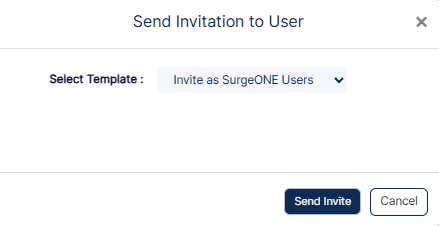 Fig: 40 - Send Invitation to User modal window view
The following image displays the various dropdown options of the Select Template field. Select any one applicable option and click on the Send Invite button.
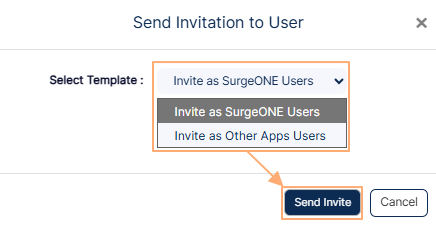 Fig: 41 - Choosing method of Inviting user
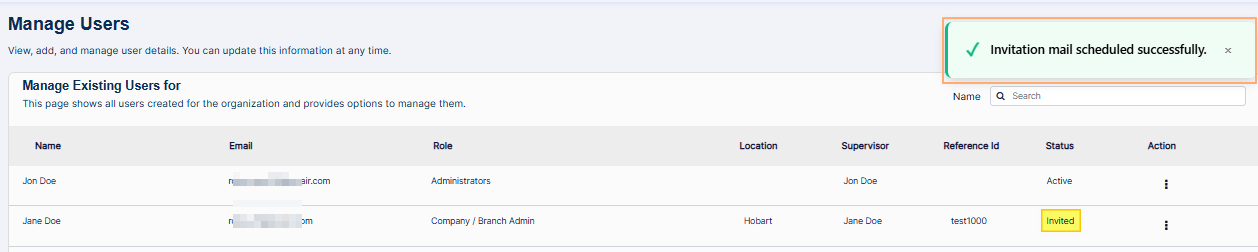 Fig: 42 - Invite mail success notification
NOTE: The invitation email is sent to the stored email address. The invited user / employee can set your SurgeONE account password from the embedded link of the invitation email.
3.5. Viewing Devices / Apps Details
The Devices and Apps feature offers a centralized way to view the technology footprint associated with each user in your organization. By selecting this option from the row context menu accessible via the vertical ellipsis icon in the Manage Users grid you can open a detailed modal window that displays device and application information linked to the selected user.
The Device Details section typically includes hardware and system attributes such as device model, operating system, host name, MAC address, and security indicators like disk encryption, antivirus status, screen lock, password policy, and firewall settings. These insights help ensure that devices meet organizational standards for security and compliance.
In parallel, the App Details section lists installed applications, showing the app name, vendor, and category. This allows administrators to monitor software usage and maintain visibility over the digital tools in use.
If no data has been captured for a user's device, the modal window will appear blank with a 'Device not found' label. Overall, this feature supports better oversight, informed decision-making, and streamlined IT and cybersecurity management across your organization.
You can click on the row context vertical ellipsis icon and click on the expanded Devices & Apps menu option to view the devices and apps info. The Device details modal window loads to display the devices and apps specific information related to the associated user.
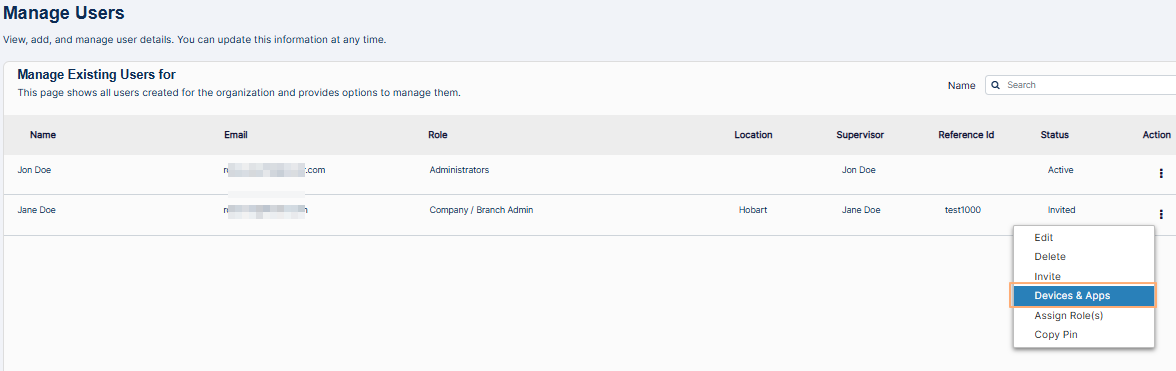 Fig: 43 - Devices & Apps menu option
Here is the view when no details are present.
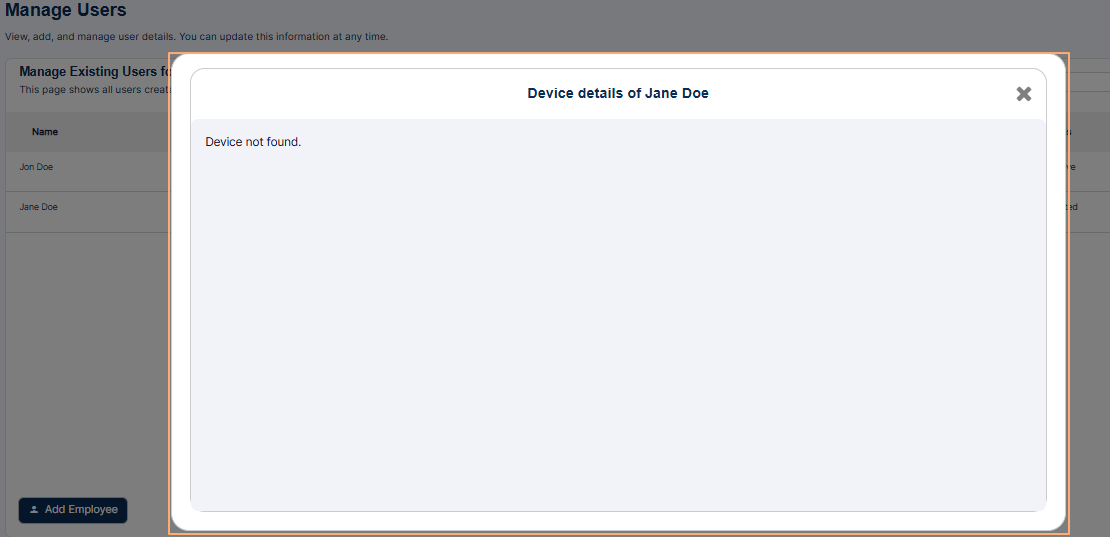 Fig: 44 - Devices & Apps option of the row context menu loads the Device details view showing no details
Here is the view when devices / apps details are present.
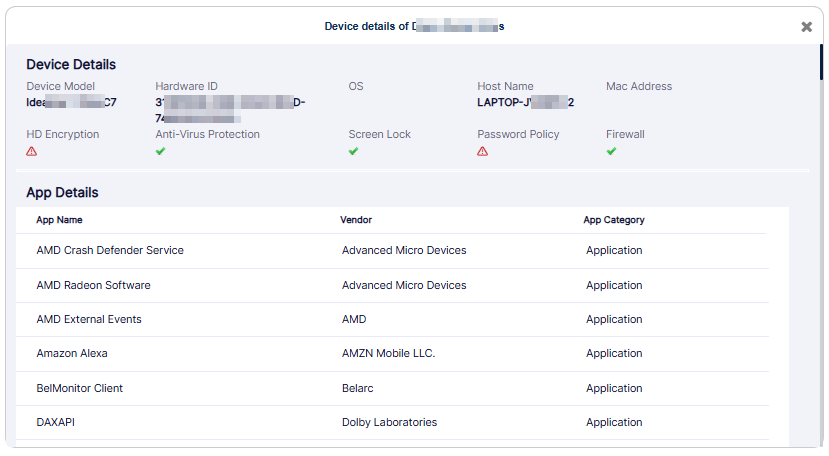 Fig: 45 - Device details view populated with details
The Device Details section displays the following information (if it is present in the system after the info is captured from the mapped device):
-
1Device ModelDisplays the manufacturer or model name/number reported by the device information. This helps you identify the device’s make and form factor (e.g., laptop, desktop, mobile, tablet).
Benefit: Allows quick identification of device type for management. -
2Hardware IDShows a unique vendor or system-assigned identifier linked to the device hardware. This ID is used for uniquely tracking and validating the physical device.
Benefit: Ensures precise device recognition, reducing duplication and errors in asset records. -
3OSDisplays the operating system name and version currently installed on the device. This helps verify platform compatibility and patch/update levels.
Benefit: Assists in ensuring compliance with company–approved OS versions and security standards. -
4Host NameDisplays the hostname the device advertises on the network. This is used for device identification, domain joining, and network visibility.
Benefit: Makes it easier to locate and manage devices within enterprise networks. -
5Mac AddressShows the network interface’s unique hardware address used for local network communication and MAC-based filtering.
Benefit: Helps in enforcing secure network access controls and device-level tracking. -
6HD EncryptionDisplays an icon that indicates whether the device’s disk encryption is enabled or disabled.
Benefit: Offers immediate visibility into data protection status to prevent unauthorized access. -
7Anti-Virus ProtectionDisplays an icon showing whether antivirus or endpoint protection is implemented on the device.
Benefit: Ensures systems are protected from malware and identifies unsecured devices quickly. -
8Screen LockDisplays an icon indicating whether a lock screen or session protection method is configured or enforced.
Benefit: Helps confirm that unattended devices stay protected against unauthorized access. -
9Password PolicyShows an icon that indicates whether password policies (e.g., minimum length, complexity) are enforced on the device.
Benefit: Ensures user authentication methods meet security standards. -
10FirewallDisplays an icon showing whether the device’s firewall is enabled. This helps monitor protection against unauthorized connections.
Benefit: Provides immediate visibility into the device’s network protection posture.
The App Details section displays the following information (if it is present in the system after the info is captured from the mapped device):
-
1App NameDisplays the official name of the installed application as captured by the system. This helps identify the exact software present on the device.
Benefit: Enables clear and accurate tracking of installed applications for auditing and management. -
2VendorShows the publisher or vendor responsible for developing and distributing the application. This helps verify the source and credibility of the software.
Benefit: Helps identify vendors to improve software security governance. -
3App CategoryDisplays the functional classification of the application (e.g., Application, Antivirus). This assists in grouping and analyzing software types across devices.
Benefit: Allows easier apps categorization for compliance checks, audits, and usage analysis.
3.6. Assigning Role(s)
Assigning roles to users in SurgeONE is a flexible way to define how individuals interact with different parts of the platform. From the user management view, you can select a team member and open their role assignment interface, where you will see two panels: one showing all available roles within your organization, and the other showing roles which are assigned to that user.
- Click on the vertical ellipsis icon of the ACTION column against a displayed user on the Manage Users page to load the menu options. Click on the expanded Assign Role(s) option to load the role assignment modal where you can assign relevant roles to the existing user.
- The following modal window loads where you can assign roles(s) or make modifications to the assigned role(s) to the chosen user. You can find two panels, one on the left and one on the right, labeled as Available Roles and Assigned Roles, respectively. The former lists out the existing roles of your organization, while the latter lists out the roles which are currently assigned to this user.
- Ensure that at least one listed role is moved from the Available Roles panel to the Assigned Roles panel. To move listed roles, you can use the buttons provided in the middle of the modal window. Refer to the following four points stated below to understand how to move roles between the panels.
- Right arrow (>) button - Click on it after making checkbox selection(s) of the listed roles of the Available Roles panel to move the selected roles to the Assigned Roles panel. Multiple checkbox selection is permitted. Alternatively, you can also double click on the label to move it, instead of clicking on the right arrow icon.
- Left arrow (<) button - Click on it after making checkbox selection(s) of the listed roles of the Assigned Roles panel to move the selected roles to the Available Roles panel. Multiple checkbox selection is permitted. Alternatively, you can also double click on the label to move it, instead of clicking on the left arrow icon.
- Double right arrow (>>) button - Click on it to move the displayed roles of the Available Roles panel to the Assigned Roles panel. If you have performed a search operation in the Assigned Roles panel and then click on this button, then only the filtered roles will be moved, while the other roles who were not fetched by the search operation, will not be moved.
- Double left arrow (<<) button - Click on it to move the displayed roles of the Assigned Roles panel to the Available Roles panel. If you have performed a search operation in the Assigned Roles panel and then click on this button, then only the filtered roles will be moved, while the other roles who were not fetched by the search operation, will not be moved.
- Click on the Done button to confirm role assignment based on the selection(s) made.
- The modal window closes and you can view the Manage Users grid view. The Rol column displays the assigned role(s) in a truncated view and on mouse pointer hover over the column text, a tooltip is visible showing all of the assigned roles of this user.
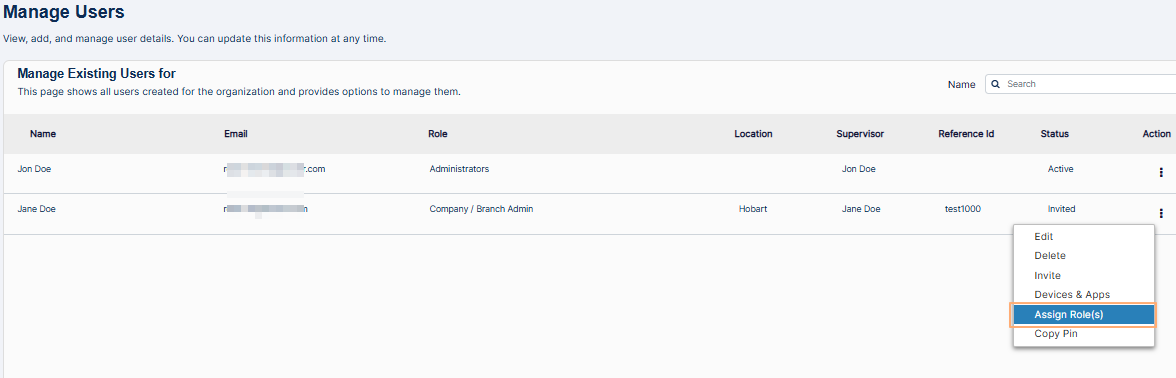 Fig: 46 - Assign Role(s) menu option
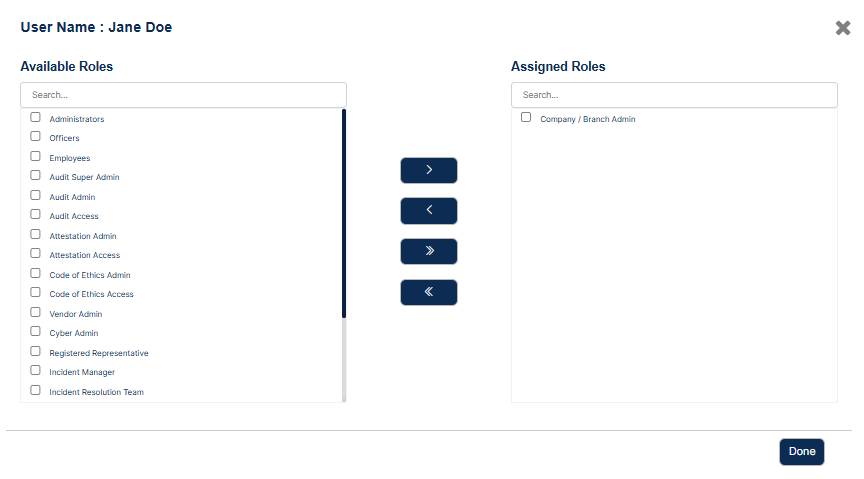 Fig: 47 - Modal window to assign role(s) to chosen user
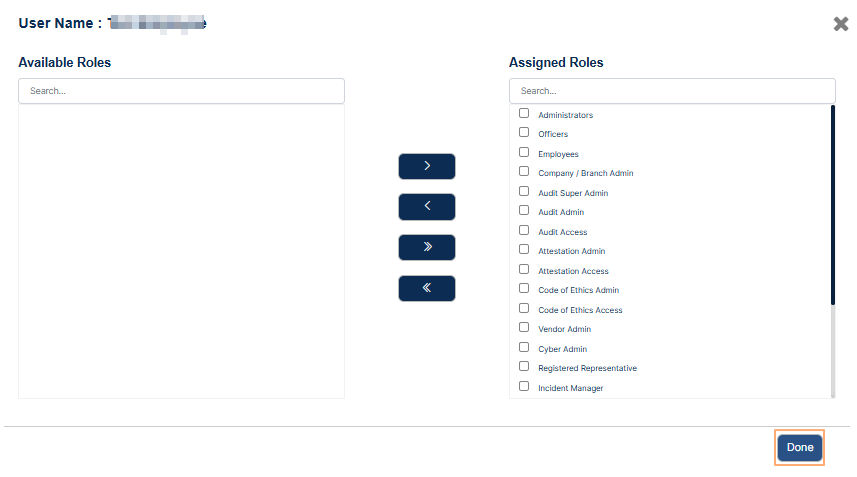 Fig: 48 - Button to confirm role(s) assignment to the user
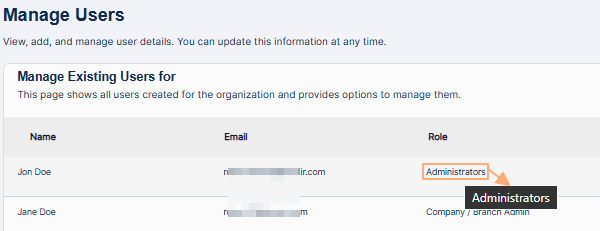 Fig: 49 - View of the assigned roles tooltip
NOTE:
- No Access to a Module: If a user is not assigned to any of the roles specific to a module, then he/she will not get access to that entire module. For example, if a user is not assigned to the Audit Super Admin, Audit Admin, and Audit Access Roles, then that user will not get the Audit Menu link on the navigation bar.
- A search facility is also provided in both the panels. The following screenshot displays a search operation executed in the Available Roles panel.
- Here is the view of the modal window when no roles are assigned to a user.
- You cannot proceed to assign users to the role, unless there are existing users listed in the modal window.
- The system will prompt a validation message when you do not move any listed role to the Assigned Roles panel and click on the Done button.
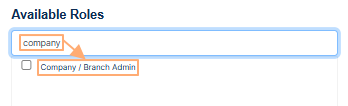 Fig: 50 - Search facility in the modal window to execute search operation among the listed roles
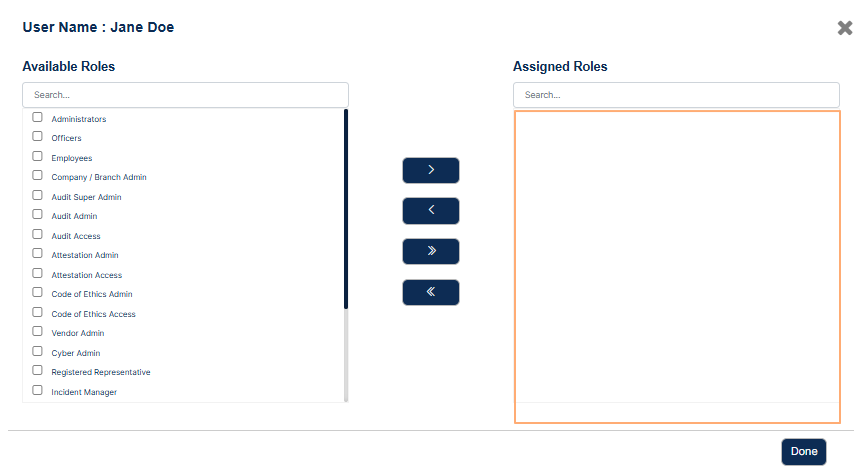 Fig: 51 - No roles assigned to the user
Fig: 52 - Validation to select role(s) to assign to the user
3.7. Copying PIN
Copying a PIN in SurgeONE provides a fast and secure way to retrieve access codes linked to a user. From the user management view, select an individual and choose the option to copy their PIN. This action generates a set of unique six-digit codes, typically used for installing software across multiple devices such as desktop, laptop, or mobile.
- Click on the vertical ellipsis icon of the ACTION column against a displayed user on the Manage Users page to load the menu options. Click on the expanded Copy Pin option to copy the unique PINs associated with the user.
- A success notification can be seen at the top of the Manage Users page.
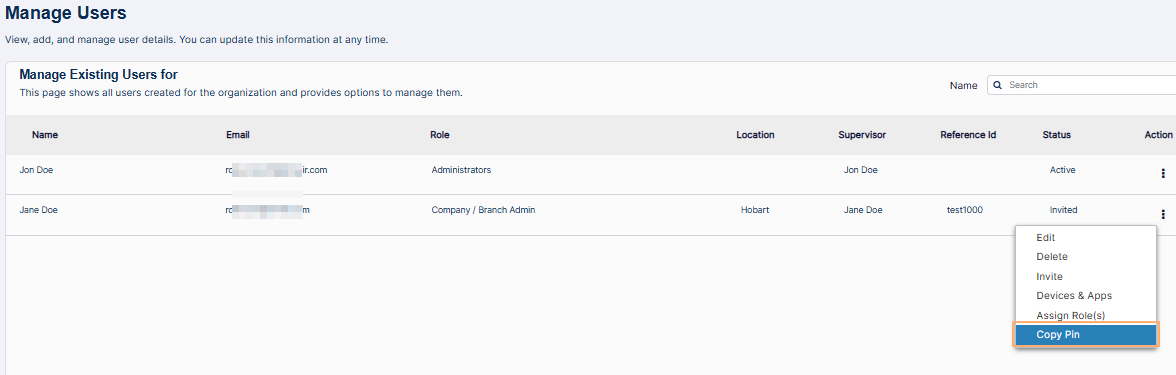 Fig: 53 - Copy Pin menu option
 Fig: 54 - View of success notification prompt
3.8. Completing Onboarding
Click on the Submit button to finalize the organization.
 Fig: 55 - Submit button
Get redirected to the SurgeONE login page. Your Firm / Organization setup is now complete.
 Fig: 56 - SurgeONE login page redirection after submission
Login again to land on the SurgeONE Dashboard.
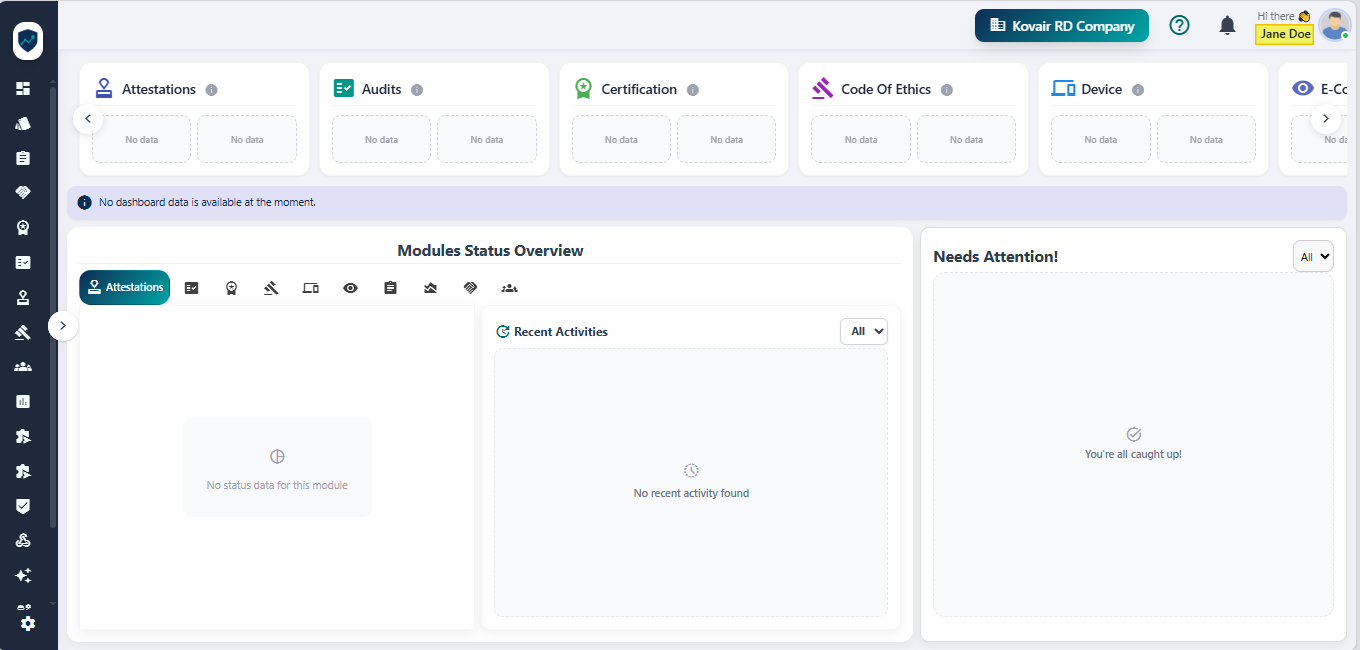 Fig: 57 - SurgeONE Dashboard view