
 This online help page is dedicated to the SurgeONE.ai Business Detail or Organizations List screen and its associated functionalities. Learn how to edit the parent organization, add sub-firms and manage the users.
The accessibility and functionalities of the different sections of this page are dependant on the role based access controls / permissions set for the logged-in user. For more details refer to the Roles online help.
1. Navigating to the Settings > Business Detail / Organizations List page
This action loads the Organizations List page, which displays a structured overview of all created organizations. The table includes key columns such as NAME, ADDRESS, and TYPE of business, offering users a clear snapshot of each entity. Additionally, the ACTIONS column features a vertical ellipsis icon that toggles a row-specific context menu, enabling quick access to management functions like editing or viewing details. This feature provides users with streamlined navigation, centralized access to organizational data, and efficient tools for administration and oversight - all within a clean, intuitive interface that supports operational clarity and decision-making.
Navigating to the Business Detail / Organizations List begins by selecting the Settings menu from the left panel and clicking on the Business Detail option.
The following screenshot displays the Organizations List page that loads.
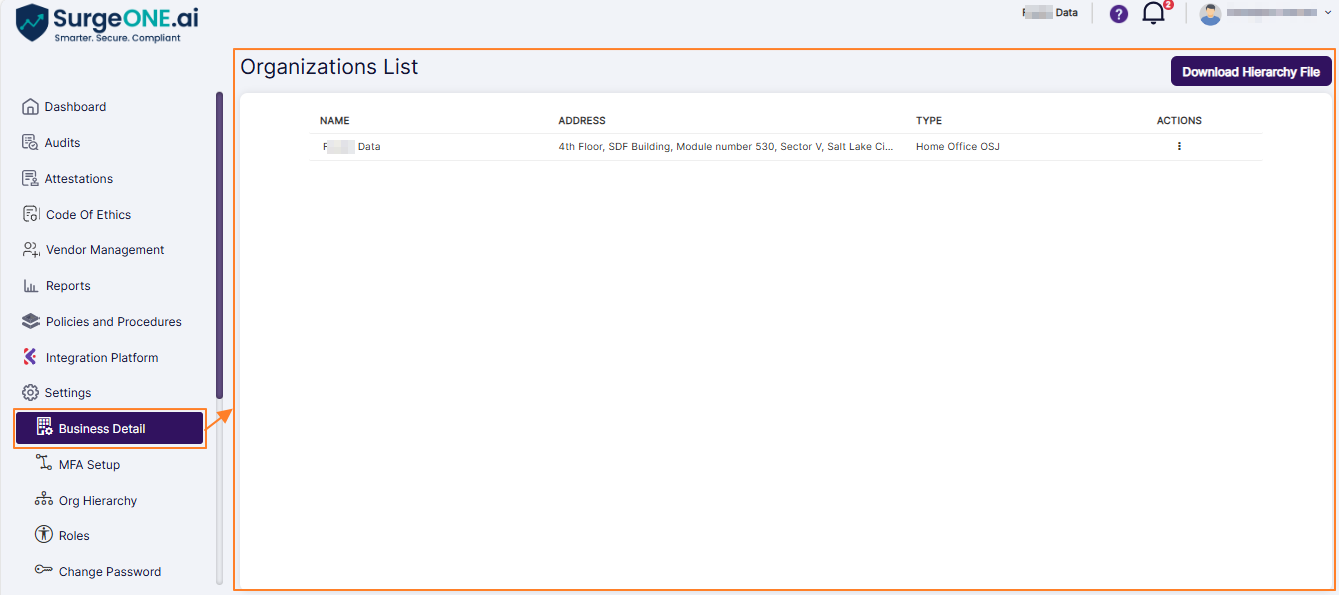
Fig: 1 - Business Detail / Organizations List
2. Editing Organization / Firm
The Editing Organization / Firm feature allows users to update business details initially provided during account setup. When expanded, this menu presents several options, including Edit. Selecting Edit opens the Edit Firm page, where the organization's current details are displayed. Users can then proceed to modify any necessary fields. Once all changes are made, clicking the Submit button ensures that the updated information is saved and reflected across the system, providing a seamless way to maintain accurate and up-to-date business records.
- You can edit the details of your business that you had provided at the time of initialization of your account. Click on the row context vertical ellipsis
 icon under the ACTIONS column.
 - Click on the expanded context menu option Edit. The Edit Firm page displays the organization details.
- Proceed to make changes to the field values as per the necessity. The following fields / page elements are present:
-
1Org NameEdit or replace the existing organization name and ensure the field is not blank because it is mandatory.
-
2Org Address DetailsEnter or update the organization address details and ensure the field is not blank because it is mandatory.
-
3Org TypeSelect the required organization type from the dropdown list and ensure a valid organization type is selected because it is mandatory. The dropdown contains the following options: Broker Dealer, RIA, Home Office OSJ, OSJ, Regional Office, Organization, and Branch. Only one option can be selected at a time.
-
4CountrySelect the required country from the dropdown list and ensure the selected country is correct. The dropdown contains the following options: USA, Canada, Mexico, and United Kingdom. Only one option can be selected at a time. Select a country to enable ZIP/Postal Code entry.
-
6Reset AllUse Reset All if the ZIP Code search needs to be cleared.
-
8StateField automatically gets auto-filled after selection of zip code search result or manual selection after using the Or Find State and City Manually option.
-
9CityField automatically gets auto-filled after selection of zip code search result or manual selection after using the Or Find State and City Manually option.
-
10ZIP CodeField automatically gets auto-filled after selection of zip code search result or manual selection after using the Or Find State and City Manually option.
-
11CurrencySelect the required currency from the dropdown list and ensure a valid currency is selected because it is mandatory.
-
12CRD NumberEnter or update the CRD number. This is an optional field and can be kept blank.
CRD Number stands for Central Registration Depository Number. It is a unique identification number assigned to a financial firm or individual registered with FINRA or securities regulators. It is commonly used to track broker-dealers, investment advisers, registered representatives, and related regulatory records. -
13Upload LogoUpload the firm logo file and ensure the file format is .png, .jpg, or .jpeg and the size is exactly 290 × 60 pixels. This is an optional field and can be kept blank.
-
14FINOPSelect the applicable FINOP from the dropdown list. This is an optional field and can be kept blank.
-
15CCOSelect the applicable CCO from the dropdown list. This is an optional field and can be kept blank.
- Click on the Submit button once done to store any modifications made.

Fig: 2 - Expanded view of row context menu toggled against an existing organization with no sub firms
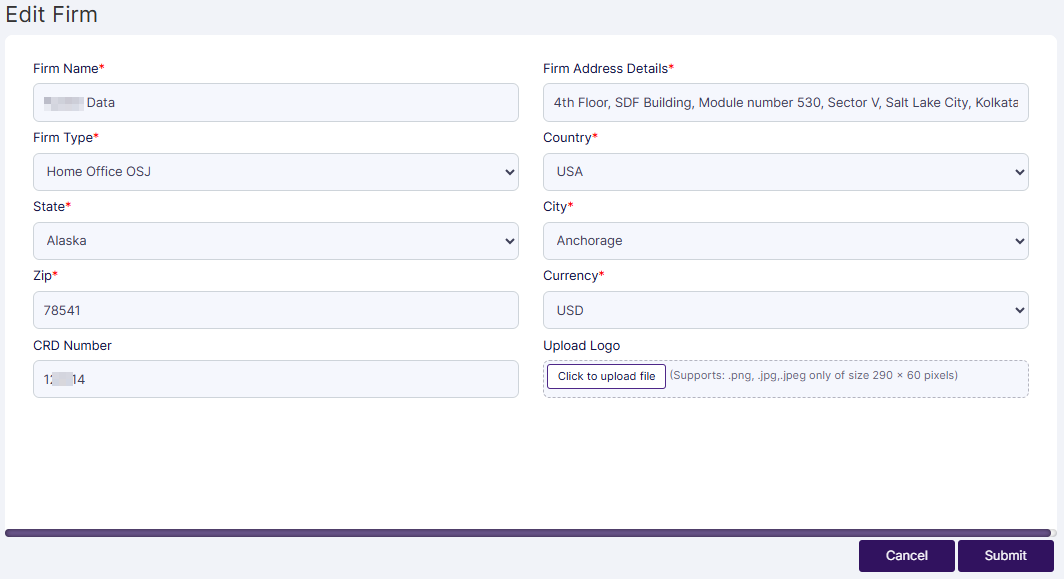
Fig: 3 - Edit Firm
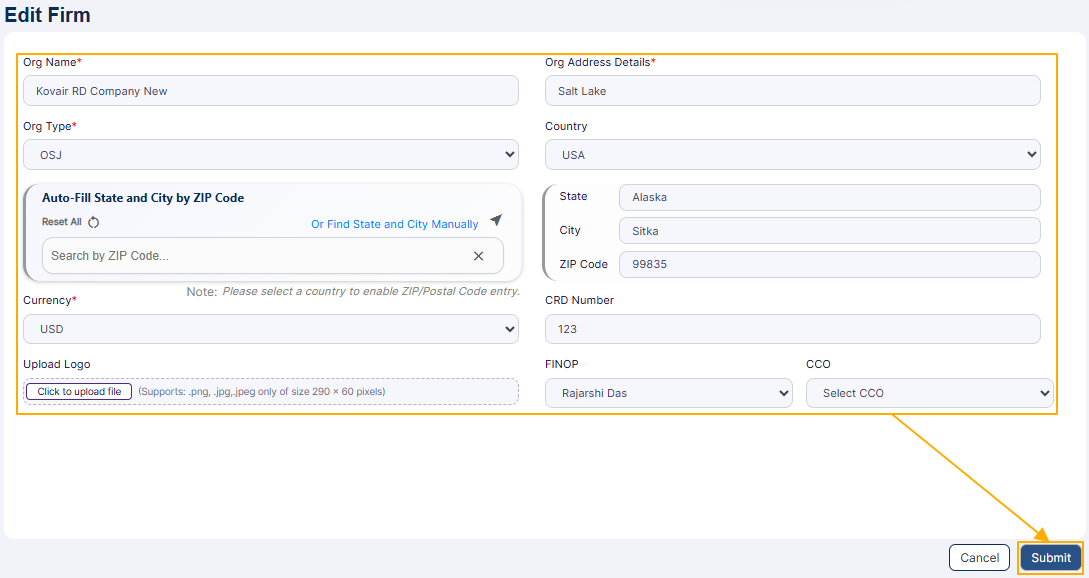 Fig: 4 - Saving changes made
2.1. Understanding the ''Auto-Fill State and City by ZIP Code'' Functionality
The Auto-Fill State and City by ZIP Code section allows the user to populate location details by entering a valid ZIP Code. Perform the following steps:
- Enter the ZIP Code in the Search by ZIP Code field. The country must be selected before that.
- Click on the search icon to retrieve the matching location details.
- If the ZIP Code is valid, selectable prompts are listed below the field. Select any one option.
- The system automatically fills the State, City, and ZIP Code fields, as well as the search bar with the same dataset.
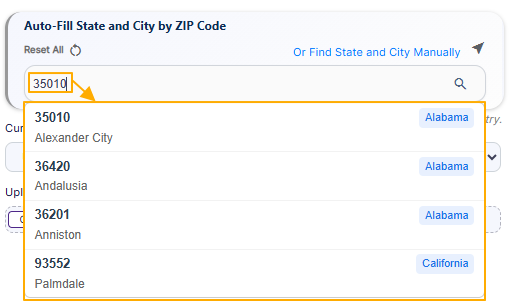 Fig: 5 - Prompted result after zip code-based search operation
 Fig: 6 - Autofilled location data
💡 TIP: Review the auto-filled location details and ensure the State, City, and ZIP Code are correct before submitting the firm details. You may use the Reset All option to clear the ZIP Code search and remove the auto-filled location details if required.
2.2. Understanding the ''Or Find State and City Manually'' Functionality
The Or Find State and City Manually option allows the user to select location details without using ZIP Code auto-fill. Use this option when the ZIP Code search does not return the required result or when the location needs to be selected manually. Perform the following steps:
- Click on the Or Find State and City Manually option. A modal window titled as Choose Manually loads.
- Select the applicable State and City using the respective dropdowns.
- Zip codes get suggested below the Zip field. Click on it (or the applicable one if multiple zip codes are prompted).
- Click the Save button. The modal window closes.
- The corresponding State, City and ZIP Code selection get auto-populated in the respective fields of the Edit Firm page.
 Fig: 7 - Loaded modal window view
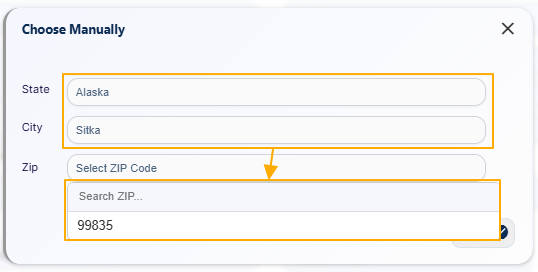 Fig: 8 - Suggested zip code based on state and city
If multiple zip codes are suggested, you can use the search bar to filter zip code(s).
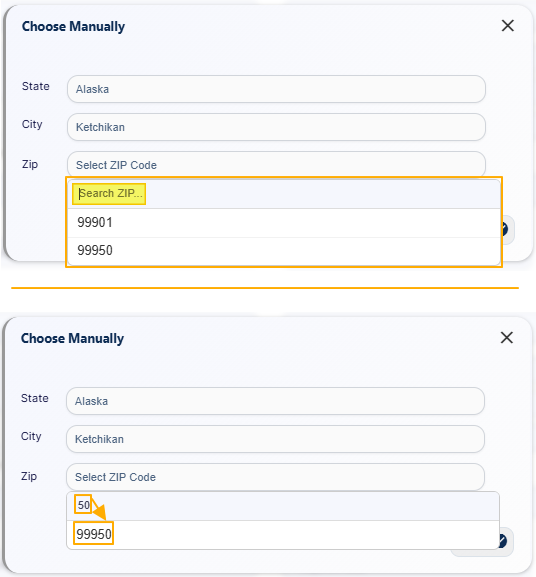 Fig: 9 - Search facility
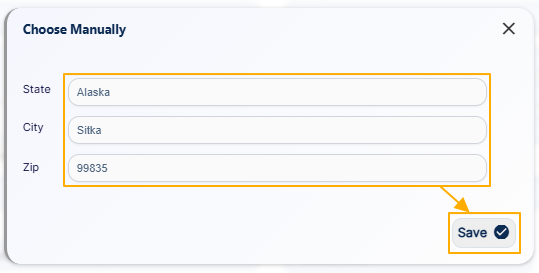 Fig: 10 - Saving the manual selections
 Fig: 11 - Manual selections getting reflected on the Edit Firm page
💡 TIP: Review the manually selected location details and ensure the State, City, and ZIP Code are correct.
3. Managing Users
To manage users within an organization, begin by navigating to the Organizations List and locating the desired entry. The Manage Users page displays a grid view of all users associated with the selected organization. Here, you can perform several user management tasks: create a new user, edit details of an existing user, invite users who have not yet been granted access to the SurgeONE platform, or delete users, provided they are not the currently logged-in user. This feature streamlines administrative control, ensuring that user access and roles within the organization remain accurate and up to date.
Click on the row context vertical ellipsis icon under the ACTIONS column. Click on the expanded context menu option Manage Users.
 Fig: 12 - Row context menu option Manage Users
The Manage Users page displays the created users of the organization.
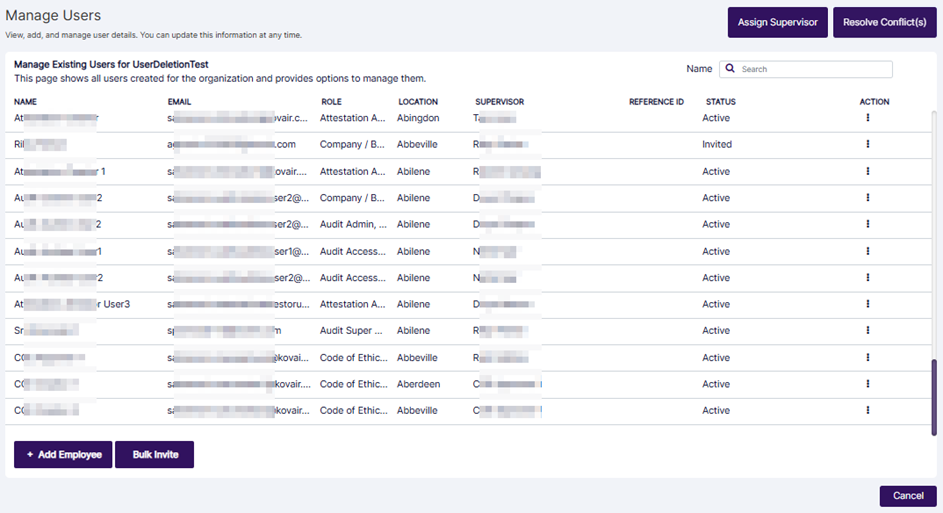
Fig: 13 - Manage Users
The grid view displays the list of existing users of the organization. You can create a new user, edit an existing user, or invite an existing user who is not yet invited to access the SurgeONE platform. You can also delete an existing user who is not the logged in user.
3.1. Creating New User / Employee
Creating a new employee profile in SurgeONE is a smooth and intuitive experience designed to simplify team onboarding. Just click the Add Employee button to launch the Create New Employee dialog box, where you’ll enter key details like name, email, city, ZIP code, and if applicable a supervisor or reference ID. The form is flexible, allowing optional fields while ensuring essential data is captured for seamless communication and access.
One standout feature is the assign roles functionality, which opens a dynamic role selection window. Here, you can choose one or more roles for the new employee, tailoring their access and responsibilities from day one. Once everything’s filled out, you have two options: Save to create the user and invite them later, or save and send activation link to instantly trigger an invitation email and get them started right away.
After saving, the new employee appears in the user grid, and a success notification confirms the action. From there, the row context menu offers quick access to edit, delete, invite, manage devices, or update roles, giving you full control over user management with just a few clicks. It is a smart, streamlined way to grow your team and keep your organization running smoothly.
Click on the Add Employee button.
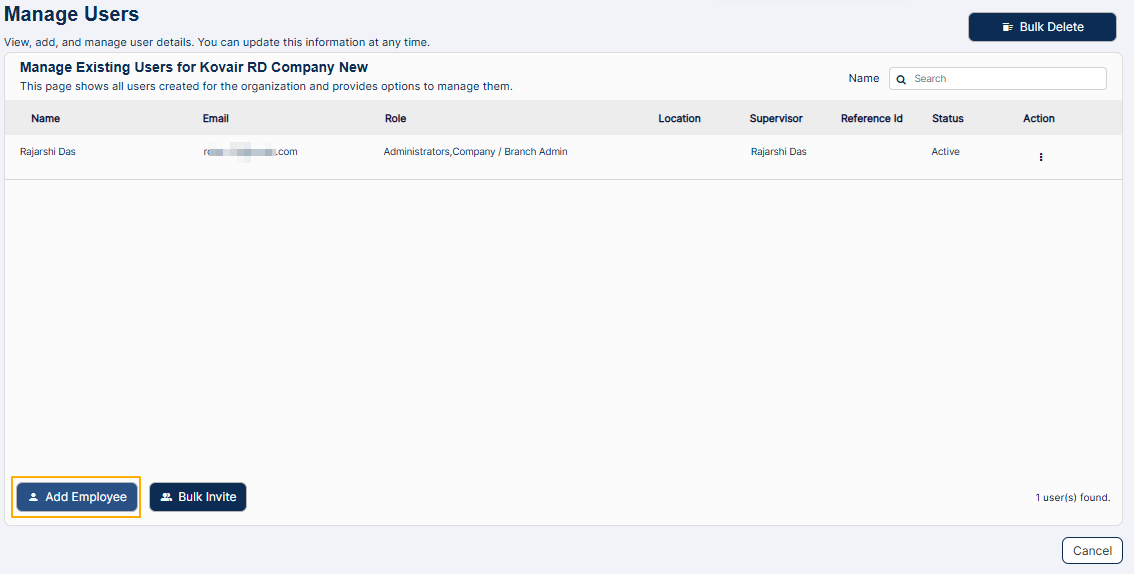 Fig: 14 - Add Employee button
The Create New Employee dialog box loads.
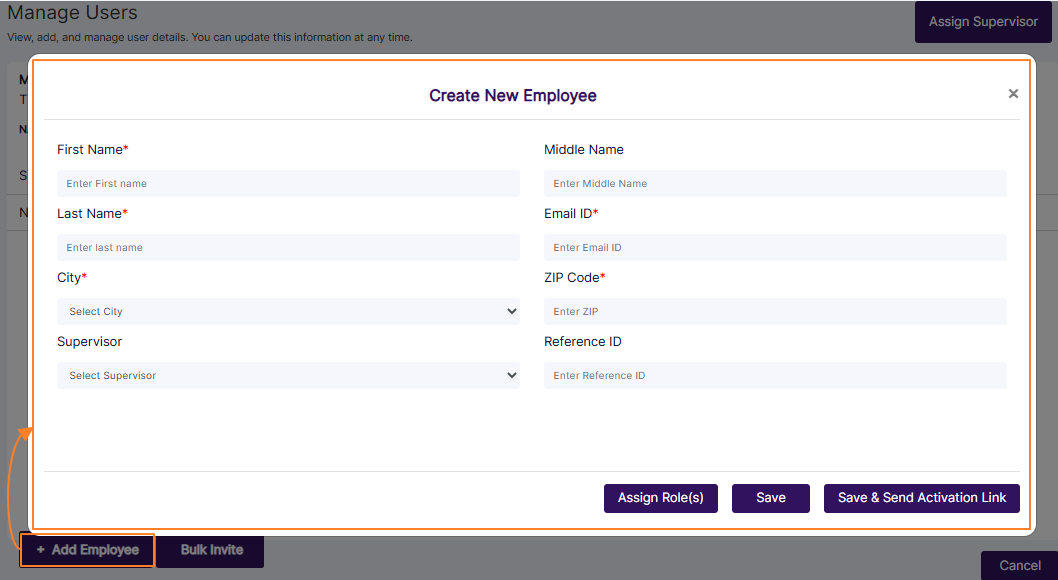 Fig: 15 - Create New Employee dialog box
The following fields are present.
-
1First NameEnter the first name of the employee. This is an optional field.
-
2Middle NameEnter the middle name of the employee.
-
3Last NameEnter the last name of the employee.
-
4Email IDEnter the valid email address of the employee. The invitation email will be sent at this address.
-
5SupervisorYou can select the current supervisor or manager of the employee. This is an optional field.
-
6CountrySelect the required country from the dropdown list and ensure the selected country is correct. The dropdown contains the following options: USA, Canada, Mexico, and United Kingdom. Only one option can be selected at a time. Select a country to enable ZIP/Postal Code entry.
-
7Auto-Fill State and City by ZIP CodeEnter the ZIP/Postal Code in the search field and use the search icon to load selectable, matching zip codes. On selection, State, City, and ZIP Code details are auto-filled in this field, as well as in the State, City and Zip Code fields to its right.
-
8Reset AllUse Reset All if the ZIP Code search needs to be cleared.
-
9Or Find State and City ManuallyUse the manual option when State and City need to be selected without ZIP Code auto-fill. Use this option when you are unsure about the correct zip code.
-
10StateField automatically gets auto-filled after selection of zip code search result or manual selection after using the Or Find State and City Manually option.
-
11CityField automatically gets auto-filled after selection of zip code search result or manual selection after using the Or Find State and City Manually option.
-
12ZIP CodeField automatically gets auto-filled after selection of zip code search result or manual selection after using the Or Find State and City Manually option.
-
13Reference IDYou may enter any relevant reference identifier of the employee if it is available. This is also an optional field.
Proceed to perform the following steps to create a new employee:
- Enter the name of the employee in the First Name, Middle Name and Last Name fields.
- Enter a valid email address in the Email ID field.
- Select the country in the Country dropdown. The Auto-Fill State and City by ZIP Code section is disabled till a country is selected.
- You can select the current supervisor or manager of this new employee using the Supervisor dropdown.
- Enter the ZIP Code in the Search by ZIP Code field. The country must be selected before that.
- Click on the search icon to retrieve the matching location details.
- If the ZIP Code is valid, selectable prompts are listed below the field. Select any one option.
- The system automatically fills the State, City, and ZIP Code fields, as well as the search bar with the same dataset.
- Click on the Find State and City Manually option. A modal window titled as Choose Manually loads.
- Select the applicable State.
- Select the applicable City using the respective dropdown. City options are populated in the dropdown based on the State selection done in the previous step.
- Zip codes get suggested below the Zip field. Click on it (or the applicable one if multiple zip codes are prompted).
- Click the Save button. The modal window closes.
- The corresponding State, City and ZIP Code selection get auto-populated in the respective fields of the Edit Firm page.
- You may enter any relevant reference identifier of the employee in the Reference ID field, if it is available. It is an optional field.
- You need to click on the Assign Role(s) button and assign at least one role to this new employee.
- Proceed to select the current role or designation of this new employee using this button. Here is a view of the modal window which loads displaying the various roles which are listed. You can select multiple roles using the respective checkboxes against those. After selecting at least one role checkbox, click on the right arrow button to move the selected role to the Assigned Roles area from the Available Roles area. More details on roles has been mentioned in this user guide.
- Click on the Done button once selection(s) are made in this modal window.
- Click on either one of the Save or the Save & Send Activation Link button to save this new employee, as explained below:
- If you click on the Save button, then the user gets created and needs to be invited for the invitation email to get triggered from the system.
- If you click on the Save & Send Activation Link button, then the user gets created.
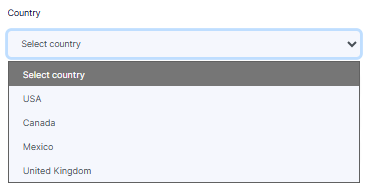 Fig: 16 - Country dropdown
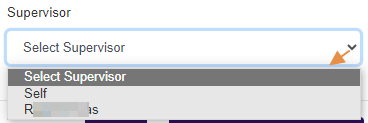 Fig: 17 - Supervisor dropdown
The Auto-Fill State and City by ZIP Code section allows the user to populate location details by entering a valid ZIP Code. Perform the following steps:
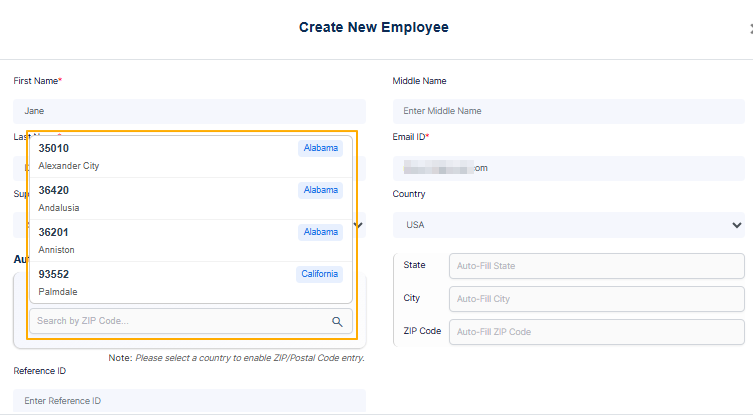 Fig: 18 - Prompted result after zip code-based search operation
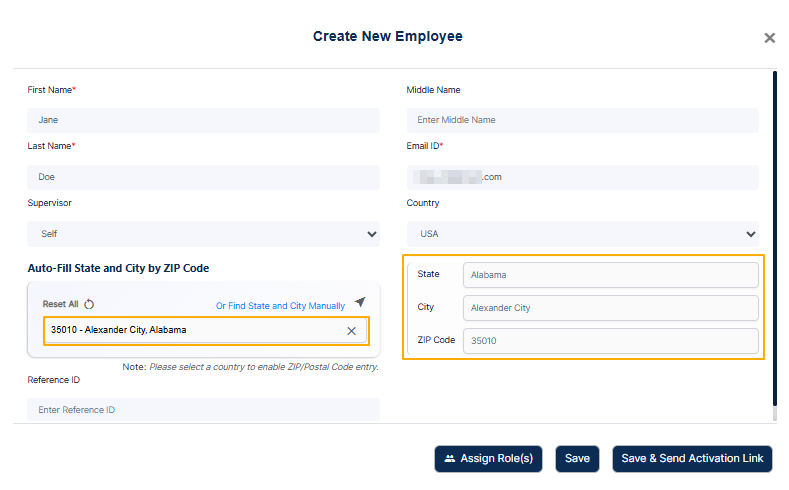 Fig: 19 - Autofilled location data
You can click on the Reset All option to reset the selections done in the location fields.
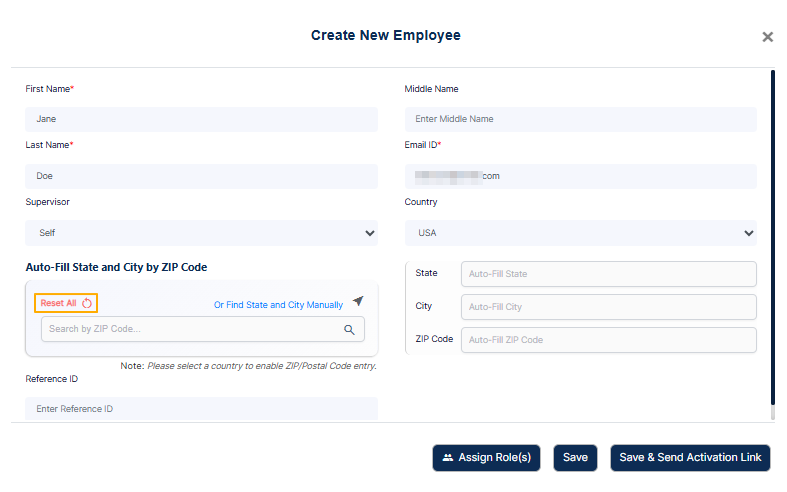 Fig: 20 - Reset All option
The Find State and City Manually option allows the user to select location details without using ZIP Code auto-fill. Use this option when the ZIP Code search does not return the required result or when the location needs to be selected manually. Perform the following steps:
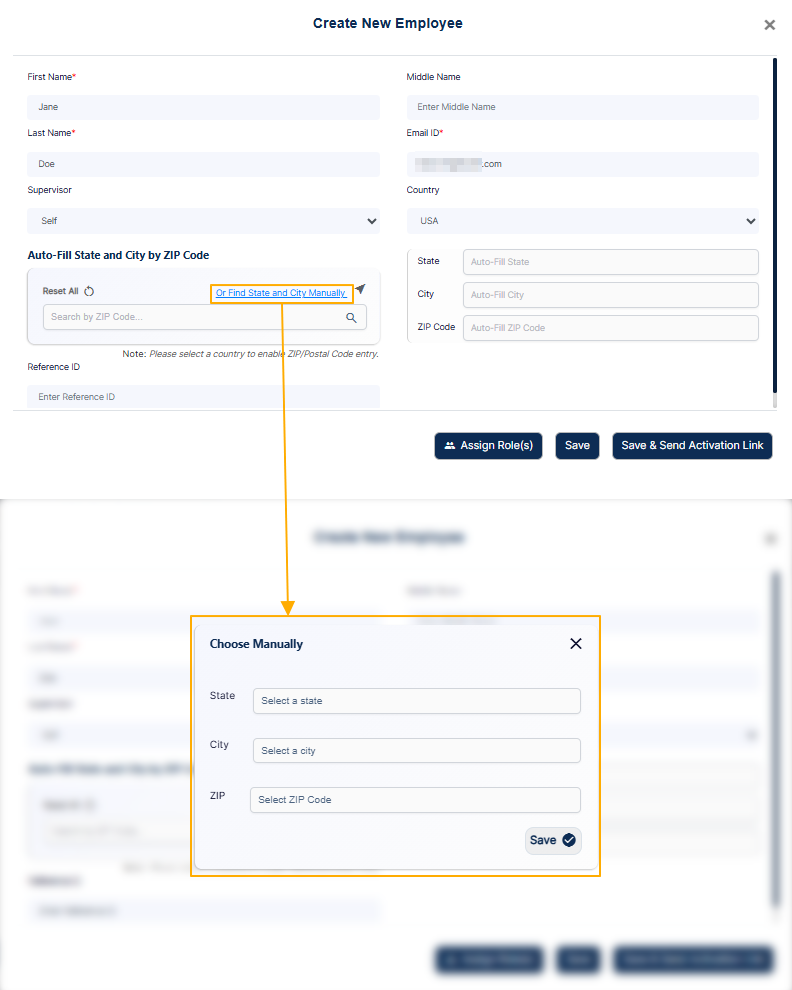 Fig: 21 - Loaded modal window view
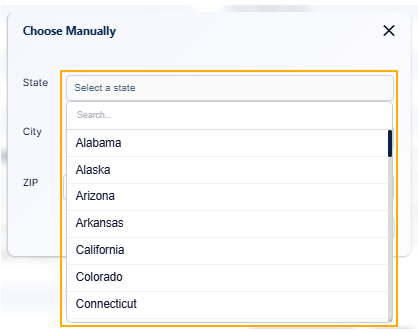 Fig: 22 - State dropdown view
 Fig: 23 - City dropdown view
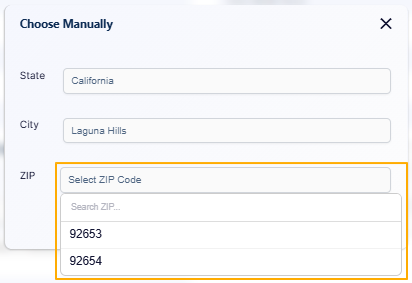 Fig: 24 - Suggested zip code based on state and city
If multiple zip codes are suggested, you can use the search bar to filter zip code(s).
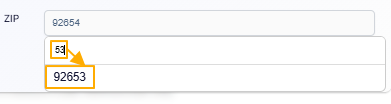 Fig: 25 - Search facility
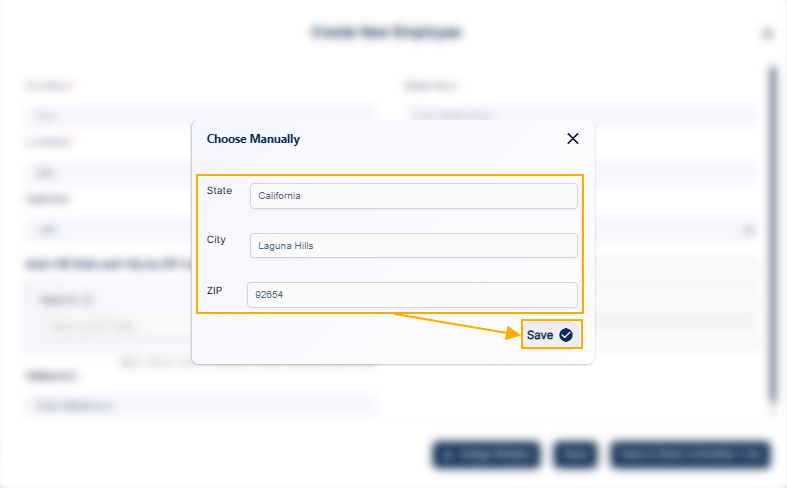 Fig: 26 - Saving the manual selections
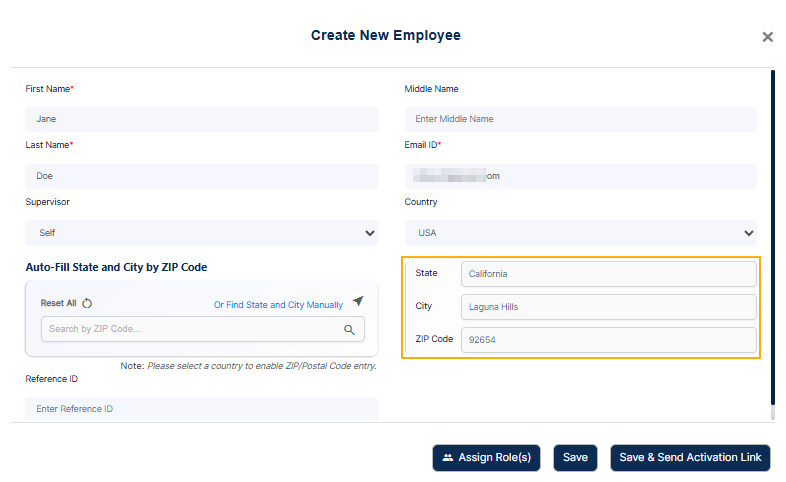 Fig: 27 - Manual selections getting reflected on the Edit Firm page
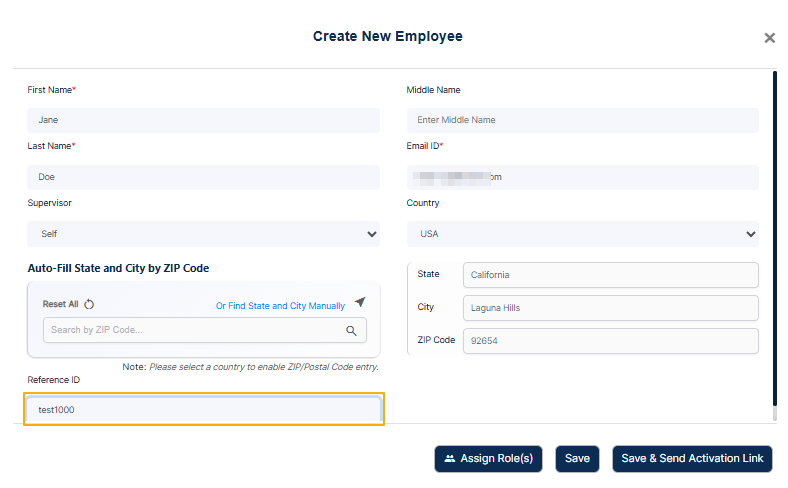 Fig: 28 - Reference ID field
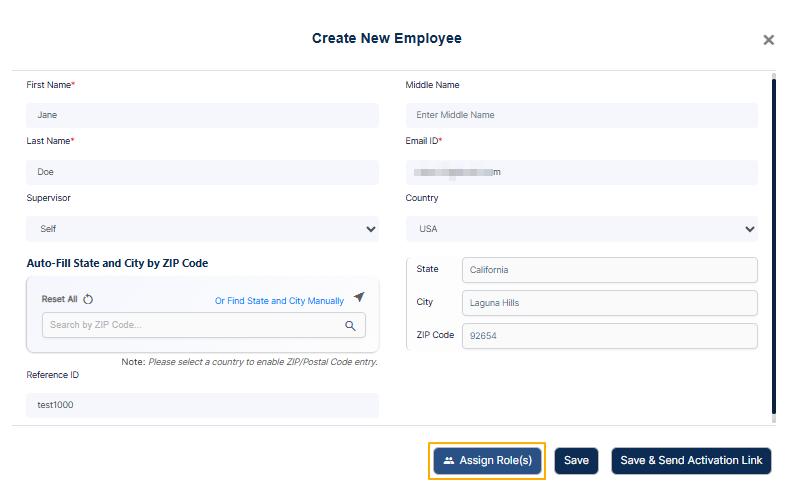 Fig: 29 - Assign Role(s) button
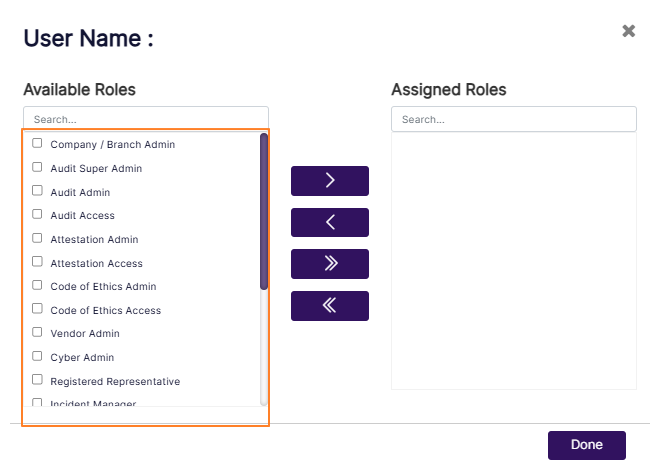 Fig: 30 - Role selection modal window
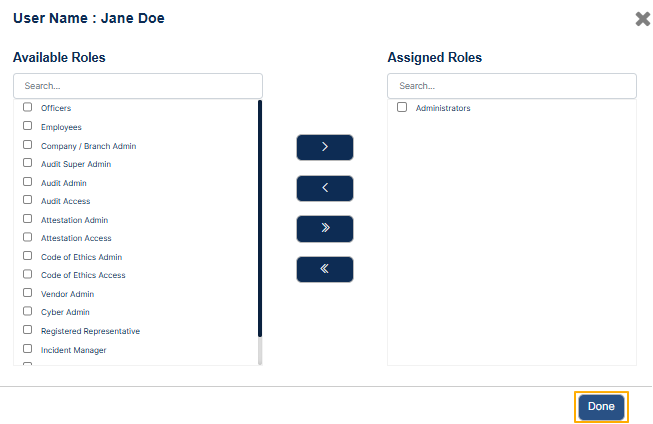 Fig: 31 - Saving role assignment done
Here is the view of the new employee details populated in the respective fields.
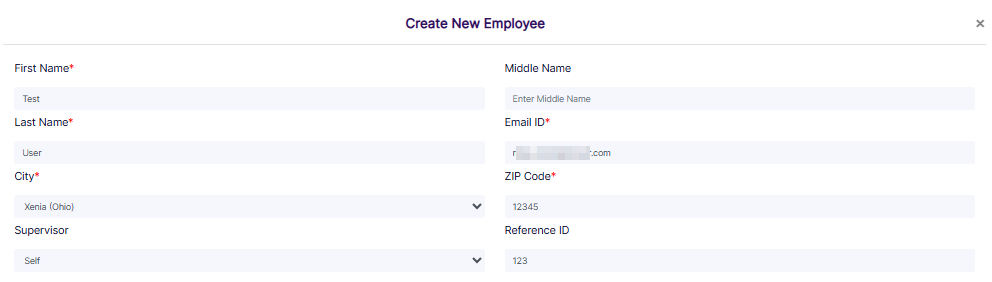 Fig: 32 - New Employee details populated
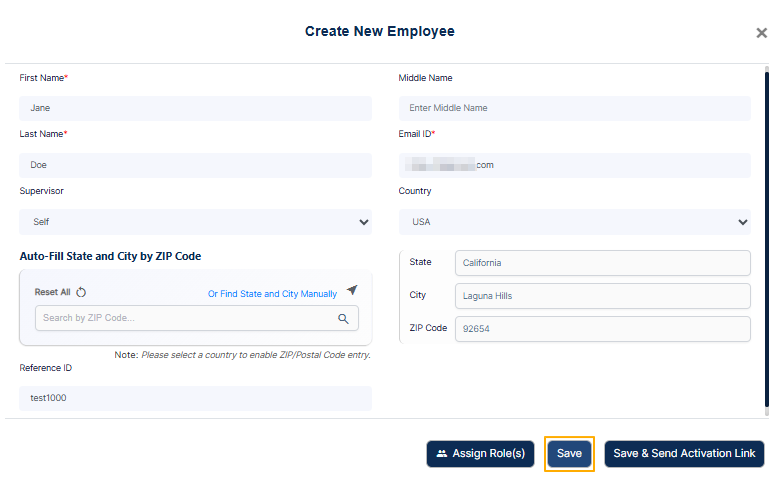 Fig: 33 - Save button
A success notification gets triggered after you get redirected to the Manage Users page. The newly created employee can be found within the grid view.
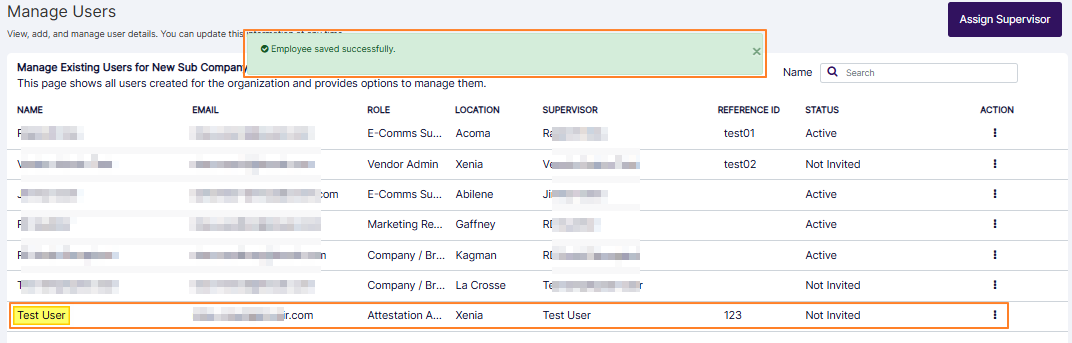 Fig: 34 - Success notification
The invited user can set password and login to SurgeONE.ai. The new user details get listed in the grid view and can be invited later on. Here is the view of the user account's row-context menu options (which is created using the Save button). The row context menu (toggled using the vertical ellipsis icon) displays Edit, Delete, Invite, Devices & Apps, Assign Role(s), Copy Pin, and Affiliate Companies options.
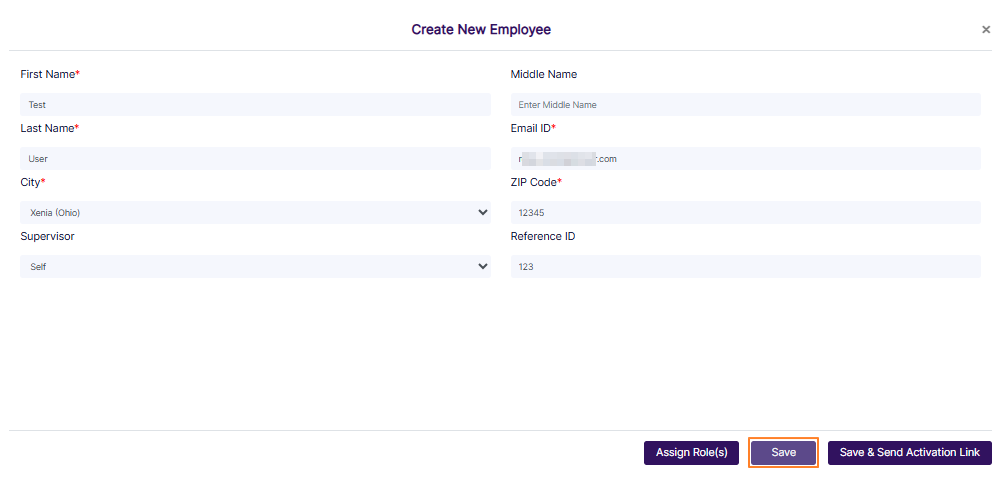 Fig: 35 - Row context menu options of the created employee
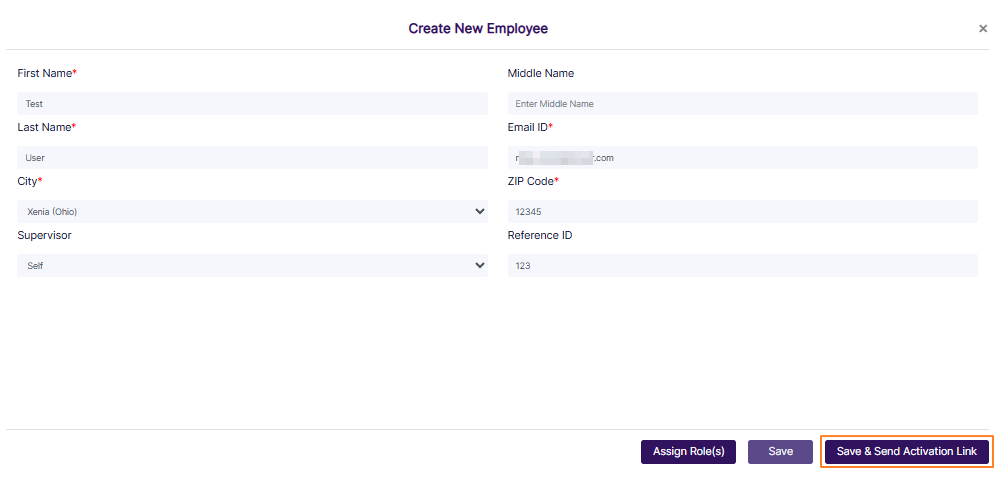 Fig: 36 - Save & Send Activation Link button
The new user details also get listed in the grid view. The invitation email is triggered from the system. After the mail is triggered a success notification can be seen as Mail sent successfully.
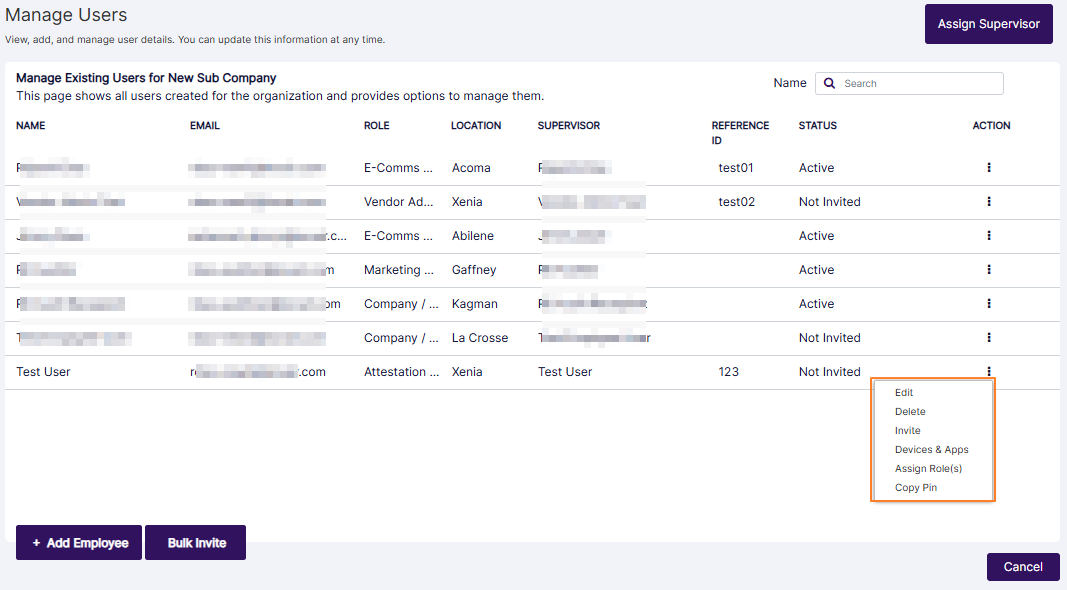 Fig: 37 - User listed and success message displayed
The row context menu (toggled using the vertical ellipsis icon) displays Edit, Delete, Re-send Invite, Devices & Apps, Assign Role(s), Copy Pin, and Affiliate Companies options.
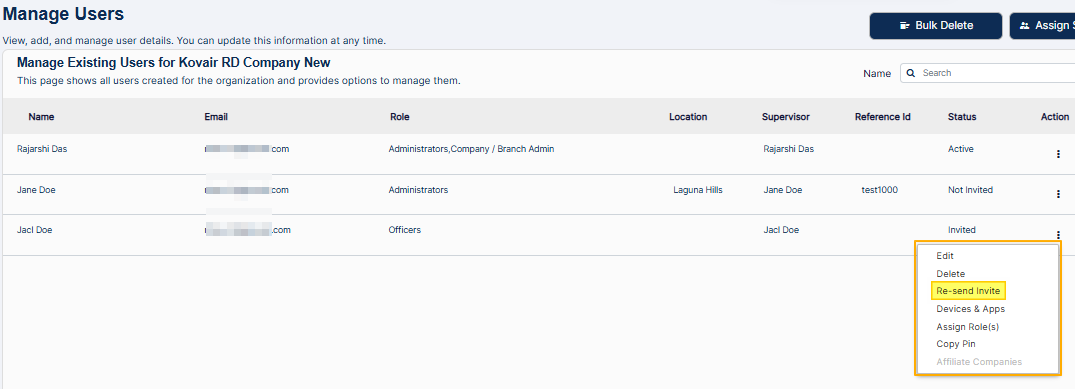 Fig: 38 - Row context menu options of this created employee
 NOTE:
NOTE:
- The following screenshot shows the various field validations that are implemented for creating the new employee.
- Here is the view of the validation employed in role assignment modal window.
- Here is the view of the triggered email after user creation.
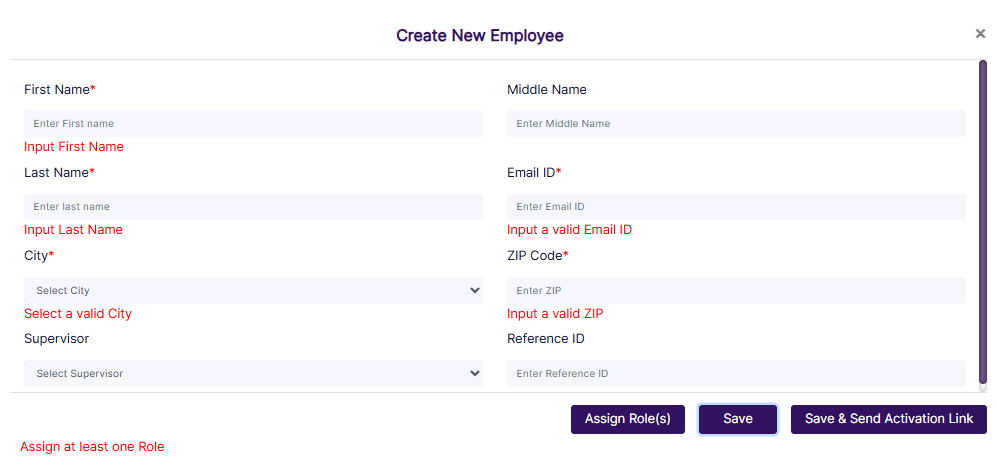 Fig: 39 - Field validations
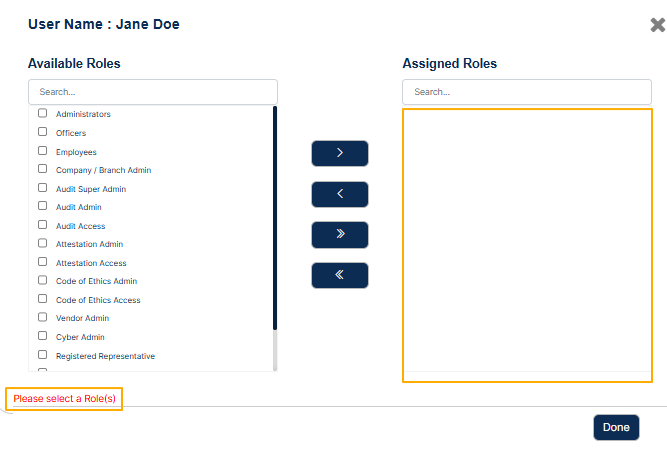 Fig: 40 - Role assignment validation
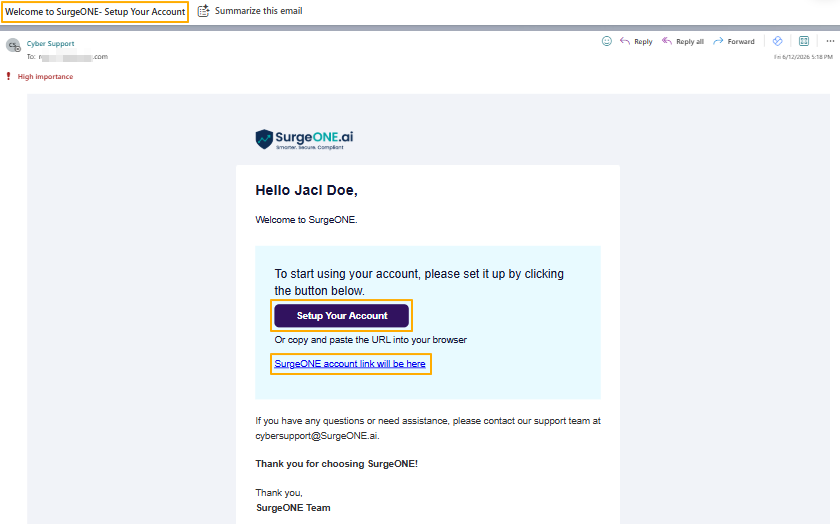 Fig: 41 - Triggered email view
3.2. Editing User / Employee
Updating employee details in SurgeONE is refreshingly simple and designed to keep your team data accurate with minimal effort. Just head to the Manage Users grid, click the vertical ellipsis under the ACTION column, and select Edit from the context menu. This opens the Edit Employee dialog box, where all existing information is pre-filled for easy review. You can tweak any field—except the Email ID, which stays locked to preserve account integrity.
Once your updates are in place, hit Save to store the changes. If the employee has not been invited to join SurgeONE yet, you will also see a button to save and send the activation link. This option not only saves your edits but also sends an invitation email, getting the user onboard instantly. Whether you are refining roles, updating locations, or prepping a new team member for onboarding, editing existing users in SurgeONE is built for speed, clarity, and control.
You can edit the details of a created employee. Click on the row context Edit menu after clicking on the vertical ellipsis icon displayed under the ACTION column.
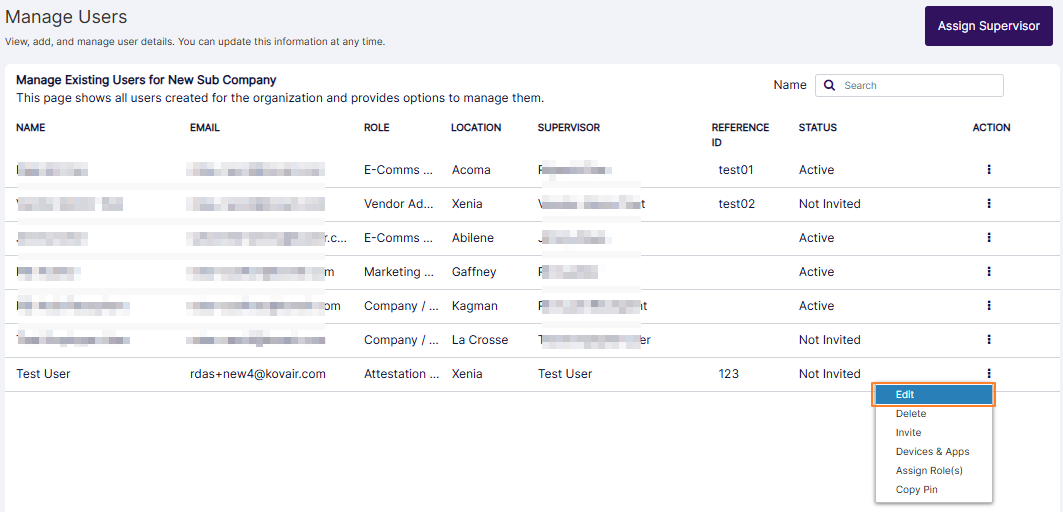 Fig: 42 - Edit option of the row context menu
Here is the view of the Edit Employee modal window. You can make your changes in all the fields, except for the email address.
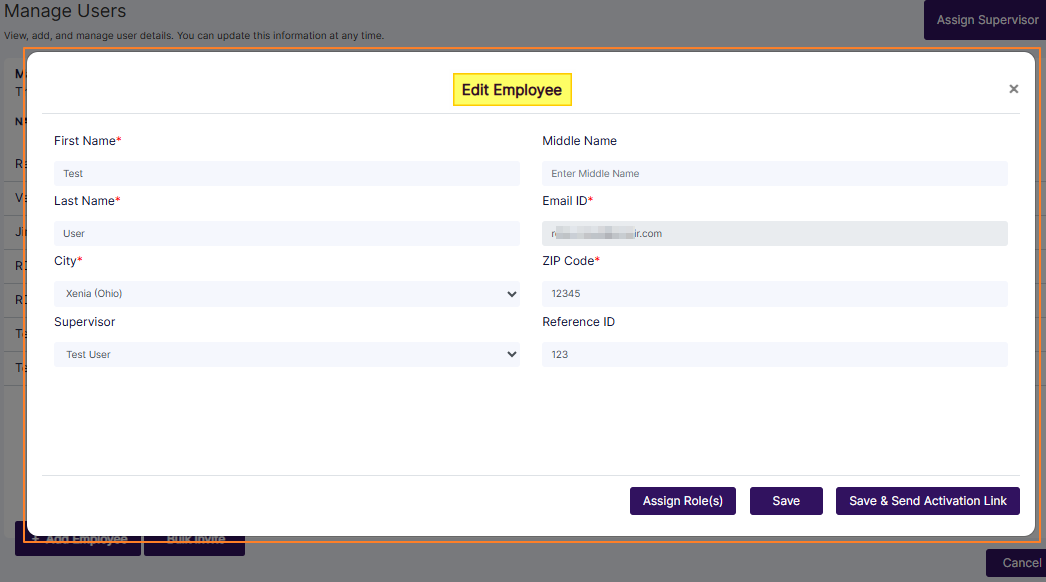 Fig: 43 - Edit Employee modal window
NOTE: The existing employee details are populated and can be edited, except for the Email ID field, which is a read-only field.
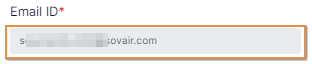 Fig: 44 - Email ID field cannot be edited
If you click on the Save button, then the user details get stored.
The Save & Send Activation Link button is present when the user is created in the system but is yet to be invited to access SurgeONE.ai. After you click on it the user details get stored as modified in this modal window, and the invitation email is triggered from the system.
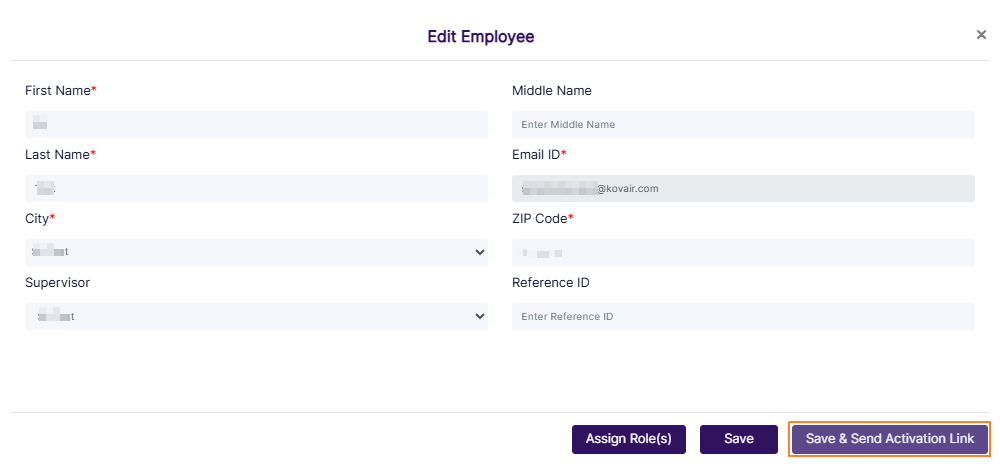 Fig: 45 - Presence of the Save & Send Activation Link button while editing a non-invited user
3.3. Deleting User / Employee
The user deletion feature in SurgeONE.ai is a critical tool for maintaining organizational integrity during role transitions, employee exits, or structural changes. It ensures that user accounts are managed responsibly, with safeguards in place to protect ongoing workflows and prevent disruption.
Key features include easy access to delete users from the Manage Users page, and an automatic check for pending tasks that blocks deletion if unresolved responsibilities exist. A pop-up highlights any outstanding items, while a confirmation prompt prevents accidental deletions. The system applies smart role-based handling, distinguishing between regular users and supervisors to ensure subordinates are reassigned before deletion. After removal, users are excluded from dropdowns and selection lists for clean data management.
Method #1: Deleting a Single User
1. Where to Find the Delete Option
With the help of the functional Delete menu option of this page (toggled by clicking on the ellipsis icon under the ACTION column), a SurgeONE.ai Platform user can delete other users.
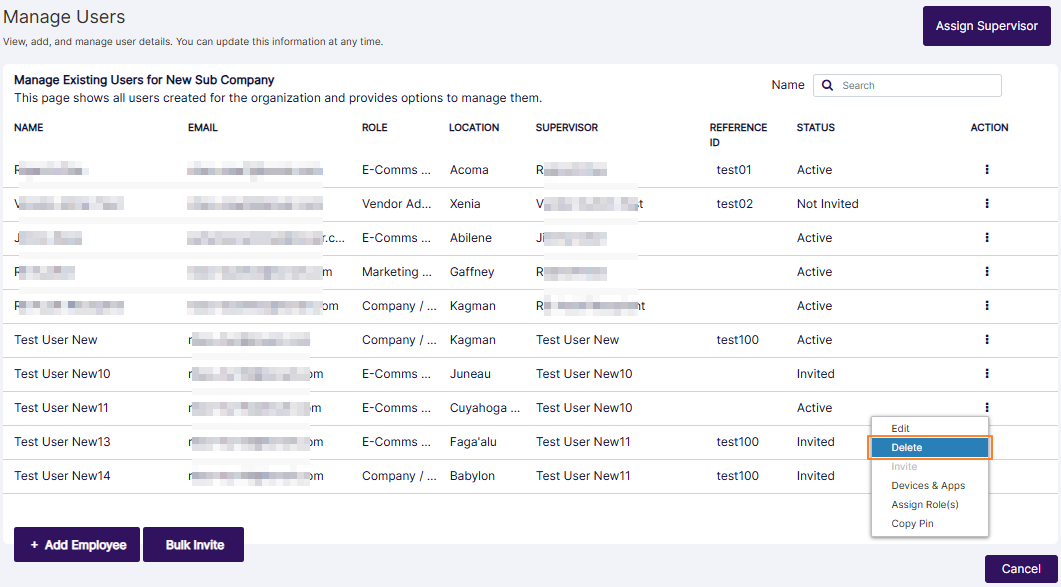 Fig: 46 - Delete menu option
NOTE: To navigate to this Manage Users page, use the Manage Users menu option of the Business Details page (after clicking on the ellipsis icon under the ACTION column).
2. What Happens When You Click Delete Option
A confirmation modal loads prompting the Do you want to delete? text, where there are two options displayed below it, labeled as Yes and No. You need to click the former to proceed with this new user deletion workflow.
 Fig: 47 - Delete confirmation modal
3. Automation Workflow Runs for User Profile Deletion
Before the system allows user deletion, it first checks if the user has any open or pending tasks across different modules. These include:
| Sl. No. | Field / Section Label | Description and Benefit |
|---|---|---|
| Audits |
This section determines whether the user is associated with audits either as an Auditor or a Recipient.
Benefit: Improves audit tracking and ensures the right users are engaged in audit processes. |
|
| Attestations |
This section checks whether the user is assigned as an Attestor or a Creator for attestations.
Benefit: Enhances accountability and ensures timely completion of attestation tasks. |
|
| Code of Ethics |
This section verifies whether there are any pending Code of Ethics items assigned to the user.
Benefit: Promotes adherence to ethical standards and ensures timely resolution of pending items. |
|
| Vendor Assessments |
This section identifies whether the user has created vendor assessments.
Benefit: Improves transparency and accountability in vendor management processes. |
|
| Marketing Review |
This section determines whether the user has uploaded marketing content or is assigned as an approver with pending reviews.
Benefit: Streamlines review cycles and ensures timely approval of marketing materials. |
|
| Incident Management |
This section evaluates whether the user is assigned to incidents (with status as Assigned) or holds the role of Incident Manager.
Benefit: Ensures proper assignment and faster resolution of incidents. |
3. A. When There Are Open Items
If the user you are trying to delete still has unresolved tasks, the system will automatically block the deletion to prevent any operational disruption or data loss. You will get prompted with a clear and informative Open Items modal window that lists all pending responsibilities, for you to know exactly which tasks need attention. These identified items cannot be resolved from here and must be done from the respective module(s), before you can again try to delete this user. This process helps maintain accountability, protects workflow integrity, and gives you full control over user transitions.
Consider the following screenshot as a example of a prompted Open Items modal window that lists a pending attestation activity. Click on the OK button to close the modal window and proceed to complete the assignment first, before trying to delete this user from the UI.
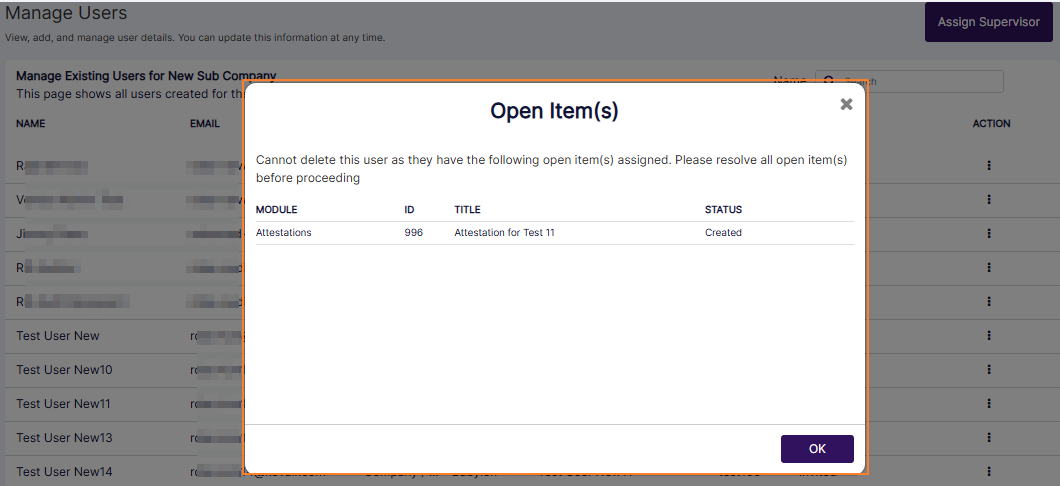 Fig: 48 - Open Item(s) modal window
3. B. When There Are No Open Items
If no open items exist, then the system checks for other existing users who have this user (user who is being deleted) as their supervisor.
4. A. When There Are No Open Items and the User Manages Other Members / Is Marked as Supervisor of Other Members
If the user you are trying to delete is a Supervisor - meaning they manage other team members, the system will automatically launch a Transfer Subordinates workflow before allowing deletion. This step ensures that no team members are left without oversight. The following screenshot displays once such use case, where the user (Test New User11) is set as supervisor of two other users (Test New User13 and Test New User14).
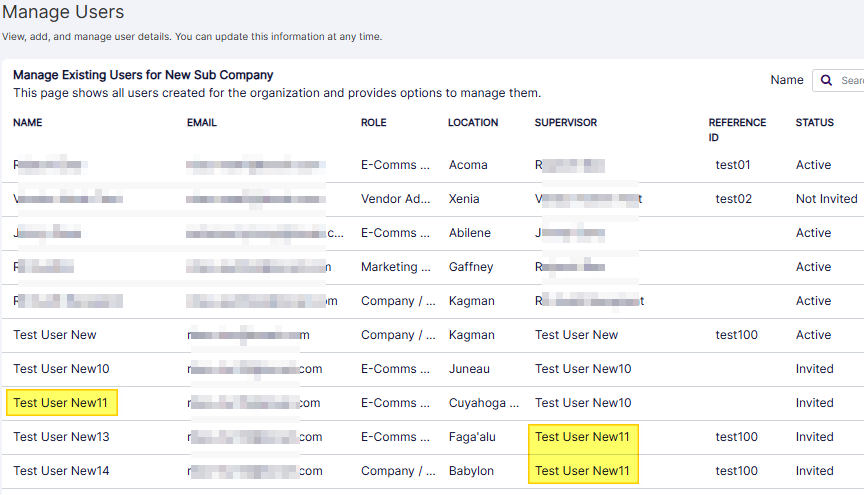 Fig: 49 - Deleting a user who is set as supervisor of other users
You will be guided through a simple process to reassign the supervisor's direct reportees to another eligible user, keeping your organizational structure intact and avoiding any disruption to ongoing work. It is a thoughtful safeguard that helps maintain team continuity and ensures that responsibilities are smoothly handed over before the supervisor is removed from the system.
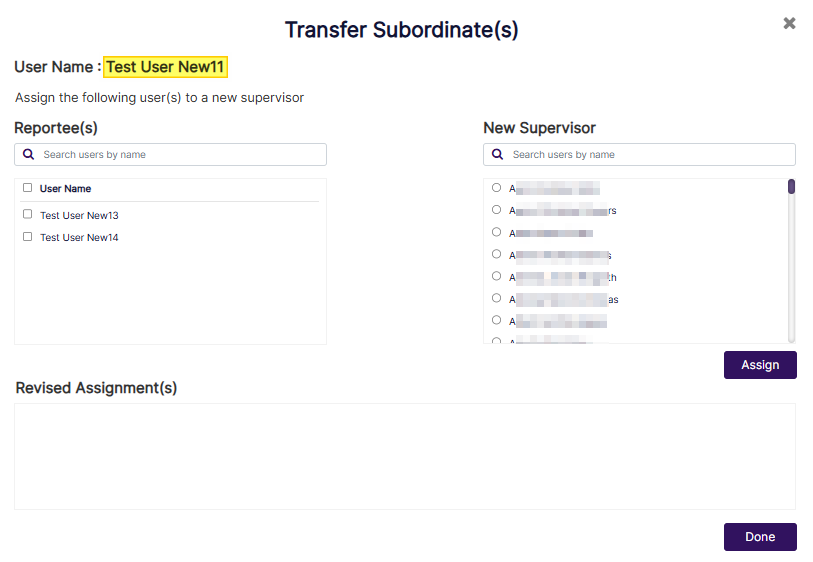 Fig: 50 - Transfer Subordinate(s) modal window
To transfer subordinates from within the prompted Transfer Subordinate(s) modal window, select the checkbox(es) against the Reportee(s) section users and then click on the radio button against any listed user under the New Supervisor section. The users who have the user being deleted as their supervisor are displayed on the left panel. Any other users who can be set as the new supervisor (inlcuding self) are displayed on the right panel.
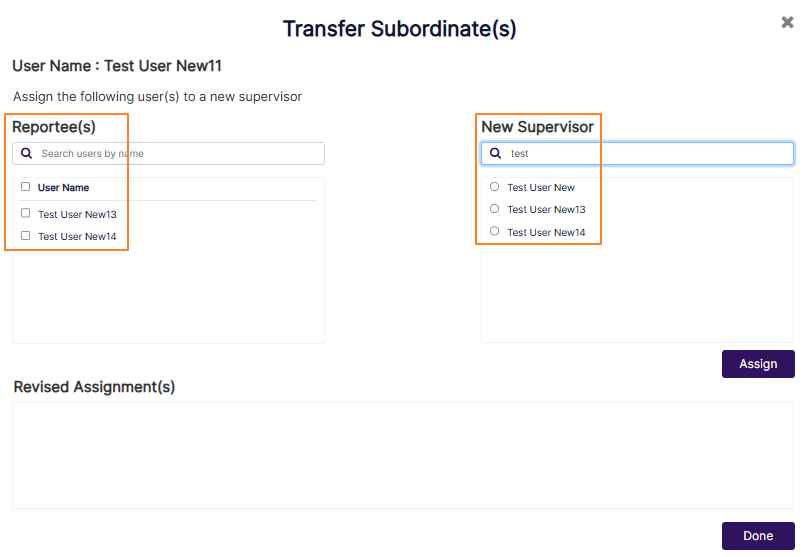 Fig: 51 - Checkbox, search bar and radio button options
Click on the Assign button to set the chosen selection(s).
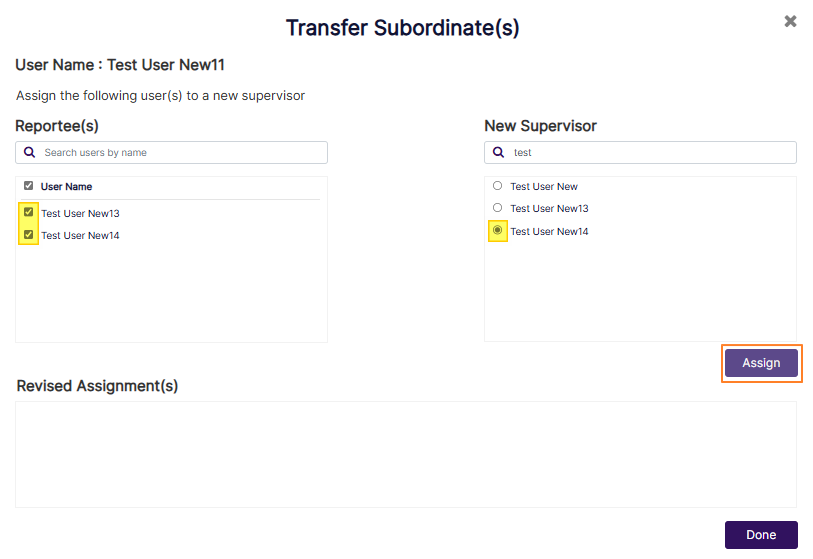 Fig: 52 - Clicking on the Assign button after selections
The assignment made is visible in the Revised Assignments section.
 Fig: 53 - Revised Assignments section showing assignment made
You can also remove and assignments made. To do so hover your mouse pointer over the row entry of the Revised Assignments section and click on the displayed Delete option.
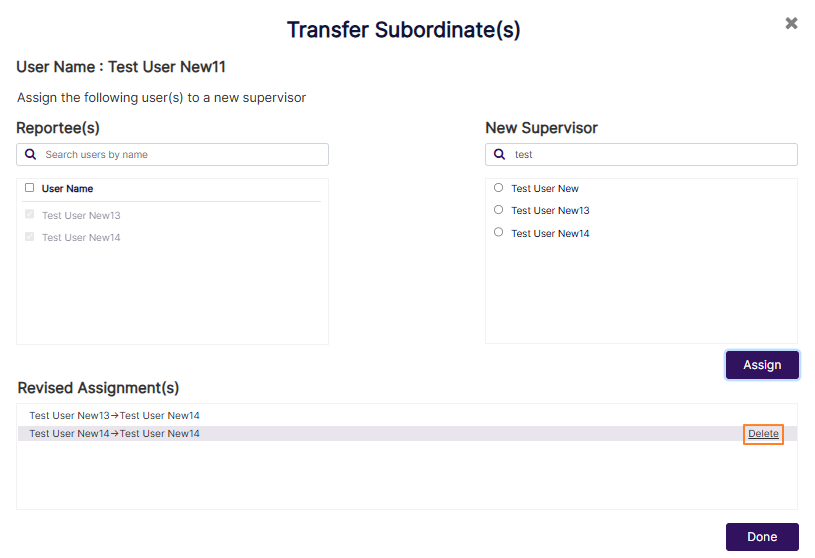 Fig: 54 - Delete option to remove any assignments made prior to confirmation
Click on the Done button to confirm. This sets the new chosen supervisor to selected users.
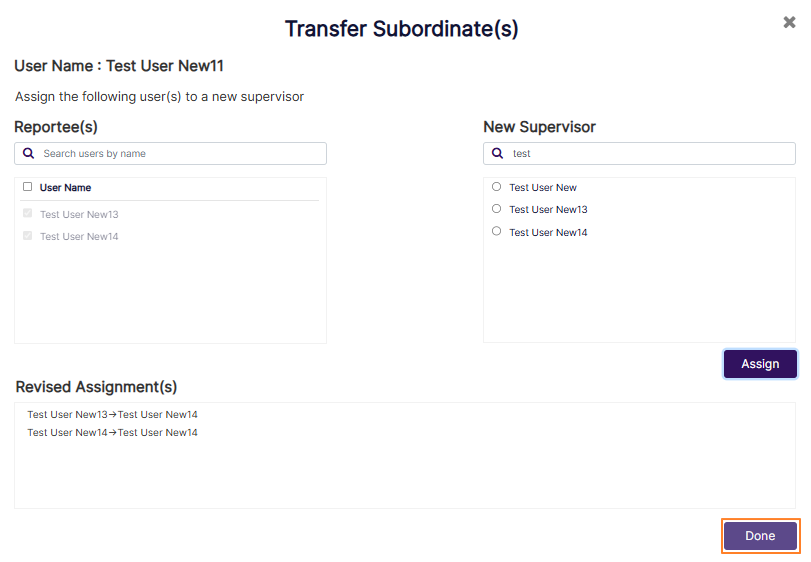 Fig: 55 - Done button to confirm the assignments made to set a new supervisor to selected users
The modal window closes. The user gets removed from the grid view of the Manage Users page. The assigments made to set new supervisor also gets displayed in the grid view against the row entries of selected user(s). A success notification gets prompted at the top.
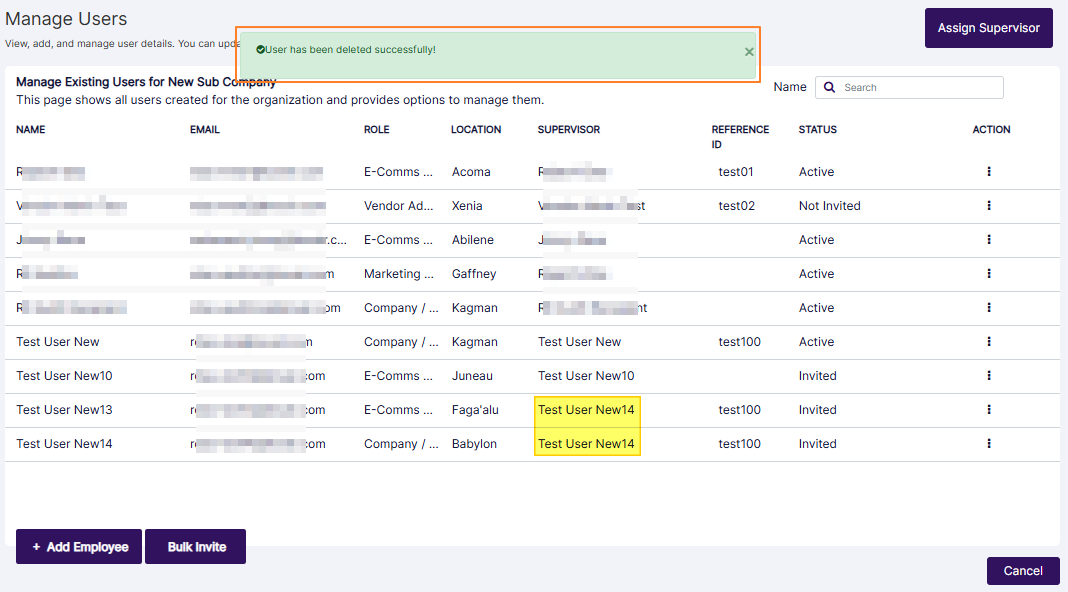 Fig: 56 - View of the success notification and the new supervisor assignments made
4. B. When There Are No Open Items and the User Has No Subordinates Under Him / Her
You can click on the row context vertical ellipsis icon and on the Delete menu option.
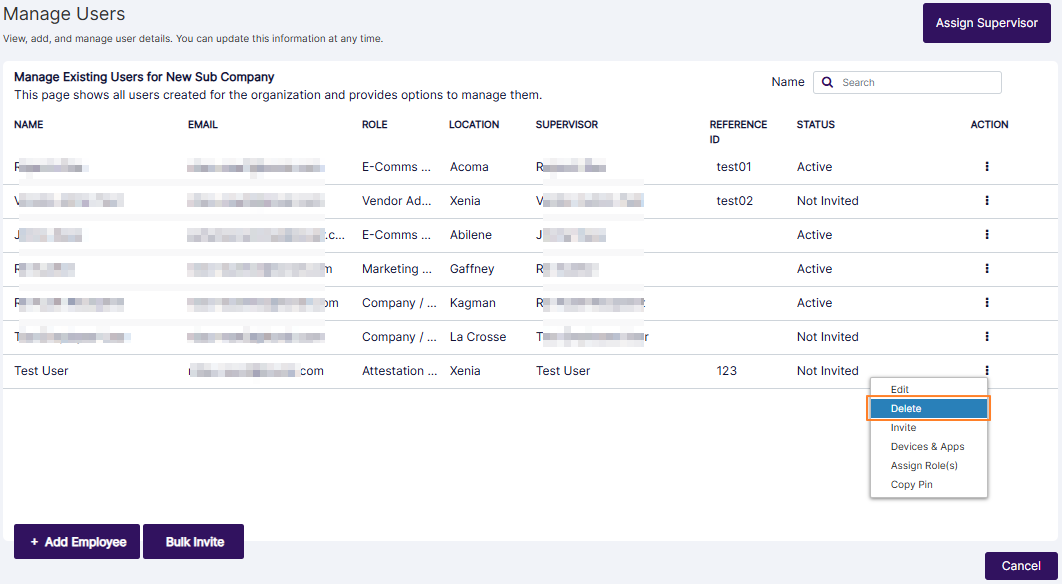 Fig: 57 - Delete option of the row context menu
A confirmation modal loads prompting the Do you want to delete? text, where there are two options displayed below it, labeled as Yes and No. You need to click the former to proceed with this new user deletion workflow.
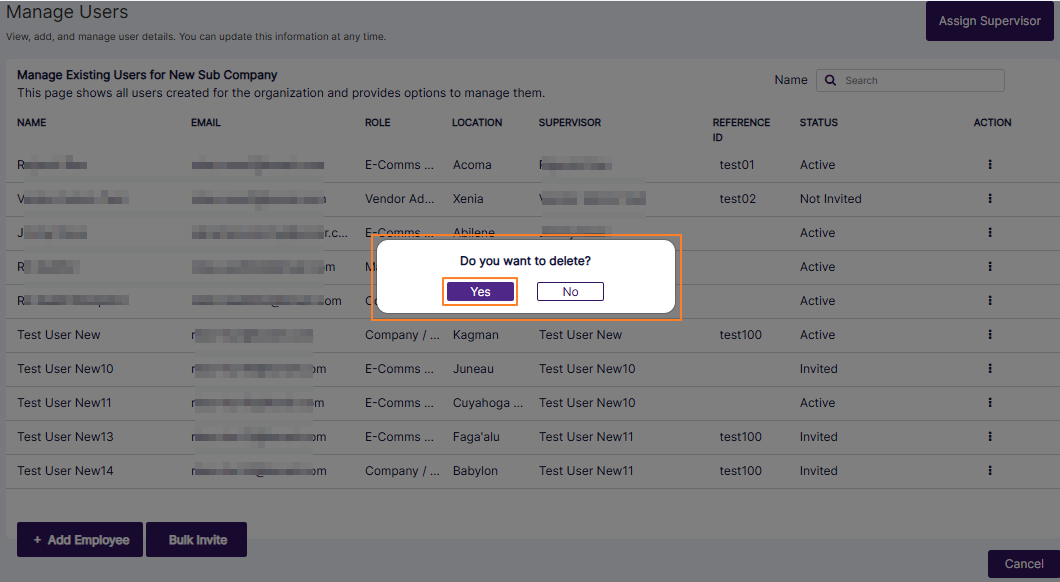 Fig: 58 - Delete confirmation modal
If the user does not have any subordinates (i.e. is a leaf node) and ongoing tasks, user profile deletion happens immediately after providing confirmation. After you click on the Yes button of the user delete confirmation modal, the user gets deleted and a success notification gets displayed at the top.
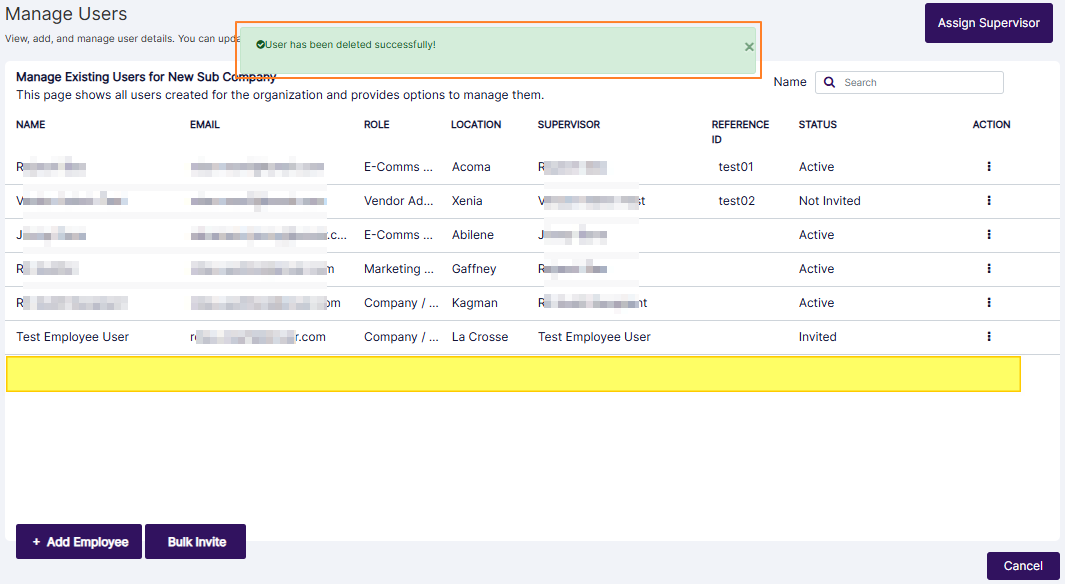 Fig: 59 - Success notification
NOTE: This user deletion process keep your workspace clean and ensures deleted users do not accidentally get assigned with new tasks.
- Once a user is deleted, the user's name/ID is suffixed with ''(Deleted)'' on all historical references across the platform.
- Deleted user will no longer show up in any user selection fields, dropdowns, or modals across the platform.
- The logged in user cannot delete own account.
- Once the user account is deleted, the account cannot be restored, and the user cannot login to the application.
- If the expanded Delete menu option is greyed-out, you cannot delete that user from this page.
 Fig: 60 - Cannot delete own account
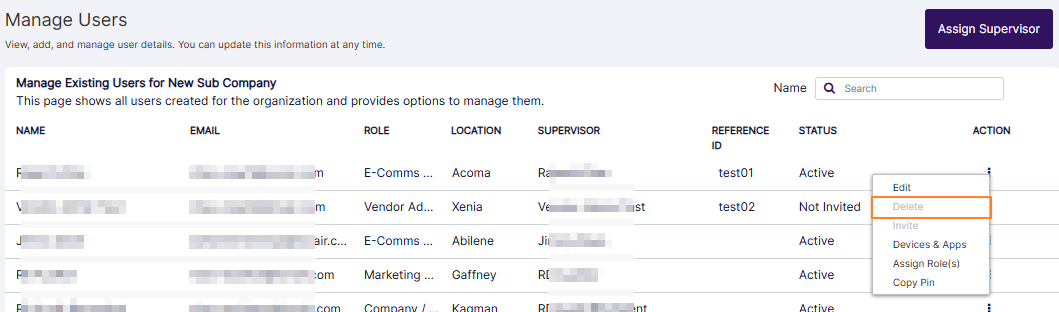 Fig: 61 - Delete option of the row context menu can load as disabled
Method #2: Deleting Multiple Users
- Click on the Bulk Delete button.
- Click on the appropriate checkboxes against the displayed users. To select all checkboxes, click on the top one. Click on the Analyze button once selections are done.
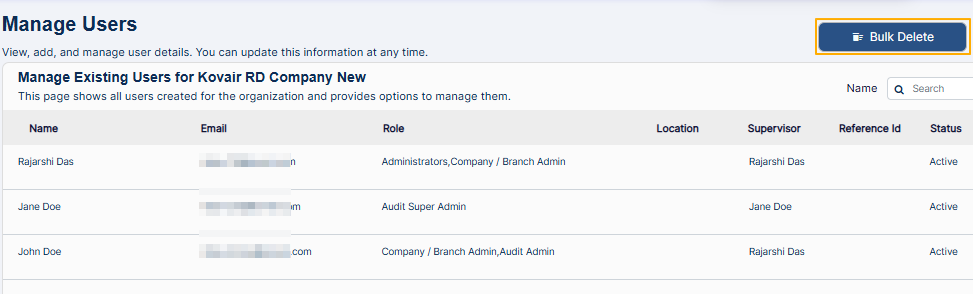 Fig: 62 - Bulk Delete button
The Delete User(s) modal window loads.
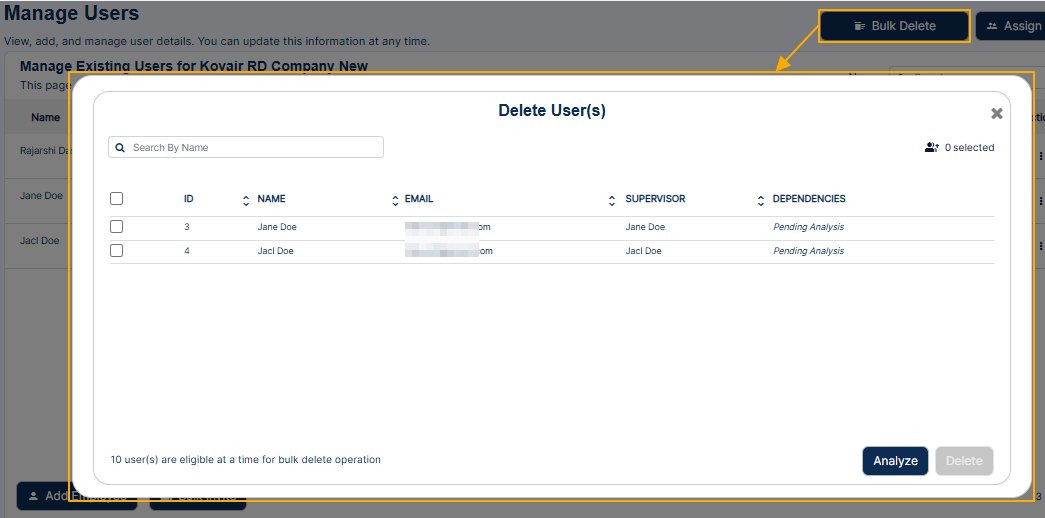 Fig: 63 - Delete User(s) modal window
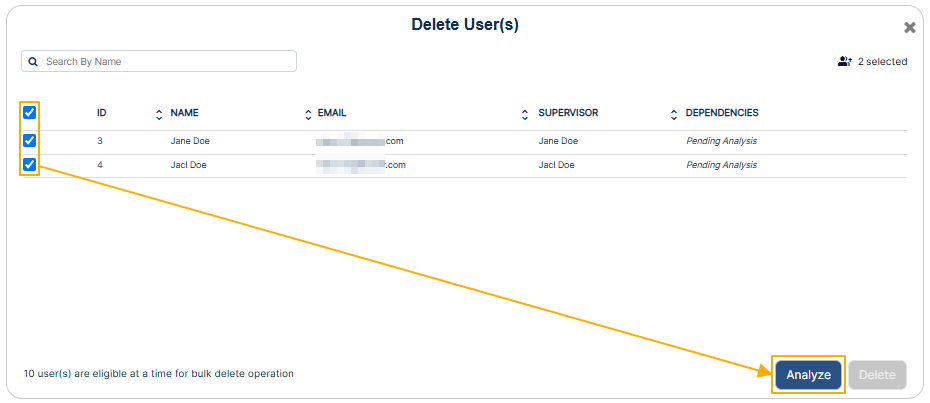 Fig: 64 - Selecting checkboxes and using the Analyze button
You must select at least one user before clicking on the Analyze button. Otherwise, the following tooltip gets prompted.
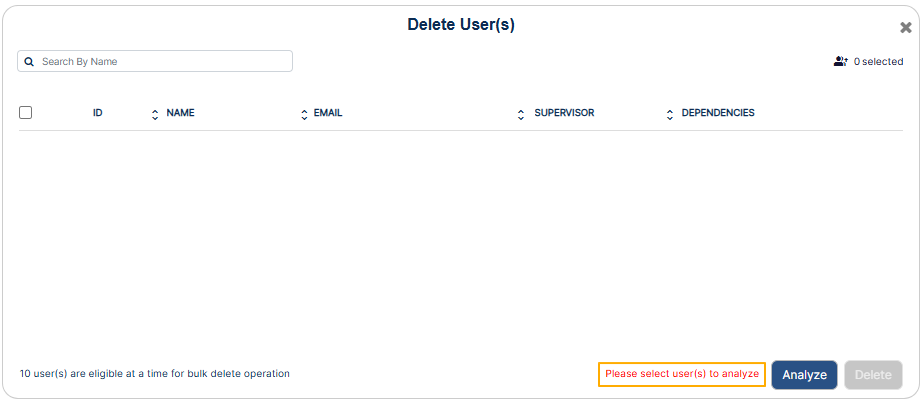 Fig: 65 - Selecting checkboxes and using the Analyze button
There can be different outcomes based on the analysis done by the system. Consider the following sub-sections to understand better:
A. When there are no dependencies and DEPENDENCIES column displays Ready To Delete label
- Click on the enabled Delete button.
- Click on the Yes button to proceed.
- Get redirected to the Manage Users page. The users get removed from the grid view. A success notification gets triggered.
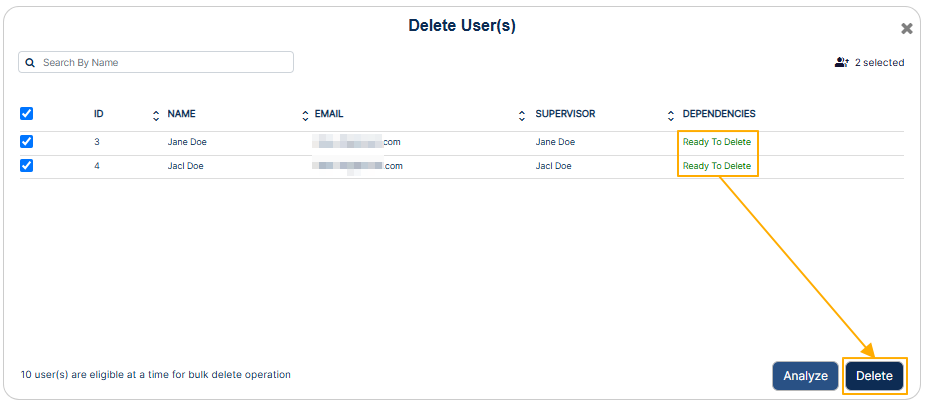 Fig: 66 - Delete button
A modal window loads to obtain your confirmation.
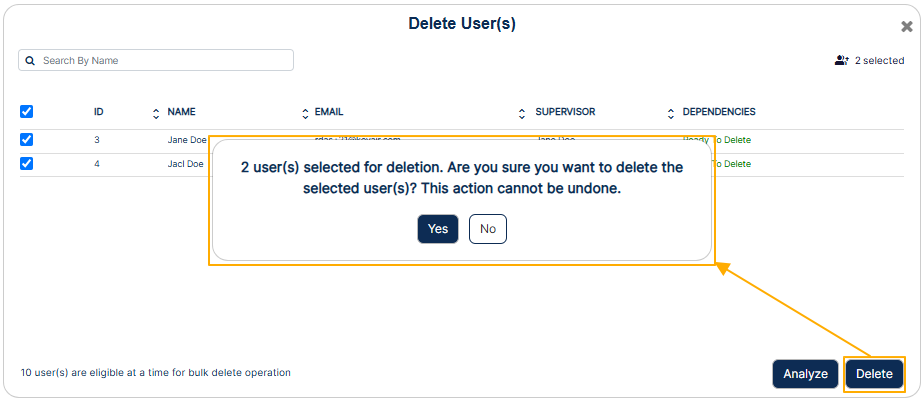 Fig: 67 - Confirmation modal
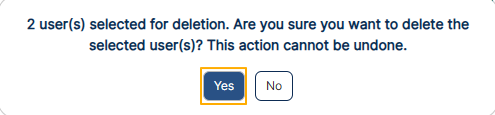 Fig: 68 - Providing confirmation
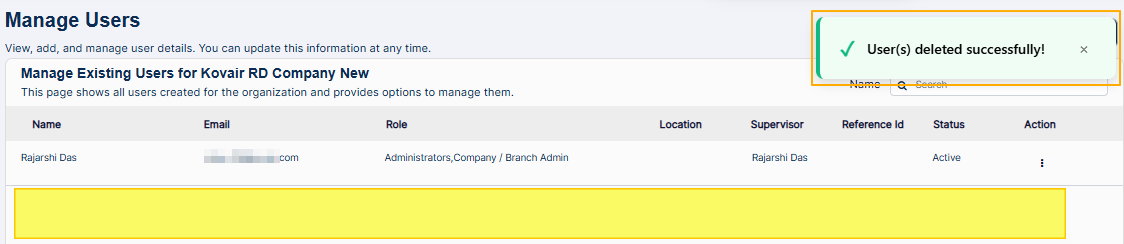 Fig: 69 - Success notification
B. When there are dependencies and DEPENDENCIES column displays Open Items label/link
- After analysis is complete and the system detects that there are open items associated with the user, the Delete button remains disabled. The Open Item(s) label is displayed as a link. Click on it.
- The Open Item(s) modal window loads. View the list of open items associated, all of which need to be manually resolved from within the respective modules. Click on the OK button to close the modal.
- After manual resolutions are done to the work items, either by assigning those to a different user or by deletion, the analysis can be performed again. Since no open items now remain for the user, the DEPENDENCIES column displays Ready To Delete label. The Delete button gets activated. Click on it to remove the user.
- Get redirected to the Manage Users page. The users get removed from the grid view. A success notification gets triggered.
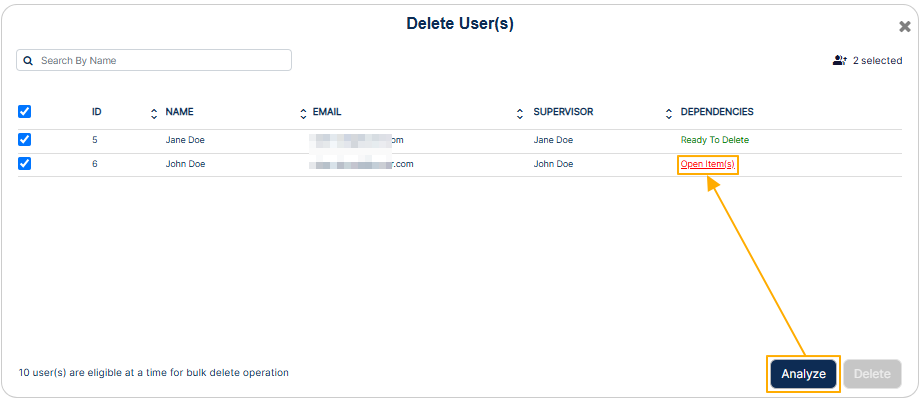 Fig: 70 - Open Item(s) label
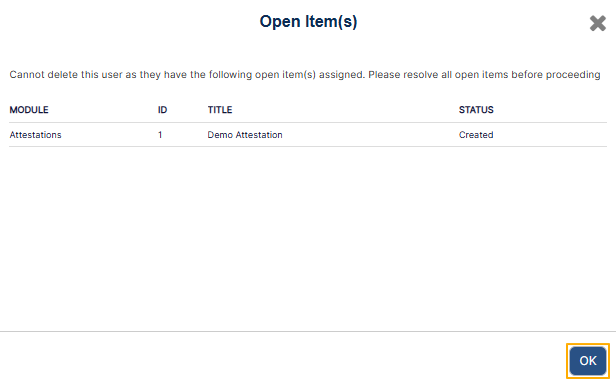 Fig: 71 - Open Item(s) modal window
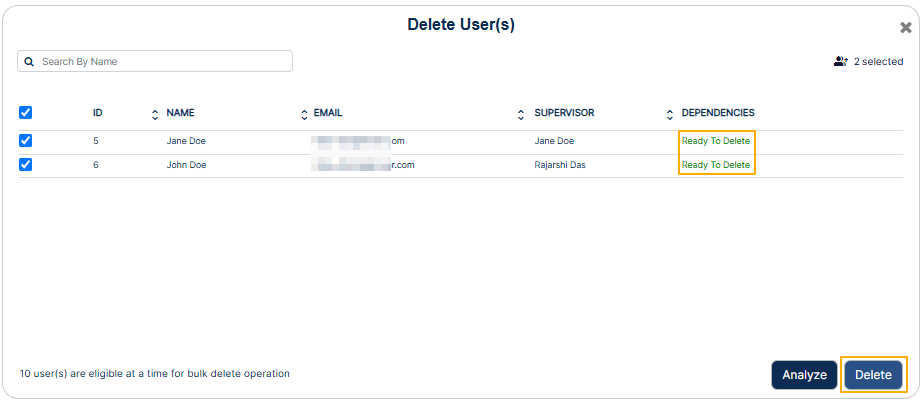 Fig: 72 - User ready for deletion after dependency resolution"
A modal window loads to obtain your confirmation. Click on the Yes button to proceed.
Fig: 73 - Providing confirmation
Fig: 74 - Success notification
C. When there are dependencies and DEPENDENCIES column displays Supervisor label/link
- After analysis is complete and the system detects that there are open items associated with the user. If no open items are present, the system checks for supervisors of the users who are being deleted. If supervisor is linked with a selected user and that supervisor is also selected here, the Delete button remains disabled. The Supervisor label is displayed as a link. Click on it.
- Two-columns titled Reportee(s) and New Supervisor, for searching users by their username without scrolling through long lists and making user selections to set a different supervisor. This provides a clear side-by-side view for easy comparison and accurate reassignment decisions.
- Revised Assignment(s) section to review any assignments made. This reduces errors by allowing users making the changes to double-check their reassignments done before finalizing. Using the Delete button against any revised assignments made, changes can be reverted prior to confirmation.
- Each displayed user of the Reportee(s) section contains a checkbox to select or deselect the user. By default, none of the checkbox(es) are selected. The inclusion of selectable checkboxes for each reportee enables precise control over reassignment decisions, allowing transfer of only the relevant reportees with accuracy and discretion.
- To facilitate this reassignment process, the interface provides a search and selection function at the top, to identify and choose multiple users efficiently. This capability ensures streamlined management of reportee allocation.
- Lists all eligible users who can be set as the supervisor of user(s) already selected in the left panel, ensuring that only valid supervisors are available and thereby reducing the chance of errors. A search bar is provided on this panel as well to quickly find suitable supervisors.
- Selected reportees of the left panel can appear here as potential supervisors and can be set to be the self (own) supervisor.
- User can choose exactly one target supervisor using the appropriate radio button, which simplifies decision-making by allowing a single, clear choice for reassignment.
- Hence, to transfer reportees to a different supervisor from within the Transfer Subordinate(s) modal window, first select the checkbox(es) against the Reportee(s) section users and then click on the radio button against any listed user under the New Supervisor section. Click on the Assign button.
- The new assignment done is visible in the Revised Assignment(s) section. Click on the Done button to confirm.
- After a different supervisor assignment is done (so that the set supervisor is not being deleted here), the analysis can be performed again. The DEPENDENCIES column displays Ready To Delete label. The Delete button gets activated. Click on it to remove the user.
- Get redirected to the Manage Users page. The users get removed from the grid view. A success notification gets triggered.
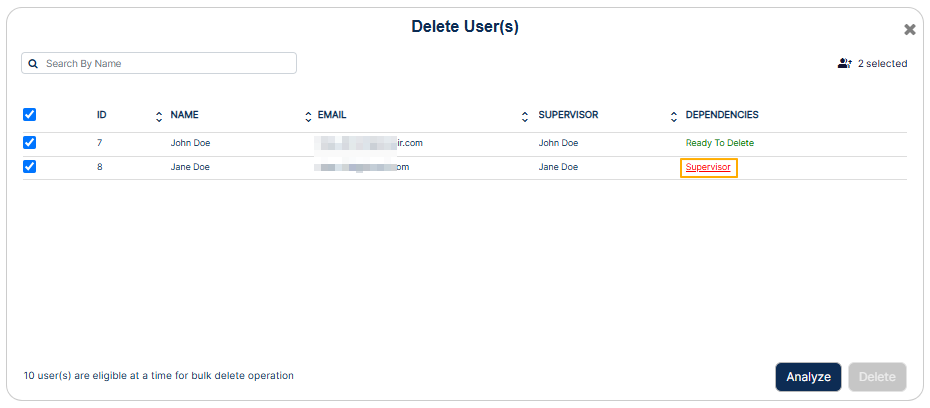 Fig: 75 - Supervisor dependency identified
The Transfer Subordinates modal window loads.
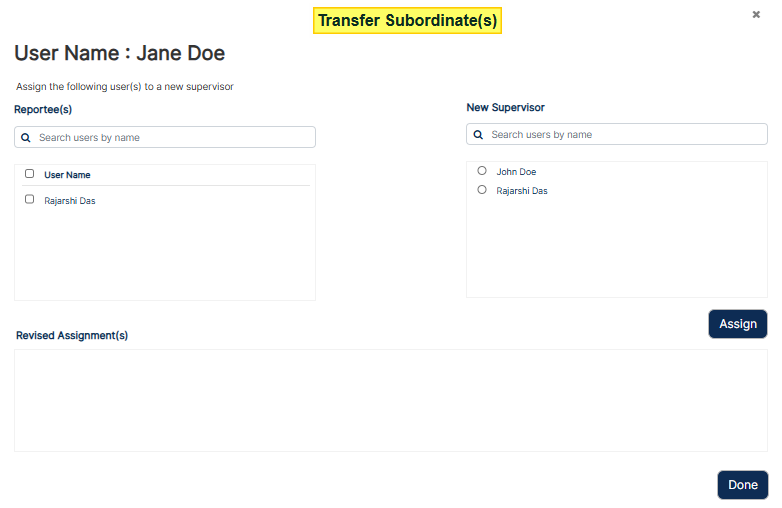 Fig: 76 - Transfer Subordinates modal window
This Transfer Subordinates modal window contains the following:
More about the Left Column – Reportee(s)
More about the Right Column – New Supervisor Selection
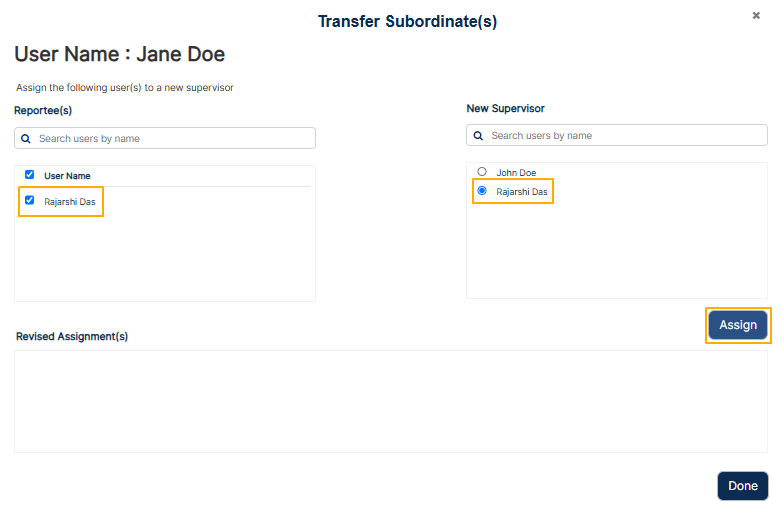 Fig: 77 - Assigning selected user with supervisor
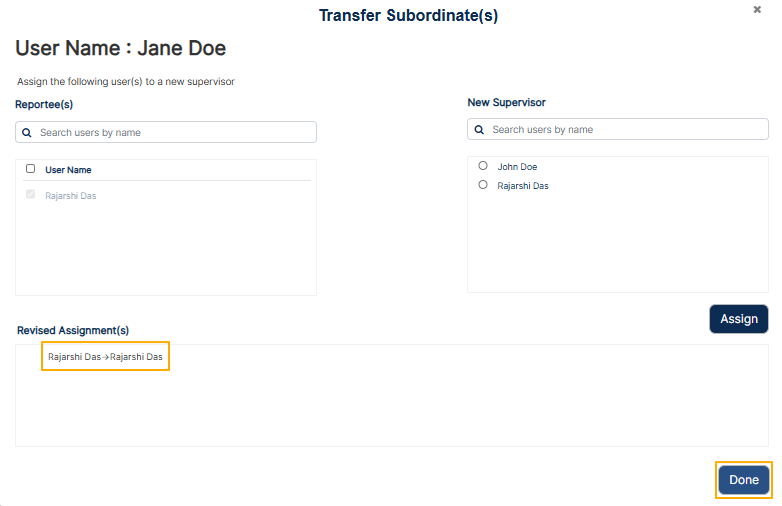 Fig: 78 - Confirming updated supervisor assignment
The Transfer Subordinate(s) modal window gets automatically closed. Once confirmed, all selected reportee(s) get transferred under the chosen supervisor. The system meticulously recalibrates hierarchical associations, ensuring that all structural updates are executed without error or overlap. This rigorous process provides stakeholders with assured consistency and reinforces the dependability of the updated organizational setup.
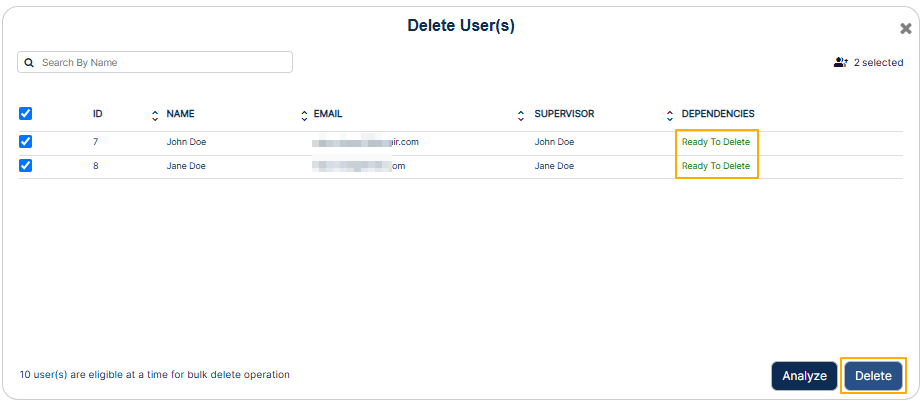 Fig: 79 - User ready for deletion after supervisor reassignment
A modal window loads to obtain your confirmation. Click on the Yes button to proceed.
Fig: 80 - Providing confirmation
Fig: 81 - Success notification
NOTE: To remove any assignment made, click on the Delete option. This option is visible when you hover over the assignment row entry displayed in the Revised Assignment(s) section.
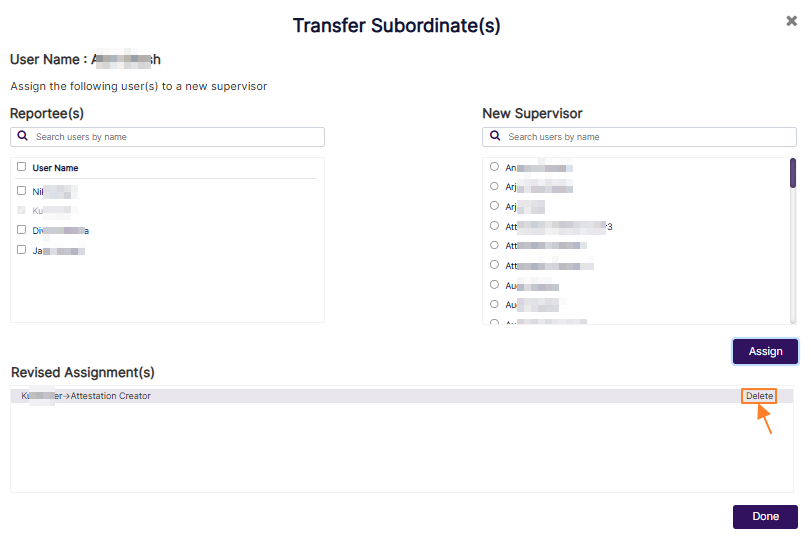 Fig: 82 - Option to remove selection made
3.4. Inviting User / Employee
Inviting users to the SurgeONE platform is a structured and efficient process designed to facilitate seamless onboarding. To invite an individual user, navigate to the Manage Users grid and click the vertical ellipsis icon under the ACTION column. From the expanded context menu, select the Invite option available only for users who have not yet accessed the platform. Upon selection, the Send Invitation to User modal window appears, allowing you to choose between two invitation types: Invite as SurgeONE User or Invite as Other Apps User, with the former selected by default. Clicking the Send Invite button dispatches an email invitation to the user's registered email address. The system then updates the user's status to Invited, and a confirmation notification is displayed.
For inviting multiple users simultaneously, select the + Bulk Invite button. This opens the Not Invited Users modal window, listing all users who have not yet received an invitation. You may select multiple users using the provided checkboxes and choose an appropriate email template from the Select Template dropdown. These templates are customizable via the Settings > Mail Templates module. Once selections are made, clicking Done sends invitation emails to all selected users and confirms the action with a success notification. If no users are selected, the system prompts you to make a selection before proceeding.
Additionally, if a user has previously been invited but has not completed the registration process, the Invite option changes to Re-send Invite, allowing you to resend the invitation email. This ensures that all users have the opportunity to activate their accounts and begin using SurgeONE without delay. The invitation workflow is designed to be both comprehensive and user-friendly, supporting effective user management across the organization.
Method #1: Inviting a single user
- You can click on the row context vertical ellipsis icon and click on the expanded Invite menu option to invite any existing user account of your organization (who is yet to sign up). This option is greyed-out against any user who has already accessed SurgeONE.ai (Status column showing Active label for that user in Manage Users grid view).
- Proceed to select any one out of the two dropdown options. The following three options are provided - Invite as SurgeONE Users and Invite as Other Apps Users, where the former is pre-selected by default.
- Click on the Send Invite button to trigger the invitation email to this user.
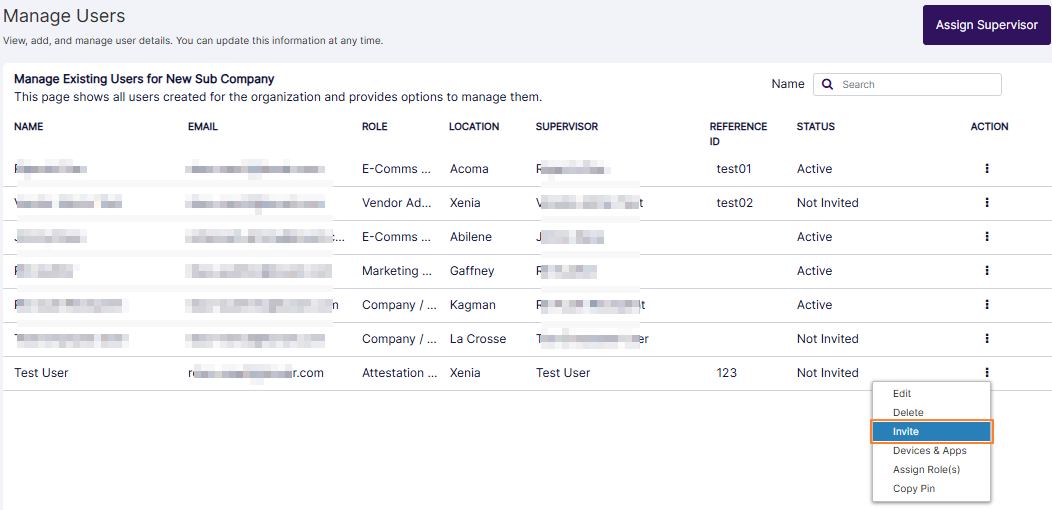 Fig: 83 - Invite option of the row context menu
The following Send Invitation to User modal window loads.
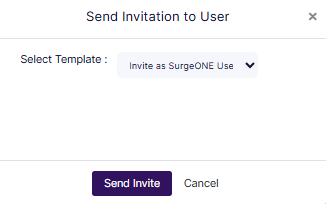 Fig: 84 - Send Invitation to User modal window
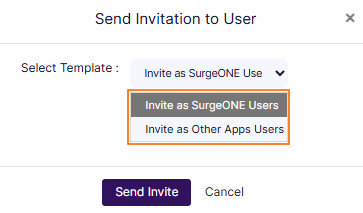 Fig: 85 - Dropdown options for inviting the user
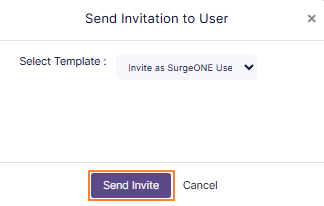 Fig: 86 - Send Invite button to trigger the invitation email
Get redirected back to the Manage Users page. You can notice that the Status column label gets updated to Invited.
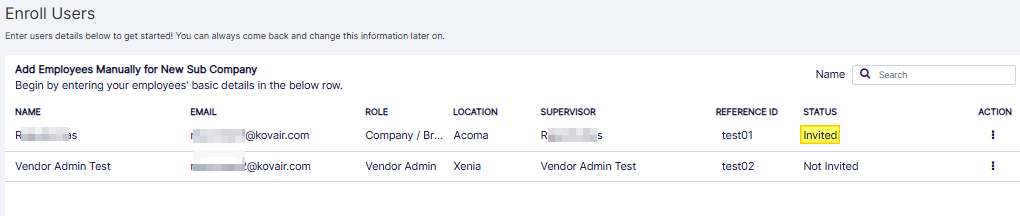 Fig: 87 - Status gets updated
A success notification can be seen at the top of the Manage Users page.
 Fig: 88 - User invitation success notification
The following invitation email gets triggered to the registered email address of the invited user.
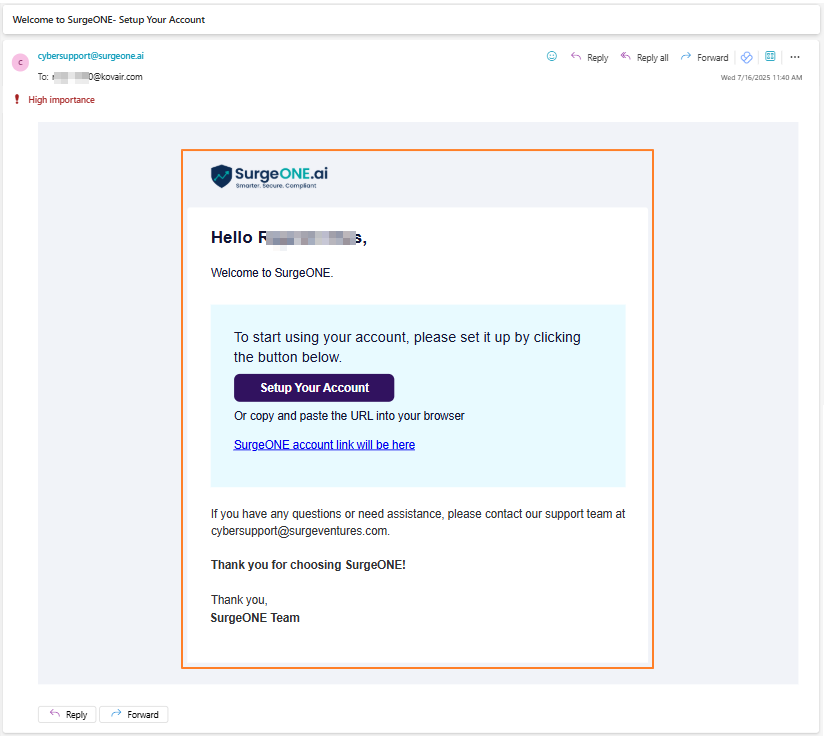 Fig: 89 - View of the triggered user invitation email
NOTE: The invitation email is sent to the stored email address. The invited user / employee can set your SurgeONE.ai account password from the embedded link of the invitation email.
Method #2: Inviting multiple users (Limited to 10 users at a time)
- You can click on the + Bulk Invite button to invite added user accounts in bulk.
- The following modal window titled as Not Invited Users is invoked with the list of users who have not yet been invited and can be added in bulk.
- Make appropiate selection of the checklists against the listed users, who are yet to sign up to the SurgeONE.ai platform. Ensure that a maximum of ten users are selected at a time, since the system does not permit you to add more than that at a given go. You can use the Select Template dropdown to make an appropiate invitation option (select the required email template to be used for this invitation purpose). Click on the Confirm button to proceed.
- The Confirm Bulk Invite modal window loads. You need to enter bulk invite in the text field.
- Click on the Send Invite button.
- The modal window closes. A success notification can be seen at the top of the Manage Users page. The system automatically extracts the email address provided for each of the selected users and sends out an email invitation to each one of them.
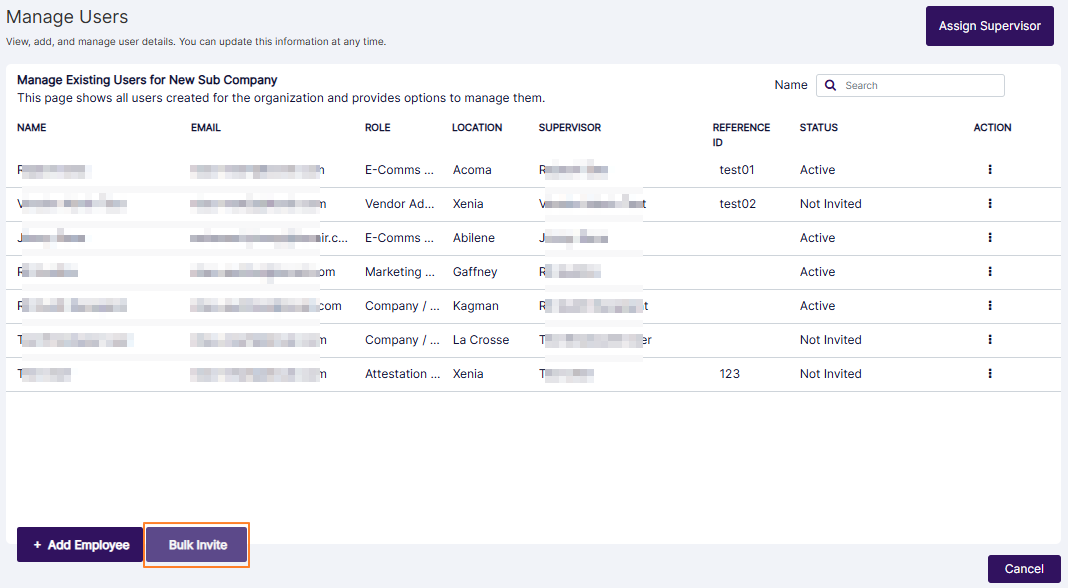 Fig: 90 - Bulk Invite button
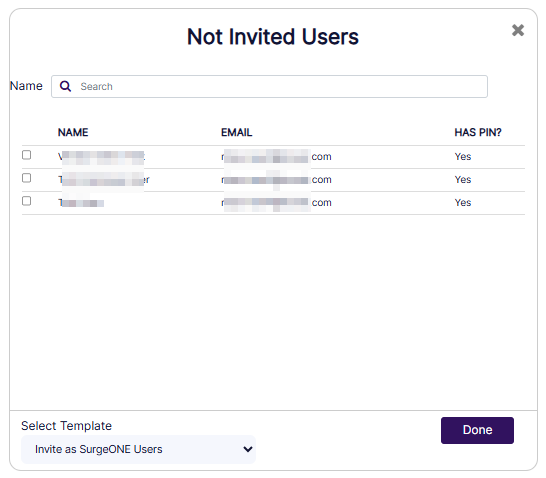 Fig: 91 - Bulk Invite modal window titled as Not Invited Users
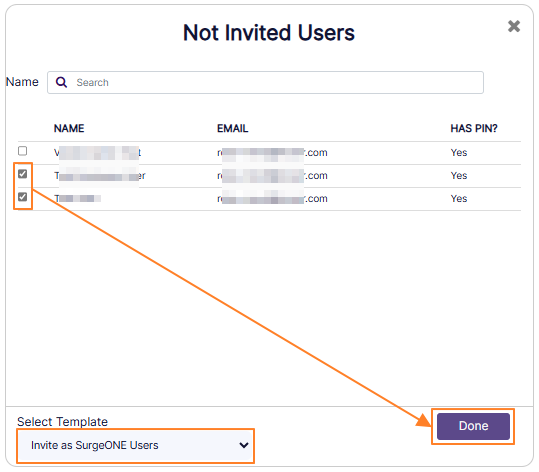 Fig: 92 - Bulk Invite users selection view
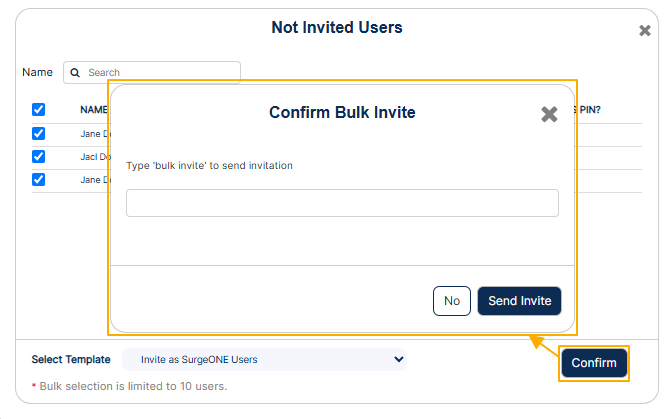 Fig: 93 - Bulk Invite text needs to be entered in the loaded modal window
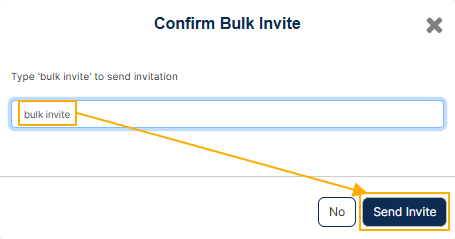 Fig: 94 - Button to trigger invite email
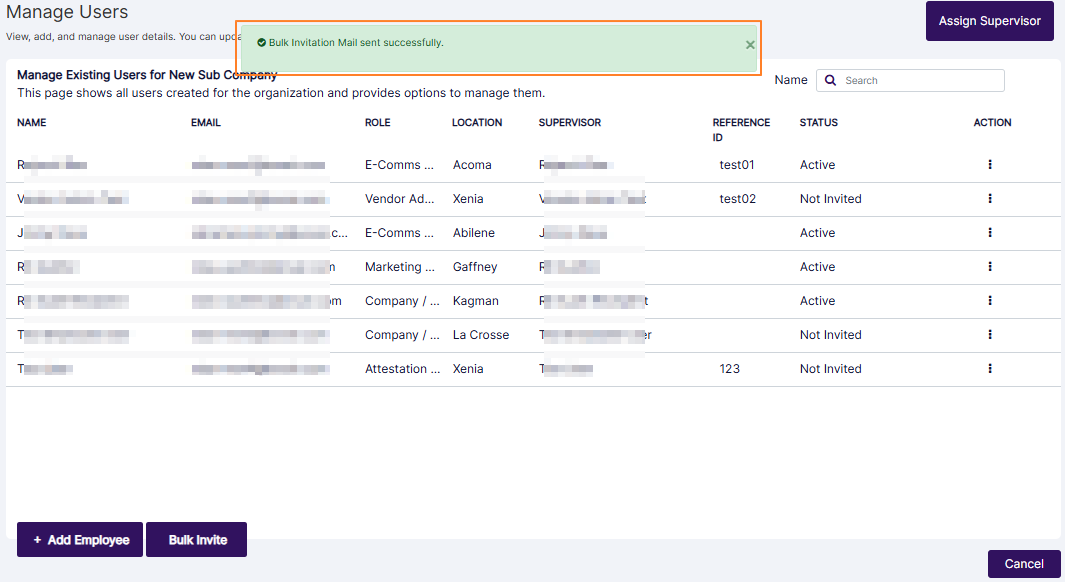 Fig: 95 - Bulk Invite success notification
NOTE:
- The Select Template dropdown contains options to set the invitation options. Here is the view of the provided options (at the time of writing this guide).
- The templates are fetched from the Settings > Mail Templates module. The templates can be customized from there so that you gain the ability to trigger custom templates during bulk invitation of users.
- If you do not make any checkbox selection against the listed user(s) of the Not Invited Users modal window and click on the Done button, then the system does not allow you to proceed. A Please select a User(s) tooltip can be seen above the Select Template field.
- You can use the search bar (labeled as Name) to quickly find uninvited users displayed within the modal window.
- The users list can vary in the Not Invited Users modal window depending on the option selection made in the Select Template dropdown. The following screenshot illustrates one such difference in user listing for invitation.
- If a user is invited and the invitation email is already triggered to the registered email address of this user, but the user is yet to sign up or set own account password, then the menu option label changes from Invite to Re-send Invite. The functionality remains same as the Invite menu option.
- Validation is employed in the text field of the Confirm Bulk Invite modal window. The following tooltip is prompted if you do not enter bulk invite text.
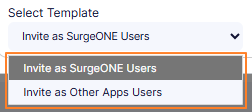 Fig: 96 - Bulk Invite selection options
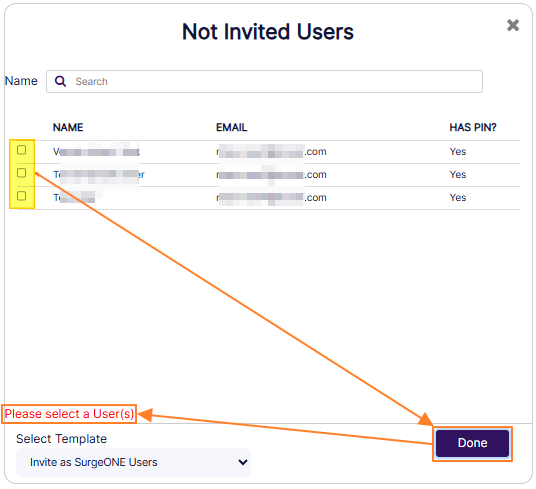 Fig: 97 - Please select a User(s) tooltip
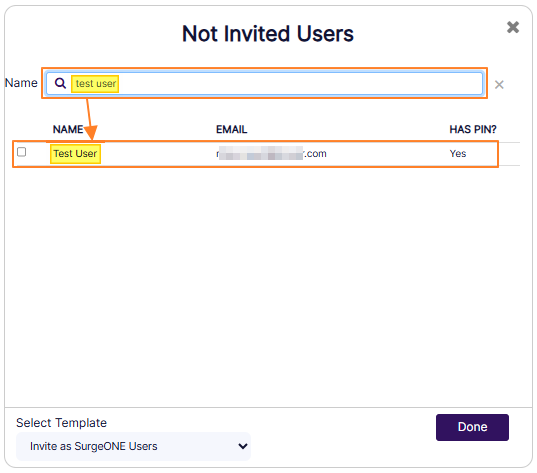 Fig: 98 - Search operation
 Fig: 99 - List of users varying on the basis of the Select Template option selection
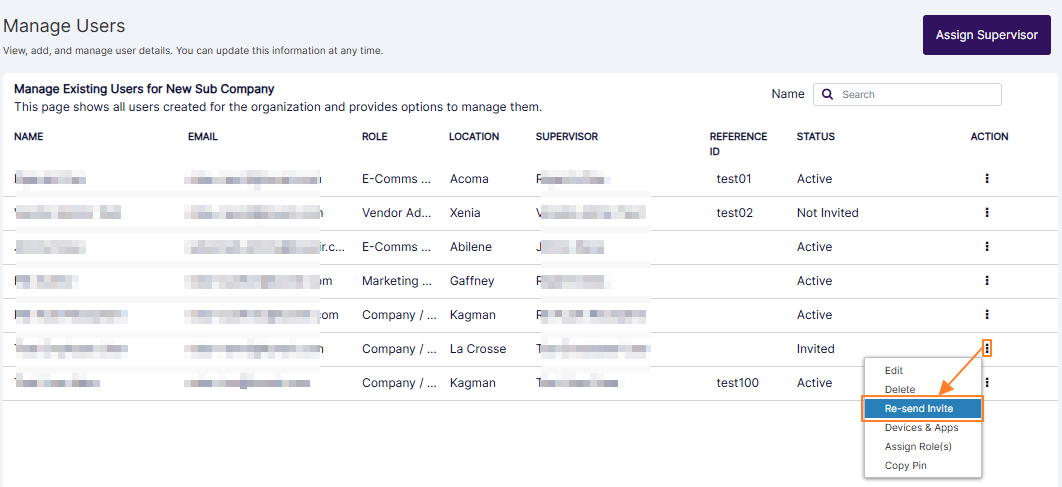 Fig: 100 - Re-send Invite menu option
The Send Invitation to User modal window loads.
The same success notification can be seen at the top.
 Fig: 101 - Invitation email trigger success notification
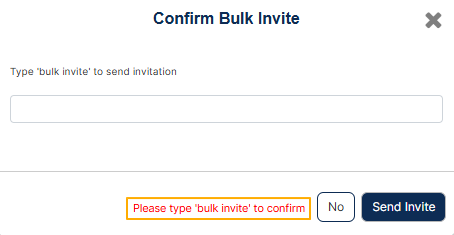 Fig: 102 - Validation on text field to enter bulk invite
3.5. Viewing Devices and Apps details
The Devices and Apps feature offers a centralized way to view the technology footprint associated with each user in your organization. By selecting this option from the row context menu accessible via the vertical ellipsis icon in the Manage Users grid you can open a detailed modal window that displays device and application information linked to the selected user.
The Device Details section typically includes hardware and system attributes such as device model, operating system, host name, MAC address, and security indicators like disk encryption, antivirus status, screen lock, password policy, and firewall settings. These insights help ensure that devices meet organizational standards for security and compliance.
In parallel, the App Details section lists installed applications, showing the app name, vendor, and category. This allows administrators to monitor software usage and maintain visibility over the digital tools in use.
If no data has been captured for a user's device, the modal window will appear blank with a 'Device not found' label. Overall, this feature supports better oversight, informed decision-making, and streamlined IT and cybersecurity management across your organization.
- You can click on the row context vertical ellipsis icon against any listed user of the grid view and click on the expanded Devices & Apps menu option to view the devices and apps information associated with the user.
- The Device details of [username] modal window loads to display the devices and apps specific information related to the associated user.
- Device Model - Displays the manufacturer or model name or number reported by the captured device information so you can identify the make and form factor (for example laptop, desktop, mobile, tablet. etc.).
- Hardware ID - Displays a unique vendor or system-assigned identifier for the device hardware used.
- OS - Displays the operating system name and version currently installed on the device so you know platform and update level.
- Host Name - Displays the network/hostname the device advertises on the network for identification and domain joining.
- Mac Address - Displays the network interface hardware address used for local network identification and MAC-based filtering.
- HD Encryption - Displays an appropriate icon to indicate the whether the disk encryption is enabled or disabled.
- Anti-Virus Protection - Displays an appropriate icon to indicate whether antivirus/endpoint protection is implemeneted or not.
- Screen Lock - Displays an appropriate icon to indicate whether a lock screen is configured or lock method enforced for session protection or not configured/enforced.
- Password Policy - Displays an appropriate icon to indicate the whether any password policy is enforced on the device or not, such as password complexity, minimum length, etc.
- Firewall - Displays an appropriate icon to indicate whether the device firewall is enabled or not for network protection.
- App Name - Displays the official name of the installed application as captured by the system to identify the software on the device.
- Vendor - Displays the publisher or vendor name responsible for the application.
- App Category - Displays the functional classification of the application (for example - Application or Antivirus).
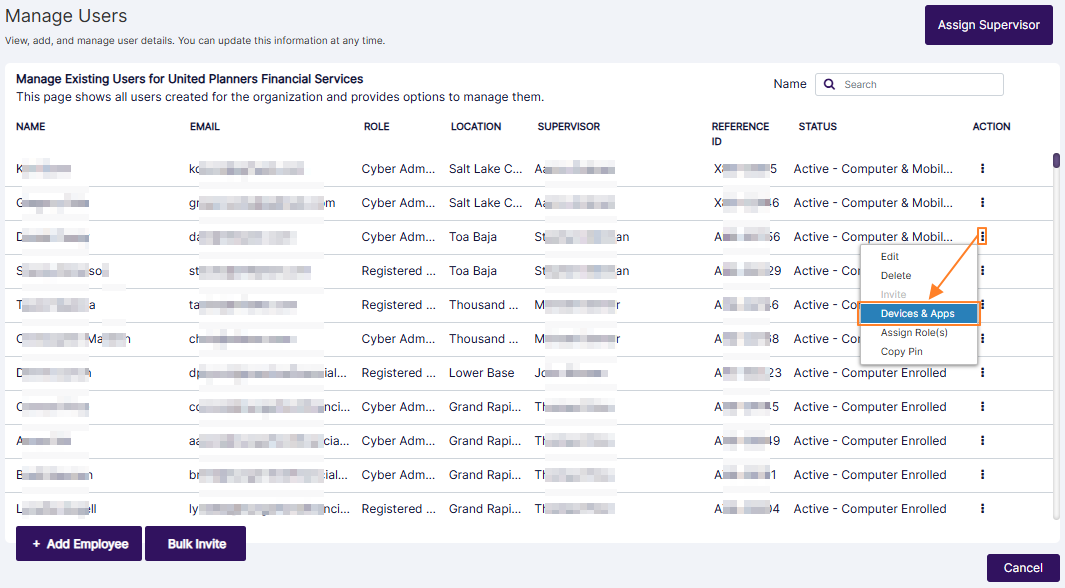 Fig: 103 - Devices & Apps option of the row context menu
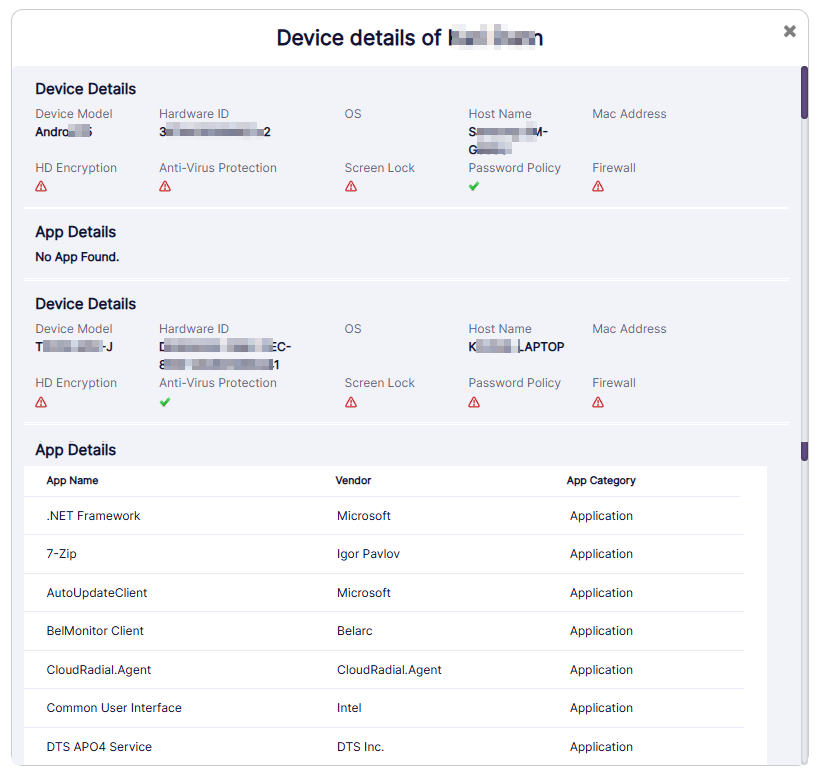 Fig: 104 - Device details view
The Device Details section displays the following information (if it is present in the system after the info is captured from the mapped device):
The App Details section displays the following information (if it is present in the system after the info is captured from the mapped device):
NOTE: The Device details modal window loads as blank if no devices and app-specific information associated with the user is captured yet. A Device not found label can be seen displayed in such a modal view.
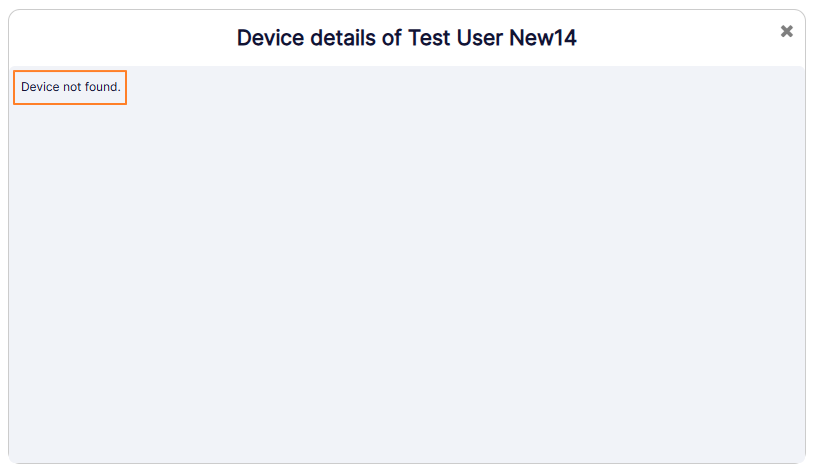 Fig: 105 - Blank Device Details modal window
3.6. Searching for Existing User
The search for existing users feature provides a quick and efficient way to locate users within your organization. Positioned at the top-right corner of the Manage Users page, the search bar allows you to enter a username to initiate the search. Once a match is found, the corresponding user details are automatically populated in the grid view, streamlining access to user-specific actions and information.
Please note that this search function is limited to usernames only and does not operate on data from other columns such as email, status, or role. This targeted search capability enhances navigation and helps administrators manage user records with greater precision and ease.
You can find the search bar at the top-right of the Manage Users page. Enter the name of the user based on which you want to execute the search operation by. If matching user is found, it will populate the grid view.
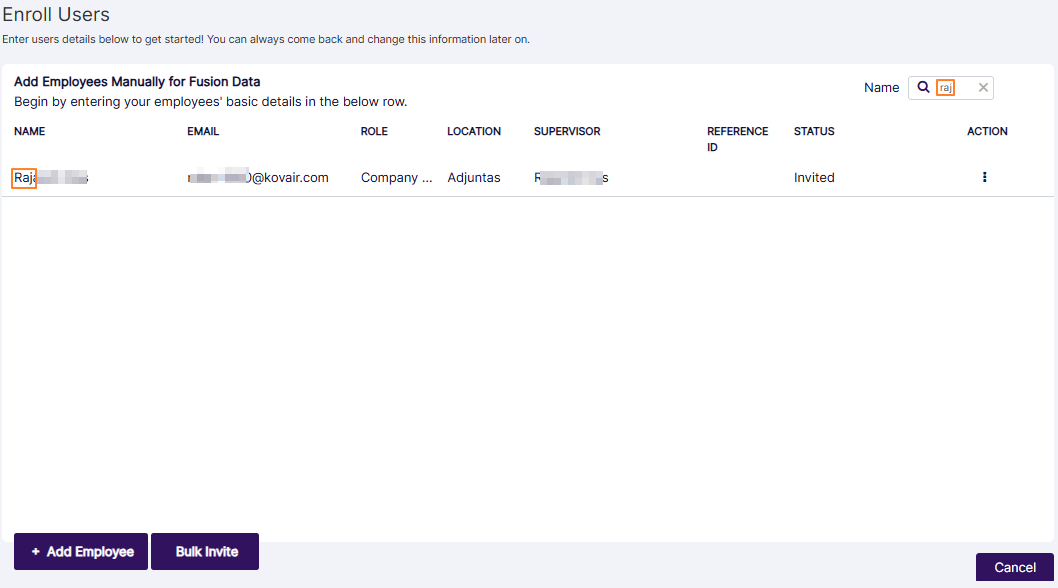 Fig: 106 - Search bar to find existing firm / company users
NOTE:
- This user search facility operates only on the username (text displayed under the Name column, and not on the data of any of the other columns).
- If no user is found, a No User Found! label populates the grid view.
 Fig: 107 - No matched users found after search operation is executed
3.7. Assigning Supervisor
This intuitive supervisor reassignment interface streamlines the process of transferring subordinates across supervisors within a hierarchical structure. Key features include a dedicated Assign Supervisor button for bulk reassignment, a quick search function to locate eligible users swiftly, and a two-column transfer modal that visually separates current reportees from potential supervisors. Users can multi-select siblings who are reporting to the same supervisor for reassignment, while eligibility filters ensure valid selections by excluding inappropriate targets and preventing self-assignment. A visual cue system highlights revised assignments before final confirmation.
The functionality delivers significant benefits: it saves time by enabling bulk actions in a single view, improves accuracy through clear sibling identification, and prevents errors with built-in safeguards. Users enjoy enhanced control via a centralized interface, and receive instant confirmation upon successful reassignment, ensuring a smooth and reliable user management experience.
The Assign Supervisor button is now available in the top right corner of the Manage Users page (except for firms which are assigned to a Child relationship).
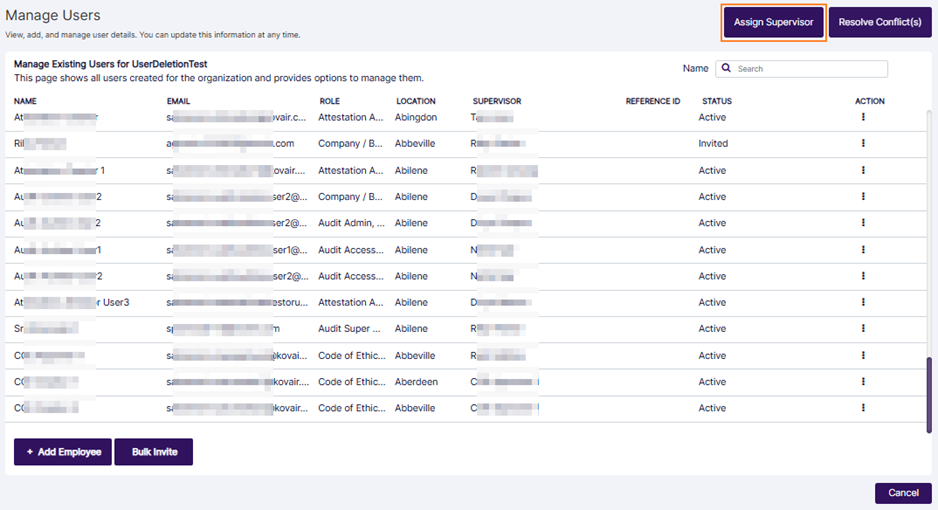 Fig: 108 - Assign Supervisor button
Clicking this button opens a modal window with the following:
- User selection search bar to quickly select specific users without having to scroll through long lists.
- Two-columns titled User Hierarchy and New Supervisor, for searching users by their username and making user selections for making changes in the current user hierarchy by setting a different supervisor. This provides a clear side-by-side view for easy comparison and accurate reassignment decisions.
- Revised Assignment(s) section to review any assignments made. This reduces errors by allowing users making the changes to double-check their reassignments done before finalizing. Using the Delete button against any revised assignments made, changes can be reverted prior to confirmation.
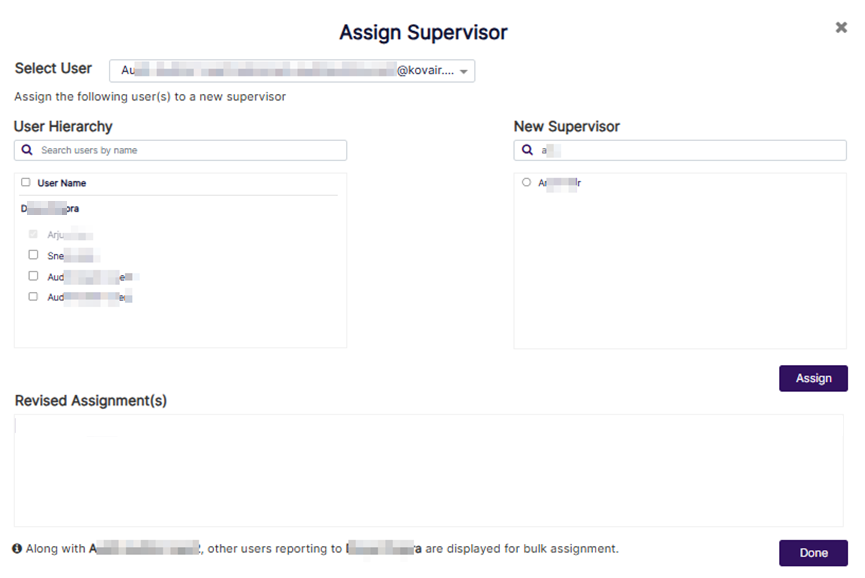 Fig: 109 - Assign Supervisor modal window
Understanding the steps to assign a new Supervisor
- First select a user from the Select User dropdown field at the top of the modal window. You can also quickly search for listed users by entering text based search query in the provided search bar. Users get displayed with their full name and email address within parenthesis.
- After you select a user in the Select User dropdown, the same user populates the left panel User Hierarchy section. Users who can be set as the new supervisor of this selected user populate the right panel New Supervisor section. The checkbox against the user on the left panel is selected by default. A search bar is also provided to quickly find displayed users.
- Proceed to select the radio button against a supervisor on the right panel New Supervisor section. A search bar is also provided to quickly find displayed users.
- Click on the Assign button to keep this assignment to the Revised Assignment(s) section.
- You can repeat the entire process from top dropdown user selection to assign new supervisors to selected users multiple times without having to leave this modal window. Self supervisor assignments can also be made. A user who is already assigned a new supervisor cannot be added in the Revised Assignment(s) section again in the modal window.
- Click on the Done button at the bottom of the modal window once you have made your assignments. Once confirmed, the user's supervisor get reassigned to the chosen supervisor.
- The Assign Supervisor modal window gets automatically closed, the Manage Users page refreshes to reflect changes, and a success message confirms the reassignment completion. In terms of data integrity, the hierarchical relationships get correctly updated in the system without any conflicts, giving users unparallel confidence that the organizational structure remains consistent and reliable.
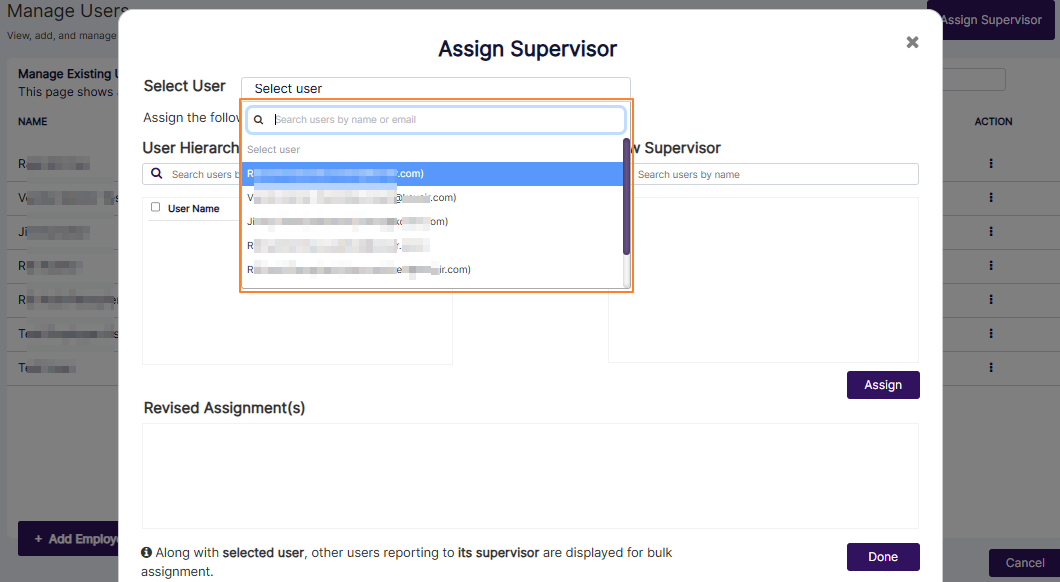 Fig: 110 - Selecting a user
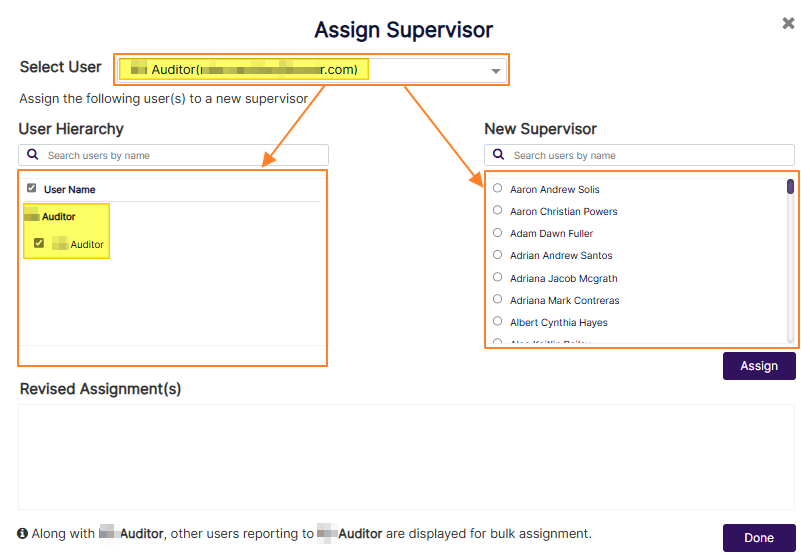 Fig: 111 - User selection populates the User Hierarchy and New Supervisor sections
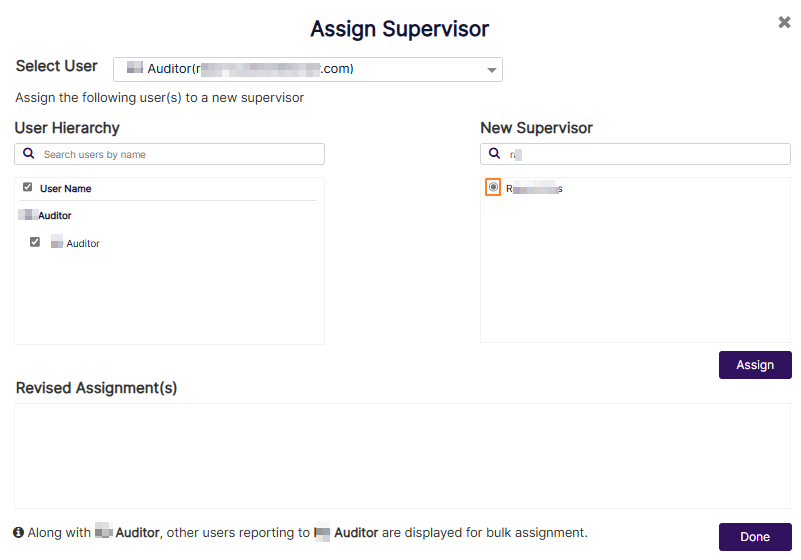 Fig: 112 - Searching for and selecting a supervisor
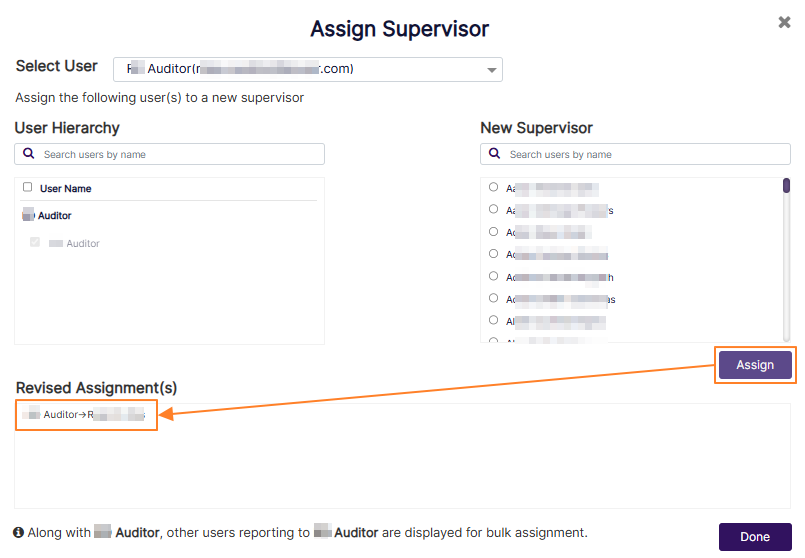 Fig: 113 - Assign button
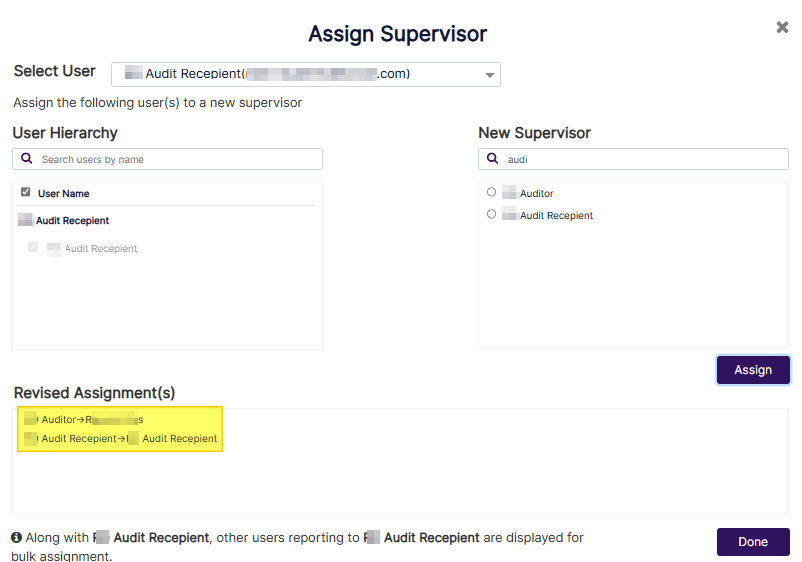 Fig: 114 - Multi assignment support
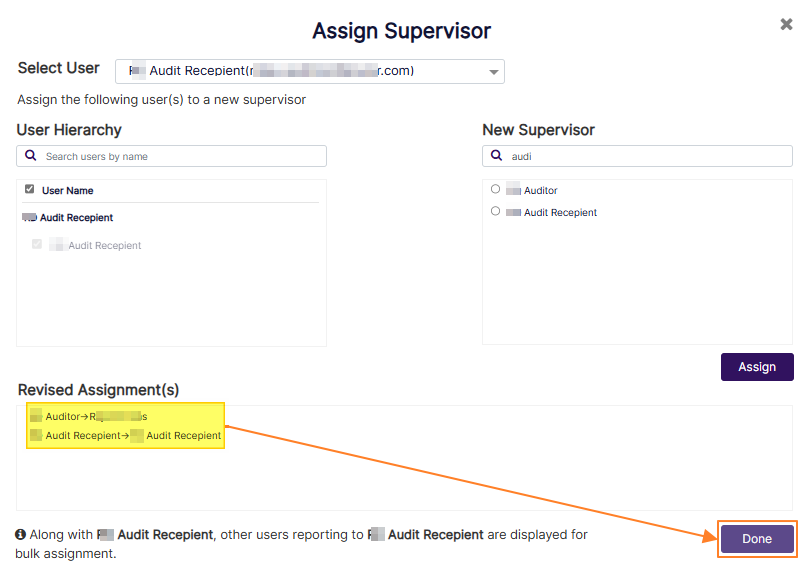 Fig: 115 - Done button to confirm any assignments made
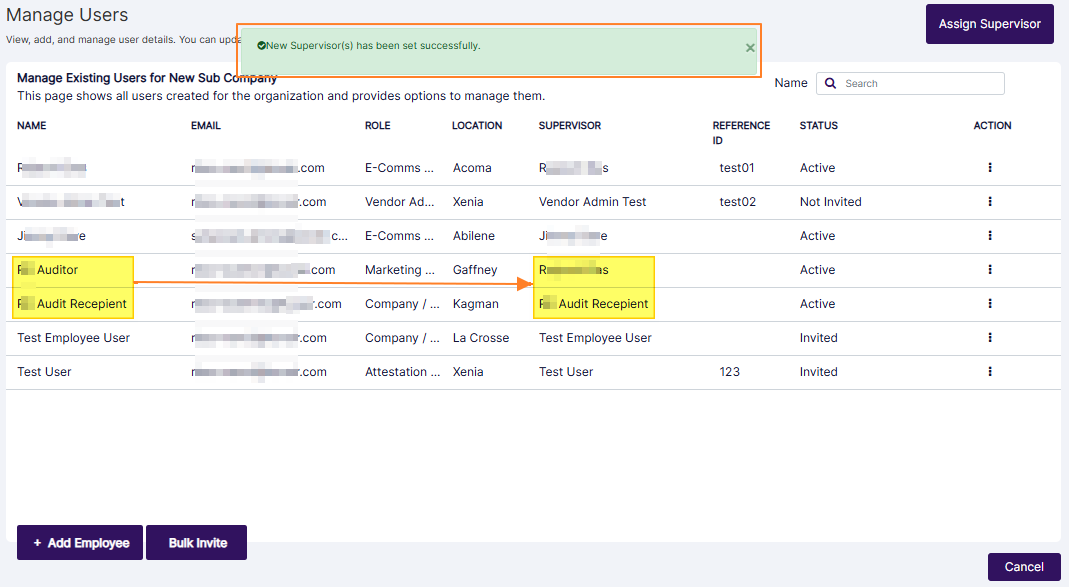 Fig: 116 - Success notification prompt and updated supervisors in grid view
NOTE:
The Assign Supervisor button is not present when only one user is present.
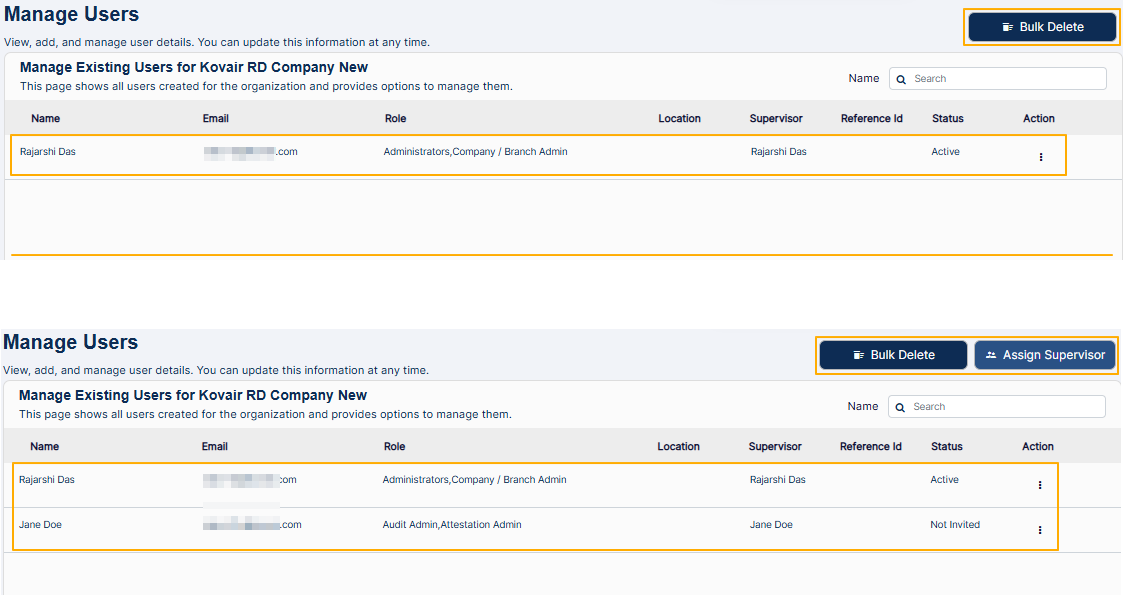 Fig: 117 - Assign Supervisor button presence and absence
To remove any assignment made, click on the Delete option. This option is visible when you hover over the assignment row entry displayed in the Revised Assignment(s) section.
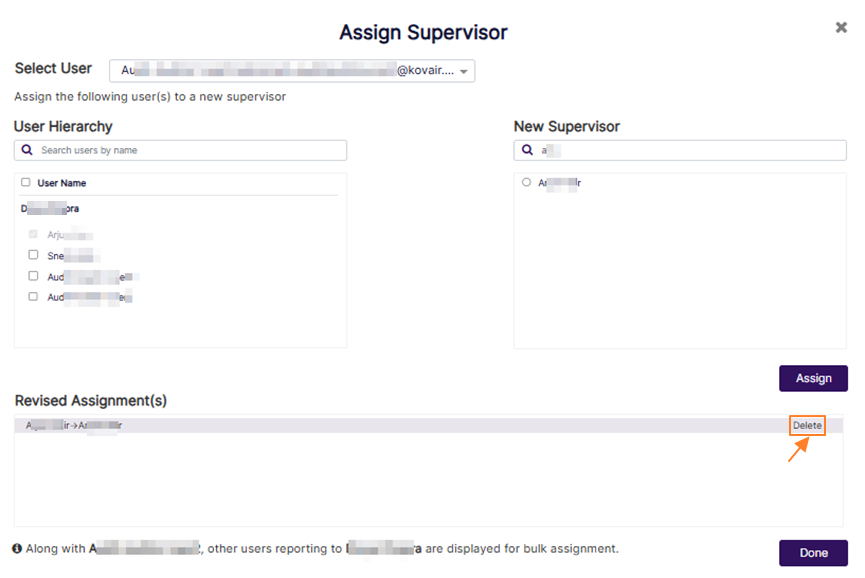 Fig: 118 - Option to remove assignment made
More about the Left Panel – User Hierarchy
- Supervisor name gets displayed at the top without any checkbox, with all the reportees below it.
- Displays the chosen user, along with the same-level hierarchical subordinates of the user' supervisor, if present, helping identify related team members for bulk reassignment in context.
- Default enabled checkbox state for the chosen user. This saves mouse clicks by pre-selecting the intended user for reassignment.
- Each displayed user below the supervisor has a checkbox to select or deselect. Individual subordinate checkboxes allow granular selection, giving flexibility to reassign only the necessary team members.
- You can search and select different users at the top to support the selection of multiple subordinates across different supervisors, enabling bulk transfers of supervisors without navigating away from the modal.
- Users who are ineligible for reassignment (e.g. exist lower in hierarchy and hence are not siblings) are not shown. This prevents invalid selections and ensures compliance with hierarchy rules.
More about the Right Panel – New Supervisor Selection
- Lists all eligible users for reassignment, excluding any selected subordinates, ensuring that only valid supervisors are available and thereby reducing the chance of errors.
- Selected subordinates can appear as potential supervisors and can be set to be the self (own) supervisor.
- User can choose exactly one target supervisor for any particular reassignment using the appropriate radio button, which simplifies decision-making by allowing a single, clear choice for reassignment.
3.8. Transferring Subordinates
This feature enables smooth reassignment of team members from one supervisor to another, ensuring uninterrupted workflows and preserving organizational structure during transitions. It is especially useful when a supervisor is departing, allowing for a clean handover of responsibilities and maintaining team cohesion.
The process is facilitated through a Transfer Subordinate(s) Modal Window, where users can easily reassign multiple reportees. A quick search facility helps locate current reportees and identify eligible supervisors for reassignment. The two-panel interface displays existing reportees on the left and allows selection of a new supervisor on the right. With multi-selection capability, users can transfer several team members at once, and revised assignment cues provide visual confirmation before finalizing changes.
This Transfer Subordinates modal window contains the following:
- Two-columns titled Reportee(s) and New Supervisor, for searching users by their username without scrolling through long lists and making user selections to set a different supervisor. This provides a clear side-by-side view for easy comparison and accurate reassignment decisions.
- Revised Assignment(s) section to review any assignments made. This reduces errors by allowing users making the changes to double-check their reassignments done before finalizing. Using the Delete button against any revised assignments made, changes can be reverted prior to confirmation.
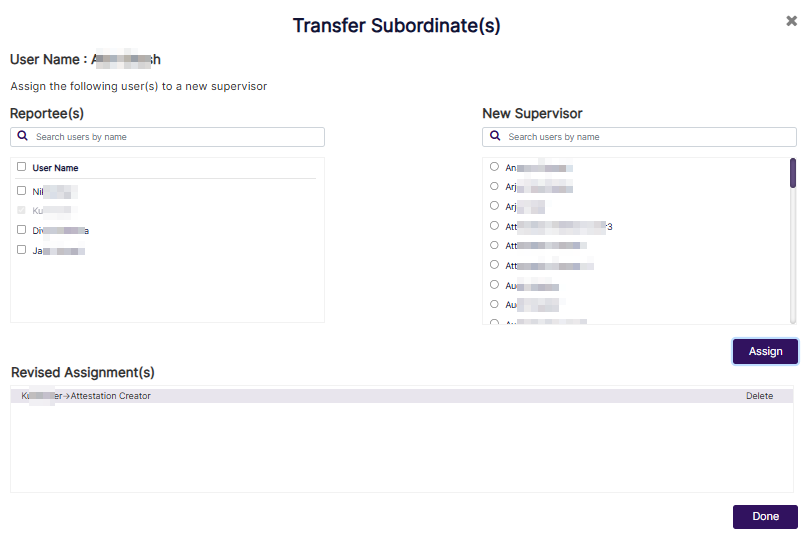 Fig: 119 - Transfer Subordinate(s) modal window showing a selected transfer prior to confirmation
More about the Left Column – Reportee(s)
- Each displayed user of the Reportee(s) section contains a checkbox to select or deselect the user. By default, none of the checkbox(es) are selected. The inclusion of selectable checkboxes for each reportee enables precise control over reassignment decisions, allowing transfer of only the relevant reportees with accuracy and discretion.
- To facilitate this reassignment process, the interface provides a search and selection function at the top, to identify and choose multiple users efficiently. This capability ensures streamlined management of reportee allocation.
More about the Right Column – New Supervisor Selection
- Lists all eligible users who can be set as the supervisor of user(s) already selected in the left panel, ensuring that only valid supervisors are available and thereby reducing the chance of errors. A search bar is provided on this panel as well to quickly find suitable supervisors.
- Selected reportees of the left panel can appear here as potential supervisors and can be set to be the self (own) supervisor.
- User can choose exactly one target supervisor using the appropriate radio button, which simplifies decision-making by allowing a single, clear choice for reassignment.
Hence, to transfer reportees to a different supervisor from within the Transfer Subordinate(s) modal window, first select the checkbox(es) against the Reportee(s) section users and then click on the radio button against any listed user under the New Supervisor section. Click on the Assign button, and then on the Done button to confirm.
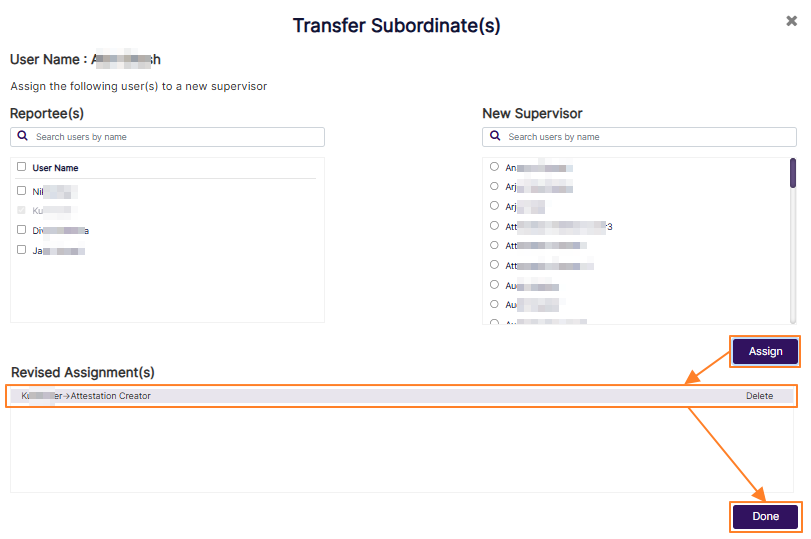 Fig: 120 - Assigning selected user with supervisor
The Transfer Subordinate(s) modal window gets automatically closed. Once confirmed, all selected reportee(s) get transferred under the chosen supervisor. The system meticulously recalibrates hierarchical associations, ensuring that all structural updates are executed without error or overlap. This rigorous process provides stakeholders with assured consistency and reinforces the dependability of the updated organizational setup.
NOTE: To remove any assignment made, click on the Delete option. This option is visible when you hover over the assignment row entry displayed in the Revised Assignment(s) section.
Fig: 121 - Option to remove selection made
3.9. Assigning Role(s)
Assigning roles to users in SurgeONE is a flexible way to define how individuals interact with different parts of the platform. From the user management view, you can select a team member and open their role assignment interface, where you will see two panels: one showing all available roles within your organization, and the other showing roles already linked to that user.
To update access, simply move relevant roles from the available list to the assigned list. You can select multiple roles at once, and use directional controls to shift them between panels. Once you have finalized the selection, confirm the update to apply the changes. After roles are assigned, they appear in the user overview with a quick preview, and hovering over the role section reveals the full list. Keep in mind that access to specific areas of the platform depends entirely on role assignment, if a user is not linked to any role tied to a module, they will not see or interact with that module at all. This approach ensures that every user has the right level of access and responsibility, helping organizations maintain clarity, security, and operational efficiency.
- Click on the vertical ellipsis icon of the ACTION column against a displayed user on the Manage Users page to load the menu options. Click on the expanded Assign Role(s) option to load the role assignment modal where you can assign relevant roles to the existing user.
- The following modal window loads where you can assign roles(s) or make modifications to the assigned role(s) to the chosen user. You can find two panels, one on the left and one on the right, labeled as Available Roles and Assigned Roles, respectively. The former lists out the existing roles of your organization, while the latter lists out the roles which are currently assigned to this user.
- Ensure that at least one listed role is moved from the Available Roles panel to the Assigned Roles panel. To move listed roles, you can use the buttons provided in the middle of the modal window. Refer to the following four points stated below to understand how to move roles between the panels.
- Right arrow (>) button - Click on it after making checkbox selection(s) of the listed roles of the Available Roles panel to move the selected roles to the Assigned Roles panel. Multiple checkbox selection is permitted. Alternatively, you can also double click on the label to move it, instead of clicking on the right arrow icon.
- Left arrow (<) button - Click on it after making checkbox selection(s) of the listed roles of the Assigned Roles panel to move the selected roles to the Available Roles panel. Multiple checkbox selection is permitted. Alternatively, you can also double click on the label to move it, instead of clicking on the left arrow icon.
- Double right arrow (>>) button - Click on it to move the displayed roles of the Available Roles panel to the Assigned Roles panel. If you have performed a search operation in the Assigned Roles panel and then click on this button, then only the filtered roles will be moved, while the other roles who were not fetched by the search operation, will not be moved.
- Double left arrow (<<) button - Click on it to move the displayed roles of the Assigned Roles panel to the Available Roles panel. If you have performed a search operation in the Assigned Roles panel and then click on this button, then only the filtered roles will be moved, while the other roles who were not fetched by the search operation, will not be moved.
- Click on the Done button to confirm role assignment based on the selection(s) made.
- The modal window closes and you can view the Manage Users grid view. The ROLE column displays the assigned role(s) in a truncated view and on mouse pointer hover over the column text, a tooltip is visible showing all of the assigned roles of this user.
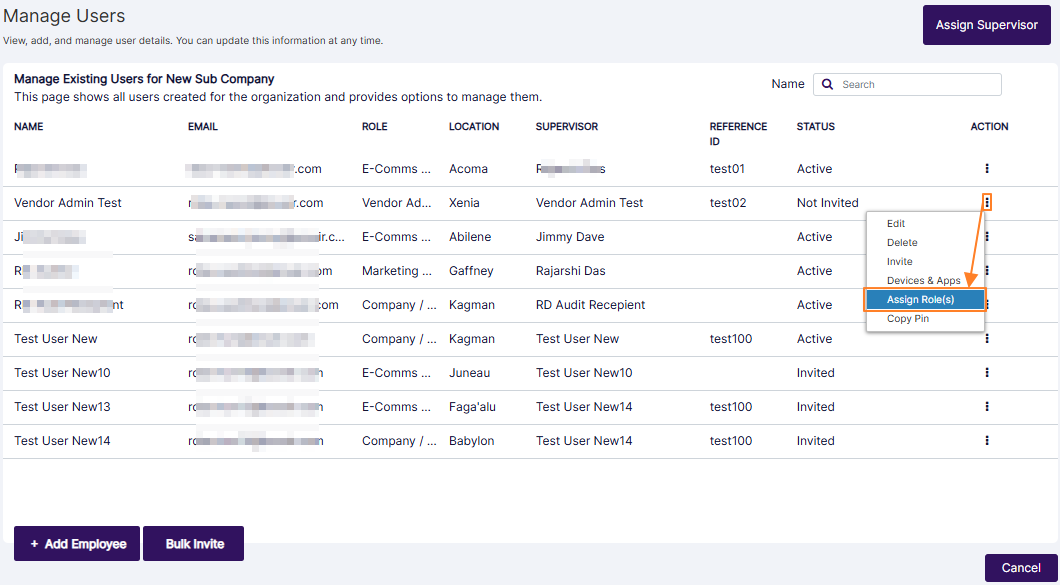 Fig: 122 - Assign Role(s) menu option
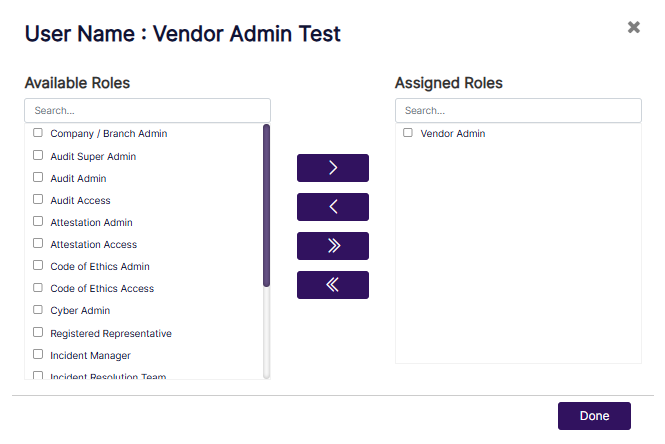 Fig: 123 - Modal window to assign role(s) to chosen user
 Fig: 124 - Button to confirm role(s) assignment to the user
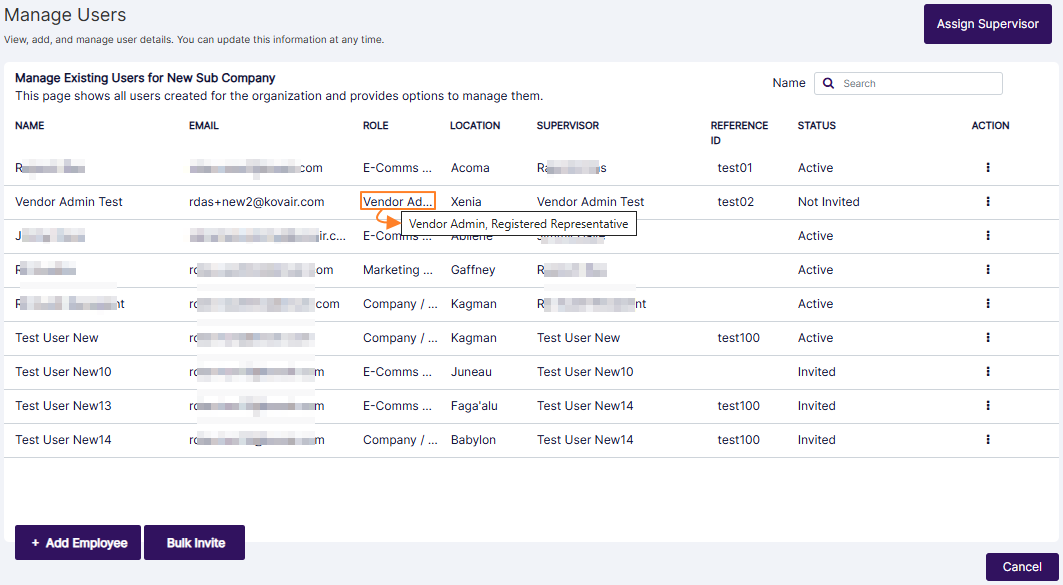 Fig: 125 - View of the assigned roles tooltip
NOTE:
- No Access to a Module: If a user is not assigned to any of the roles specific to a module, then he/she will not get access to that entire module. For example, if a user is not assigned to the Audit Super Admin, Audit Admin, and Audit Access Roles, then that user will not get the Audit Menu link on the navigation bar.
- A search facility is also provided in both the panels. The following screenshot displays a search operation executed in the Available Roles panel.
- Here is the view of the modal window when no roles are assigned to a user.
- You cannot proceed to assign users to the role, unless there are existing users listed in the modal window.
- The system will prompt a validation tooltip when you do not move any listed role to the Assigned Roles panel and click on the Done button.
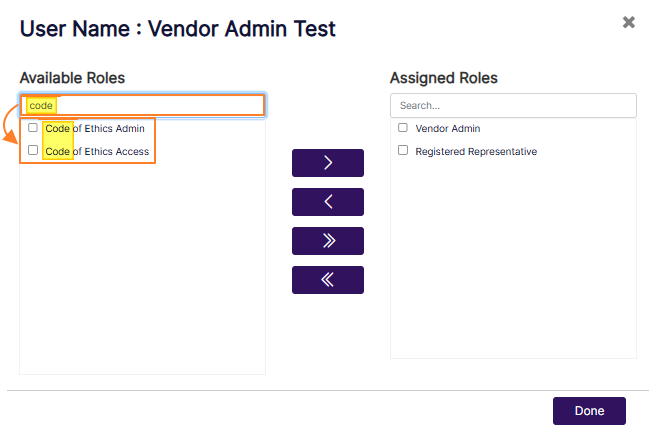 Fig: 126 - Search facility in the modal window to execute search operation among the listed roles
 Fig: 127 - No roles assigned to the user
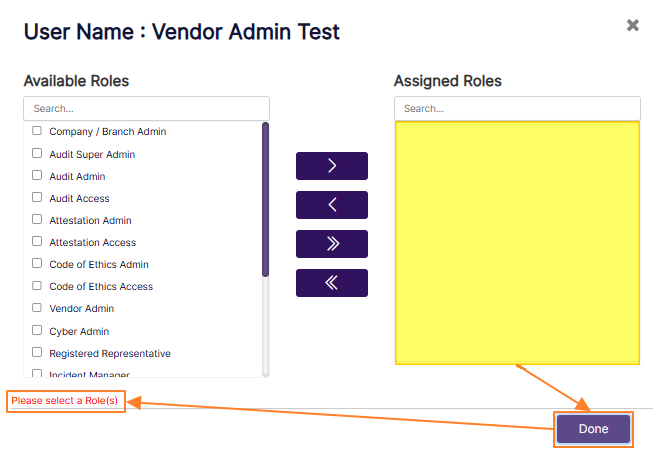 Fig: 128 - Validation to select role(s) to assign to the user
3.10. Copying PIN
Copying a PIN in SurgeONE provides a fast and secure way to retrieve access codes linked to a user. From the user management view, select an individual and choose the option to copy their PIN. This action generates a set of unique six-digit codes, typically used for installing software across multiple devices such as desktop, laptop, or mobile.
A confirmation message appears once the PIN is copied, indicating the process is complete. These codes help streamline device setup while maintaining secure user identification across different endpoints. It is a simple yet effective method for managing access credentials within the organization.
- Click on the vertical ellipsis icon of the ACTION column against a displayed user on the Manage Users page to load the menu options. Click on the expanded Copy Pin option to copy the unique PINs associated with the user.
- A success notification can be seen at the top of the Manage Users page.
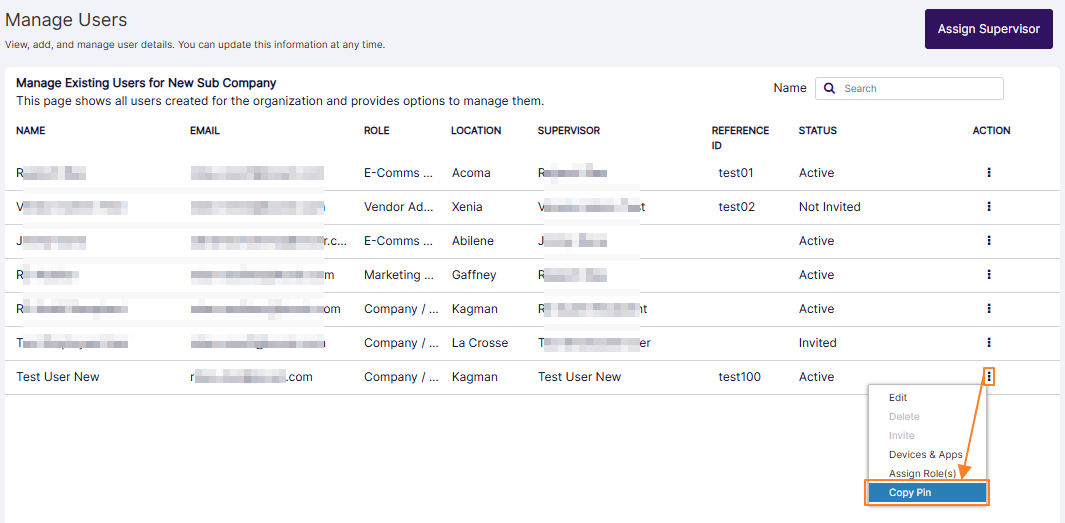 Fig: 129 - Copy Pin menu option
 Fig: 130 - View of success notification prompt
Here is the view of the copied pin of three sets of 6-digit number. Each set can be used for KiteCyber installation in three different user devices (such as workstation, macbook and mobile).
 Fig: 131 - View of copied sample PINs
3.11. Affiliate Companies
The Affiliate Companies feature in the Manage Users module enables administrators to seamlessly associate users across parent and child organizational structures. Through a straightforward interface, users can be assigned to one or more affiliated companies using a dual-panel selection mechanism, ensuring clear visibility and control over assignments. This functionality enhances administrative efficiency by allowing user access management from a centralized location while maintaining organizational hierarchy. It also ensures consistency in user availability across related entities, supports scalable user onboarding, and provides flexibility for future updates.
-
Locate the required user and click on the three-dot (⋮) Action menu on the right side. Next, click on the expanded Affiliate Companies menu option.
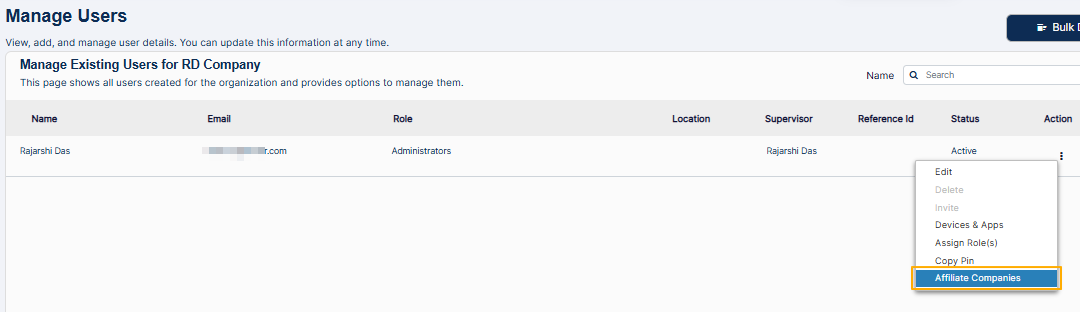 Fig: 132 - Selecting Affiliate Companies option
-
In the Available Companies list, select the desired company (e.g., RD Child Company) to assign. Click the right arrow ( > ) button to move the selected company to Assigned Companies.
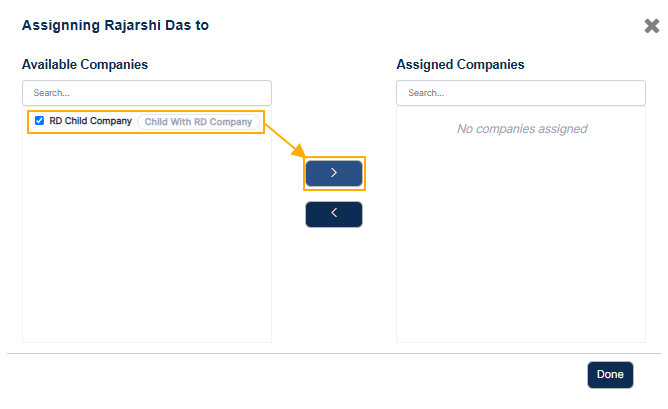 Fig: 134 - Moving company to assigned list
-
Confirm that the selected company now appears under Assigned Companies. The Available Companies list will no longer show the selected company. Click on the Done button to finalize the assignment.
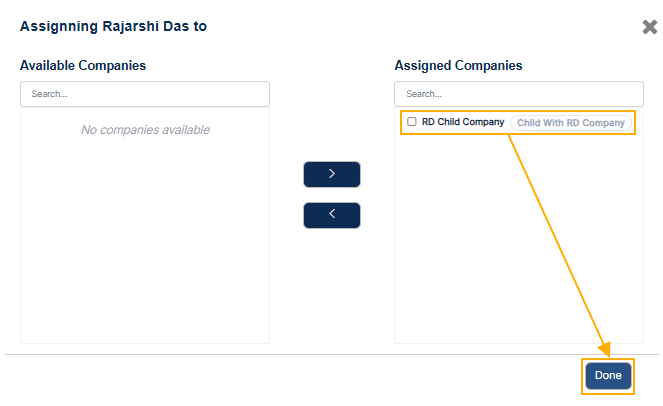 Fig: 135 - Confirming assignment
-
The modal window closes. A success notification gets triggered on the redirected Manage Users page of the parent organization.
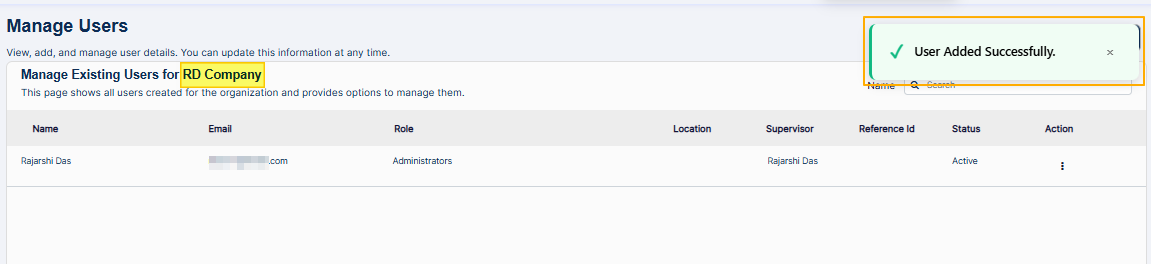 Fig: 136 - Success notification after assignment
-
If checked on the Manage Users page of the child organization, the same user is listed there with Active status. The Affiliate Companies option is now enabled for future updates.
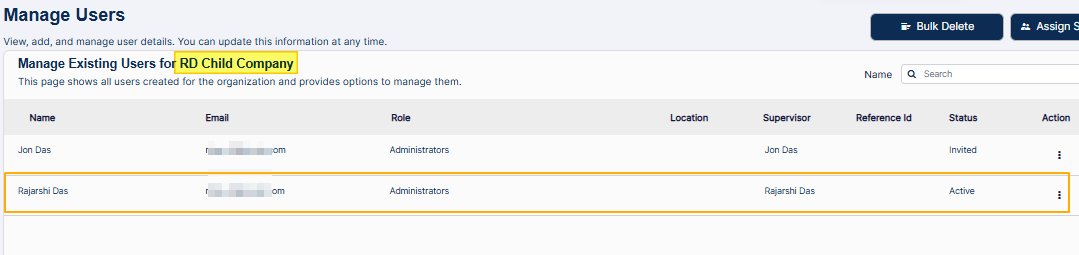 Fig: 137 - User visible in child organization
-
If the status of the user is Invited, the Affiliate Companies option is disabled. This applies to both parent and child organizations. Below is the view in the parent organization.
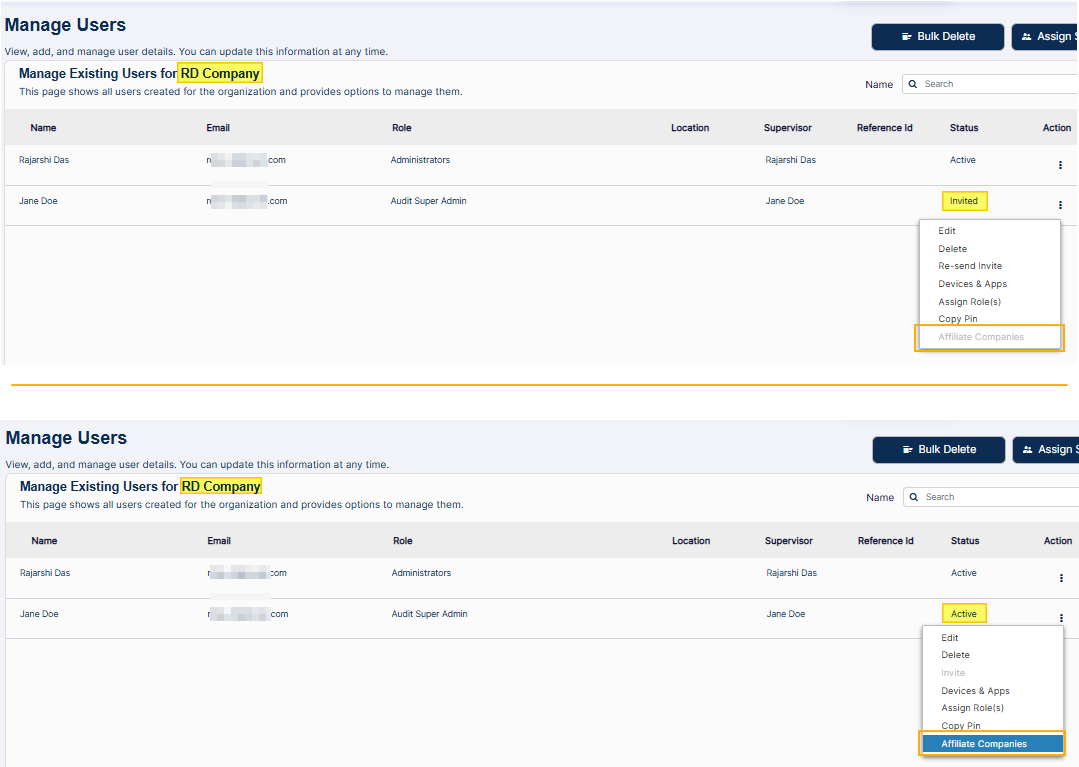 Fig: 138 - Disabled option in parent organization
-
The enabled menu option can be used to create more users in the child organization directly from the parent organization.
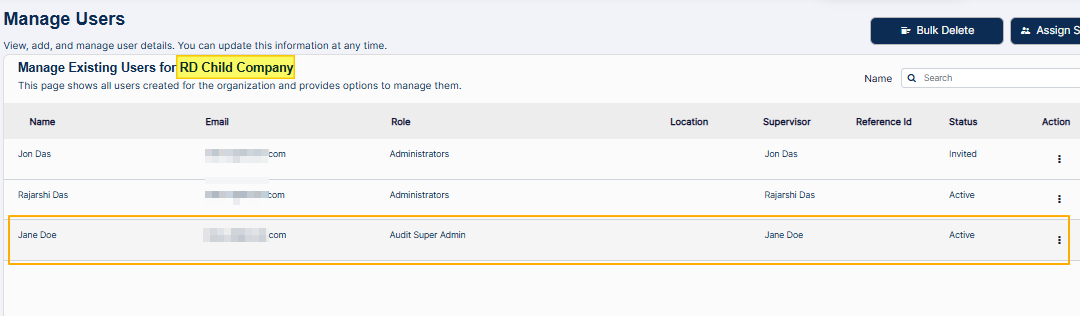 Fig: 139 - Creating users in child organization
-
As mentioned above, if the status of the user is Invited, the Affiliate Companies option is disabled. Here is the view of the option in the child organization.
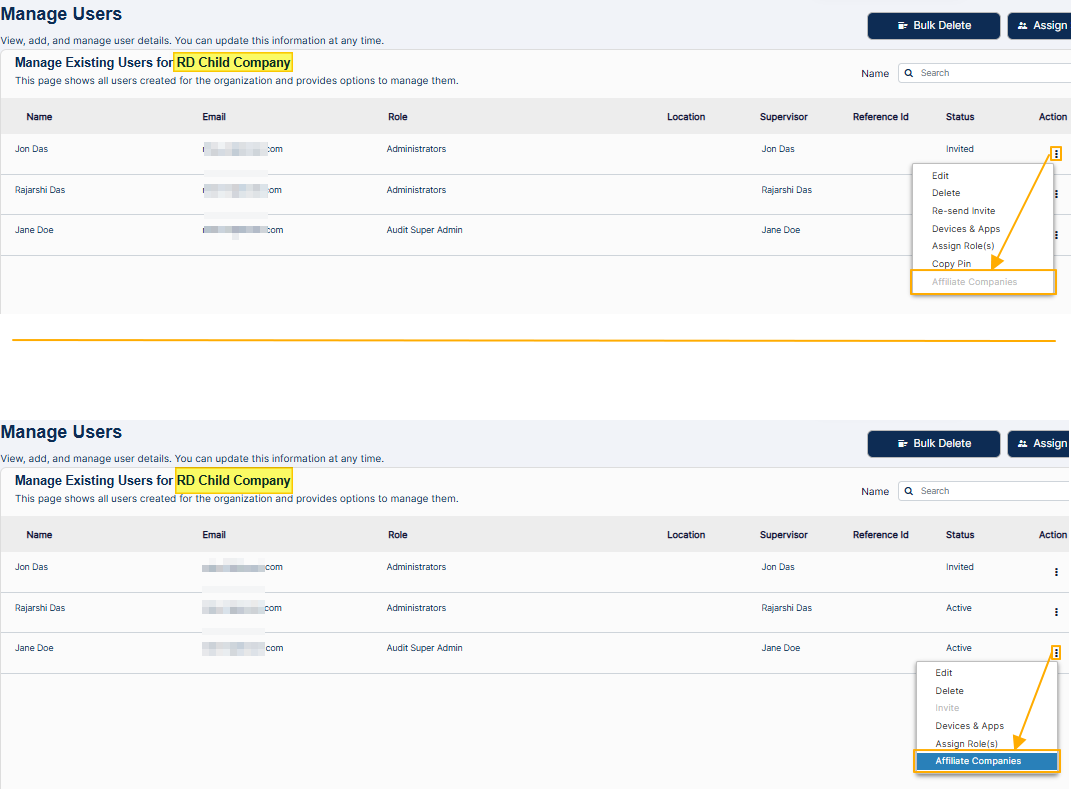 Fig: 140 - Option in child organization
The company assignment modal window loads. It is titled as “Assigning [User Name] to”. It contains two sections: Available Companies (left side) and Assigned Companies (right side).
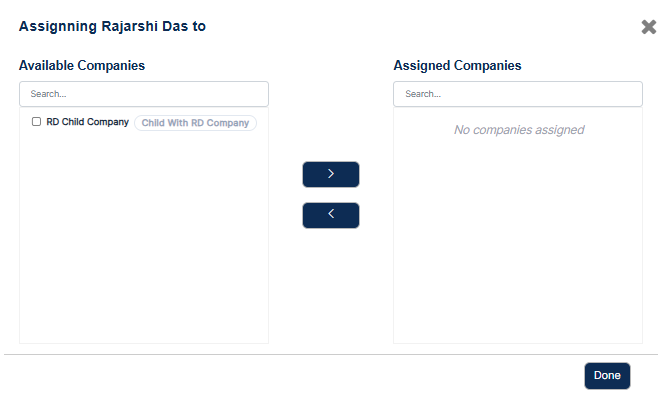 Fig: 133 - Assignment modal window
The hierarchical relationship (parent-child) can also be viewed in the Companies page of the Admin portal.
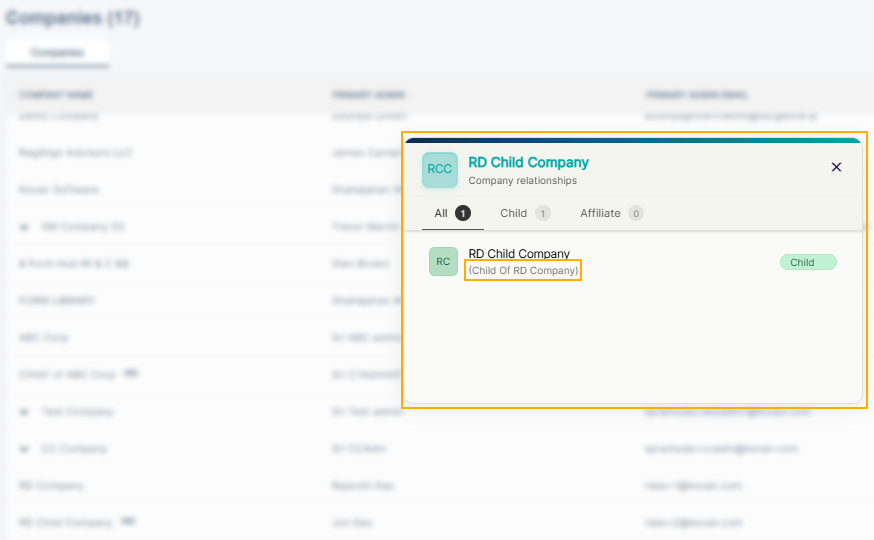 Fig: 141 - Parent-child hierarchy view
4. Importing File
Importing a file in SurgeONE allows you to bring in organizational data in a structured way. From the organization list, you can choose the option to import when only one top-level firm exists and no sub-firms have been created. This ensures that the hierarchy is set up cleanly from the start. You then provide a properly formatted Excel file that contains the hierarchy details. Once the file is selected, the name of the file becomes visible, and you have the option to remove it if needed before proceeding. After confirmation, the system processes the file and, if successful, displays a notification that the data has been imported
If the file is not valid or the import fails, a message is shown to indicate the issue, and you can cancel the attempt. This process ensures that only accurate and structured data is introduced, keeping the organizational setup consistent and reliable.
- On the Organizations List page, click on the row context vertical ellipsis icon under the ACTION column and click on the expanded Import File menu option.
- The Import Hierarchy dialog box loads. A Choose File button is present. Click on it to browse and upload a valid and formatted excel file with populated data to import its dataset into SurgeONE.ai.
- After you upload an excel file, you can notice the file name getting displayed beside the button. A red cross icon is visible after the displayed file name to remove the uploaded file.
- Click on the Import button to confirm your selection. The system will display success notification if the importing is successful.
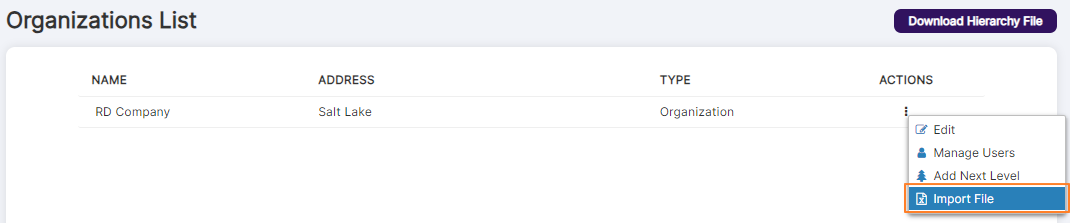 Fig: 142 - Import File option of the row context menu
NOTE: The Import file context menu option is available only if one organization is present and there are no existing sub-firms.
The following screenshot displays that the menu option is absent.
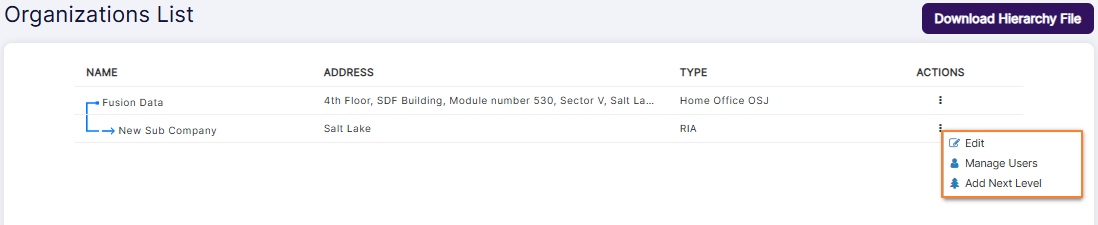 Fig: 143 - Import File context menu absent
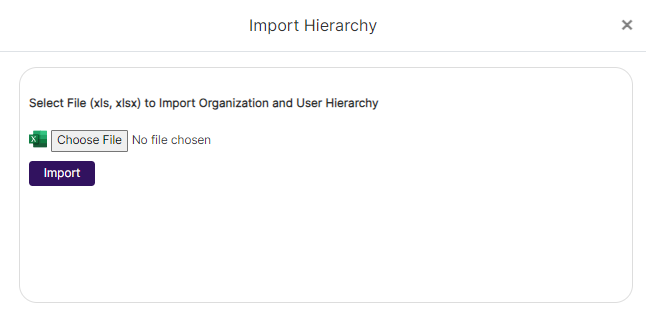 Fig: 144 - Import Hierarchy dialog box
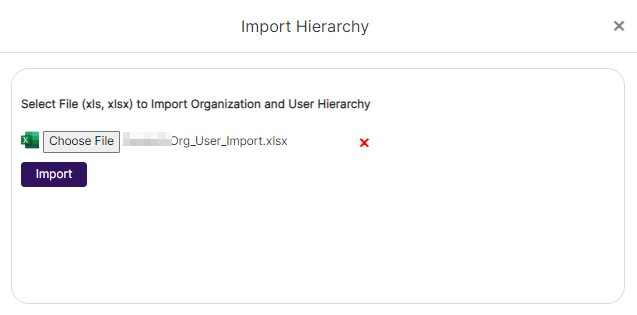 Fig: 145 - File name of uploaded excel file displayed
NOTE: If the data import from the uploaded excel file is not successful, the system will display an appropiate dialog box, as follows. Click on the Cancel button to close it.
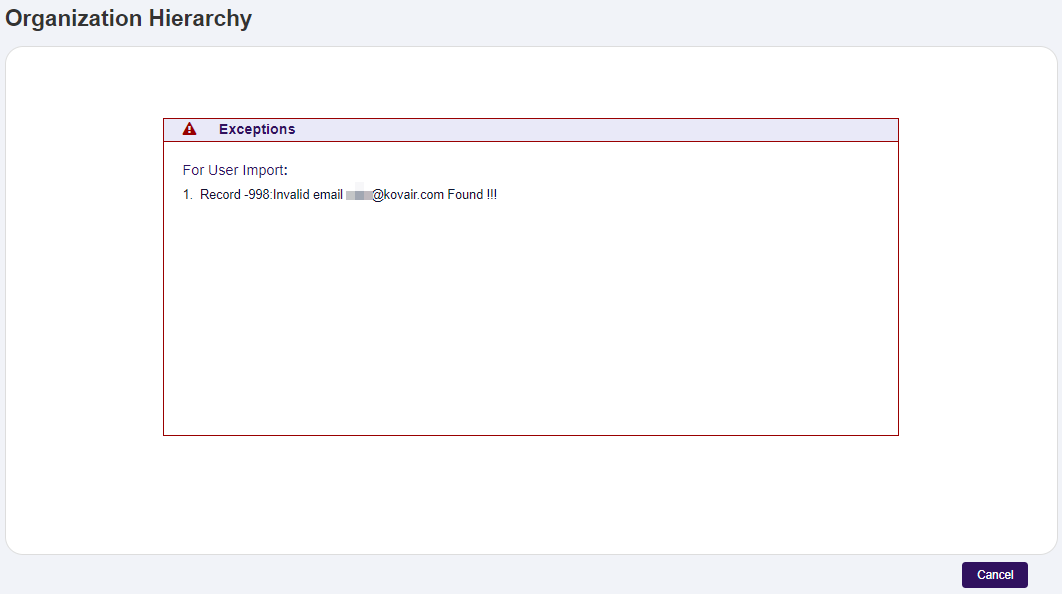 Fig: 146 - Import failed
Here is the view of the second sheet of the template file populated with data for uploading into SurgeONE.

Fig: 147 - Populated templated excel file for uploading
5. Downloading Hierarchy File
Downloading a hierarchy file in SurgeONE provides a structured template that captures both organization and user level information. From the organization list view, you can choose the option to download the file, which is generated as an Excel document.
The file contains two sheets. One sheet lists details related to the organization, and the other sheet lists details related to users. This format makes it easier to review, prepare, or update data for bulk operations such as imports or audits. By using this file, administrators can maintain consistency in how information is recorded and ensure that organizational structures and user records remain aligned. It also serves as a convenient reference for planning, reporting, or onboarding activities.
Click on the Download Hierarchy File button at the top right of the Oganizations List view.
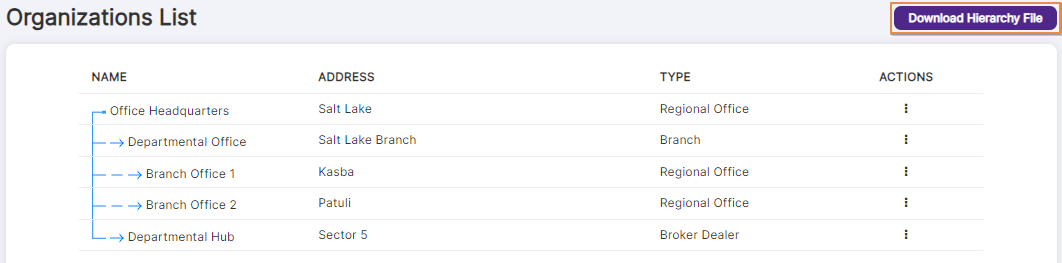
Fig: 148 - Download Hierarchy File button
An excel file gets downloaded with the filename SurgeONE.ai_Org_User_Import.xlsx. It contains the firm / organization and user level details in two sheets labeled Organization and User respectively.
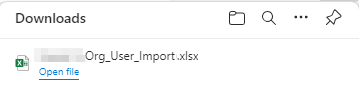 Fig: 149 - Downloaded excel file