
 This online help page offers detailed guidance on the SurgeONE.ai Certification Packages interface and its capabilities.
The Certification Packages page introduces a structured way to group multiple forms into reusable bundles to targeted employees for certification purposes. This page improves efficiency by standardizing certification workflows and reducing manual setup. With deadline management and progress tracking, users gain better oversight and experience a smoother certification journey.
Certification Items page displays these Certification Packages ONLY to their submitters and assigned users.
The accessibility and functionalities of the different sections of this Certification Packages page are dependent on the published forms and the pool based access set for the logged-in user. For more details refer to the Forms Library online help and Users Pool online help.
1. Navigating to the Certification Packages page
To begin working with Certification Packages, permitted users must first access the Certification Packages module. The Certification Packages page acts as the central hub for all employee certification activities within the SurgeONE system. Users can perform tasks such as creating, searching, reviewing, and performing certification actions.
Click on the Certification menu group of the left panel and then on the expanded Certification Packages menu label.
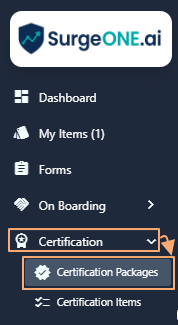 Fig: 1 - Certification Packages menu option
Clicking on this menu option loads the Certification Packages page showing a blank grid view.
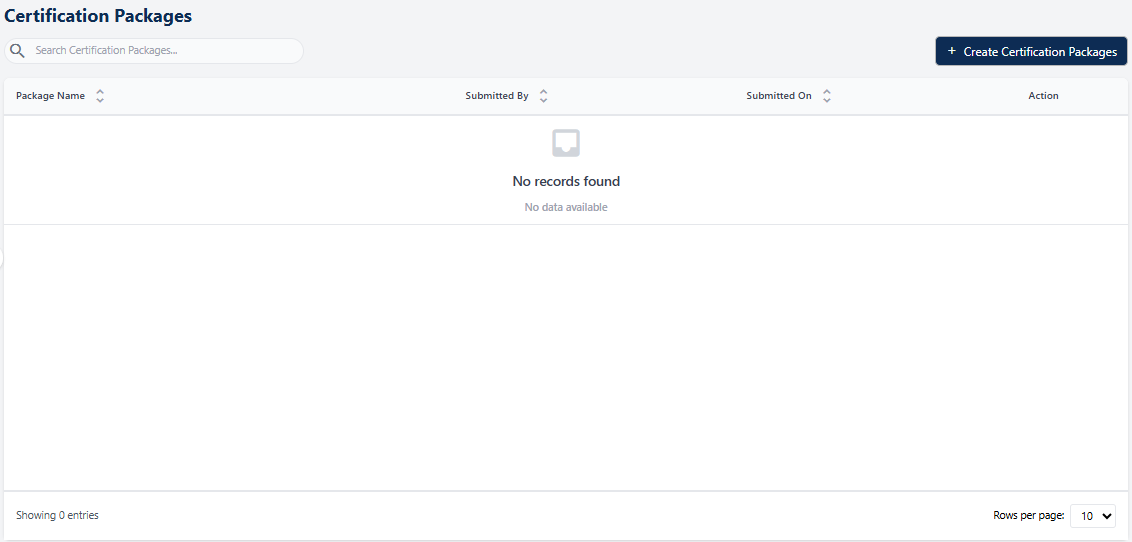 Fig: 2 - Grid view blank by default
All the Certification Packages of your organization can be published here manually, one-by-one. Here is the view of one such entry populating the grid view. These custom Certification Packages can be created and submitted for review and approval by the assigned personnel.
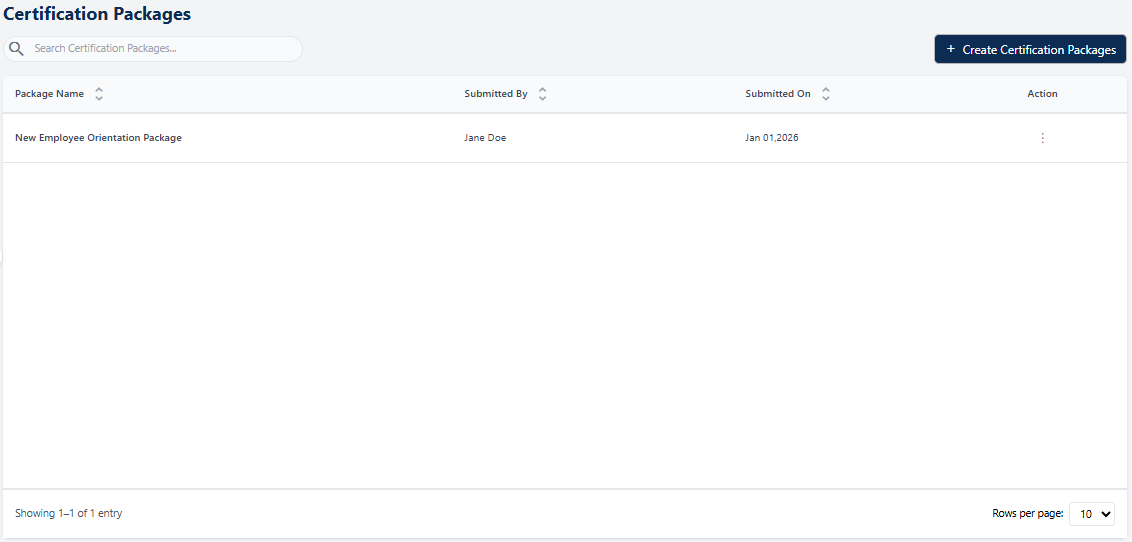 Fig: 3 - Certification Packages page with added custom Certification Packages
Key features of this Certification Packages page
- Package Creation → Create certification packages by grouping selected forms and defining essential info such as category, review dates, etc.
- Form Selection → Choose from available forms to include in the certification package for compliance and review purposes.
- User Assignment → Assign certification packages to individual employees or multiple users for streamlined management.
- Progress Tracking → Monitor completion status, review timelines, and compliance progress across all assigned employees.
2. Understanding the Certification Packages page elements
The Certification Packages page is designed to provide an organized interface for managing packages. It includes various elements that support navigation, viewing, and performing actions efficiently. These components work together to help users access information, manage entries, and complete tasks without unnecessary complexity. Familiarizing yourself with the page layout ensures smooth navigation and effective use of available features.
Refer to the following screenshot which is marked with numerical values that correspond to the below stated points.
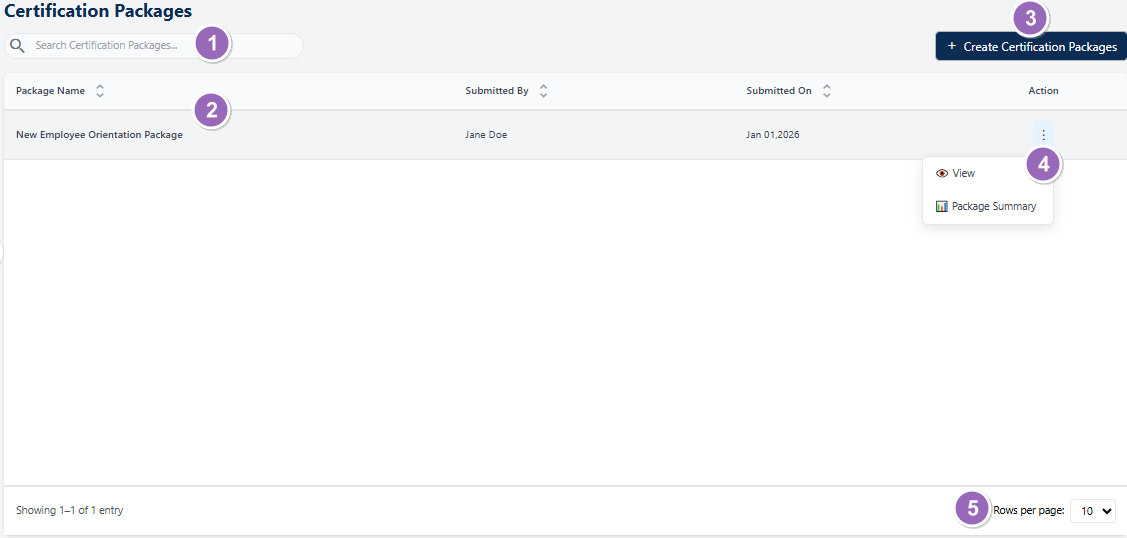 Fig: 4 - Understanding the various elements of the Certification Packages page
-
1Search barThe search bar allows users to quickly locate added / submitted certification package entries using keywords.
-
2Grid viewDisplays loaded or filtered results in a structured tabular format.
-
3+ Create Certification Packages buttonAdd a new certification package entry in the Certification Packages grid view by choosing any published forms from Manage Forms module and assigning active employees.
-
4Action columnContains a vertical ellipsis
 icon to toggle row-context menu options.
 -
5Pagination optionsControls page item limits and enables navigation across multiple pages of certification package entries.
 NOTE: The following sub-sections elaborate further the associated functionalities of the above-stated points.
2.1. Searching for Certification Packages
The Search feature allows users to quickly locate specific Certification Packages within large datasets. Instead of manually scrolling through multiple pages, users can enter keywords, package names, or other relevant criteria to filter results instantly. This functionality improves efficiency by narrowing down the list to only the most relevant entries, making it easier to access, review, and manage the desired packages. Using search ensures faster navigation and a more streamlined workflow.
You can use the search bar to enter text and find matching results.
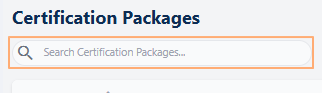 Fig: 5 - Search bar to quickly find added Certification Packages
The search operation gets executed on the Package Name, Submitted By and Submitted On columns' data. Based on the text entered, matching results are listed out.
 Fig: 6 - Filtered results
If no results are fetched by the executed search query, a No records found label in the grid view and a Showing 0 Records label is displayed below the grid view.
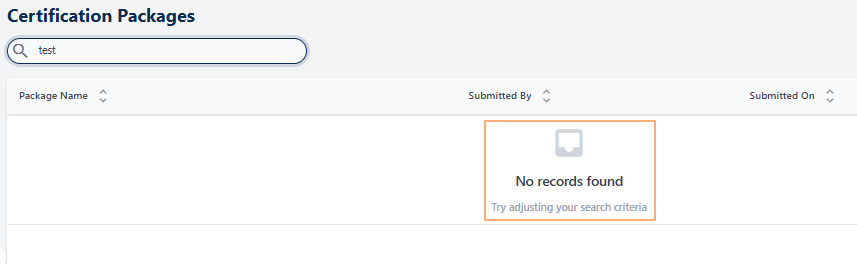 Fig: 7 - No matching records found
2.2. Understanding the grid view
The grid view provides a structured, tabular layout of all Certification Package entries, making it easy to review and manage large datasets. Each row represents an individual package, while columns display key details such as package name, status, and associated actions. This view is designed for quick scanning and efficient navigation, allowing users to sort, filter, and access relevant information without opening multiple screens. By leveraging the grid, users can perform essential tasks, such as viewing certification package details or initiating actions directly from this centralized interface.
The grid view displays all certification package entries. The following columns are present:
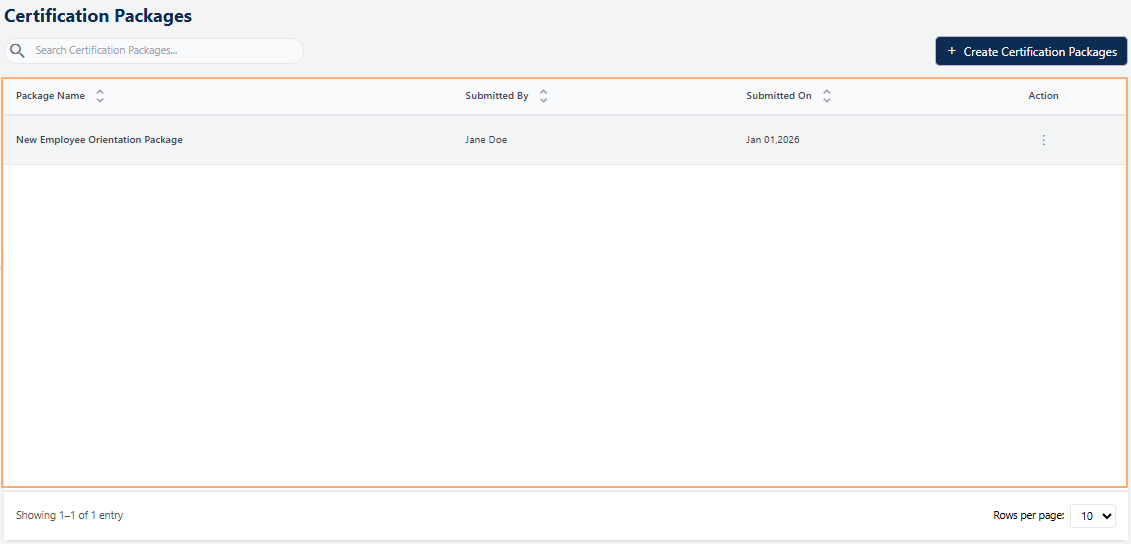 Fig: 8 - Certification Packages grid view
-
1Package NameDisplays the official name of the package as defined during its creation. This helps users identify which certification package or process the entry belongs to.
-
2Submitted ByShows the name of the individual who submitted the package, ensuring accountability and easy traceability.
-
3Submitted OnDisplays the exact date when the package was submitted, supporting timely reviews and compliance monitoring.
-
4ActionContains a vertical ellipsis icon to toggle row-context menu options for performing actions.
2.3. Creating a Certification Package
The Create Certification Package feature allows users to define and assemble all necessary components for a new certification process. This option provides a structured workflow to input essential details and configure package settings. By using this functionality, users can ensure that each package is accurately set up to meet compliance and organizational requirements. It simplifies the process of building certification packages from scratch, enabling efficient assignment to targeted employees.
Click on the + Create Certification Packages button to add a new certification package entry in the Certification Packages grid view by choosing any published forms and assigning active employees.
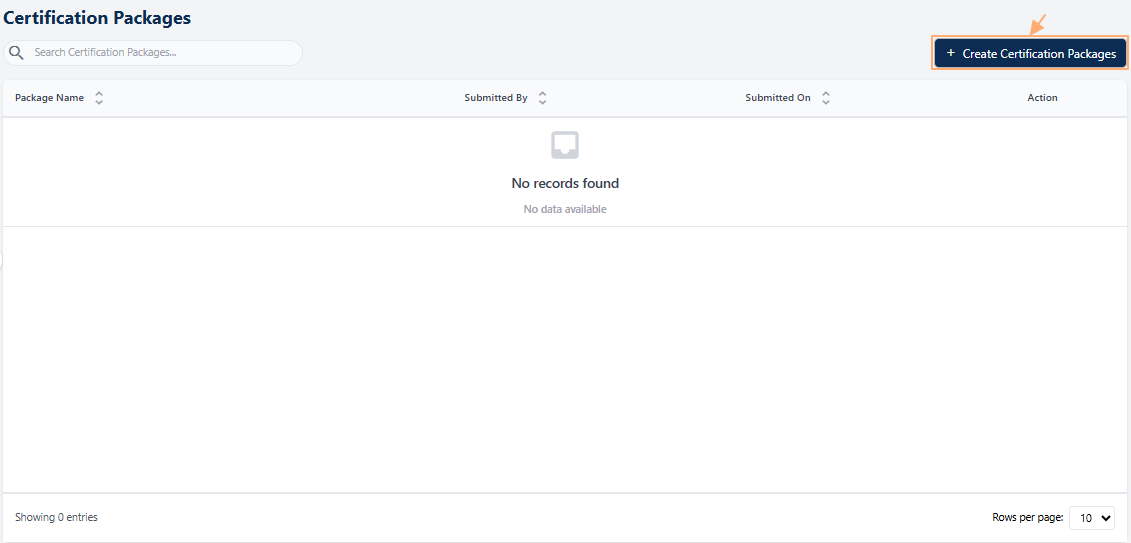 Fig: 9 - Clicking on the package creation button
There are three tabs to create a Certification Package, as follows:
-
1Package DetailsDefine the core information for the certification package, including name, start date, purpose, and procedures.
-
2Select FormsChoose and add relevant forms to the package for a complete certification workflow.
-
3Assign EmployeesAllocate the certification package to designated employees and finalize submission.
Steps to fill the Package details are mentioned in the below table.
1st Tab > Package Details
| Sl. No. | Field / Section Label / Action | Description and Benefit |
|---|---|---|
| Name |
Enter the name of the certification package (e.g., "New Employee Orientation Package").
Benefit: Helps identify the certification package easily in the system. |
|
| Category |
Select the appropriate category from the dropdown list to classify the package.
Benefit: Organizes packages for better filtering and reporting. |
|
| Review Start Date |
Choose the date when the certification review process begins.
Benefit: Ensures timely initiation of certification activities. |
|
| Review End Date |
Choose the date when the certification review process ends.
Benefit: Defines the deadline for completion and compliance tracking. |
|
| Initiation Date |
Choose the date which denotes the starting date of the certification process.
Benefit: Helps ensure activities begin as per the planned schedule. |
|
| Completion Date |
Choose the date as the expected end date of the certification process.
Benefit: Enables tracking of progress and timely completion of tasks. |
|
| Procedures |
Outline the steps or processes included in the certification package.
Benefit: Provides clarity on required actions for successful certification. |
|
| Mail Template |
Select an email template for notifications related to this certification package.
Benefit: Ensures consistent communication with participants. |
|
| On-Screen Information |
Add instructions or guidance that will appear on-screen for users completing the certification.
Benefit: Improves user experience by providing clear directions. |
|
| Additional Information |
Include any extra details that may help clarify the package requirements.
Benefit: Offers flexibility for adding context or special instructions. |
|
| Purpose |
State the objective of this certification package.
Benefit: Provides clarity on the goal and expected outcomes. |
|
| Workflow Settings > Send Notifications? |
Slider to configure workflow behavior. When enabled, it reveals a Notifier Pool dropdown. Select any displayed option to trigger notifications to the users belonging to the chosen notifier pool.
Benefit: Triggered notifications assist users in timely workflow execution. |
|
|
||
| Cancel / Next |
Use Cancel to discard changes or Next to proceed to the next step (Select Forms).
Benefit: Offers easy navigation and control over the process. |
|
|
||
| Stage Indicator |
Displays the current step in the certification package creation process at the top right of the interface (e.g., Package Details → Select Forms → Assign Employees).
Benefit: Provides clear visibility of progress and helps users understand where they are in the workflow. |
|

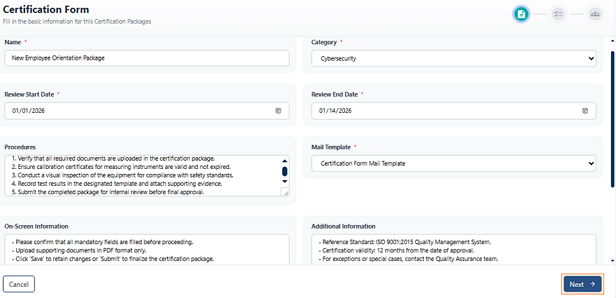
Here is the view of the first tab. The image is marked with numerical values which correspond with the tabular data mentioned above.
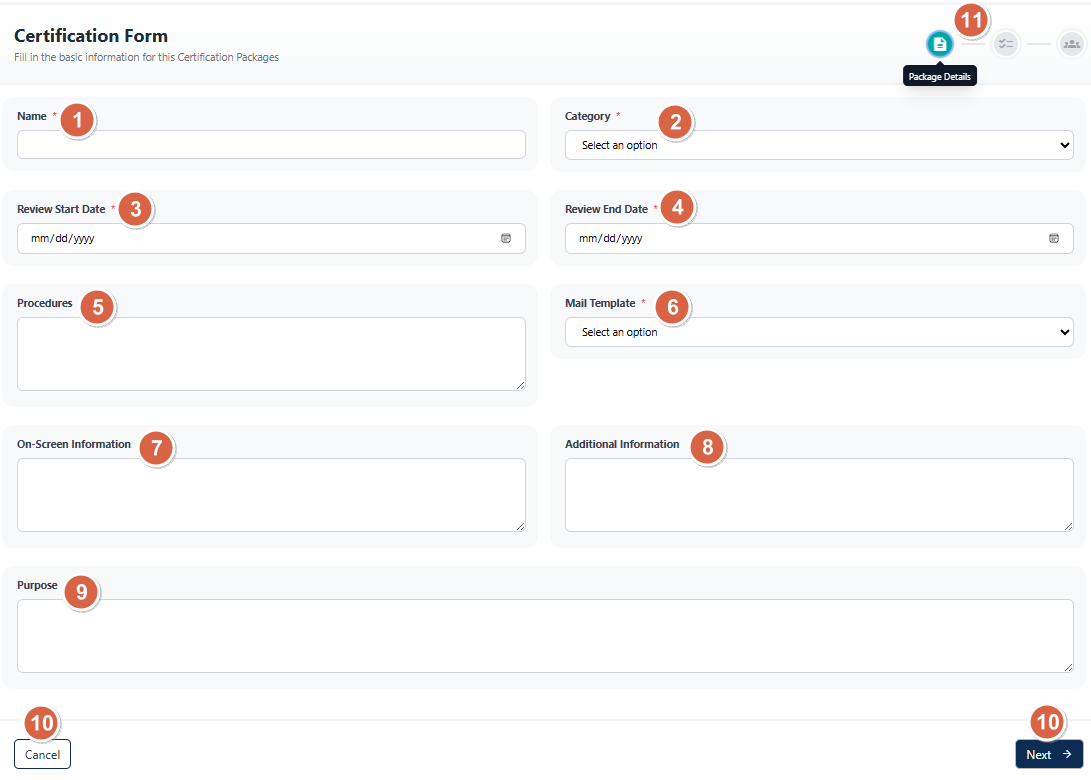 Fig: 12 - Package Details tab of Certification Package creation
NOTE:
- You must enter data in all of the mandatory fields to proceed to the next tab. Otherwise, the following validation tooltip gets prompted.
- After you click on the Send Notifications? slider, a Notifier Pool dropdown appears in the Workflow Settings card. The slider needs to be enabled if notifications should be sent using a mail template to people in notifier pool. Select appropriate notifier pool from the dropdown. Only one option can be set. The dropdown options are fetched from created notifier pools of the Users Pool page.
- If you click on the Next button without selecting a dropdown option when this slider is enabled, the system does not allow you to proceed.
- Admin-Controlled and Package-Specific Behavior - The behavior of notifications is fully Admin-driven and specific to each package:
- Only Administrators (or permitted users) can configure notifier pools and workflow notifications.
- Notification settings apply solely to the package being configured.
- A system-managed email template ensures consistency in message format and reduces ongoing maintenance.
This structure provides complete administrative control while giving stakeholders improved visibility with no additional configuration required on their end. - Only pools configured with the type Notifier Pool under Settings → User Pool will appear in the dropdown. This gives Admins precise control over who receives progress updates on a package-by-package basis.
Each email includes key details such as:- Package name
- Submitted form name
- Submitter's name
- Remaining form count
- Completion indicator (e.g., "All Forms Filled")
- Once notifications are enabled and a pool is selected:
- Each time a form is submitted, the system triggers a progress email.
- All users in the selected Notifier Pool receive the update.
- Alerts continue to be triggered in the system until the entire package is completed. This ensures complete clarity and alignment throughout the entire lifecycle of a package, significantly improving workflow transparency.
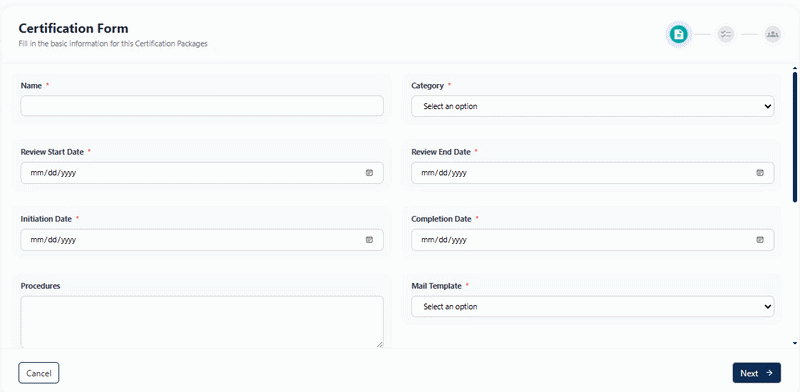 Fig: 13 - Validation tooltip to enter data in mandatory fields
 Fig: 14 - Enabling the Send Notifications? slider to choose a notifier pool
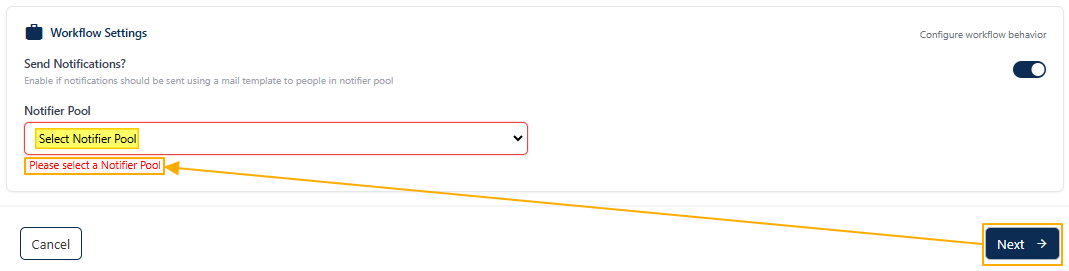 Fig: 15 - Tooltip prompted to select notifier pool
2nd Tab > Select Forms
The form selection step has been briefly described in the following two tables.
- The first table describes the default page elements and form selection process
- The second table describes the page elements present after form selection, the submission of the selected forms and configuration of its parameters
| Sl. No. | Field / Section Label / Action | Description and Benefit |
|---|---|---|
| No Forms Selected Yet |
Displays a message when no forms have been added to the package. This is the default state.
Benefit: Alerts users to add forms before proceeding. |
|
| Browse Available Forms |
Allows users to view and select forms from the available list. Only forms with Active status of Forms Library are visible in the loaded modal window. It disappears when you include a form.
Benefit: Ensures correct forms are included in the package. |
|
| Add Forms to Package |
Performs the same function as the above field. Click on it to load a modal to view and select forms from the available list. Any forms already included are displayed with greyed-out checkboxes.
Benefit: Provides visibility of included forms before submission. |
|
| Selecting Forms |
Click on the checkbox or row entry of the published forms to select. Use the top checkbox to select all listed forms. You can use the search bar to quickly find forms. Click on the Add Selected Forms button to add the forms to the package as per your selection.
Benefit: Seamlessly include active forms to the package. |
Here is the view of the second tab and the loaded Available Forms modal window. The image is marked with numerical values which correspond with the tabular data mentioned above.
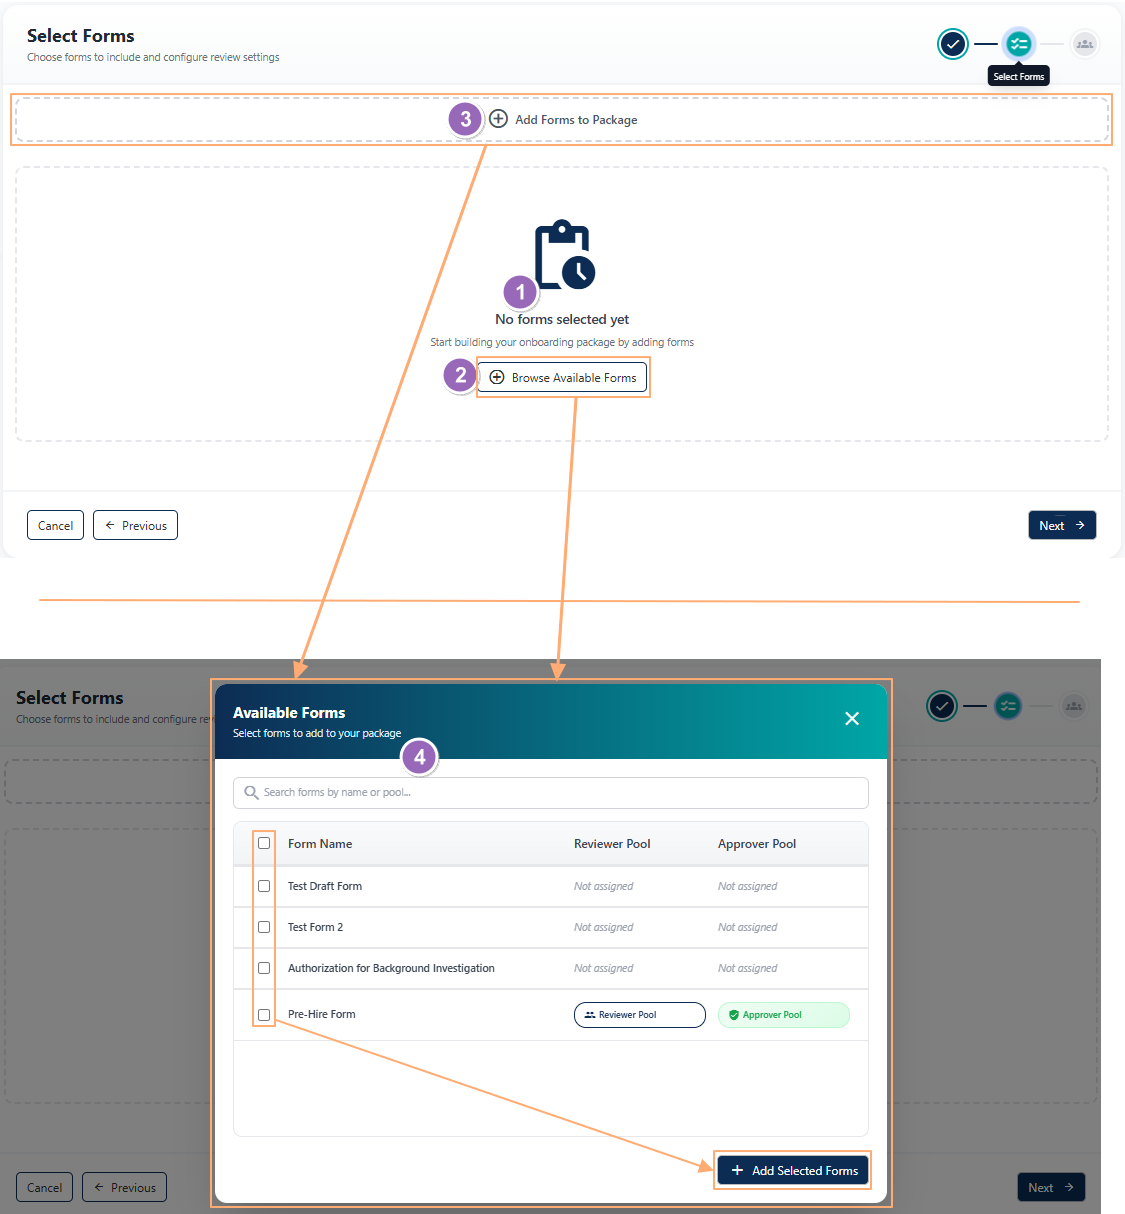 Fig: 16 - Default view of the Select Forms tab during Certification Package creation
This table describes the page elements present after form selection, the submission of the selected forms and configuration of its parameters.
| Sl. No. | Field / Section Label / Action | Description and Benefit |
|---|---|---|
| Add Forms to Packages |
Opens the Available Forms dialog, allowing users to select forms to be included in the certification package.
Benefit: Enables quick selection of required forms without leaving the workflow. |
|
| Review Required Toggle |
Allows users to enable or disable the review requirement for a selected form.
Benefit: Provides flexibility to include review steps only where necessary. |
|
| Reviewer Pool Selector |
Allows users to assign a reviewer pool responsible for reviewing the selected form.
Benefit: Ensures forms are reviewed by the appropriate group of reviewers. |
|
| Reviewer Requirement Scope |
Defines whether review is required from any one reviewer or all reviewers in the selected pool.
Benefit: Supports both parallel and single‑review approval models. |
|
| Approver Pool Selector |
Allows users to assign an approver pool responsible for approving the selected form.
Benefit: Ensures proper authorization before form completion. |
|
| Approver Requirement Scope |
Specifies whether approval is required from any one approver or all approvers in the selected pool.
Benefit: Provides control over approval strictness and governance. |
|
| Delete icon |
Allows users to remove a previously added form from the certification package.
Benefit: Enables easy correction when forms are added unintentionally. |
|
| Next button |
Proceeds to the next step in the certification package configuration workflow.
Benefit: Allows users to continue setup once form configuration is complete. |
|
| Previous button |
Navigates back to the previous step without losing configured form settings.
Benefit: Allows users to review or modify earlier configurations. |
|
| Cancel button |
Exits the certification package creation process without saving further changes.
Benefit: Provides a safe exit to prevent saving incomplete configurations. |
Here is the view of the second tab after forms are displayed in the page (after inclusion) along with its configurable parameters. The image is marked with numerical values which correspond with the tabular data mentioned above.
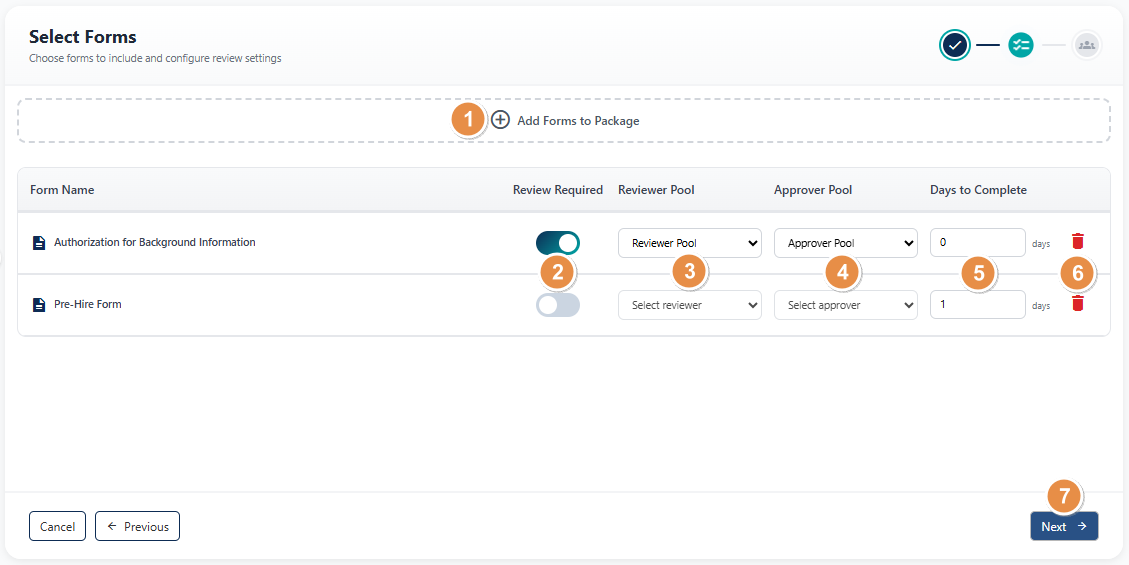 Fig: 17 - Select Forms tab view after form(s) selection
3rd Tab > Assign Employees
Here is the view of the third tab after forms have been selected and its configurable parameters have been specified. The image is marked with numerical values which correspond with the tabular data mentioned below.
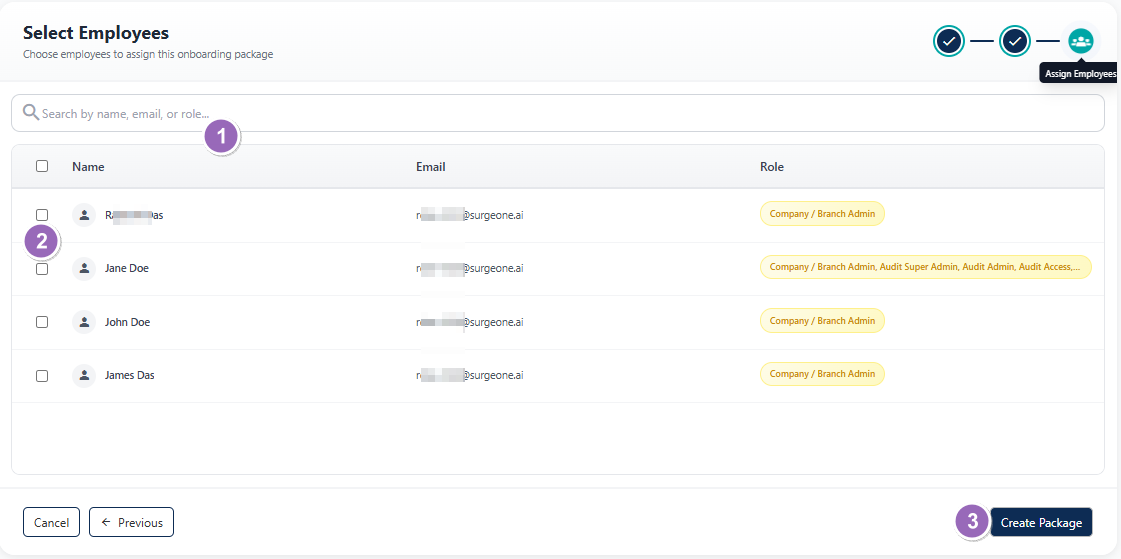 Fig: 18 - Assign Employees tab view after form(s) selection
| Sl. No. | Field / Section Label / Action | Description and Benefit |
|---|---|---|
| Search bar |
Search for listed users by entering keywords fully or partially. Search operation is executed on the basis of user name, email address or assigned role of the user.
Benefit: Displays individuals who can receive the certification package. |
|
| Selection checkbox and Select Employees grid view |
Assign the certification package to selected employees for execution by using the checkboxes provided. Multiple employees can be assigned to work on one package. In the grid view, listed results consisting of the active employees of your organization can be seen. The inactive users are not displayed here. Three columns are present to reveal the full name, registered email address and the role(s) assigned to the active employees. You can also use the search bar to quickly find active employee(s).
Benefit: Ensures the right individuals receive the package for timely completion. |
|
| Set Reminders button |
Allows users to configure automated reminder notifications for important dates related to the certification package. More details on setting reminder have been explained in the below NOTE section (for the same menu option, the explanation is provided here).
Benefit: Helps ensure timely follow‑ups, reduces the risk of missed deadlines, and keeps stakeholders informed without manual intervention. |
|
| Previous button |
Navigates the user back to the previous step in the certification package creation workflow without discarding the entered information.
Benefit: Allows users to review or modify earlier inputs easily, reducing errors and rework. |
|
| Cancel button |
Exits the certification package creation process without saving it.
Benefit: Gives users a safe way to stop the process and avoid saving incomplete or incorrect information. |
|
| Create Certification Packages button |
Confirms and creates the certification package (included forms) for processing by the selected employees.
Benefit: Finalizes the process of certification package creation. |
Here is the view of the third tab after employees have been selected. The number of employees selected is displayed at the top-right.
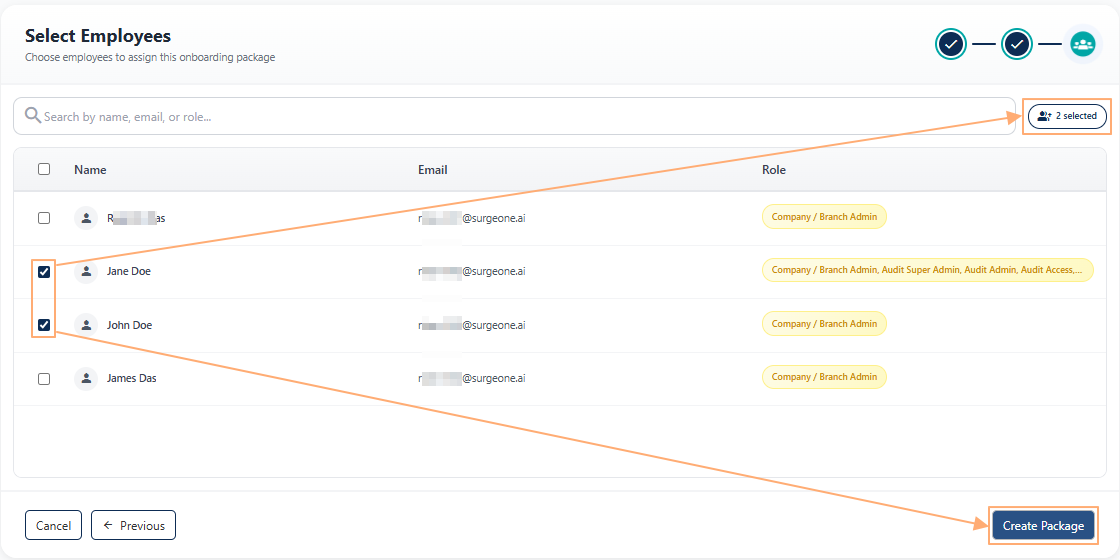 Fig: 19 - Assign Employees tab view after employee selection
By following these steps, users can confidently submit Certification Packages. Once created, it is visible in the grid view.
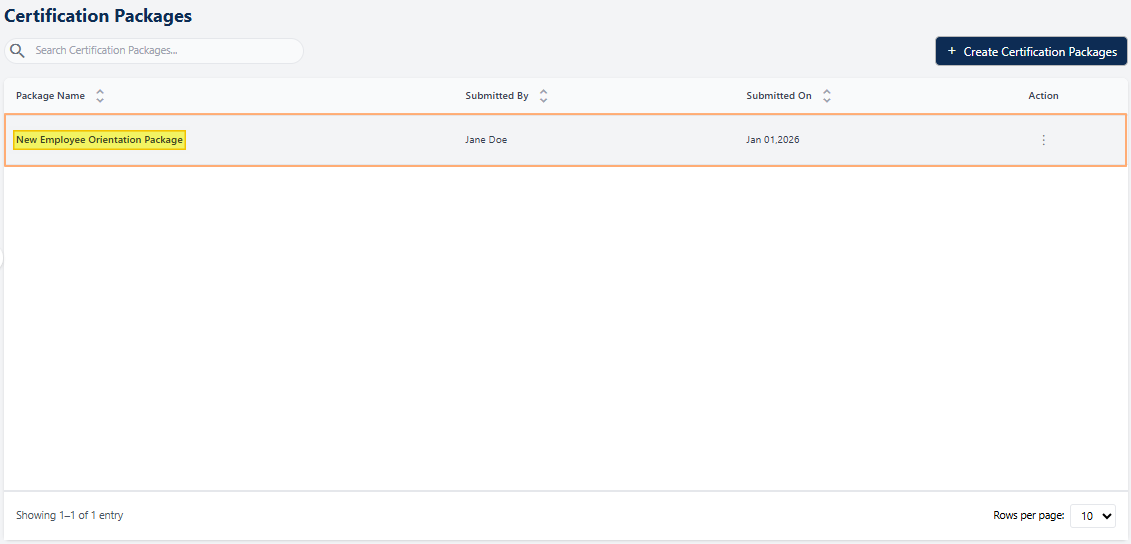 Fig: 20 - Created entry visible in grid
An email gets triggered to the assigned user(s).
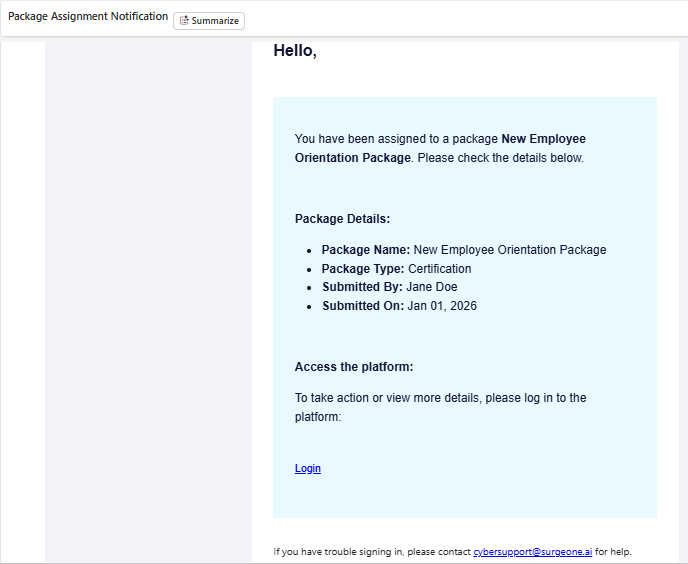 Fig: 21 - Triggered email on package creation
Submitted Certification Packages are available to the assigned employees under the Certification Items module (grid view and package summary view), as well as in the My Item(s) page.
Only submitters and assigned users see these submitted Certification Packages in Certification Items page. NOTE:
- You can use the search bar to enter text and find matching results. The search operation gets executed on the Name, Email and Role columns' data. Based on the text entered, matching results are listed out.
- If you click on the Cancel option and then on Yes, Cancel button of the confirmation prompt modal window, the page closes and you get redirected to the Certification Packages page.
- You must select at list any one user to proceed to create the certification package. Otherwise, the following validation gets prompted.
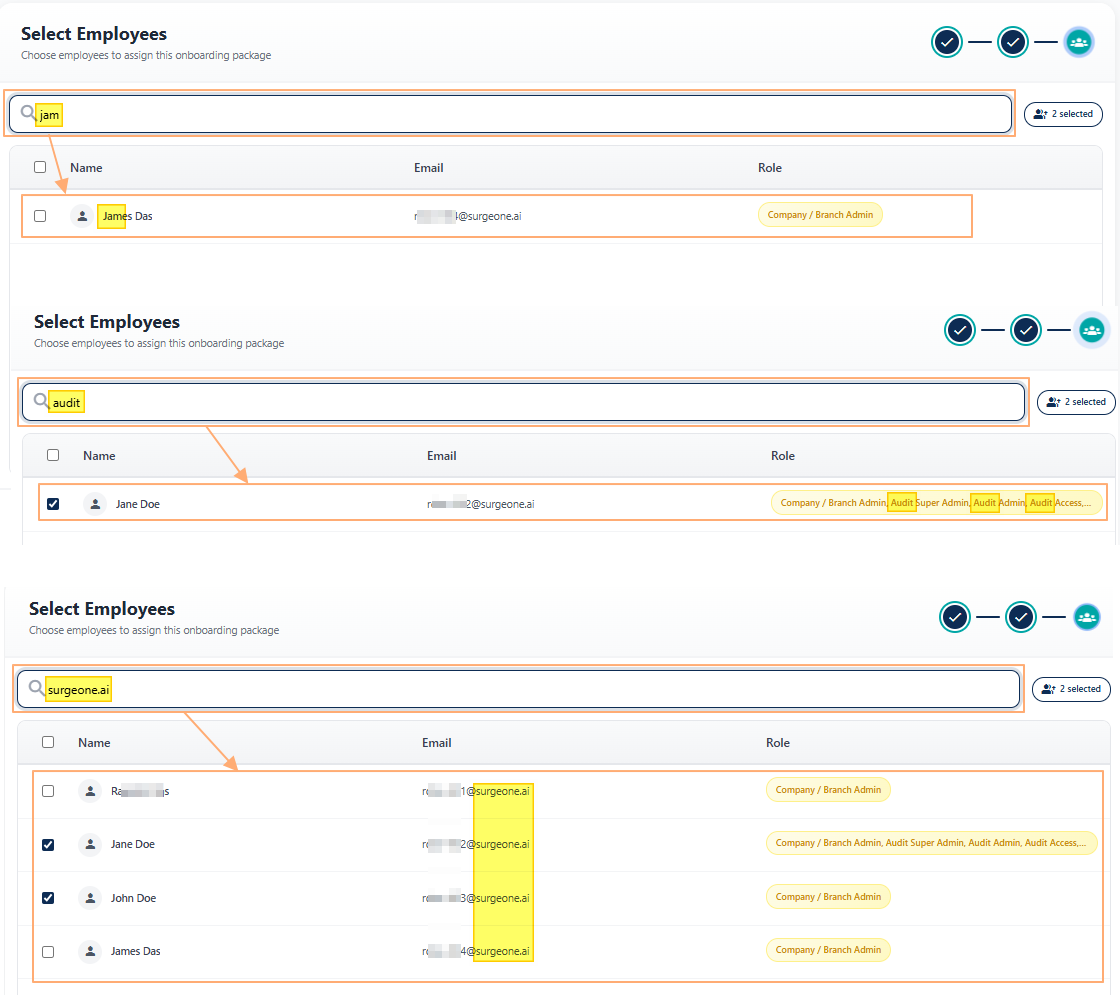 Fig: 22 - Filtered results
If no results are fetched by the executed search query, a No records found label in the grid view and a Showing 0 Records label is displayed below the grid view.
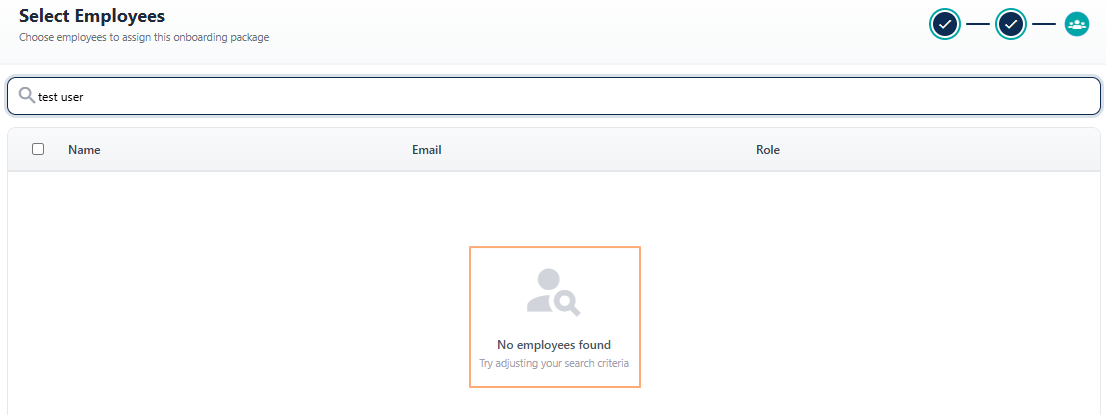 Fig: 23 - No matching records found
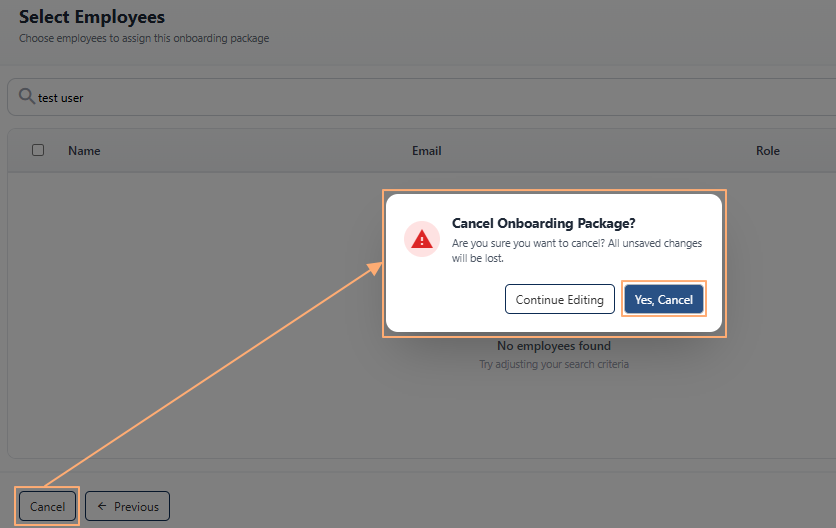 Fig: 24 - Cancelling certification package creation during employee selection
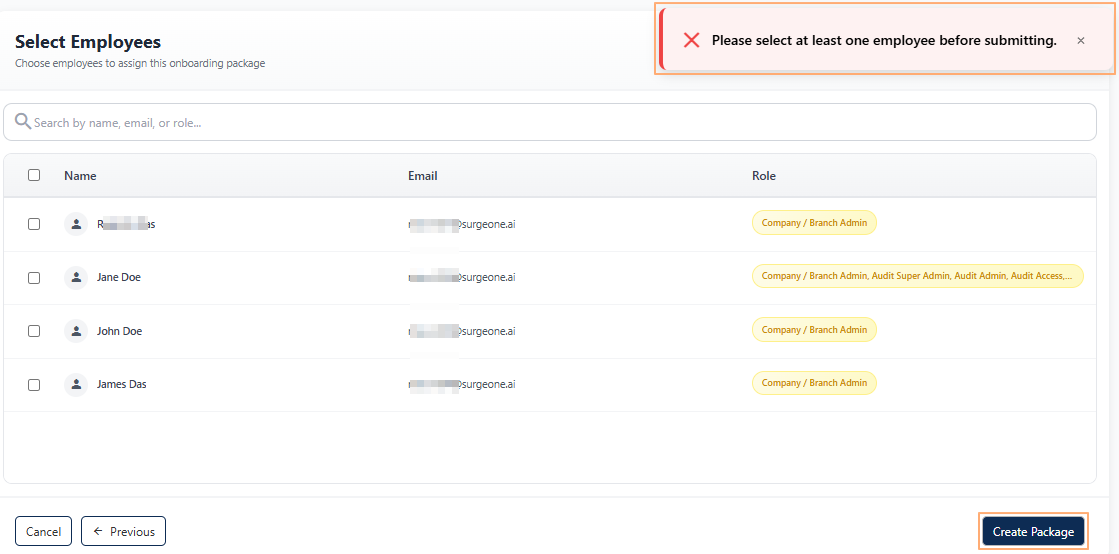 Fig: 25 - User selection validation
2.4. Using the Action column menu options
Each certification package entry displayed in the grid includes an Action column that offers quick-access options. This design enables users to perform key actions directly from the grid without leaving the current page, streamlining workflows and improving efficiency.
Click on the vertical ellipsis icon against any displayed row entry of the grid view to toggle the row-context menu options.
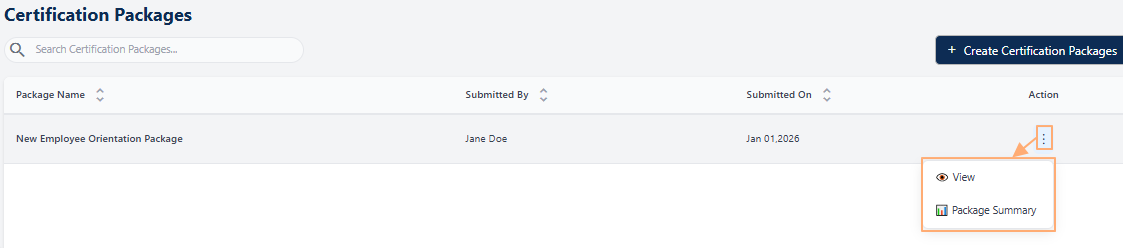 Fig: 26 - Action menu options
The following menu options are present:
-
1
 ViewUsed to view the submitted responses made to the forms of a package without the ability to make any modifications to the responses.
 -
2
 Package SummaryUsed to see the package overview, the purpose and its procedures, view the included forms of a package, its completion progress, the assigned employees and their assigned certification activities completion percentages.
 -
3
 Set RemindersUsed to enable and set or disable automated notifications during workflow progression to stakeholders (Submitter, Reviewer and Approver).
NOTE: The following sub-sections elaborate on the functionalities associated with these options.
2.4.1. Using the View menu option
The View menu allows users to access detailed information about a selected Certification Package. This option provides a comprehensive display of all associated data, including package contents, configuration details, and related metadata. By using the View feature, users can examine the package structure in depth, verify its components, and ensure accuracy before performing any actions. It is an essential tool for reviewing and validating package information without making changes to the underlying data.
- Click on the vertical ellipsis icon under the Action column, against any displayed row entry of the Certification Packages grid view to toggle the row-context menu option labeled as View.
- After clicking on it, three tabs are visible to display the certification package as per its configurations made during the creation stages.
 Fig: 28 - Viewing a Certification Package
- Click on Cancel button to exit viewing the certification package.
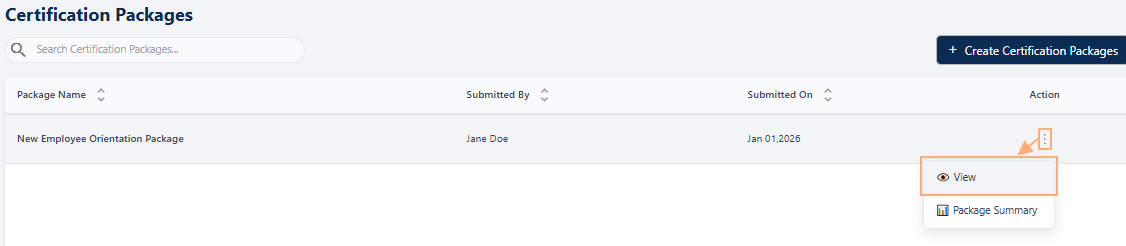 Fig: 27 - Clicking on the View menu option
2.4.2. Using the Package Summary menu option
The Package Summary menu provides a quick, consolidated view of all key details related to a Certification Package. It serves as a central reference point, allowing users to review essential information such as package status, included components, and associated metadata without navigating through multiple screens. This feature is designed to streamline workflows by offering an at-a-glance summary, making it easier to verify package contents, monitor progress, and ensure accuracy before taking further actions.
- Click on the vertical ellipsis icon under the Action column, against row entry of the Certification Packages grid view to toggle the row-context menu option labeled as Package Summary.
- After clicking on it, a modal window loads to display three tabs. More details of the tabs are provided in card-format below. To get a visual overview of it, check out the following image.
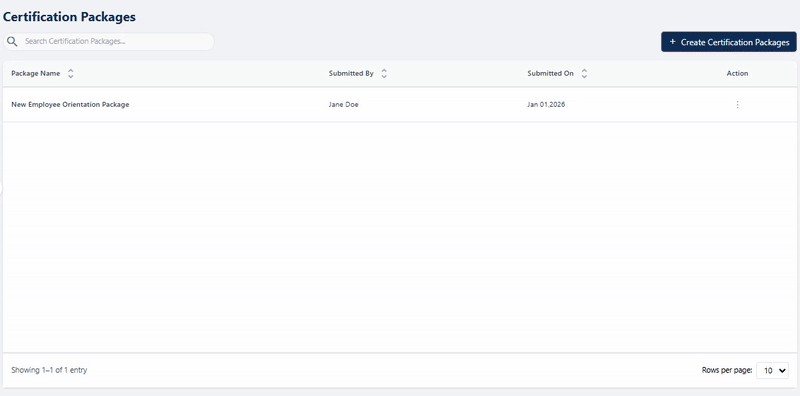 Fig: 30 - Viewing the Package Summary modal
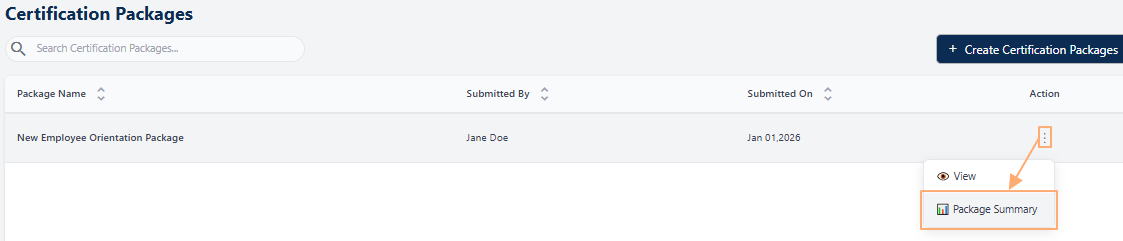 Fig: 29 - Clicking on the Package Summary menu option
-
1Overview Tab
- What it is: A dashboard-style tab summarizing the package via key cards (Total Forms, Employees, Avg. Progress) and a Package Summary section (Name, Purpose, Start Date, Procedures).
- Why it matters: Offers a single-glance understanding of package scope and health, helping stakeholders track progress and align on certification objectives.
- Typical actions: Review metrics (form count, assigned employees, average completion), confirm package context (e.g., New Employee Orientation Package), note Purpose (structured certification to cover policies, expectations), check starting or ending dates of certification period, and review Procedures (e.g., completing Pre-Hire and Authorization for Background Investigation forms).
-
2Forms Tab
- What it is: A tab that lists each included form in the package as cards showing the form name, status, assigned pools, and related metadata.
- Why it matters: Centralizes visibility and control over all package forms, enabling easy tracking of completion states and assignment coverage.
- Typical actions: Browse the forms (e.g., Pre-Hire Form, Authorization for Background Investigation), check each form’s Status (Pending, Completed, etc.), review Assigned Pools, open a form to manage details or view progress.
-
3Employees Tab
- What it is: A tab that shows cards for each assigned employee with their name, email, form activity status, and completion progress percentage.
- Why it matters: Provides granular tracking of who is assigned and how far each person has progressed, helping HR and managers identify blockers and drive timely completion.
- Typical actions: Search/filter employees, view an employee’s activity, check completion percentages, or open the employee card for details.
2.4.3. Using the Set Reminders menu option
The Set Reminders option allows users to configure automated reminder notifications within an certification package workflow. By defining reminder schedules in advance, users can ensure timely follow‑ups and reduce the risk of missed deadlines or delayed tasks.
- Click on the vertical ellipsis icon under the Action column, against any displayed row entry of the Certification Packages grid view to toggle the row-context menu option labeled as Set Reminders.
- After clicking on it, a modal window loads for you to toggle, set or disable the notifications feature to involded stakeholders. Refer to the following image to understand its functionality better.
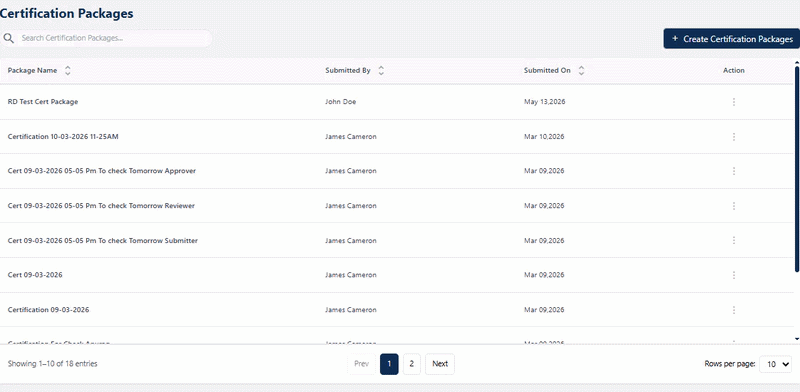 Fig: 32 - Demonstration of the reminders setting feature
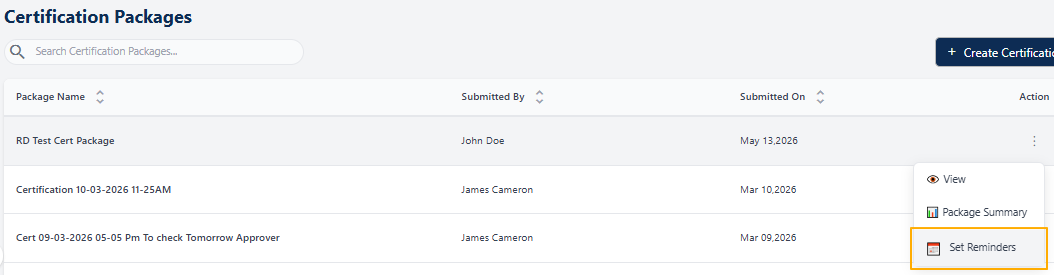 Fig: 31 - Clicking on the Set Reminders menu option
-
1Proceed to Reminder Configuration
- What it is: Opens the Set Reminders modal window for configuring reminder settings.
- Why it matters: Allows reminder setup before finalizing certification assignment.
- Typical actions: Click the Set Reminders menu option.
-
2Enable Reminders
- What it is: A slider toggle that enables reminder configuration.
- Why it matters: Activates the reminder workflow for stakeholders.
- Typical actions: Turn the slider ON to load Timeline and Configuration sections.
-
3Review Timeline Dates
- What it is: Read‑only initiation and completion dates inherited from Package Details.
- Why it matters: Defines the valid window for reminder calculations.
- Typical actions: Review dates and hover over the info icon next to the Value field.
-
4Configure Reminders for Submitter
- What it is: Configuration row for defining submitter reminder intervals.
- Why it matters: Ensures submitters are reminded to complete tasks on time.
- Typical actions: Select Days and enter a numeric value.
-
5Configure Reminders for Reviewer
- What it is: Reminder settings for reviewers.
- Why it matters: Prevents review delays.
- Typical actions: Enter the reviewer reminder interval value.
-
6Configure Reminders for Approver
- What it is: Reminder settings for approvers.
- Why it matters: Ensures approval actions are not missed.
- Typical actions: Provide a valid numeric reminder value.
-
7Validate Reminder Inputs
- What it is: System validation ensuring all required values are entered.
- Why it matters: Prevents saving incomplete reminder settings.
- Typical actions: Resolve missing or invalid numeric values.
-
8Save Reminder Configuration
- What it is: Saves and applies all configured reminder settings.
- Why it matters: Activates automated reminders for all stakeholders.
- Typical actions: Click Set Reminders after validation passes.
- What it is: A success notification displayed after reminders are configured and saved successfully.
- Why it matters: Confirms that reminder settings have been applied without errors.
- Typical actions: View the message to ascertain that success reminder has been set. You can close it. It closes automatically after a few seconds.
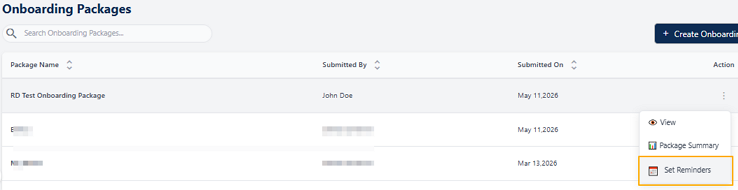 Fig: 33 – Set Reminders option
Here is the view of the loaded modal window. If the reminder is already set for the certification package then those get displayed here. For the sake of understanding the feature, consider the following cards which illustate setting reminder from scratch.
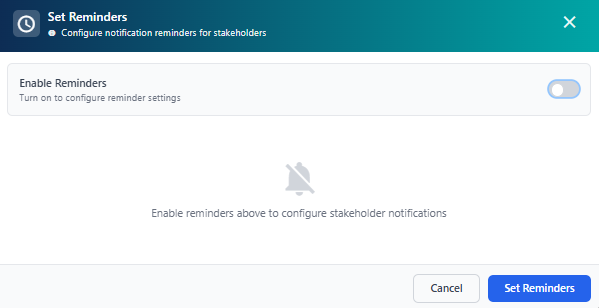 Fig: 34 – Set Reminders modal window default view after load
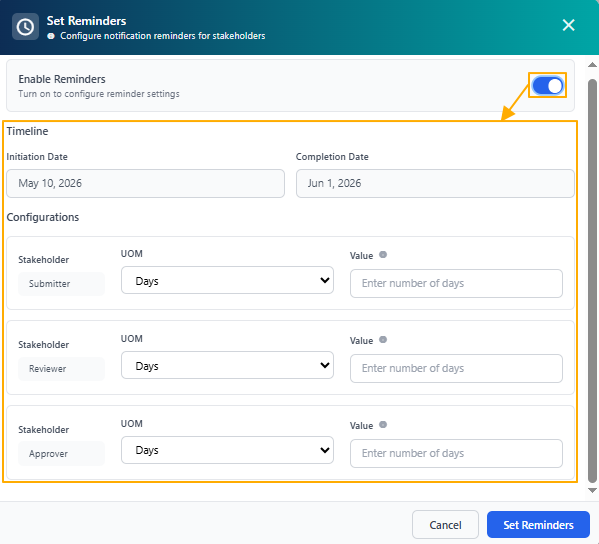 Fig: 35 – Enable Reminders slider toggle turned on
 Fig: 36 – Timeline dates and reminder calculation tooltip
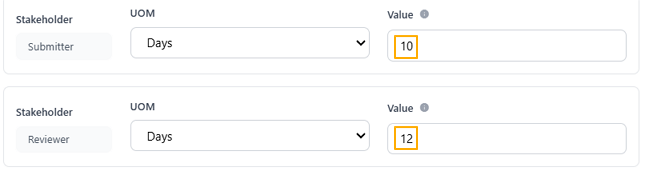 Fig: 37 – Submitter & Reviewer reminder configuration
 Fig: 38 – Reviewer reminder configuration
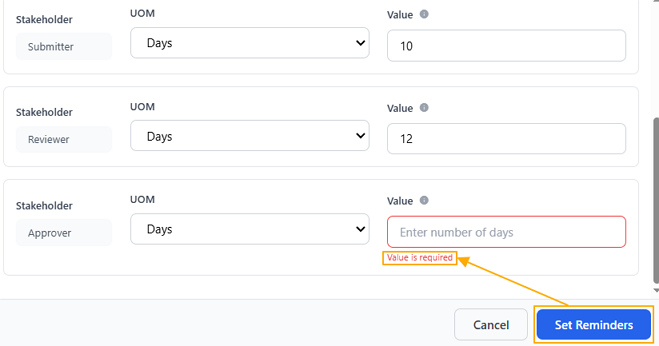 Fig: 39 – Approver reminder validation message
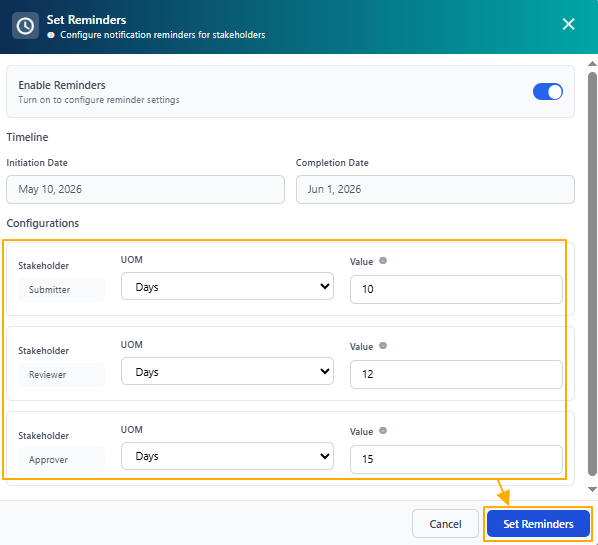 Fig: 40 – Validation resolved before saving reminders
 Fig: 41 – Confirmation message indicating reminders were set successfully
2.5. Pagination
Pagination helps users navigate large sets of Certification Package entries efficiently. Instead of displaying all records at once, which can slow performance and clutter the interface, the system organizes entries into smaller, manageable pages. This approach improves loading speed, enhances usability, and makes it easier to browse, locate, and manage Certification Packages within extensive datasets. By using the pagination options, users can quickly access the specific set of entries they need without excessive scrolling.
Pagination options are provided at the bottom-right, to navigate through multiple pages of entries, which populate the grid view as per the selected count of items per page. Selectable options are 10, 20 and 50. By default, the former is set.
The Previous and Next buttons can be clicked to navigate through various grid view pages.
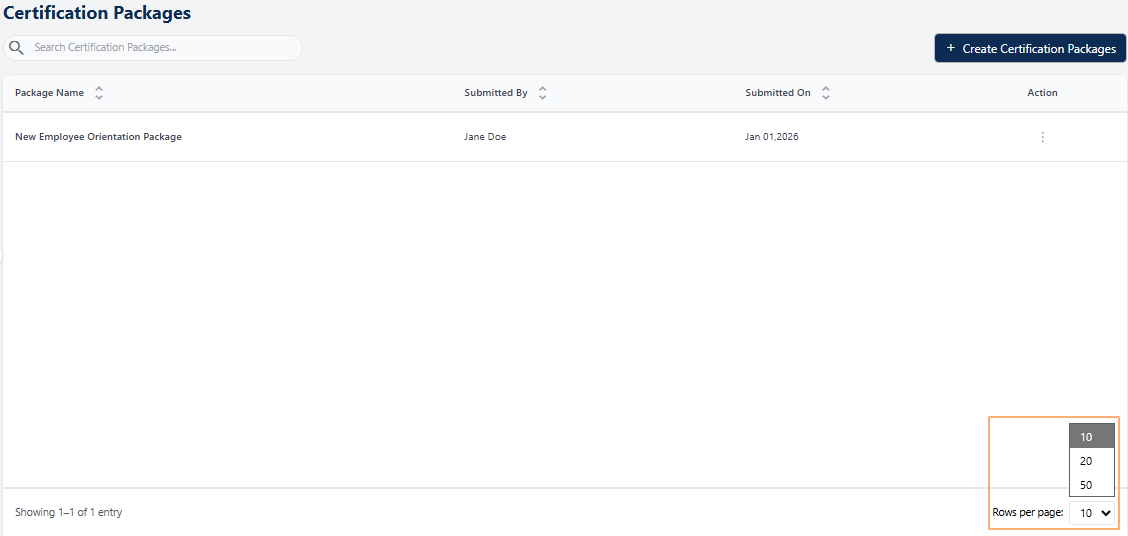 Fig: 42 - Pagination options
Submitting a Certification Package in SurgeONE.ai is the process of responding to the form questions, for review and approval workflows when configured. Timely and accurate submission is essential for maintaining compliance, achieving certification milestones set in your organization, and enabling smooth progression through the certifications process lifecycle.
Certification packages listed in the grid view of the Certification Packages page can be submitted from the Certification Items page, as well as from this page. The following image displays how it can be performed from this Certification Packages page.
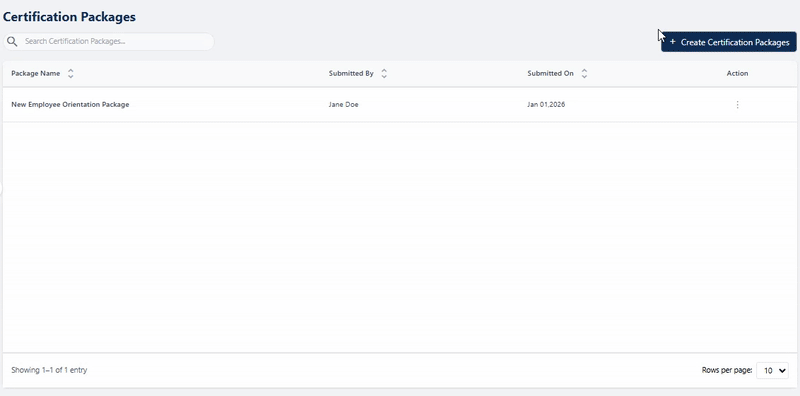 Fig: 43 - Submitting a Certification Package
The submitted package's status updates to Completed if reviewer and approver workflows are not configured.
The submitted package's status updates to Pending Review if reviewer and approver workflows are configured and this status change can be viewed in the Certification Items grid view.
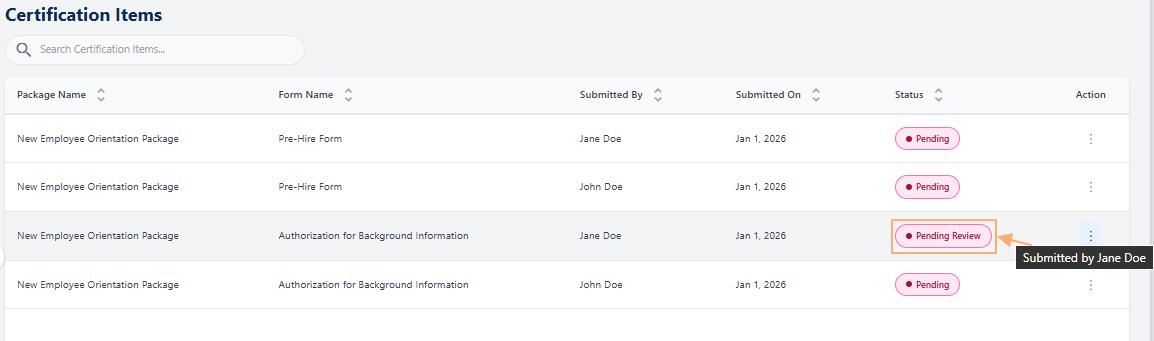 Fig: 44 - Status update visible in the Certification Items page
Here is a brief overview of the involved process steps.
-
1Access Action Menu
- What it is: The vertical ellipsis icon in the Action column of the Certification Packages grid.
- Why it matters: Provides quick access to package-level actions and details.
- Typical actions: Click the ellipsis icon to open the context menu for the desired package.
-
2Open Package Summary
- What it is: A detailed view of the chosen certification package.
- Why it matters: Displays package-level information and tabs for deeper navigation.
- Typical actions: Select Package Summary from the expanded row-context menu.
-
3Navigate to Employees Tab
- What it is: A tab listing all employees assigned to the package.
- Why it matters: Enables tracking and managing employee-specific form completion.
- Typical actions: Click the Employee tab in the loaded modal window.
-
4Select Employee Card
- What it is: An individual card showing employee details and progress.
- Why it matters: Allows you to drill down into assigned forms for that employee.
- Typical actions: Click any employee card to view their assigned forms.
-
5Open Assigned Form
- What it is: A detailed form page for the selected employee.
- Why it matters: Enables reviewing and updating form status.
- Typical actions: Click either the color-coded Status tag or the Form Name link in the Assigned Forms view.
-
5Fill up Form Fields
- What it is: The fields of the form are displayed in its respective sections.
- Why it matters: Mandatory form fields must be stated with accurate data.
- Typical actions: Enter relevant data in fields of the form.
-
7Select Next Action
- What it is: A dropdown menu on the form page for workflow actions.
- Why it matters: Determines the next step in the certification process.
- Typical actions: Click the Select next action dropdown and choose the Submit option.
-
8Submit Form for Review Workflow when Reviewer / Approver is Configured or Complete Assigned Form Workflow if no Reviewer / Approver is Configured
- What it is: The final step to confirm and save your action.
- Why it matters: Completes the workflow and updates the form status to Completed if review workflow is not configured or Pending Review when the submitted form review and approval is needed.
- Typical actions: Click the enabled Submit button to finalize the process.
2.7. Reviewing a Certification Package
Reviewing a certification package ensures all assigned forms and employee progress meet compliance requirements. It involves checking the form included in the certification package, verifying form fields, and confirming its accuracy before moving forward.
In a similar manner to the process illustrated in the above section, any submitted package with status Pending Review can be reviewed from the Certification Packages grid view. Refer to the following image which illustrates a review process activity. Once review is done, the status of the form updates to Pending Approval.
 Fig: 45 - Reviewing a Certification Package
This status change is also visible in the Certification Items grid view.
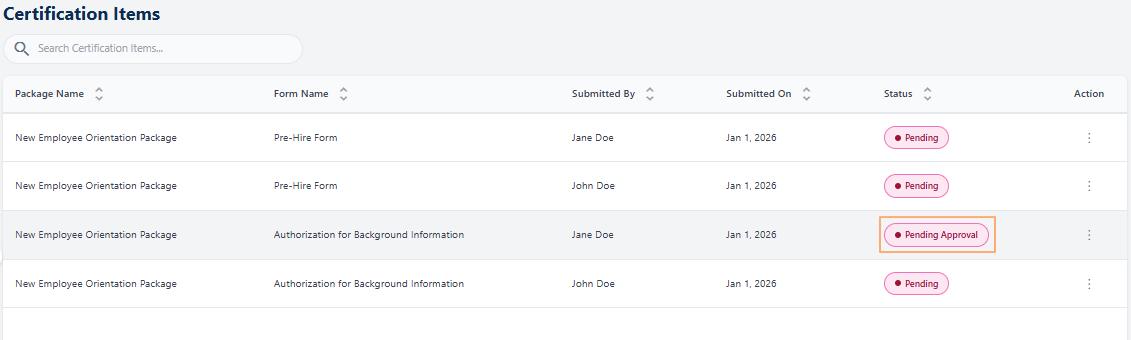 Fig: 46 - Status update visible in the Certification Items page
Here is a brief overview of the involved process steps.
-
1Access Action Menu
- What it is: The vertical ellipsis icon in the Action column of the Certification Packages grid.
- Why it matters: Provides quick access to package-level actions and details.
- Typical actions: Click the ellipsis icon to open the context menu for the desired package.
-
2Open Package Summary
- What it is: A detailed view of the chosen certification package.
- Why it matters: Displays package-level information and tabs for deeper navigation.
- Typical actions: Select Package Summary from the expanded row-context menu.
-
3Navigate to Employees Tab
- What it is: A tab listing all employees assigned to the package.
- Why it matters: Enables tracking and managing employee-specific form completion.
- Typical actions: Click the Employee tab in the loaded modal window.
-
4Select Employee Card
- What it is: An individual card showing employee details and progress.
- Why it matters: Allows you to drill down into assigned forms for that employee.
- Typical actions: Click any employee card to view their assigned forms.
-
5Open Assigned Form
- What it is: A detailed form page for the selected employee.
- Why it matters: Enables reviewing and updating form status.
- Typical actions: Click either the color-coded Status tag or the Form Name link in the Assigned Forms view.
-
6Select Next Action
- What it is: A dropdown menu on the form page for workflow actions.
- Why it matters: Determines the next step in the certification process.
- Typical actions: Click the Select next action dropdown and choose the Reviewed option.
-
7Complete Form Review
- What it is: The final step to confirm and save your action.
- Why it matters: Completes the workflow and updates the form status to Pending Approval.
- Typical actions: Click the enabled Submit button to finalize the process.
2.8. Approving a Certification Package
Approving a certification package is the final step to validate completion. After review, select the appropriate action, add a comment for clarity, and submit to confirm compliance and end the process.
In a similar manner, any reviewed package with status Pending Approval can be approved from the Certification Packages grid view. Refer to the following image which illustrates an approval process activity. Once approval is done, the status of the form updates to Completed.
Comment must be posted by the approver to be able to approve and complete the form workflow. Fig: 47 - Approving a Certification Package
This status change is also visible in the Certification Items grid view.
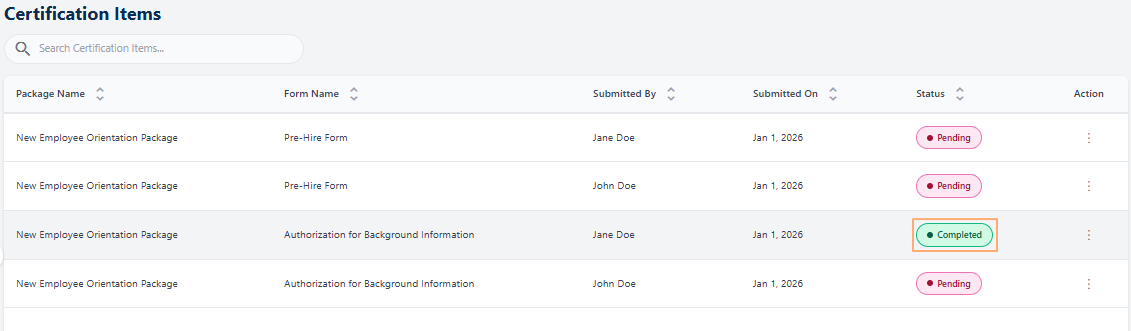 Fig: 48 - Status update visible in the Certification Items page
Here is a brief overview of the involved process steps.
-
1Access Action Menu
- What it is: The vertical ellipsis icon in the Action column of the Certification Packages grid.
- Why it matters: Provides quick access to package-level actions and details.
- Typical actions: Click the ellipsis icon to open the context menu for the desired package.
-
2Open Package Summary
- What it is: A detailed view of the chosen certification package.
- Why it matters: Displays package-level information and tabs for deeper navigation.
- Typical actions: Select Package Summary from the expanded row-context menu.
-
3Navigate to Employees Tab
- What it is: A tab listing all employees assigned to the package.
- Why it matters: Enables tracking and managing employee-specific form completion.
- Typical actions: Click the Employee tab in the loaded modal window.
-
4Select Employee Card
- What it is: An individual card showing employee details and progress.
- Why it matters: Allows you to drill down into assigned forms for that employee.
- Typical actions: Click any employee card to view their assigned forms.
-
5Open Assigned Form
- What it is: A detailed form page for the selected employee.
- Why it matters: Enables reviewing and updating form status.
- Typical actions: Click either the color-coded Status tag or the Form Name link in the Assigned Forms view.
-
6Select Next Action
- What it is: A dropdown menu on the form page for workflow actions.
- Why it matters: Determines the next step in the certification process.
- Typical actions: Click the Select next action dropdown and choose the Approved option.
-
7Provide Comment
- What it is: A text input modal window for entering remarks when approving or rejecting a form.
- Why it matters: Adds context and justification for the selected action, improving compliance and communication.
- Typical actions: Click on the comment
 icon to enter a clear, concise comment and click on the send comment
  icon to explain your decision prior to submission. You can also attach relevant documents using the attach
  icon.
icon.
-
8Approve Form and Complete Workflow of the Assigned Form
- What it is: The final step to confirm and save your action.
- Why it matters: Completes the workflow and updates the form status to Completed.
- Typical actions: Click the enabled Submit button to finalize the process.