
 This online help page is dedicated to the SurgeONE.ai Audits screen and its associated functionalities. Experience hassle-free, comprehensive audits, saving you time and ensuring accuracy.
The accessibility and functionalities of the different sections of the Audits module, as well as its reports are dependent on the role based access controls / permissions set for the logged-in user. For more details refer to the Roles online help.
1. Navigating to the Audits page
Accessing the Audits page provides users with a centralized location to manage and monitor audit activities. This streamlined entry point enhances operational efficiency by allowing quick access to essential audit functions and historical data.
Click on the Audits menu of the left navigation panel. The following screenshot displays the Audits screen. The page lists the audits that are created for your organization in the system.
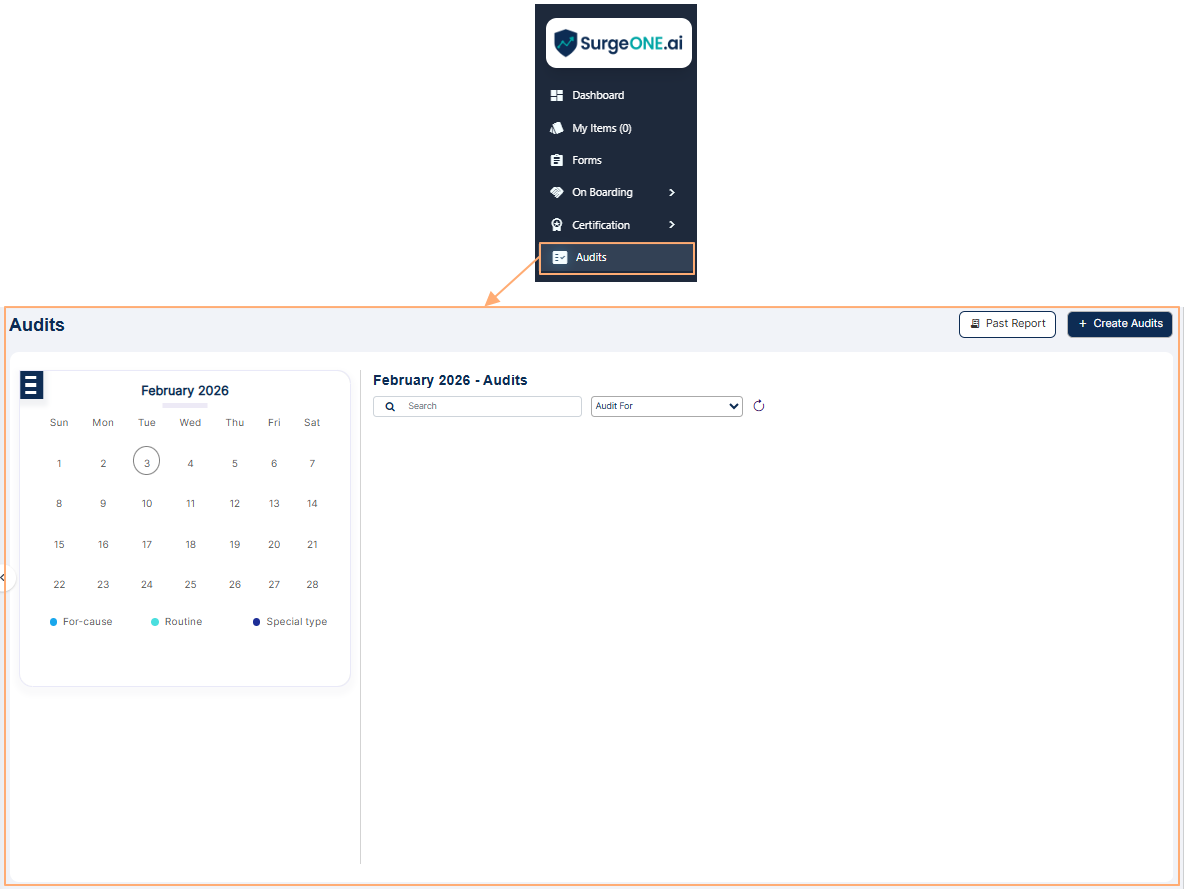 Fig: 1 - Audits page
 NOTE:
NOTE:
-
Applicable Only for Assigned or Permitted Users
- If there are any audits with upcoming start dates or those whose start dates have already passed, a call-to-action button will appear in the Upcoming Audits section of the Dashboard. Clicking this button will take you directly to the respective audit processing stage. This way, you might not need to visit the Audits page to perform the audit.
- The Audit page will not having the Functionalities to view created / assigned audits, view the audit reports or create a new audit.
Applicable for Users Not Having Audit Related Permissions / Roles
 Fig: 2 - Audits page with limited functionalities for non-permitted user
2. Understanding the Various Elements of the Audits page
Familiarity with the components of the Audits page empowers users to utilize the platform effectively and confidently to manage their audit processes. It ensures informed decision-making in the configured audit, minimizes errors in creation and submitting responses, and promotes a comprehensive understanding of audit workflows, data visualization, and past audits reporting, ultimately improving overall audit compliance and practices.
Refer to the following screenshot which is marked with numerical values that correspond to the below stated points.
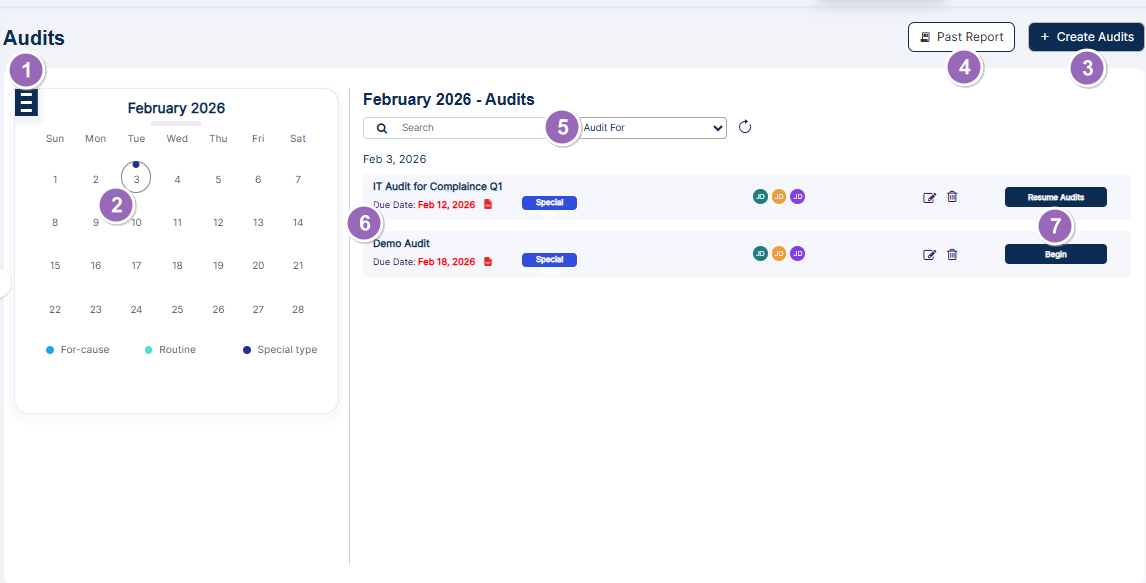 Fig: 3 - Understanding the Audits page
2.1. Calendar selection
The calendar selection feature allows users to filter audits by specific dates or ranges, making it easier to track timelines and align with regulatory deadlines.
The calendar month loads as the current month, but you can change it using the hamburger  icon at the top left. Select the desired month and year and click again on the hamburger icon to collapse this selection view.
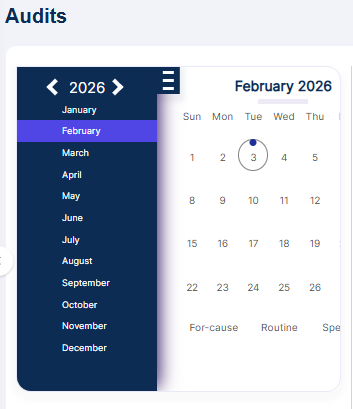 Fig: 4 - Calendar selection view
2.2. Calendar view
The calendar view displays audits in a clear monthly format, helping users track workload, avoid scheduling conflicts, and allocate resources effectively. Dates with audits are marked with colored indicators linked to audit type legends, allowing quick recognition of scheduled activities without extra clicks.
View the audits created for the current calendar month. The current date is highlighted in the calendar with a circle. Click on a specific date to see audits that have the same start date. After selecting a specific date, audits with different start dates within the same month will not be displayed.
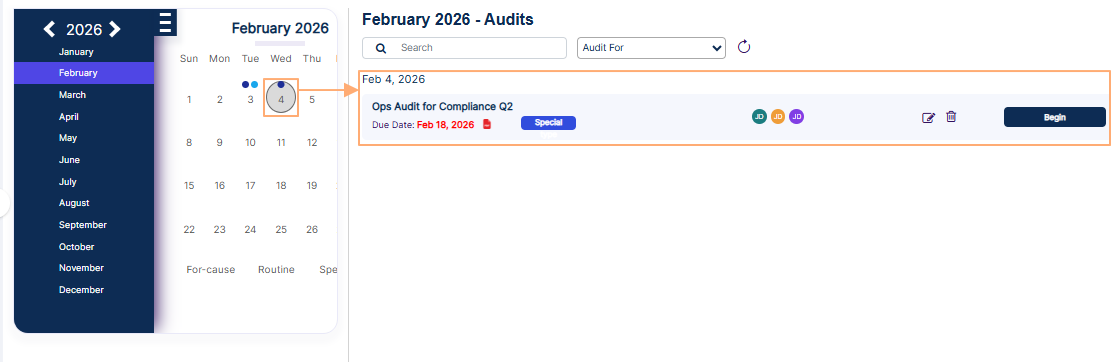 Fig: 5 - Date selection on calendar month loads Audits starting on that date
If you select a calendar date that does not have any created audits starting on the same date, then the system will display a No records found for the selected date text.
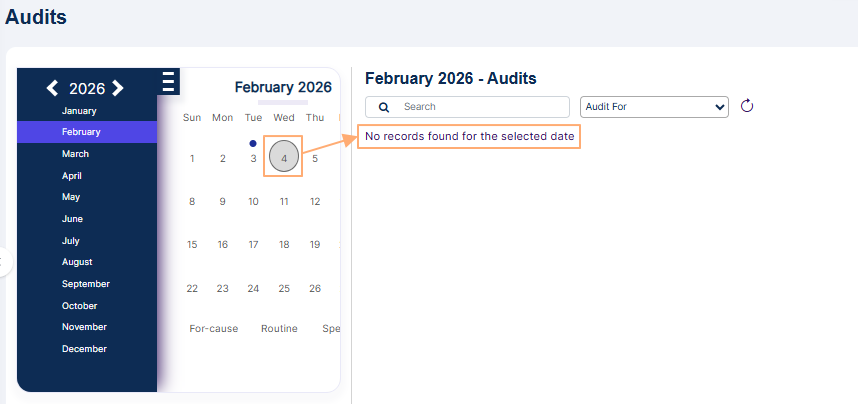 Fig: 6 - No audit records found for the selected date
You can also notice that the audit type legends are present at the bottom of the calendar. Small colored dots corresponding to the same color of the legend items are displayed above the numeric dates in the calendar, so that the user can easily understand which audit types are present on which date without having to click on those dates. Multiple colored dots over a date indicate multiple audits starting on the same day.
2.3. Create Audit
The option to initiate a new audit directly from this button simplifies the process of audit creation. It encourages proactive compliance, supports timely risk management practices, and ensures organizations can respond quickly to emerging issues or regulatory requirements with easy audit creation capabilities.
Click on the + Create Audits button at the top right, to proceed to create a new audit for your organization. A detailed description of the entire process has been explained in the following Creating a New Audit section.
 Fig: 7 - + Create Audits button
2.4. Past Report
Access to past audits allows users to review historical performance, identify recurring issues, and benchmark improvements over time. This retrospective insight supports strategic planning, strengthens accountability, and provides evidence of continuous improvement for internal and external stakeholders.
Click on the Past Report button at the top right, to proceed to view the completed audit report. A user can view audits that they have created or audits where they have been assigned as an auditor or a recipient.
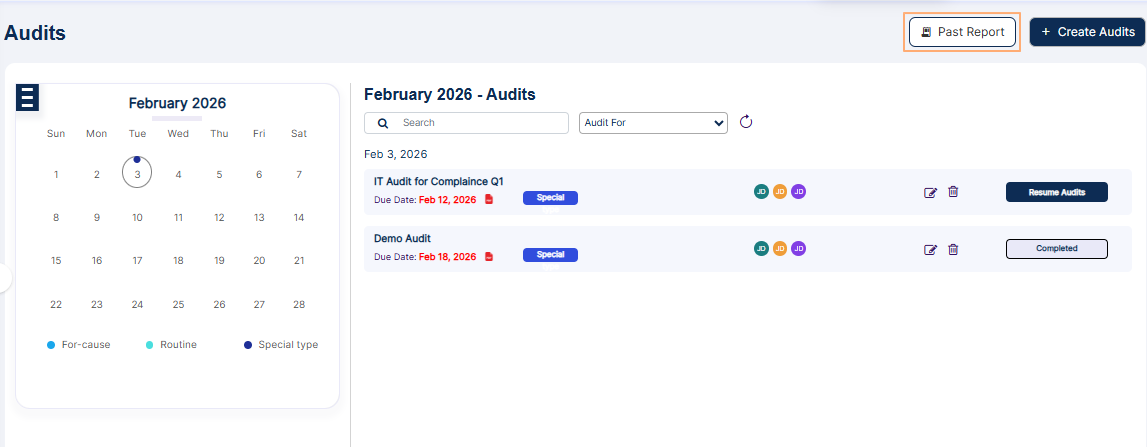 Fig: 8 - Past Report button
Consider this screen as a combination of dashboard and report view, where you can view drilldown of past audits, as well as search for past audits.
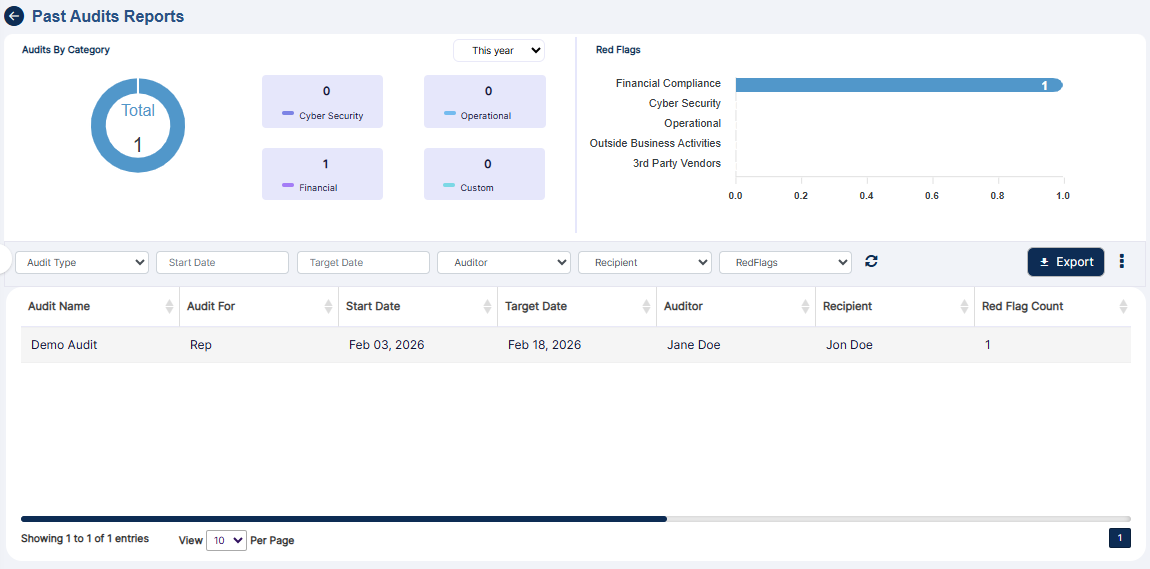 Fig: 9 - Past Audit Reports view
Let us illustrate the three sections which are present:
2.4.1. Audits by Category
Visualization of audits categorized by its type enhances clarity and organization, enabling users to analyze performance across different operational areas. It supports benchmarking and helps prioritize resources for areas requiring greater attention or improvement.
This section shows a donut chart illustration to represent the number of audits per audit category. There are four different types of audit categories as follows - Cybersecurity, Operational, Financial and Custom.
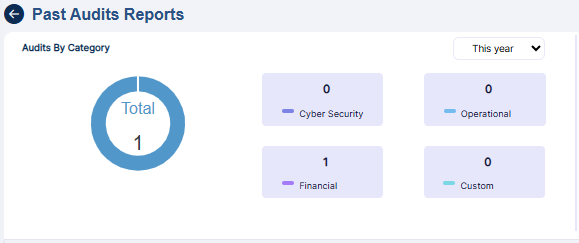 Fig: 10 - Audits By Category
- Each of these audit categories are color coded. Hover your mouse pointer over the donut chart to reveal a tooltip text about the audits count per audit category, out of the total audits count for that year. Refer to the following image to understand better.
- By default, the current year is selected. You can select another year from the year selection dropdown (at the top right of this section) to load the count of existing audits of different category types (of that year). This selection is only possible if audits were created and completed during that particular year.
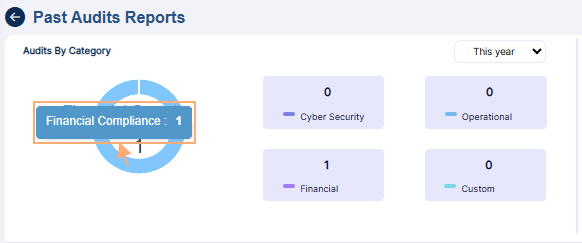 Fig: 11 - Audits By Category tooltip view
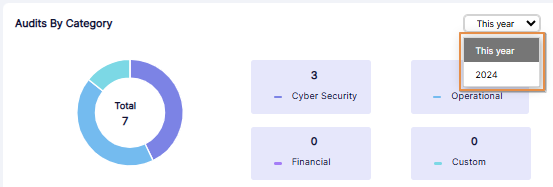 Fig: 12 - Year selection dropdown expanded view
Highlighting red flags according to audit types draws immediate attention to critical issues that require urgent action. This feature facilitates risk mitigation, ensures potential threats are addressed promptly, with a clear view of priority areas needing intervention. You can also view past years data if such dataset is present in the system.
This section shows a horizontal bar chart illustration to represent the red flags count per audit category type. There are five categories labeled as - Financial Compliance, Cyber Security, Operational, Outside Business Activities and 3rd Party Vendors. If there is no bar chart present for a category, then there is no red flagged question response for it yet.
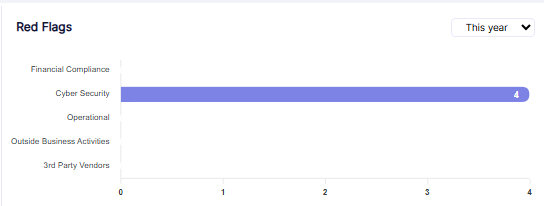 Fig: 13 - Chart view of Red Flags section
- By default, the current year is selected. You can select another year from the year selection dropdown at the top right of this section.
- Hover your mouse pointer over a displayed bar chart to reveal a tooltip text about the red flags count of that audit category. Refer to the following image to understand better.
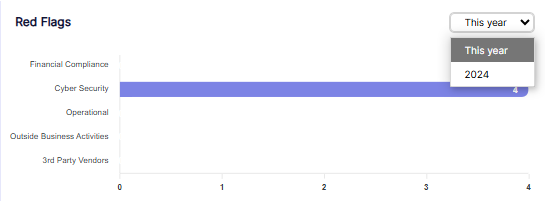 Fig: 14 - Year selection dropdown expanded view
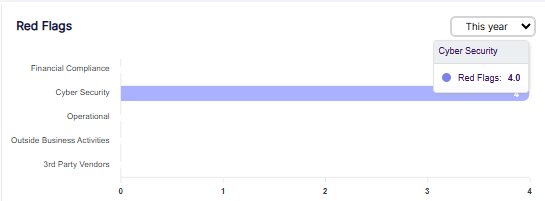 Fig: 15 - Tooltip view of Red Flags of Operational audit category
The grid view section provides a consolidated view of all audit activities, offering users a complete record for internal reviews, external audits, and regulatory inspections. With filters for audit type, date range, auditor, recipient, and red flags, users can quickly locate and analyze audits. The sortable grid view displays key details, ensuring transparency, efficient reporting, and easier compliance management.
You can search for and view existing audits from this section. Let us first have a look at the different filters that can be set.
 Fig: 16 - Grid view filter options of Past Report Report
- You can click on the Audit Type dropdown to expand its options. By default, no option is selected. These are the different audit template types which can be utilized in the system. The selectable options are loaded in accordance to the audit category. If audit for a particular category is not yet created, that category does not populate this dropdown. For example, consider the following screenshot which displays only the Financial Compliance option.
- You can select the date range using the provided Start Date and Target Date date selection fields.
- You can click on the Auditor dropdown to expand its options. Existing permitted/set users populate this dropdown.
- You can click on the Recipient dropdown to expand its options. This dropdown displays the full names of all users who are set as Recipient in different audits, as assigned in the Audit Details tab during audit creation.
- You can click on the RedFlags dropdown to expand its options. Selectable options are All, Yes and No. However, the dropdown does not reveal its options if there are no completed audits or if the completed audit has no red flags.
- The following image shows the view when there report results are fetched to populate the grid view.
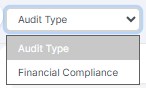 Fig: 17 - Audit Type dropdown options
 Fig: 18 - Date range fields
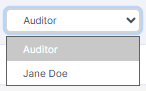 Fig: 19 - Auditor dropdown
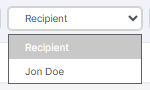 Fig: 20 - Recipient dropdown
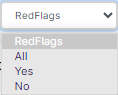 Fig: 21 - RedFlags dropdown
 Fig: 22 - Report results in grid view
NOTE:
- All of the columns are sortable except for the Action column.
- The following columns populate the grid view:
-
1Audit NameDisplays the official title assigned to the audit. This helps identify the purpose, focus area, or the specific audit event being conducted.
Benefit: Provides clear reference and easy retrieval of audit records. -
2Audit ForIndicates the entity for which the audit is being performed.
Benefit: Helps in identifying the exact scope and target area of the audit. -
3Start DateDisplays the date on which the audit activity is to begin.
Benefit: Ensures tracking of audit timelines and scheduling accuracy. -
4Target DateShows the expected completion date of the audit. This acts as the target deadline for the particular audit.
Benefit: Helps maintain timely progress and prevents audit delays. -
5AuditorDisplays the name of the individual responsible for conducting or completing the audit.
Benefit: Provides clear accountability and point of contact for audit queries. -
6RecipientShows the individual user who will receive the audit findings or final reports.
Benefit: Ensures audit results reach the correct users for action. -
7Red Flag CountDisplays the number of issues, violations, or concerns detected during the audit.
Benefit: Provides a quick snapshot of audit risk level and compliance health. -
8CategoryIndicates the classification of the audit category based on its template.
Benefit: Helps organize and group audits for easy filtering and reporting. -
9OrganizationDisplays the name of the company / firm or sub-firm for which the audit is being performed.
Benefit: Reveals the proper mapping of audit data with organizational structure. -
10Audit YearSpecifies the year to which the audit belongs or is scheduled for.
Benefit: Helps maintain chronological audit records for compliance and review. -
11Audit TypeDefines the nature of the audit, such as Routine, For-cause, or Special type.
Benefit: Enables proper classification and workflow routing based on audit type. -
12ActionContains the vertical ellipsis icon, clicking on which toggles the visibility of the View Details menu option for a listed audit entry.
Benefit: Provides quick access to audit operations.
The following image shows the view when there is no fetched data to populate the grid view.
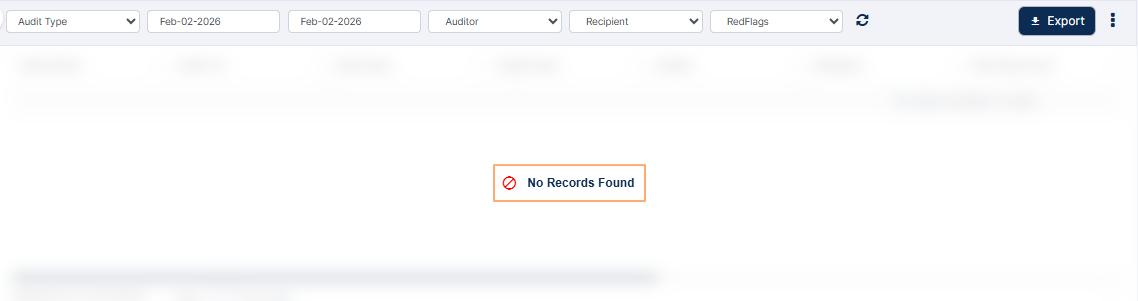 Fig: 23 - No Records Found label
2.4.3.1. Reset filters
You can click on the reset  icon to reset the report filters.
2.4.3.2. Exporting report results
- Click on the Export button to load the export options (to download a local copy the generated report). Two options labeled as CSV and PDF load below the button. Click on the former to download an excel file or on the latter to download a .pdf copy.
- Here is the view of the contents of the exported PDF file, after clicking on the PDF option. The file is named as AuditReport_YYYYMMDD_HHMMSS, where the timestamp is the Coordinated Universal Time (UTC).
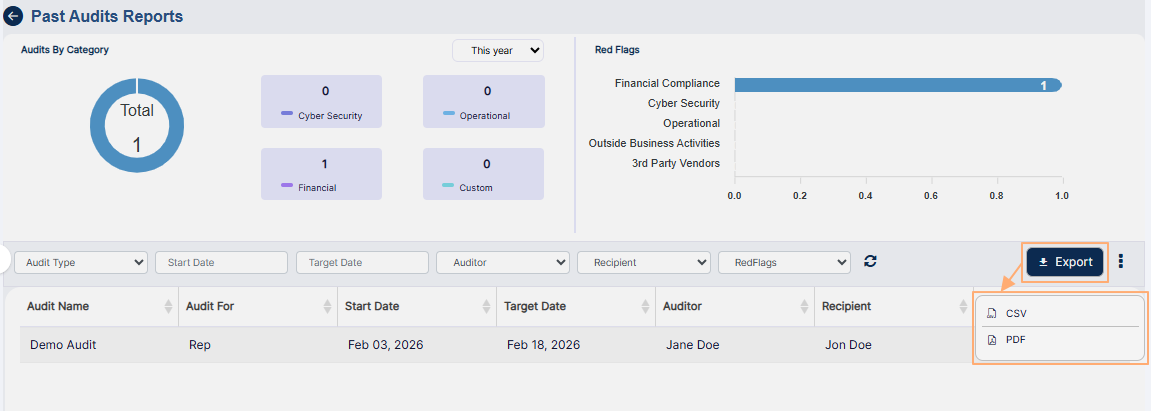 Fig: 24 - Export button
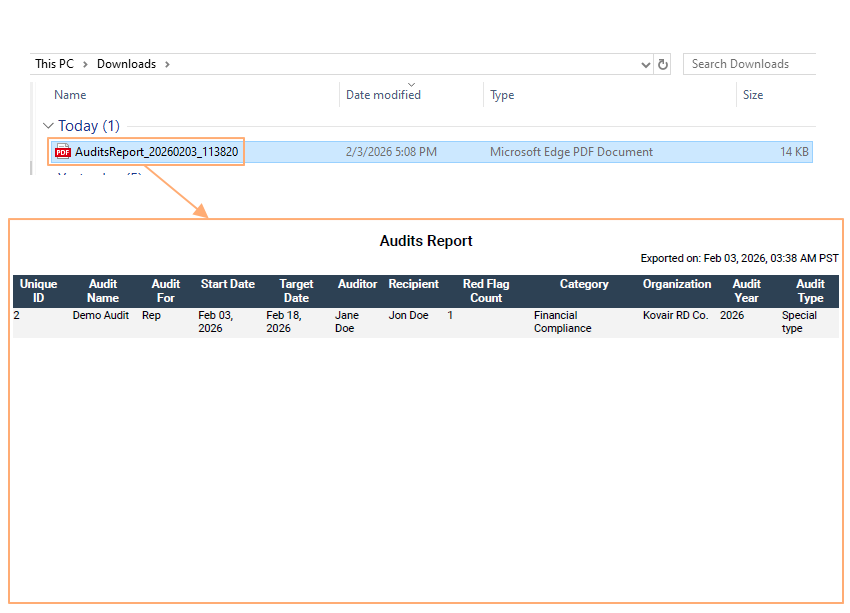 Fig: 25 - Exported PDF file content view
2.5. Search Audit(s)
The search feature allows users to quickly find audits by name or type, saving time and improving accessibility. Filters such as Branch or Rep refine results, while the reset option clears queries for a seamless experience. By enabling precise searches, it enhances responsiveness during key activities such as auditing cycles, management reviews, or compliance reporting exercises, where timely access to accurate information is essential.
Use the search bar to enter text and find matching audits (by the name of the existing audit).
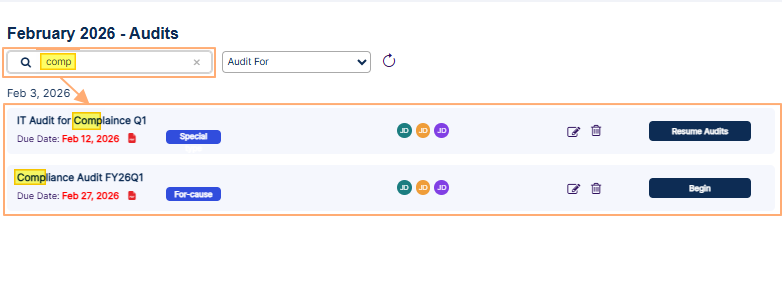 Fig: 26 - Searching for audit
Use the Audit For dropdown to filter the listed audits based on the audit type. The available options in the dropdown are Branch and Rep.
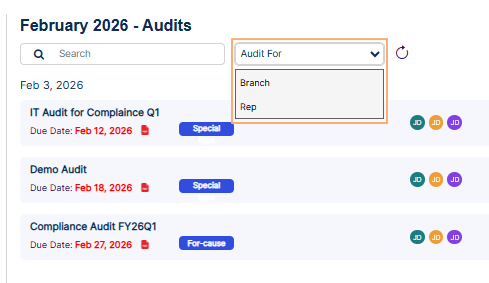 Fig: 27 - Filter dropdown options
Based on the selection made here, or both the filters set, matching audits are listed out.
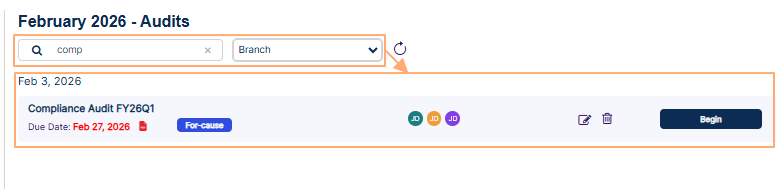 Fig: 28 - Filtered results
Click on reset  icon to remove any search query or dropdown filter set.
2.6. Audit details
Detailed audit information offers users a deeper understanding of findings, actions taken, and outcomes. This granularity supports thorough evaluations, strengthens evidence-based decision-making, and provides a reliable knowledge base for training and future audits.
View the audits which are scheduled for the calendar month. The following details are visible:
- The name of the audit.
- The due date of the audit (in red font).
- The
 icon to download the audit report. The downloaded .pdf file will be titled as per the name of the audit.
 - The type of the audit (in white font with blue box shading).
- The name initials of the Submitter (creator) of the audit (in white font with metallic seaweed colored round shading).
- The name initials of the Auditor (can begin and complete audit) of the audit (in white font with orange colored round shading).
- The name initials of the Recipient (provides additional information or documentation if required) of the audit (in white font with purple colored round shading).
You can use the edit  and delete
  icons to modify some of the audit details and delete the audit. The audit Status and Audit For dropdown option cannot be modified. The icons are enabled only for an audit which is yet to be started. Audits which are in progress, requiring remediation or completed cannot be edited or deleted.
2.7. Audit Call to Action button
The Audit Call to Action button provides users with context-sensitive options based on the audit status. This dynamic button streamlines workflow, ensures clarity, and guides users through each stage of the audit process, while adhering to any applicable role-based permissions.
An action button is present against the listed audits. Usually, the action button of any audit is present on the right side.
The audit action button labels can vary according to the stage or status of the audit viz. Begin, Resume Audit, Start Remediation, Resume Remediation and Completed. In case of the latter, no action can be performed.
 Fig: 29 - Audit Call to Action button view
NOTE:
- If the audit is yet to start (the audit starting calendar date is yet to come), then the Begin button is disabled.
- After the role based access control implementation, Anyone with view all access, conduct access, remediation and resolve red flag access will be able to begin an audit.
- If the audit is completed (without remediation or with red flag remediation), then the Begin button label changes to Completed.
3. Creating a New Audit
Creating a new audit allows users to assess compliance, identify risks, and uphold operational standards. From the Audits page, clicking the + Create Audits button opens the Audit Details page, where users proceed through three stages to configure and launch an audit effectively.
Let us assume that you have navigated to the Audits page, and clicked on the + Create Audits button at the top right (to proceed to create a new audit for your organization).
Fig: 30 - Create Audit button
The following screenshot displays the Audit Details page that loads.
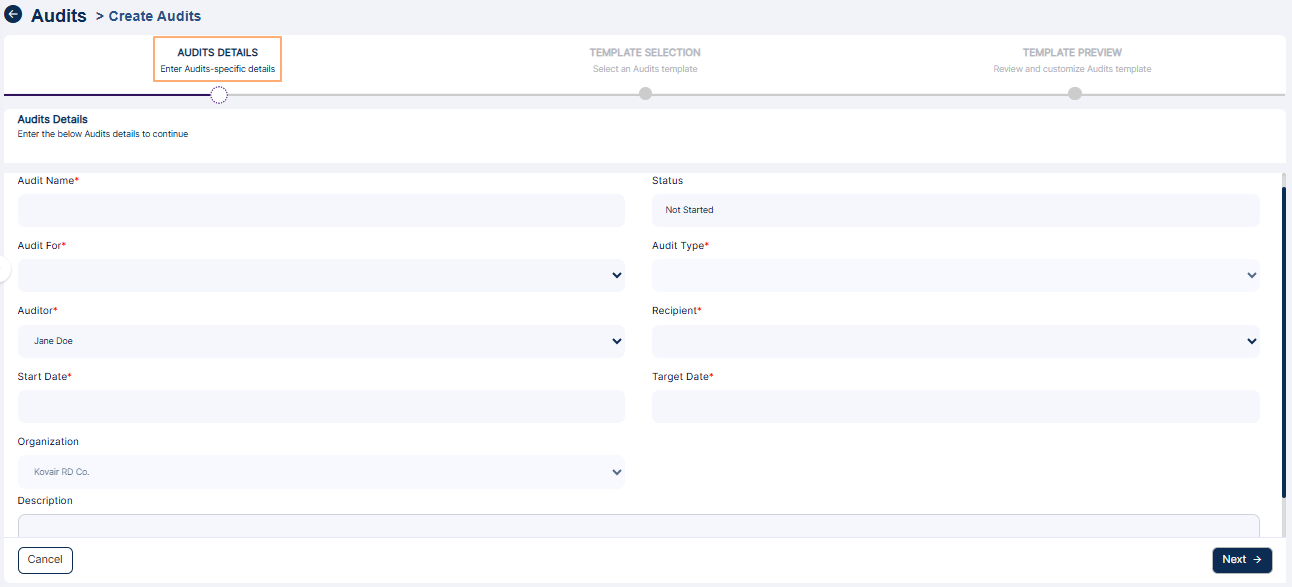 Fig: 31 - Audit Details stage view
NOTE: There are two entities for which there are audits in SurgeONE.ai. They are Branch and Rep audits, both of which are comprising of few types.
There are three stages labeled as follows: Audit Details, Template Selection and Template Preview. Each stage has been briefly described in the following sub-sections.
3.1. Step #1 - Providing Audit Details
The facility to enter audit details ensures that each assessment is tailored to specific objectives and contexts, so that the audit remains relevant to organizational goals. This section guides you through entering key audit details in the Audit Details tab, such as name, type, dates, and assigned personnel. These inputs form the foundation of a structured and traceable audit, ensuring clarity, accountability, and readiness for execution and reporting. By capturing accurate information upfront, users streamline the audit process and support compliance from the start.
Enter audit-specific details here. Perform the following activities to provide necessary details in the Audit Details tab:
- Enter a suitable name for the new audit in the Audit Name field. The system applies validation to ensure the audit name meets the required criteria.
Benefit: A clear and descriptive audit name helps in easy identification and retrieval of audits later, especially when managing multiple entries.
- The Status field is disabled and set as Not Started by default.
Benefit: This default status provides a clear starting point in the audit lifecycle, helping teams track progress from initiation to completion.
- Select either Branch or Rep within the Audit For dropdown, to specify the entity for which the new audit is being created.
Benefit: This selection ensures that audits are accurately scoped and aligned with the appropriate operational unit, improving accountability and relevance.
- Select the desired audit type from the Audit Type dropdown field. The options available in the Audit Type dropdown will be dynamically populated based on the selection made in the Audit For dropdown field.
Benefit: Dynamic filtering reduces errors and simplifies the user experience by showing only valid audit types for the selected entity.
- Select the auditor who will be responsible for performing the audit from the Auditor dropdown. By default, the name of the logged-in user who is creating this audit will populate this dropdown.
Benefit: Assigning a specific auditor ensures clear ownership and accountability, streamlining communication and follow-up.
- Next, choose the user who will receive update on this audit. Permitted users will be listed out in the Recipient dropdown.
Benefit: Designating a recipient ensures that key stakeholders stay informed, supporting transparency and timely action.
- Choose the date on which the audit is to be scheduled to begin from. Click on the Start Date field to load the calendar and make a date selection accordingly. You can only select an upcoming calendar date and not a past date.
Benefit: Scheduling audits in advance helps with planning and resource allocation, while system validation prevents scheduling conflicts.
- Similarly, choose the date on which the audit is intended to be completed. Click on the Target Date field to load the calendar and make a date selection accordingly. You can only select an upcoming calendar date and not a past date and the date must be later than the audit start date.
Benefit: Setting a clear timeline helps teams stay on track and ensures audits are completed within expected timeframes.
- The Organization field is also disabled and shows the name of the current organization. It is enabled when sub-firms are created. In that case, the firm and sub-firm names populate this dropdown.
Benefit: This auto-filled field ensures organizational consistency and prevents accidental misattribution.
- You may enter a suitable audit description in the Description field. It is an optional field.
Benefit: Adding context or notes can help clarify the audit's purpose or scope for future reference.
- Click on the Next button to proceed to the Template Selection tab.
Benefit: The guided step-by-step flow ensures users don't miss critical setup steps, reducing errors and improving audit quality.
 Fig: 32 - Audit For dropdown options
 Fig: 33 - Audit Type dropdown options
NOTE: Branch dropdown option selection in the Audit For dropdown loads the three options - Routine, For-cause and Special type in the Audit Type dropdown field, while the Rep dropdown option selection in the Audit For dropdown loads the two options - Routine and Special type in the Audit Type dropdown field.
NOTE: The users who are assigned suitable role-wise permission(s) in your organization will be listed here.
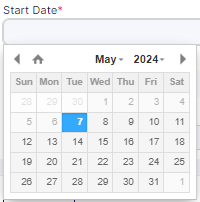 Fig: 34 - Audit Start Date calendar view for date selection
NOTE: The audit Start Date must be earlier than the audit Target Date. Otherwise, the system will prompt the tooltip - Start Date cannot be greater than Target Date.
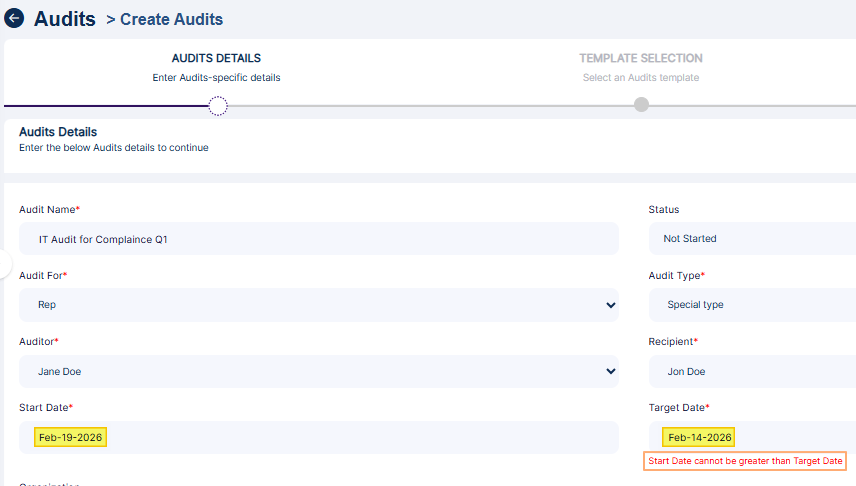 Fig: 35 - Start Date cannot be greater than Target Date tooltip
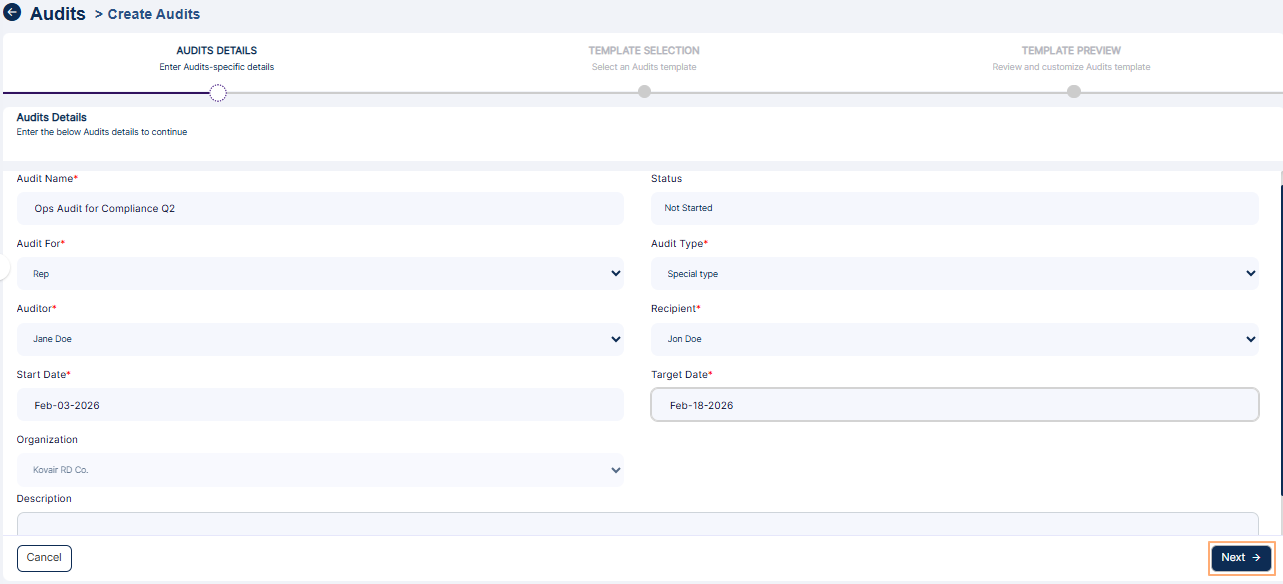 Fig: 36 - Next button to proceed
NOTE: You can proceed only if all the field validations are met on this page. Otherwise, the system will prompt appropriate validation tooltips below the field(s). Real-time validation ensures data accuracy and completeness, reducing rework and improving data integrity.
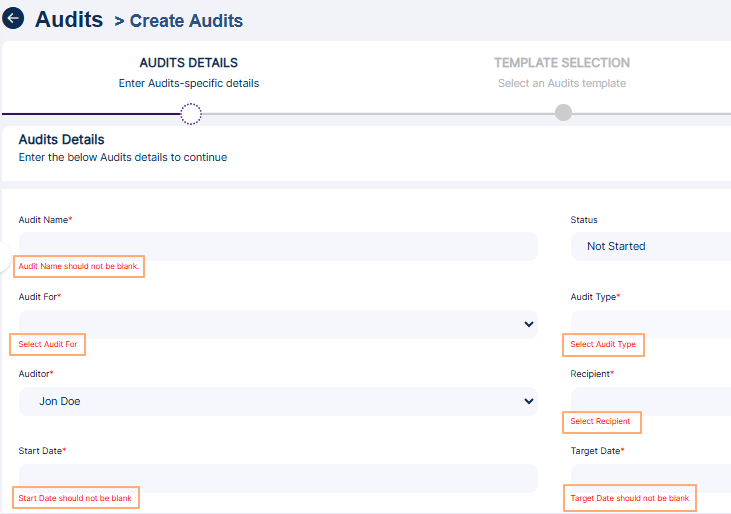 Fig: 37 - Field validations
3.2. Step #2 - Selecting Audit Template
Choosing a suitable template standardizes the audit process, ensuring consistency and alignment with organizational policies or regulatory requirements. It enables the usage of system defined or custom created templates, which in turn promotes efficiency across the audit activties of your organization.
- Proceed to choose a pre-built audit template.
-
1Financial Compliance Audits
- Anti Money Laundering
- Fraud Detection
- Registered Representative
- Investment Advisor Representative[IAR]
-
2Cyber Security Audits
- Network Security
- Data Encryption and Privacy
- Penetration Testing Assesment
-
3Operational Audits
- Compliance to Internal Audit(3110)
- Disaster Recovery
-
4Outside Business Activities
- Outside Business Activities
-
53rd Party Vendors
- Security Implementation Questionnaire
- Click on the Next button (at the bottom right) to proceed to the third stage.
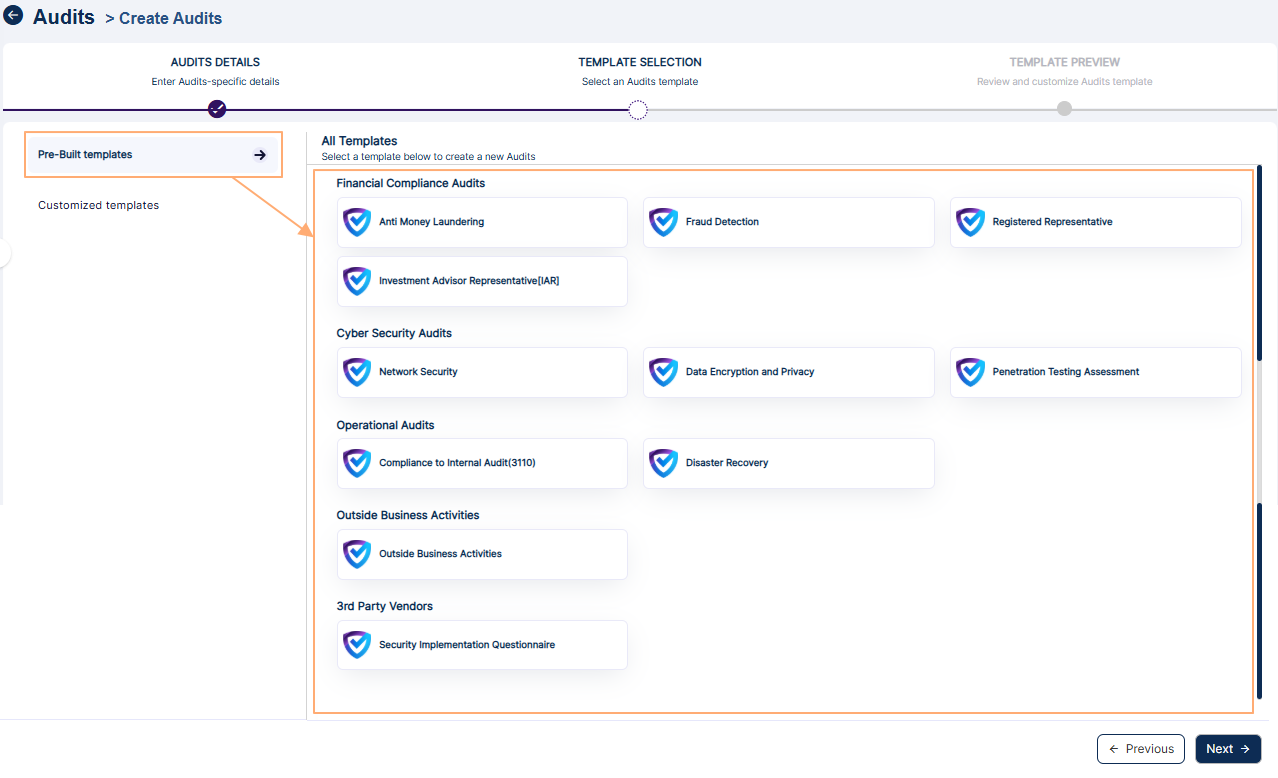 Fig: 38 - Available Audit Templates
You can select only one out of the available templates. A Selected label can be seen above the selected template type.
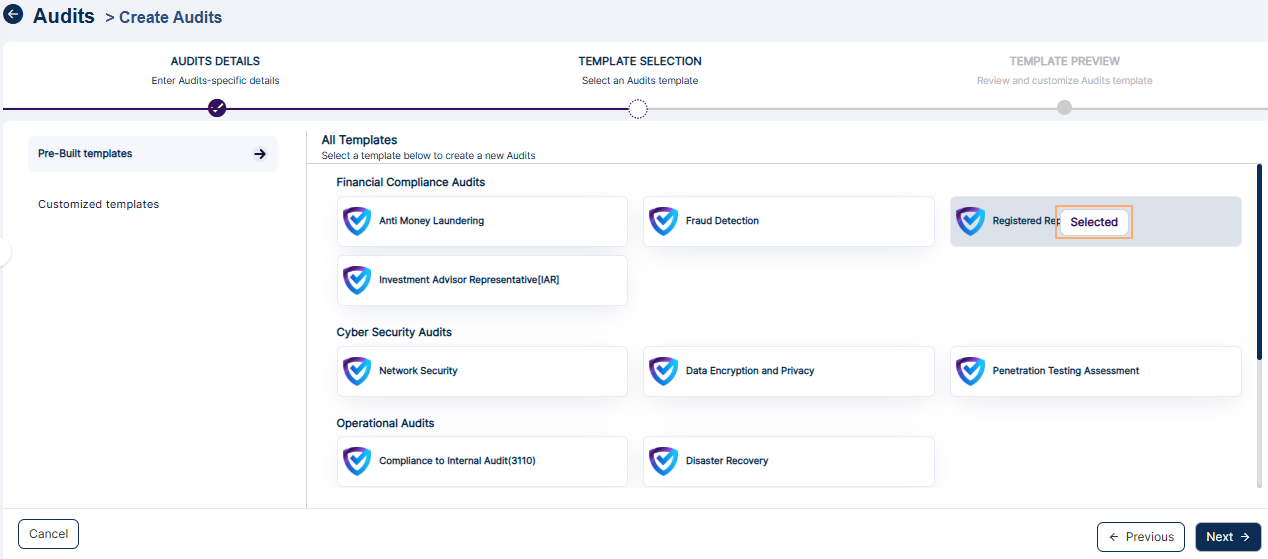 Fig: 39 - Selected Template
The following templates are provided (at the time of writing this guide):
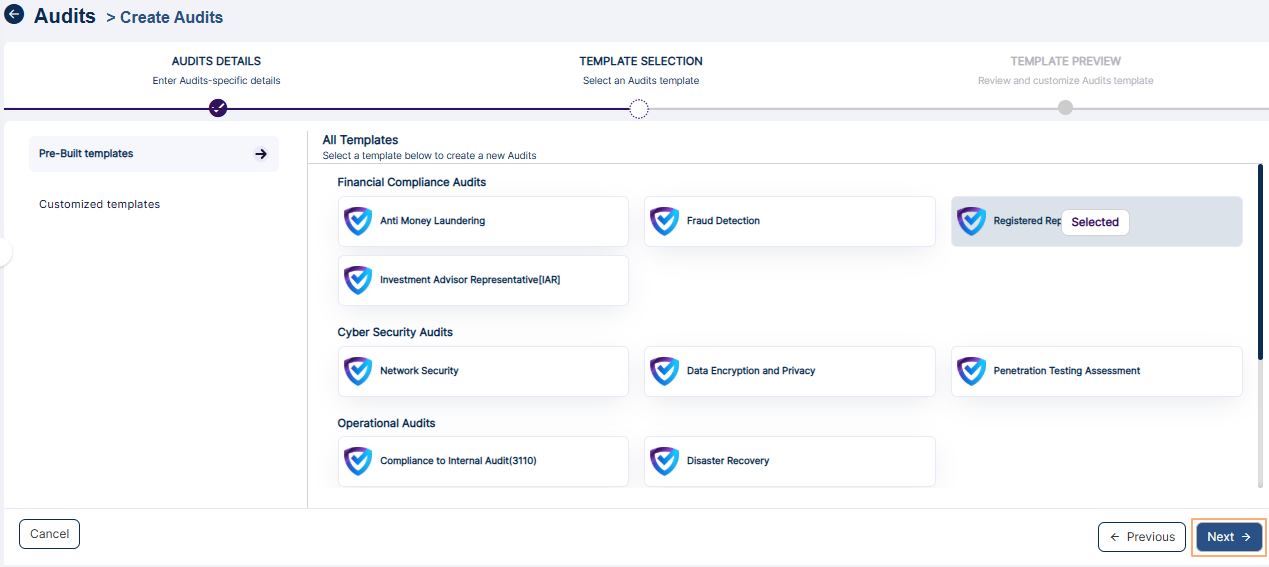 Fig: 40 - Next button to proceed
NOTE: There is option to choose custom template, if created. Custom templates can be created from the Settings menu > Template Library menu option > Add Template page.
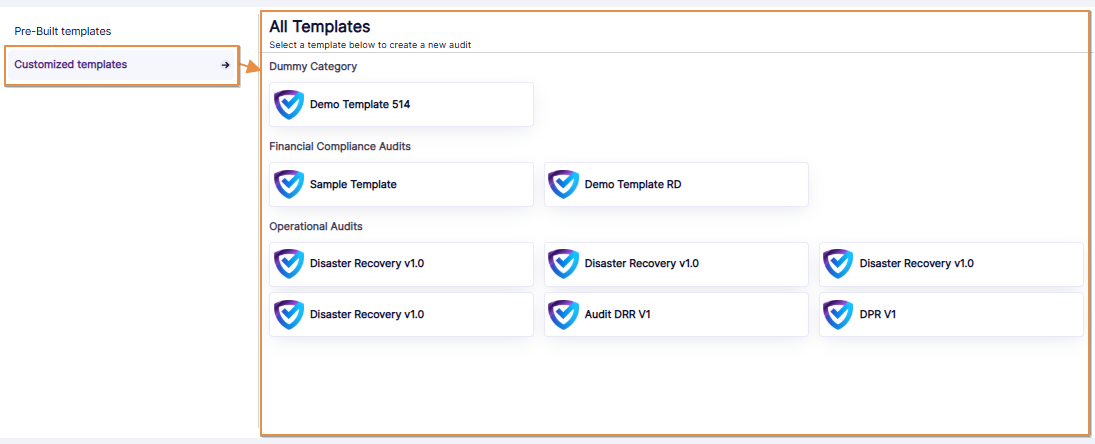 Fig: 41 - Custom template
3.3. Step #3 – Previewing Audit Template
Previewing the template allows users to verify its structure and content before proceeding. This reduces errors, ensures alignment with objectives, and builds confidence in the audit's design and execution.
In the Template Preview stage, you can view audit template category questionnaires. Based on the template selected in the Template Selection stage, audit questions are loaded in the third Template Preview stage.
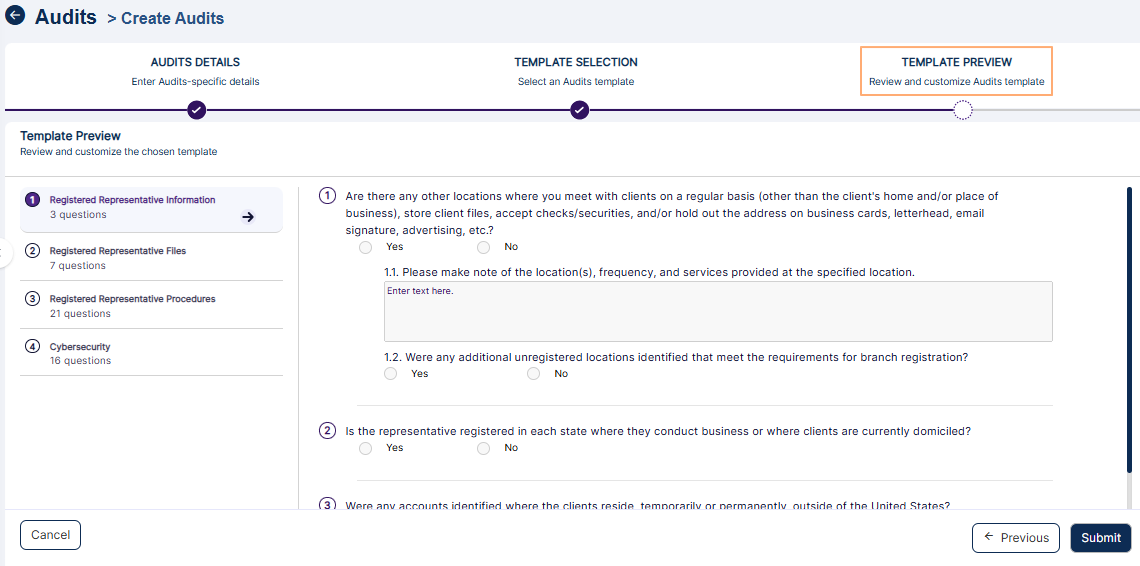 Fig: 42 - Selected Template Preview
3.3.1. Submitting the Selected Template
Submitting the template finalizes the audit setup, enabling the assigned auditor to perform the audit activity with confidence. It streamlines audit workflows, reduces any delays, and ensures that the audit activity is responded to by the user.
The left panel will display certain sections which are related to the template. Each selection loads a set of questions to the right side of it. After you are done editing the chosen template, click on the Submit button to create the audit as per the template.
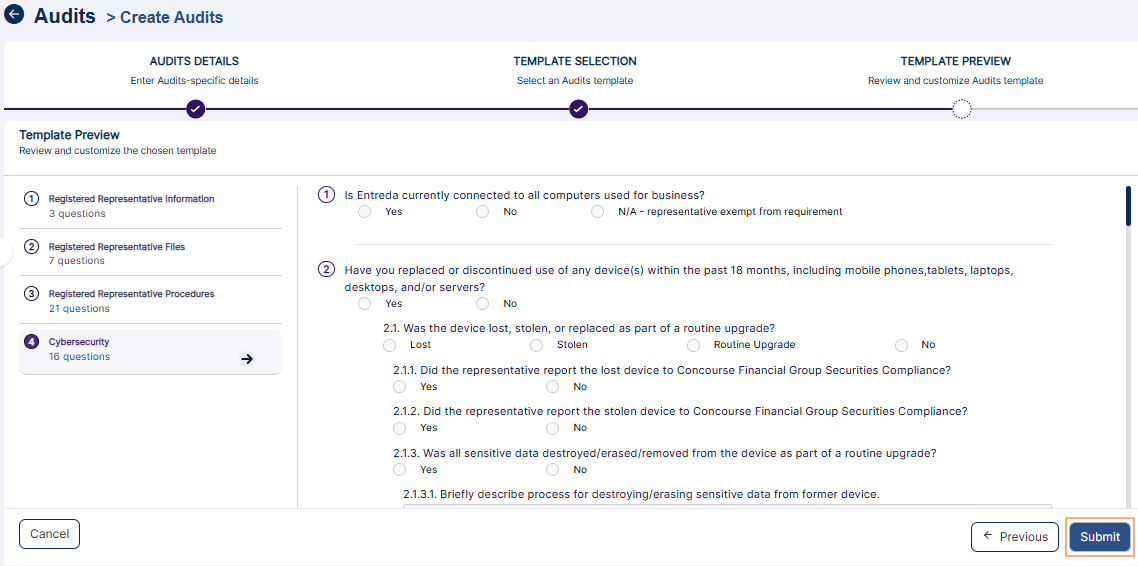 Fig: 43 - Submit button to create Audit
The created audit will get listed in the Audits page.
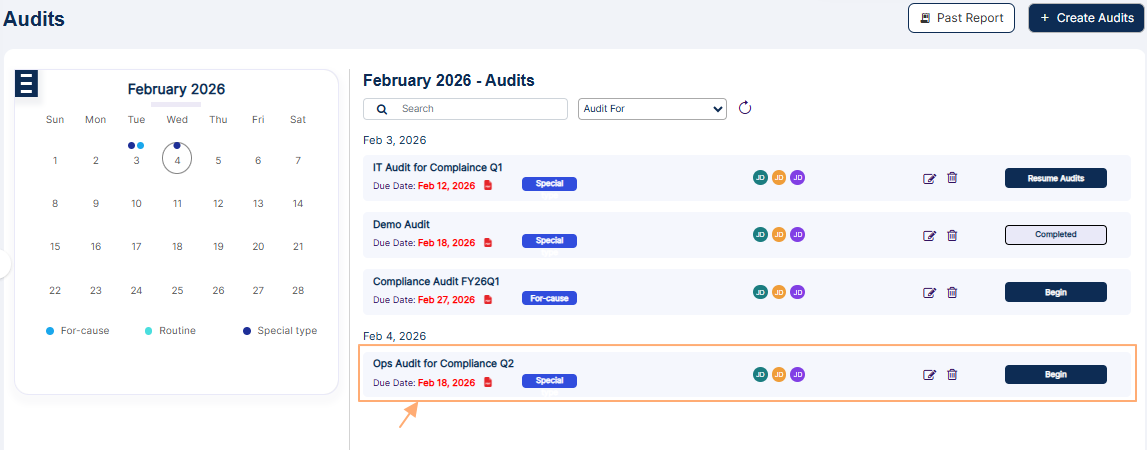 Fig: 44 - New Audit displayed on the Audits page
NOTE:
- An audit can be created by permitted user of your firm. The following image shows a different user has created the audit, a different auditor is assigned and a different recipient is related to the created audit.
- The audit is visible to the assigned user(s). The following screenshot shows that some assigned audits are visible to the Jane Doe user.
- However, the below screenshot shows that the same audits are not visible to the Test Employee user, since this user is not assigned to perform any audit activities.
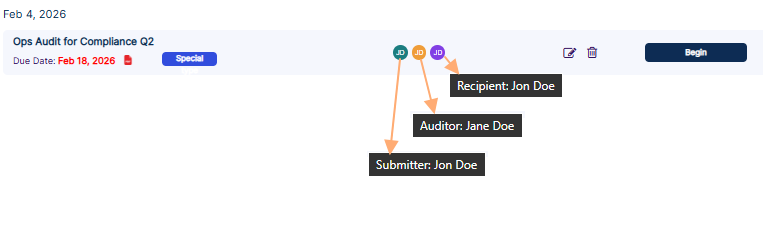 Fig: 45 - Different users related to a created audit
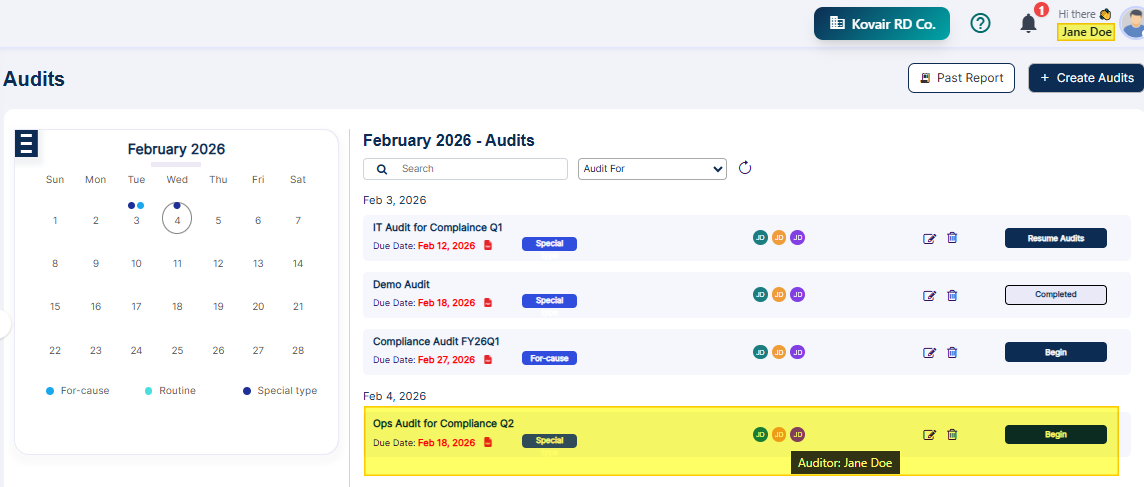 Fig: 46 - Created audit visible to related user who is either auditor or recipient
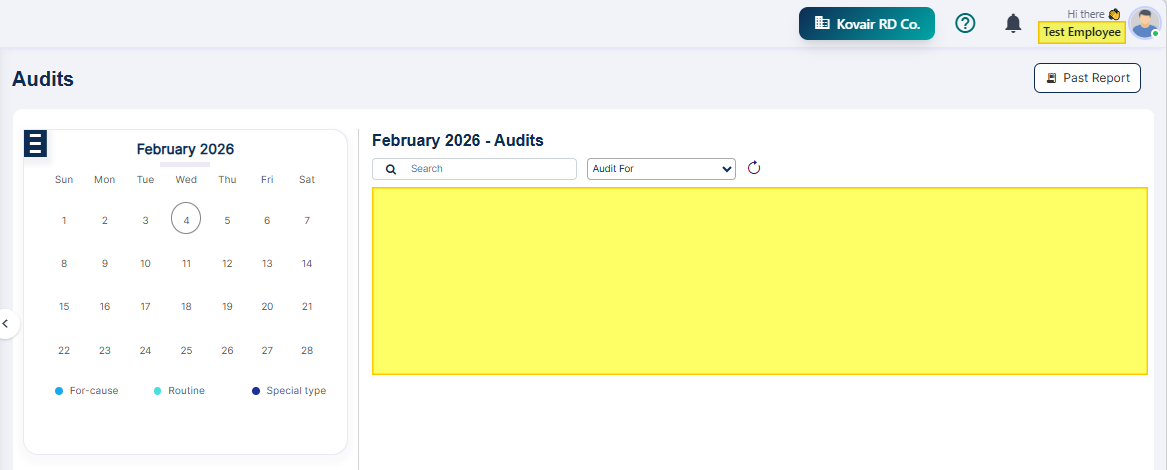 Fig: 47 - Created audit not visible to user who is not the specified auditor or recipient
4. Viewing Existing Audits
The ability to view existing audits offers significant value by providing users with a clear and accessible record of all past and ongoing assessments. This visibility ensures transparency across the organization, allowing stakeholders to track progress, verify compliance and confirm that corrective actions have been implemented. From a practical standpoint, quick access to existing audits reduces duplication of effort, strengthens accountability and ensures readiness for internal reviews or external inspections.
The permitted user can view own audits on the Audits page.
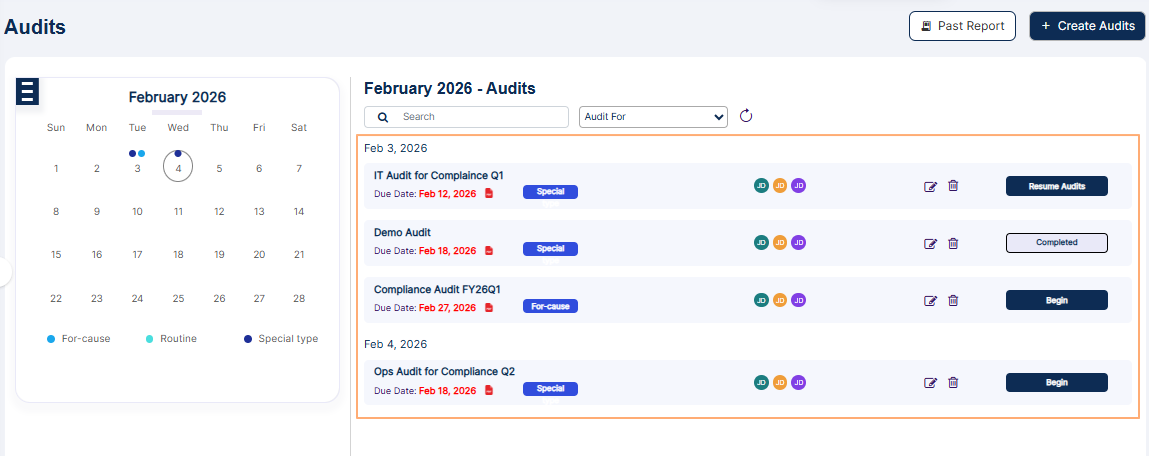 Fig: 48 - Audits view
Toggle the month selection calendar using the hamburger icon at the top left.
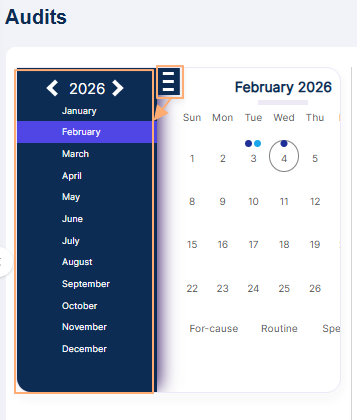 Fig: 49 - Expanded calendar view
Select desired month/year and date and any audits created on that get displayed on the right side of the calendar view.
Fig: 50 - Audit displayed for selected date of the month
NOTE: You can navigate to the Audits page from a Needs Attention! section entry of the Audits tab view within the Dashboard.
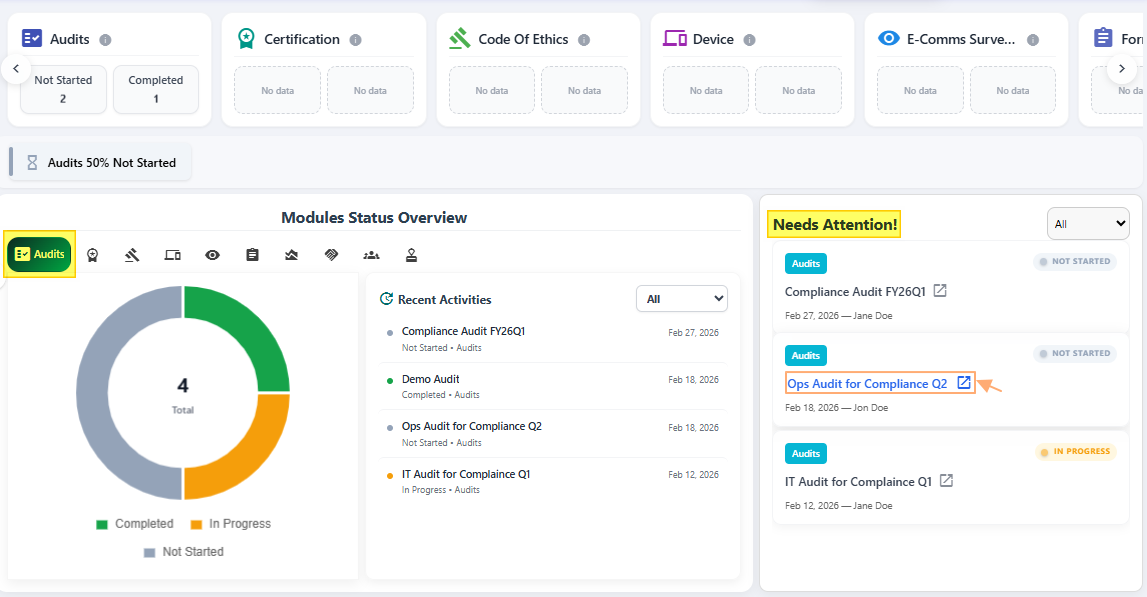 Fig: 51 - Needs Attention! section entry of Dashboard
5.1. Beginning Audit Process
Starting an audit initiates the evaluation phase, allowing users to examine procedures, identify gaps, and document findings effectively. This ensures timely detection of risks and supports proactive corrective measures.
Applicable Only for Assigned or Permitted Users
Click on the Begin action button to initiate the audit. The Begin button is disabled (identifiable through the lighter shade of violet colored background of the button) if the user is not the assigned Auditor for the audit or is not granted requisite permissions.
Fig: 52 - Begin / Resume Audit button to start / resume audit
Considering the user is the designated auditor and the audit start date is same as the current date, after clicking on the Begin button of that audit, the following page loads.
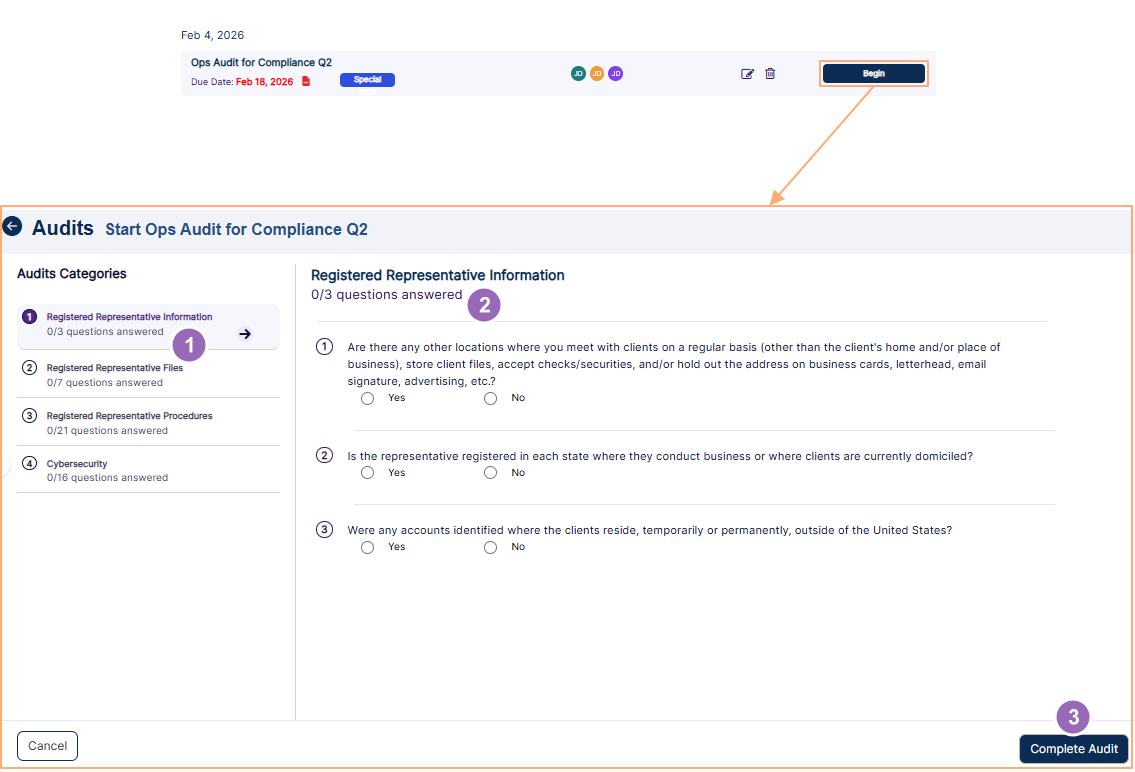 Fig: 53 - Audit questionnaires
The following three points correlate with the numerical values indicated in the above screenshot.
- The left panel lists out selectable sections that are part of the audit.
- The right panel loads out questions which belong to the selected audit category or section. User/Auditor must provide responses to all questions. Proceed to complete the questions of each category/section one by one. You can view how many questions have been answered in comparison to the total number of questions of that category. Refer to the following screenshot.
- Click on the Complete Audit button to record the completed audit.
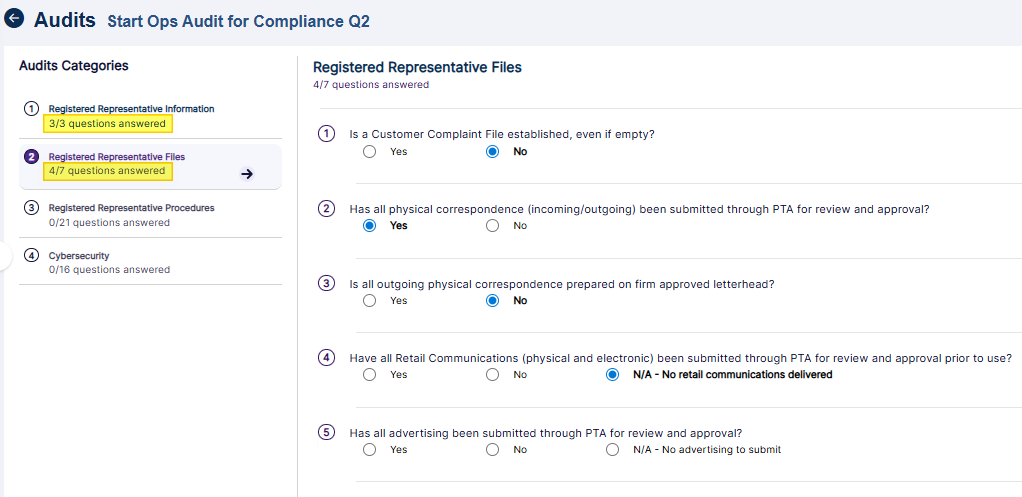 Fig: 54 - Number of questions answered
NOTE:
- If you click on the Begin button but you do not end up responding to all of the audit questions, then the next time you view the Audits page, the button label will display Resume Audit.
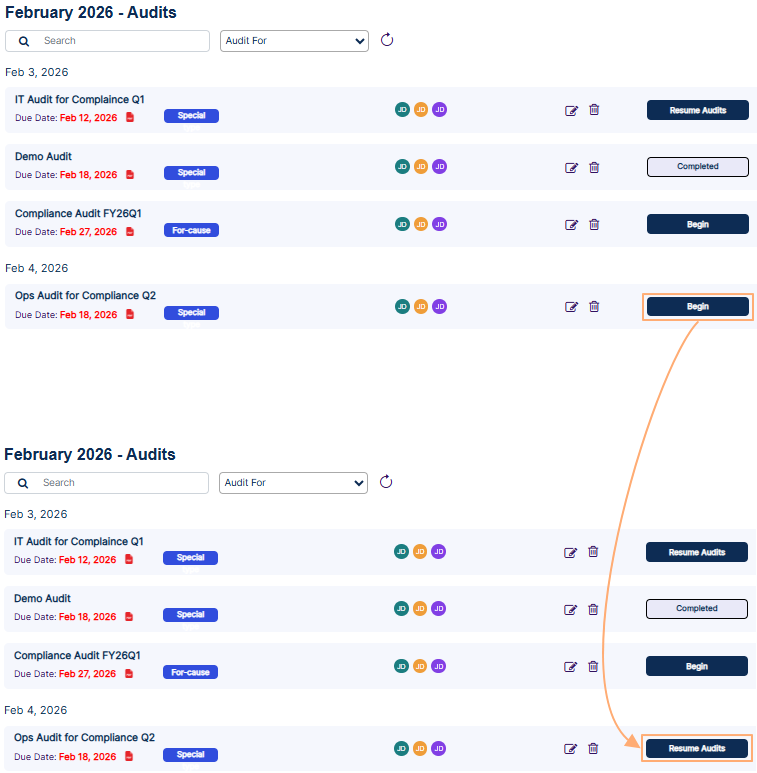 Fig: 55 - Begin button label changes to Resume Audit
- The system automatically saves your responses that load the next time you resume auditing.
5.2. Completing Audit Process
Finalizing an audit confirms that all necessary checks have been performed and the audit activity is submitted in the system for review. It marks the transition to analysis and remediation, ensuring closure, accountability, and proper documentation of results.
Applicable Only for Assigned or Permitted Users
- Click on the Complete Audit button after responses to all the question are provided.
- After you click on the Complete Audit button, the following success dialog box is prompted.
- Click on the Back to Audits button to close the success dialog box and navigate to the Audits page.
- You will notice that the status of the audit action button label has changed from Begin to Completed if the system does not detect any red flagged questions. No remediation is required in this case.
- You will notice that the status of the audit action button label has changed from Begin to Start Remediation if the system detects any red flagged questions.
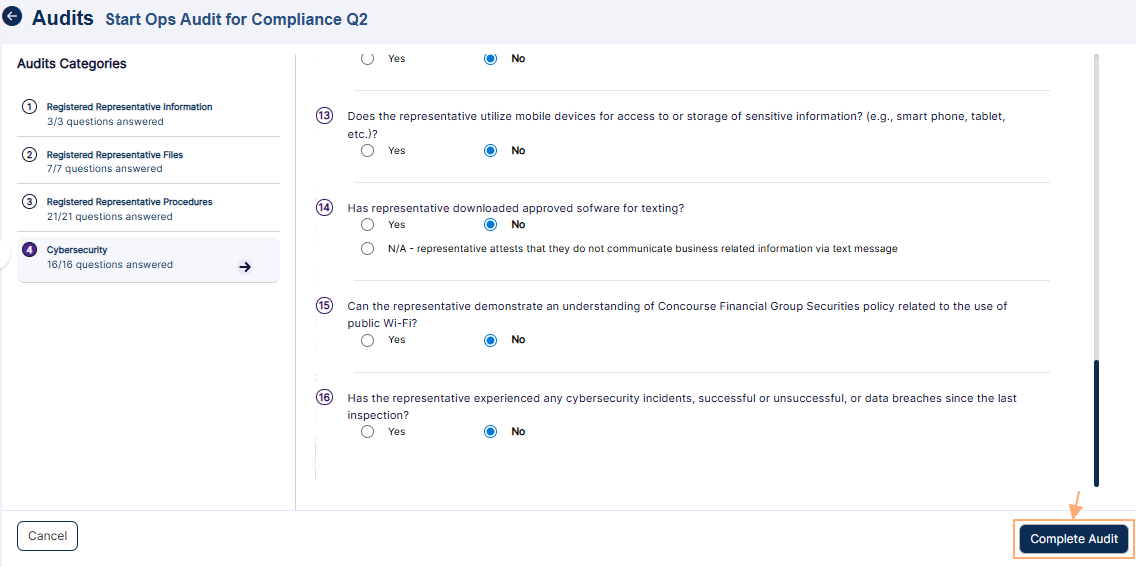 Fig: 56 - Complete Audit button
NOTE:
If you click on the Complete Audit button before all questions are responded, the system will display the following dialog box. Click on the Ok button to close it.
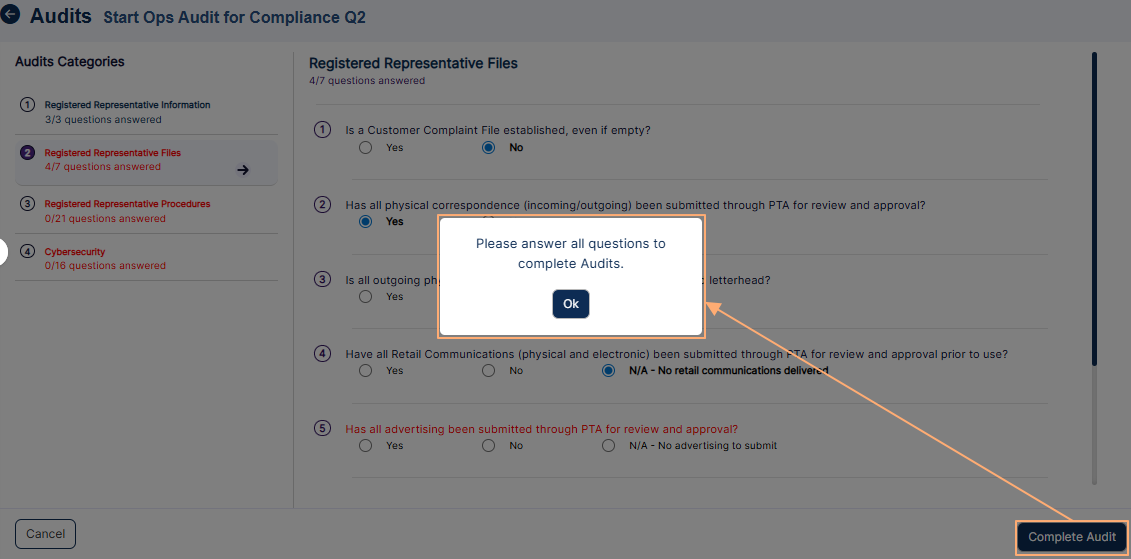 Fig: 57 - All questions are not responded dialog box
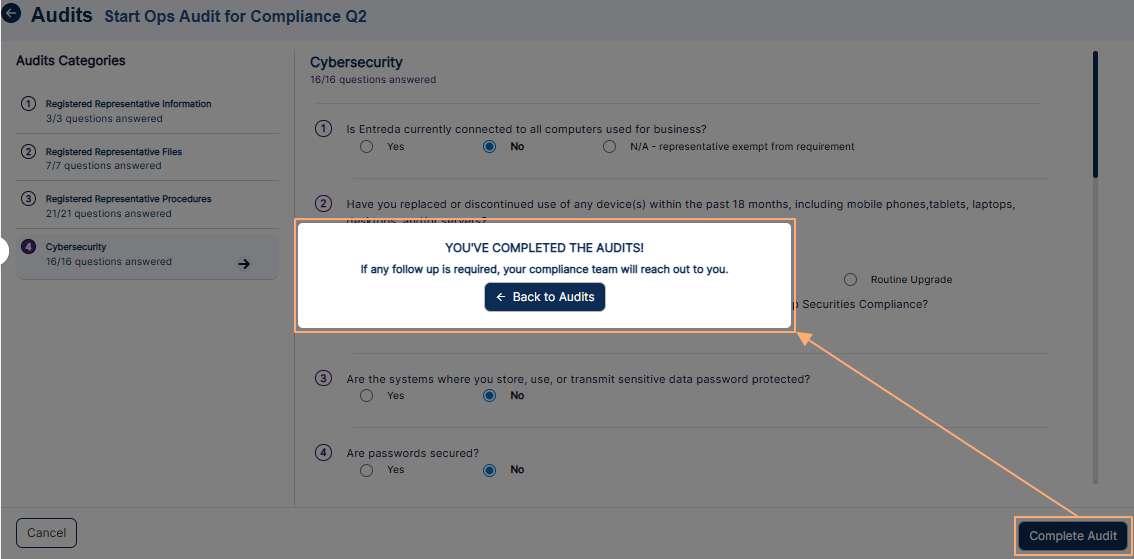 Fig: 58 - Success dialog box
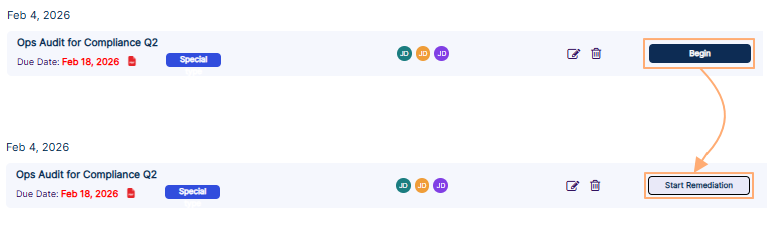 Fig: 59 - Audit action button label changed from Begin to Start Remediation
NOTE:
The Dashboard shows the audit status after it is processed.
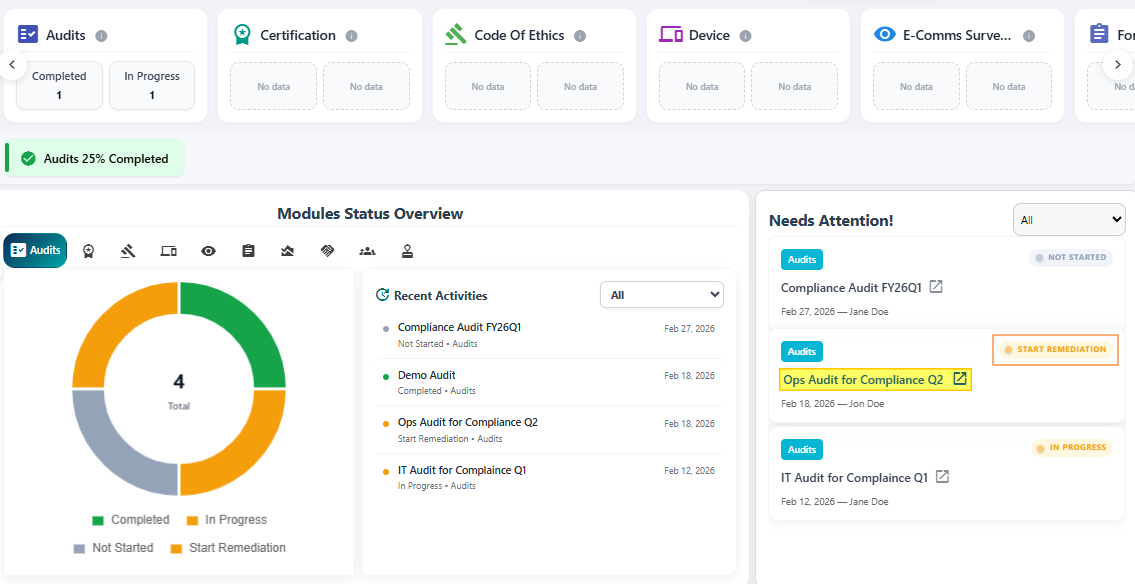 Fig: 60 - Dashboard shows the updated audit status
5.3. Starting Audit Remediation
Starting audit remediation is a pivotal stage in the audit lifecycle, transforming findings into structured corrective actions. Once an audit is completed and red-flagged responses are identified, remediation ensures these issues are systematically addressed rather than left unresolved. This process demonstrates organizational accountability, strengthens compliance posture, and reduces exposure to operational, financial, or reputational risks. By initiating remediation, organizations exhibit that they are proactive in resolving deficiencies, which builds trust and confidence in their governance practices.
NOTE:
- This section is applicable only when you have completed the audit processing and there is at least one red flagged question response.
- If the audit is completed without any red flags, then the Begin Audit or Resume Audit button label changes to Completed on the Audits page.
- If the audit is completed with any red flagged question responses, then the Begin Audit or Resume Audit button label changes to Start Remediation on the Audits page.
- This Start Remediation button is disabled for the users who are not permitted.
Applicable Only for Assigned or Permitted Users
- Once the audit is submitted, the following occur:
- A notification is generated in the application (for the logged-in auditor) regarding the completion of the audit.
- An email gets triggered to the assigned auditor's email address regarding the completion of the audit.
- Remediation activity can be initiated as the audit action button label gets updated to Start Remediation. Click on the Start Remediation button against the flagged audit.
- After you click on the Start Remediation button, the audit remediation page loads. The response(s) to certain question(s) that need to be addressed to are present during audit remediation. One such red flag question which is to be remediated can be seen in the following screenshot.
- Provide the necessary response in the form of a note. You, as the Auditor, can enter your note as a Private Notes entry or a Public Notes entry or make both. As the name suggests, the former have limited visibility while the latter is visible to all existing users.
- Click on the send (paper plane)
 icon to post your note. You can post any number of notes. The profile picture preview of the poster, the full name, and the timestamp is visible above the note. The timestamp format is MM/DD/YYYY HH:MM:SS AM/PM.
- Click on the expand
 icon to focus and view the note section.
- Click on the attach
 icon to post any attachment.
- Click on the delete
 icon to remove your posted note.
- Click on the Request Info/Docs button to request furnishing of any additional documentation from the auditee to support the audit response. After you click on it a confirmation dialog box will be prompted.
- Click on the Continue button to confirm the request.
- A Preview dialog box will load next.
- Click on the Confirm button. The system will display a success notification as Request sent successfully at the top.
The following image is marked with numerical values which correspond with the above three bullet points.
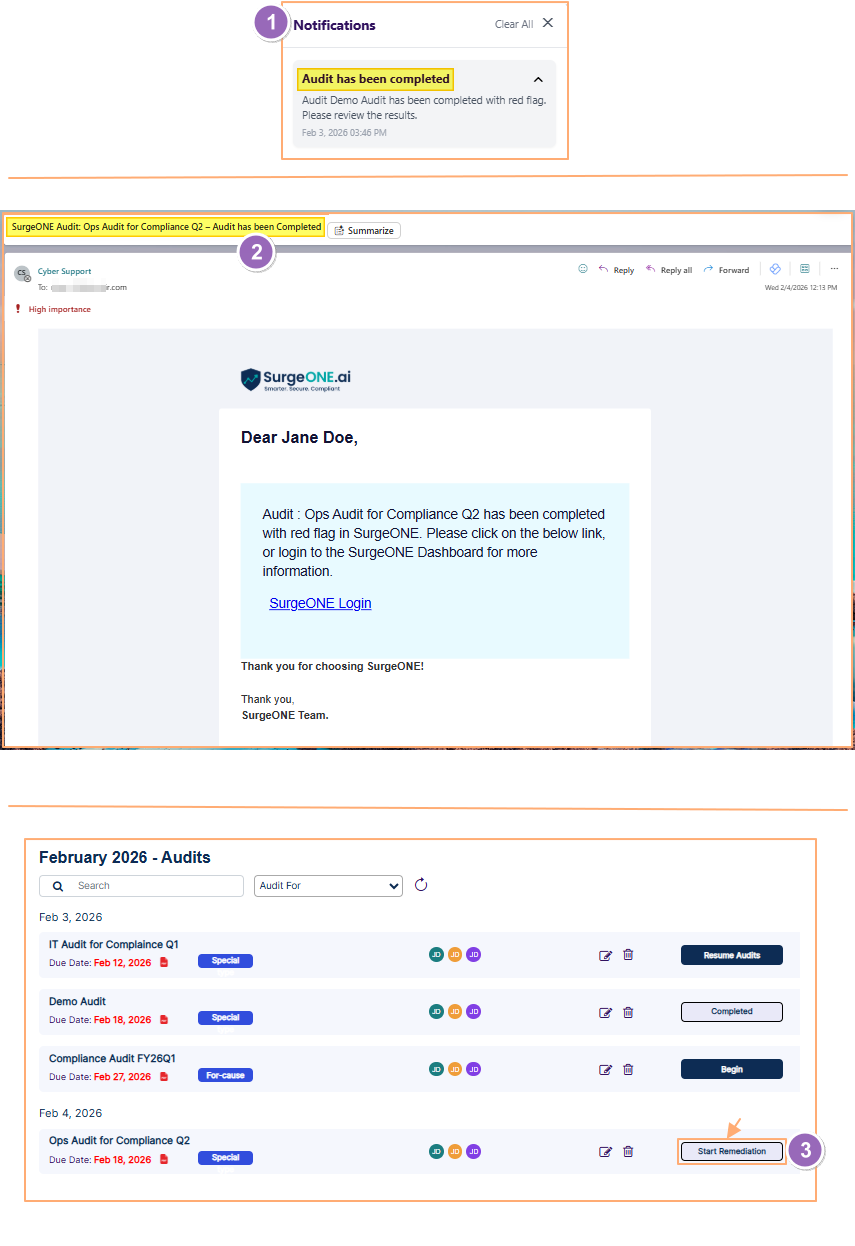 Fig: 61 - View of the triggered notification, email and the Start Remediation button
NOTE:
This Start Remediation button against the flagged audit is enabled or disabled depending on the logged-in user permissions set.
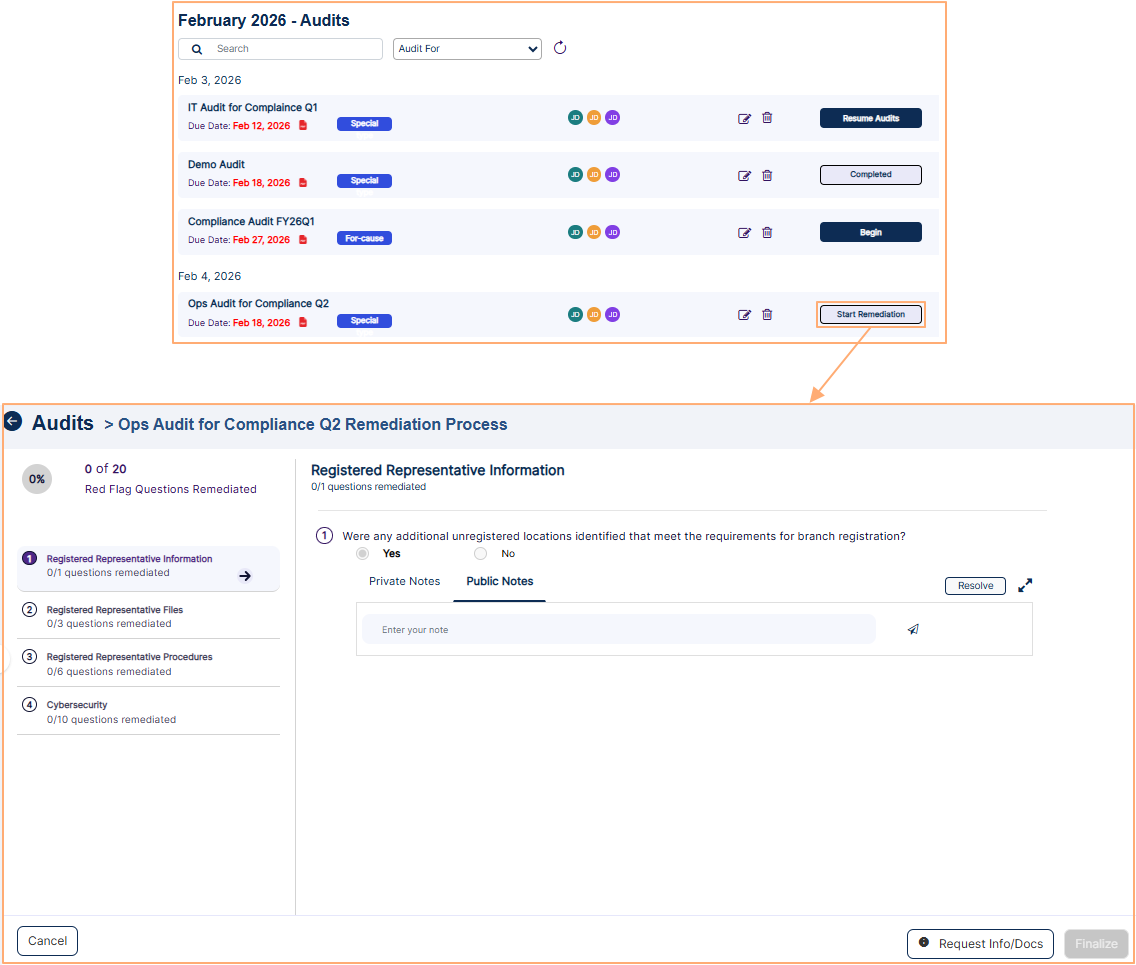 Fig: 62 - View of red flag question which is to be remediated
NOTE:
The following five bulleted items consists of optional activities:
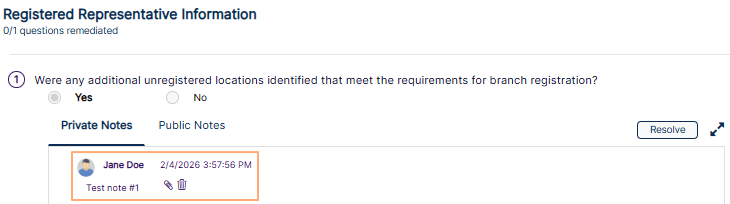 Fig: 63 - Sample note posted
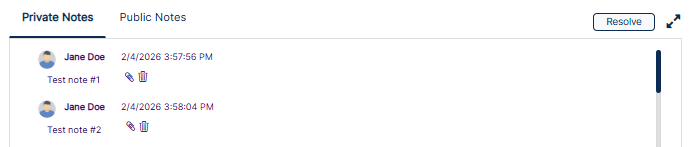 Fig: 64 - Expanded view
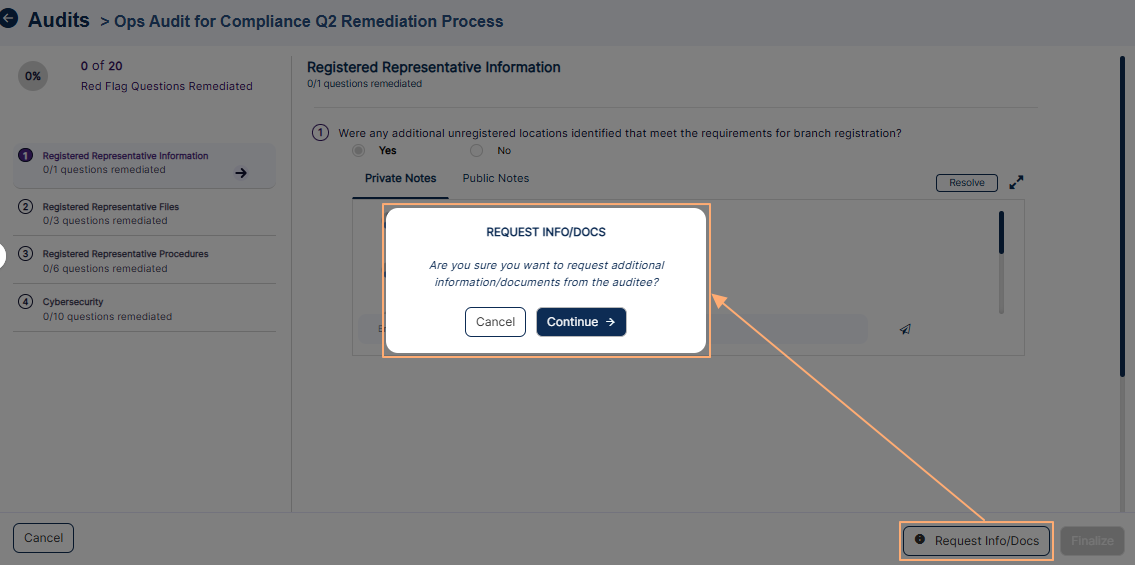 Fig: 65 - Requesting for additional information or documentation
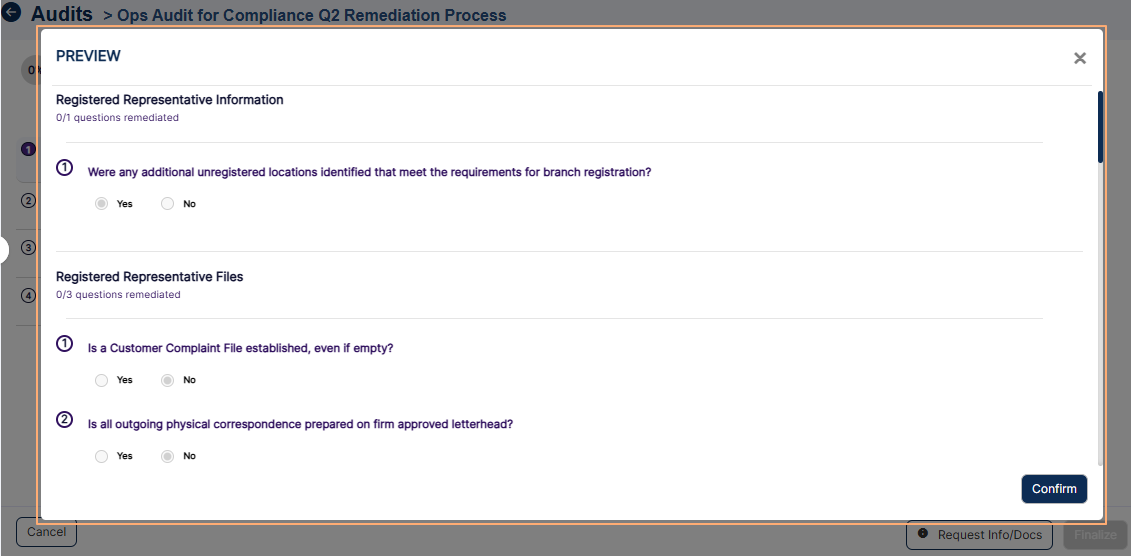 Fig: 66 - View of Preview dialog box
 Fig: 67 - View of success notification of request sent
Applicable Only for Recipients
- Receive an email about the request for additional information. You can use the embedded link to navigate to SurgeONE.ai.
- Click on the Resume Remediation button of the Audits page against the flagged audit.
- The response(s) to certain question(s) that need to be addressed to are present during audit remediation. One such red flag question has been commented in the following screenshot. Relevant attachment can also be uploaded for the Auditor to review after a public note is posted.
- Click on the Send Requested Data button to forward the provided information/details.
- The system will display a success notification after the Auditee / Recipient clicks on it.
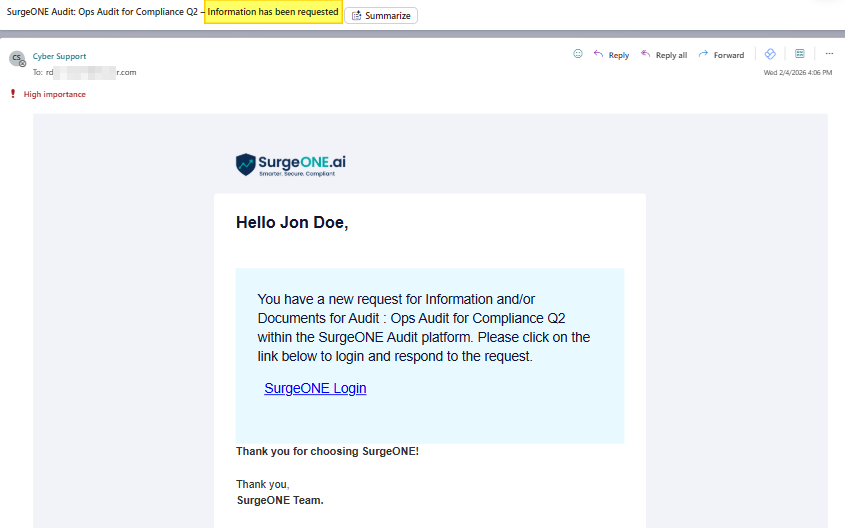 Fig: 68 - View of received email
 Fig: 69 - View of Resume Remediation button
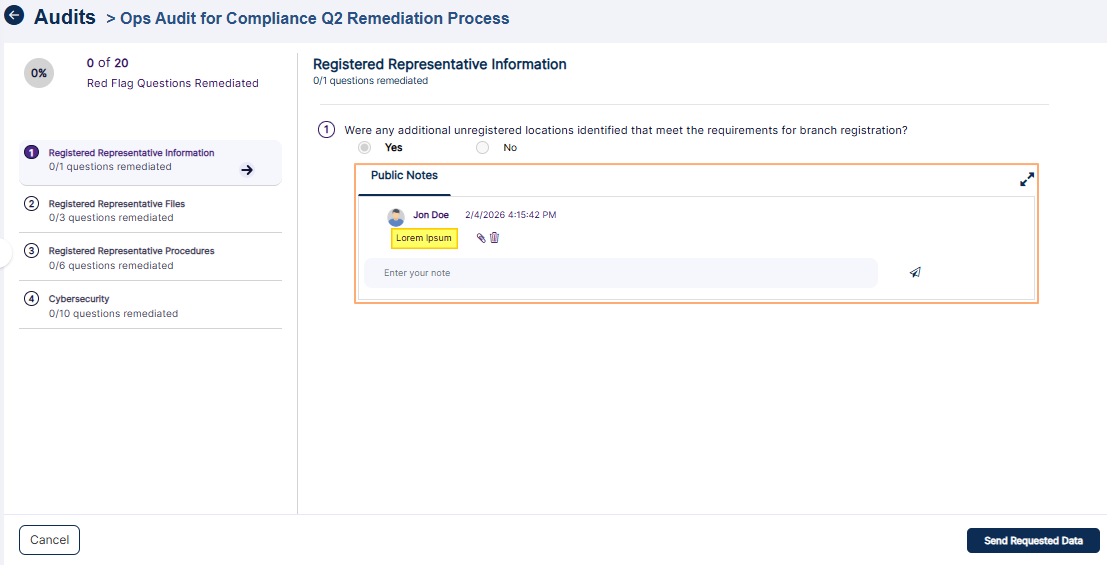 Fig: 70 - Comment added
NOTE:
For the Auditor, Notes are of two types: Public and Private. For the sake of own benefit, only the Auditor user can post notes that are visible only to self and not to others. But, for the Recipient, only the Public Notes option is present. This note (when posted) is visible to the Auditor during audit remediation.
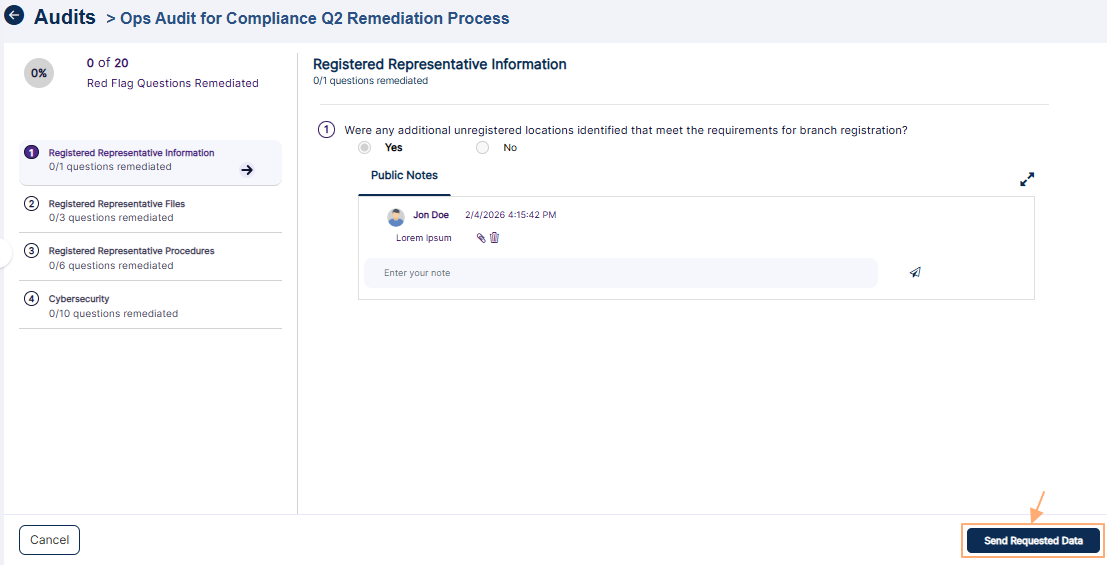 Fig: 71 - View of Send Requested Data button
 Fig: 72 - View of save success notification
NOTE:
You can also upload attachment with your comment using the attach icon or delete the comment using the delete icon. Uploaded attachment can be removed using the red cross icon.
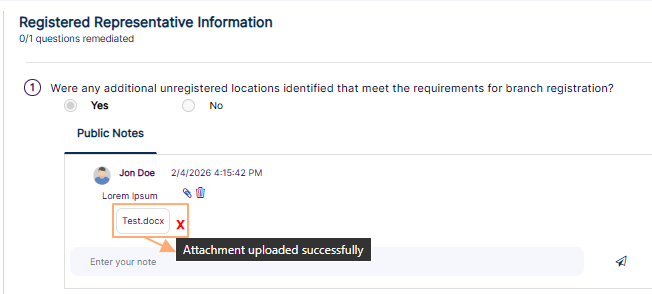 Fig: 73 - View of uploaded attachment
5.4. Resuming Audit Remediation
Resuming audit remediation is an essential capability that ensures continuity in the corrective action process. When remediation has been initiated but not fully completed, this feature allows users to seamlessly return to their work without losing any previously entered data or progress. It safeguards the integrity of the remediation process by preventing duplication of effort, ensuring that every action taken is preserved and traceable. This functionality is particularly valuable in scenarios where additional information or documentation is required from recipients before flagged issues can be resolved. By enabling auditors to pause and later resume remediation, the process becomes more flexible and collaborative, accommodating dependencies on other stakeholders while maintaining momentum. Resuming remediation also reinforces accountability by ensuring that all red-flagged responses are systematically addressed before finalization.
NOTE:
- This section is relevant only when you have started the audit remediation process, but have not resolved all of the red flagged question responses.
- The Resume Remediation button can be found on the Audits page only when you begin an audit remediation process, but not finalize the audit at one go.
One such scenario can be when you click on the Request Info/Docs button to request furnishing of any additional information or documentation and the Recipient has provided the requested information..
Applicable Only for Assigned or Permitted Users
- The Auditor will receive a system generated email regarding the furnished information.
- The audit action button label can be seen as updated from Start Remediation to Resume Remediation.
- Click on the Resume Remediation button to go back to the audit remediation red flagged question(s).
- Click on the Resolve button of a particular flagged audit response question to mark it as resolved.
- A confirmation dialog box is prompted. Click on the Resolve button to confirm.
- That red flagged question gets resolved and the label of the Resolve button changes to Unresolve.
- Repeat this resolution activity for all the red flagged ones. The percentage at the top left increases up to 100%, which indicates completeness of all red flagged question responses.
- Click on the Finalize button if there are no more red flagged questions as unresolved. A confirmation dialog box is displayed. Click on the Finalize button of the dialog box to proceed.
- You will get redirected to the Audits page. The audit gets marked as Completed.
- The Auditor will receive an email regarding the audit completion. It is triggered when audit is completed without red flags or with red flags. The following image displays the latter.
- The Auditor can receive application notification on audit completion.
- The same is reflected in the Dashboard > Modules Status Overview > Recent Activities view.
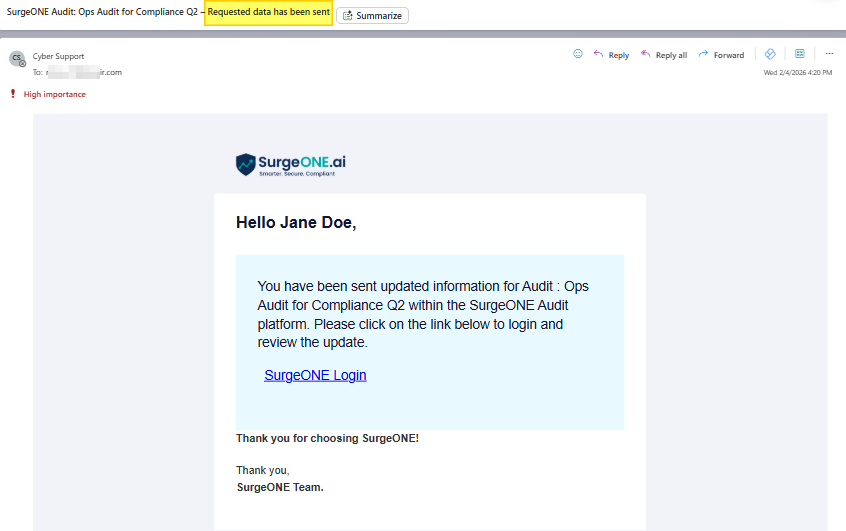 Fig: 74 - View of received email
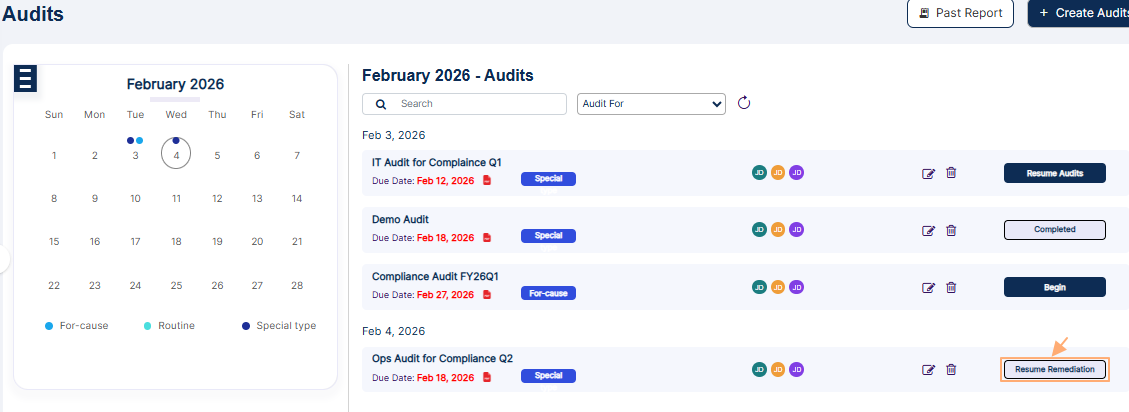 Fig: 75 - View of Resume Remediation button
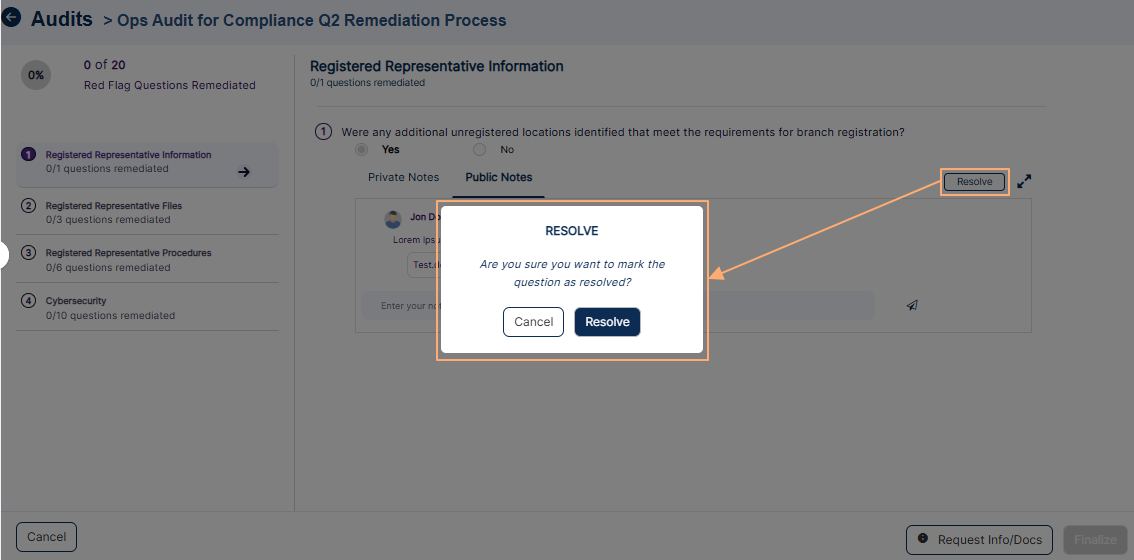 Fig: 76 - Resolve dialog box prompted
NOTE:
Click on the Unresolve button to again raise the red flagged question response, if you need to.
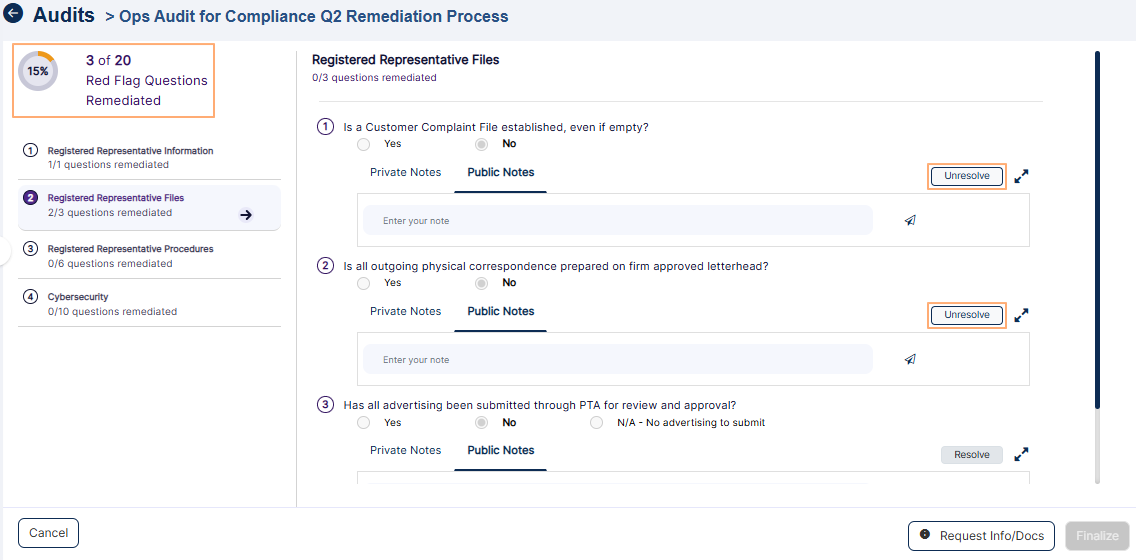 Fig: 77 - Unresolve button
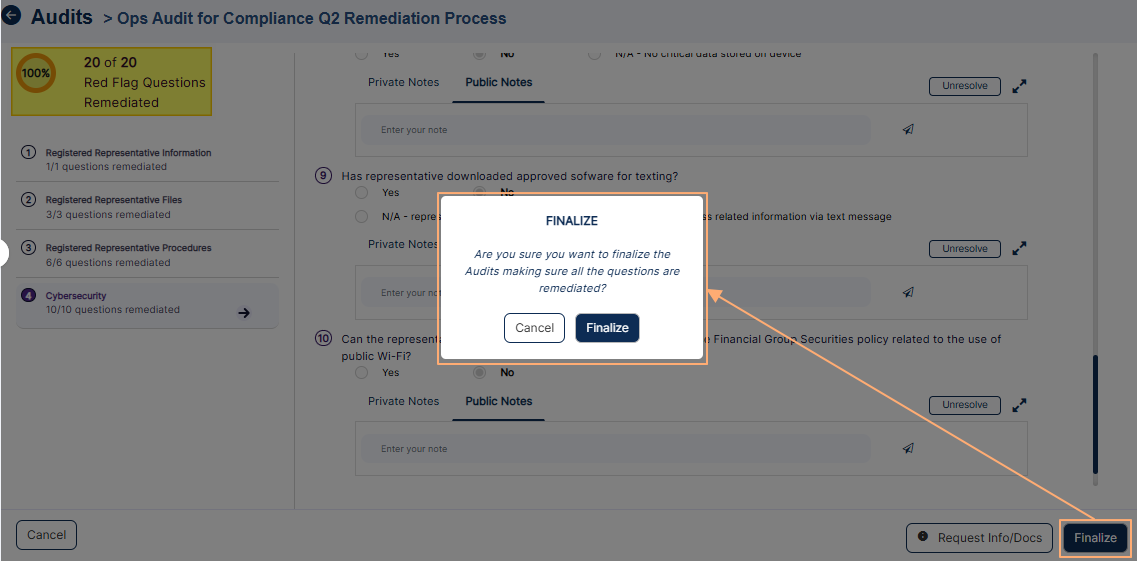 Fig: 78 - Finalization when no red flagged questions are left in the audit
NOTE:
You cannot finalize an audit unless you ensure that there are no pending red flagged questions which are unresolved. Consider the following screenshot where the button is disabled since there are unresolved questions.
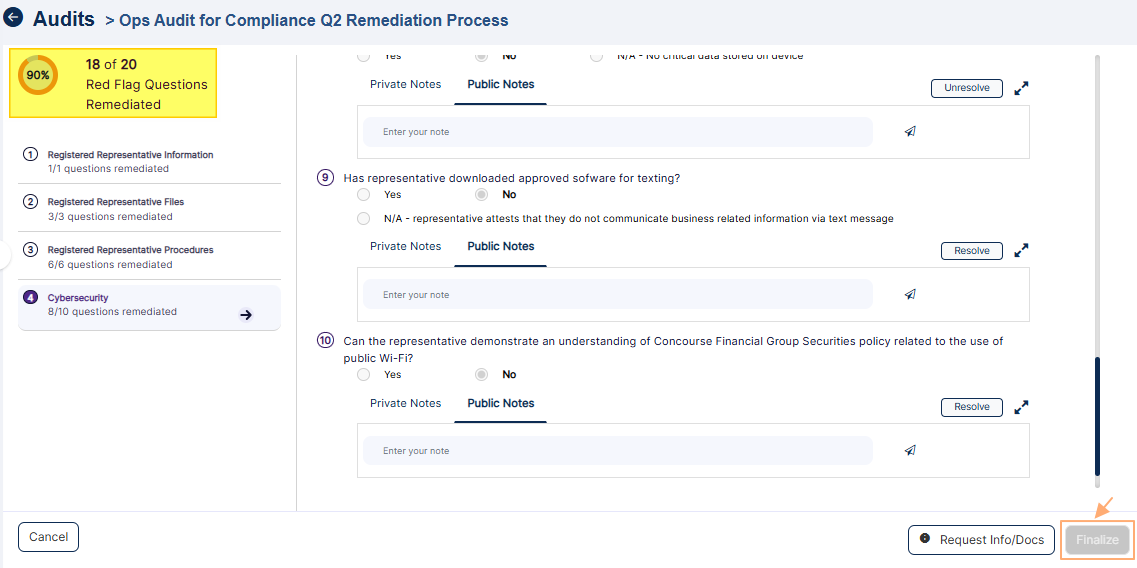 Fig: 79 - Finalization button disabled
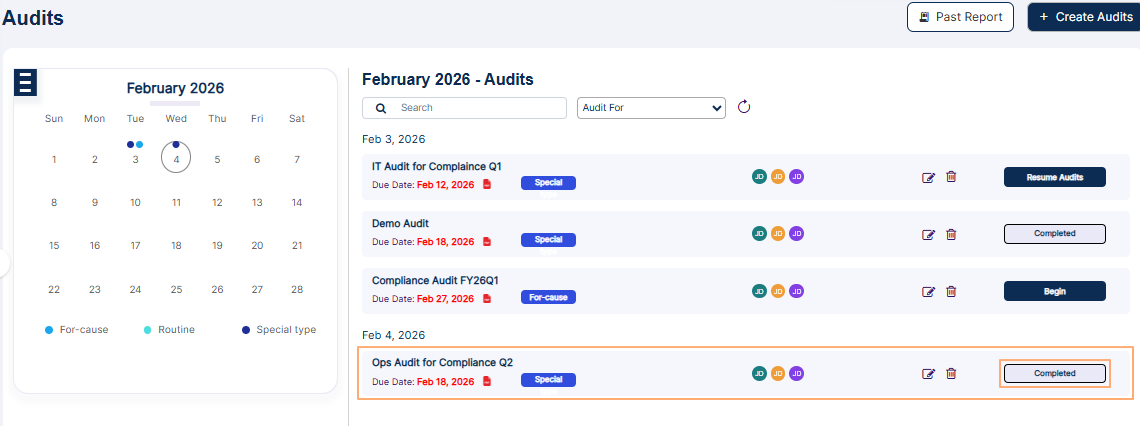 Fig: 80 - View of audit marked as Completed
NOTE:
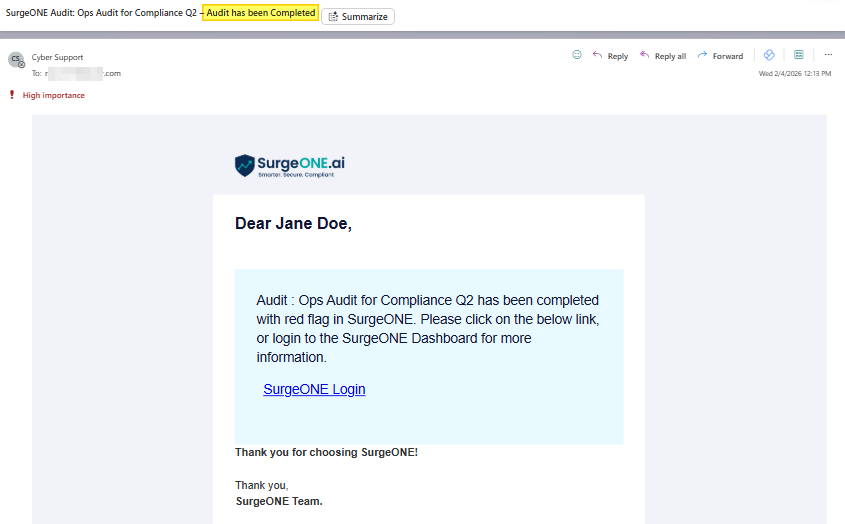 Fig: 81 - View of email regarding the audit completion
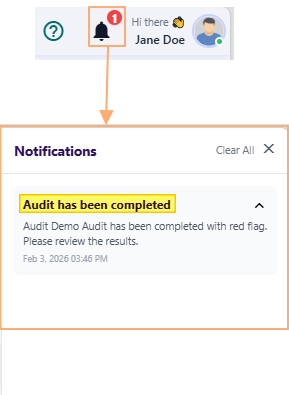 Fig: 82 - View of success notification
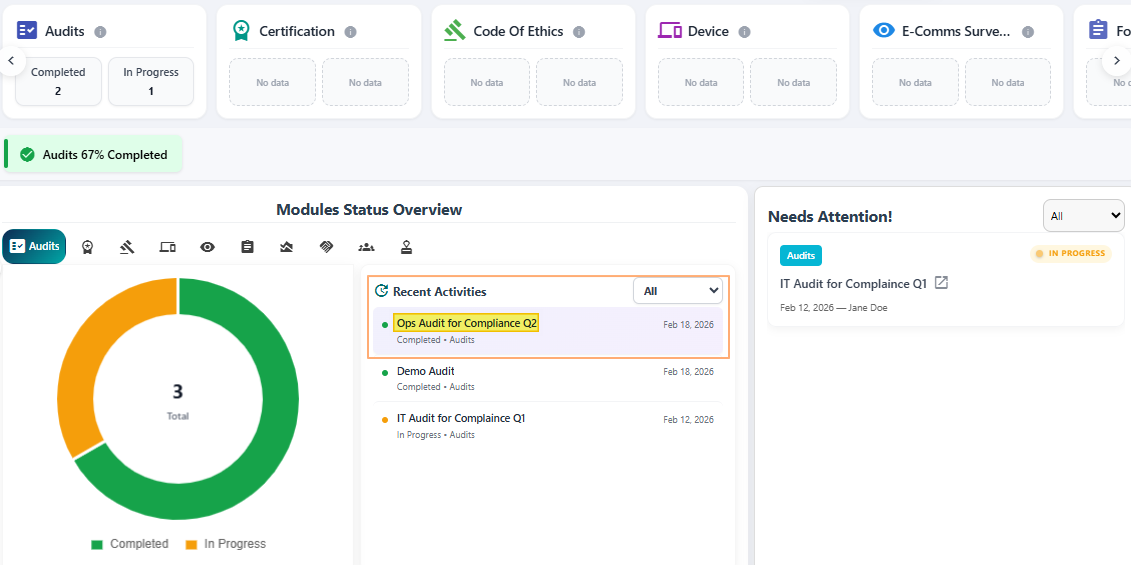 Fig: 83 - View of Dashboard showing audit completion data
5.5. Editing an Audit
The ability to edit an audit, provided the necessary permissions are granted and the audit has not yet commenced, ensures accuracy and flexibility in the audit process. This feature allows users to correct errors, update details, or refine details before the audit begins, thereby improving the quality and relevance of the audit activity. It reduces the risk of misaligned audits, prevents wasted effort, and ensures that the audit reflects the most current requirements or organizational priorities.
NOTE: An audit can be edited if permission is provided and the audit is yet to be started.
- Click on the enabled edit icon to proceed to edit an audit.
- You can modify any fields data of the Audit Details tab view - except for the Audit For and Status fields. The Organization dropdown is disabled if there are no sub-firms or parent firms of the current organization. Click on the Submit button to save your changes.
- Get redirected to the Audits page. A success notification gets displayed at the top.
 Fig: 84 - Option to edit an audit which is not started
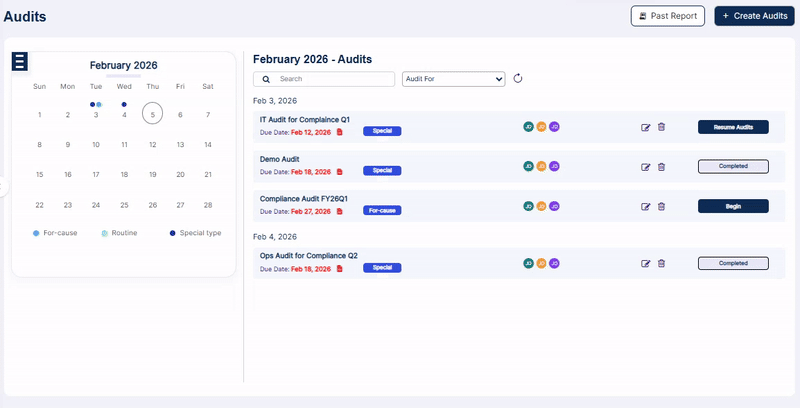 Fig: 85 - Editing an audit
 Fig: 86 - View of the success notification
5.6. Deleting an Audit
The ability to delete an audit ensures that only relevant and purposeful audits remain in the SurgeONE system. This functionality helps maintain data accuracy, reduces unnecessary clutter, and prevents confusion caused by outdated or incorrectly created audits.
NOTE: An audit can be deleted if permission is provided and the audit is yet to be started.
- Click on the enabled delete icon to proceed to delete an audit.
- A modal window loads to obtain your confirmation. Click on Yes button to proceed.
- The modal window closes and the audit gets removed.
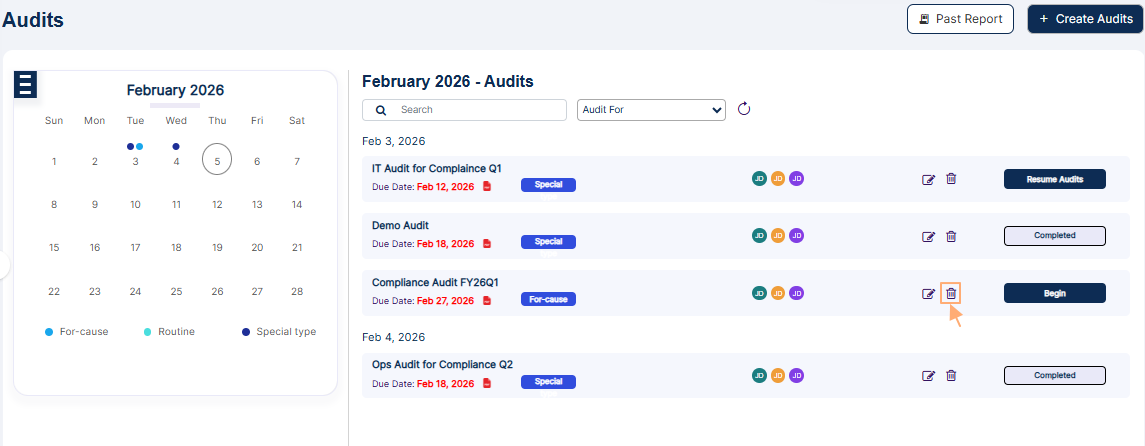 Fig: 87 - Option to delete an audit which is not started
 Fig: 88 - Confirmation modal window
6. Customizing the Past Report Report columns
Customization empowers users to tailor reports to their unique needs, improving relevance, enhancing stakeholder communication, and supporting data-driven decision-making. It ensures reports highlight the most critical information for each audience, as per their preferences and convenience.
- To customize the grid view columns from within the past audits report page, first click on the vertical ellipsis
 icon to the right of the Export button.
 - You can click on the right arrow icon to toggle the visibility of the column labels and its selection status.
- Make checkbox selections against the labels which you wish to display in the grid view. The greyed-out checkboxes cannot be deselected since those are always displayed in the grid. Click on the Save button after your checkbox selections are done. The modal window will close and the column changes made will get reflected in the grid view.
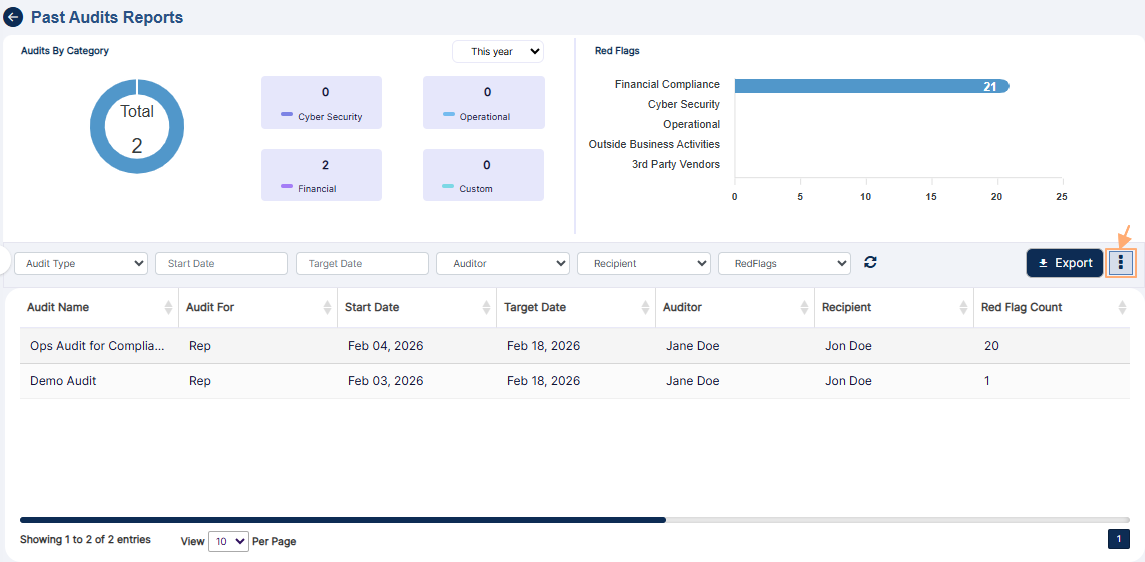 Fig: 89 - Icon to load modal window to customize grid view columns
The following Audit Attributes modal window loads.
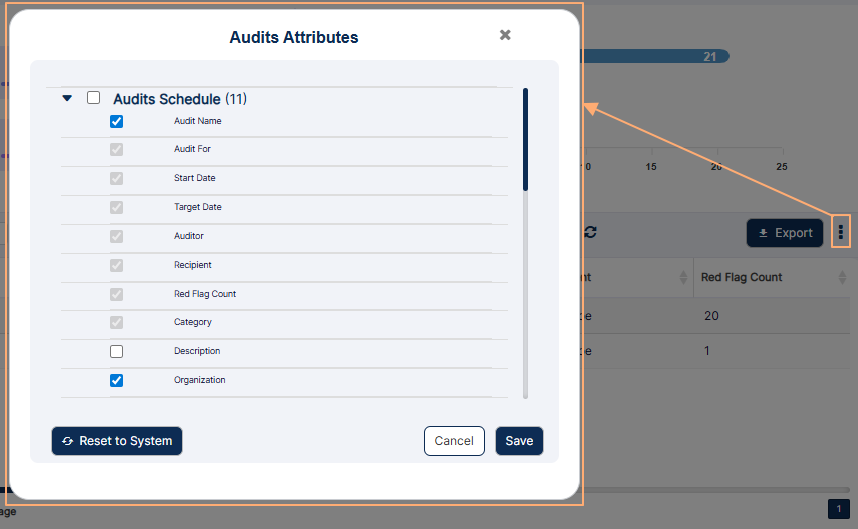 Fig: 90 - Audit Attributes modal window
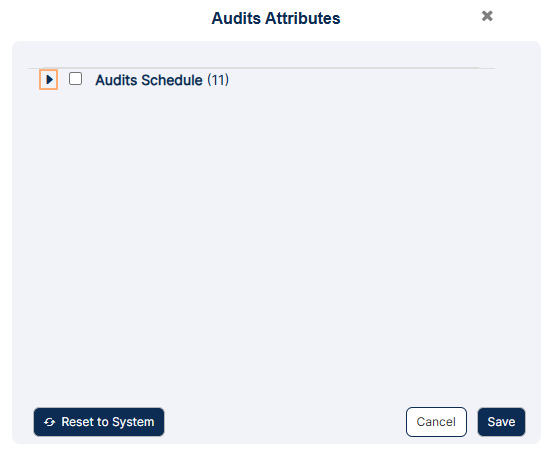 Fig: 91 - Collapsed view of the various column labels and its selection status
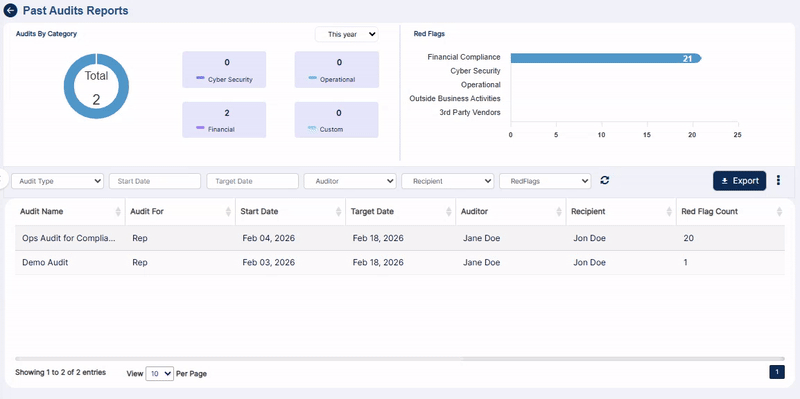 Fig: 92 - Saving the column checkbox selections
NOTE:
You can click on the Reset to System button to restore the column selections to the default setting.
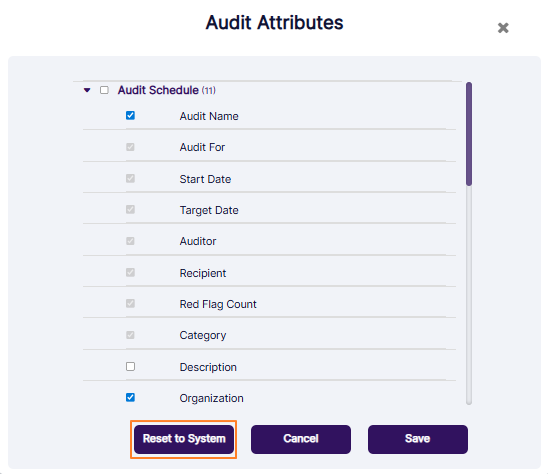 Fig: 93 - Button to reset columns display to default view
7. Appendix - Audit Lifecycle Flowchart
The following image depicts the flowchart of Audit life cycle in SurgeONE:
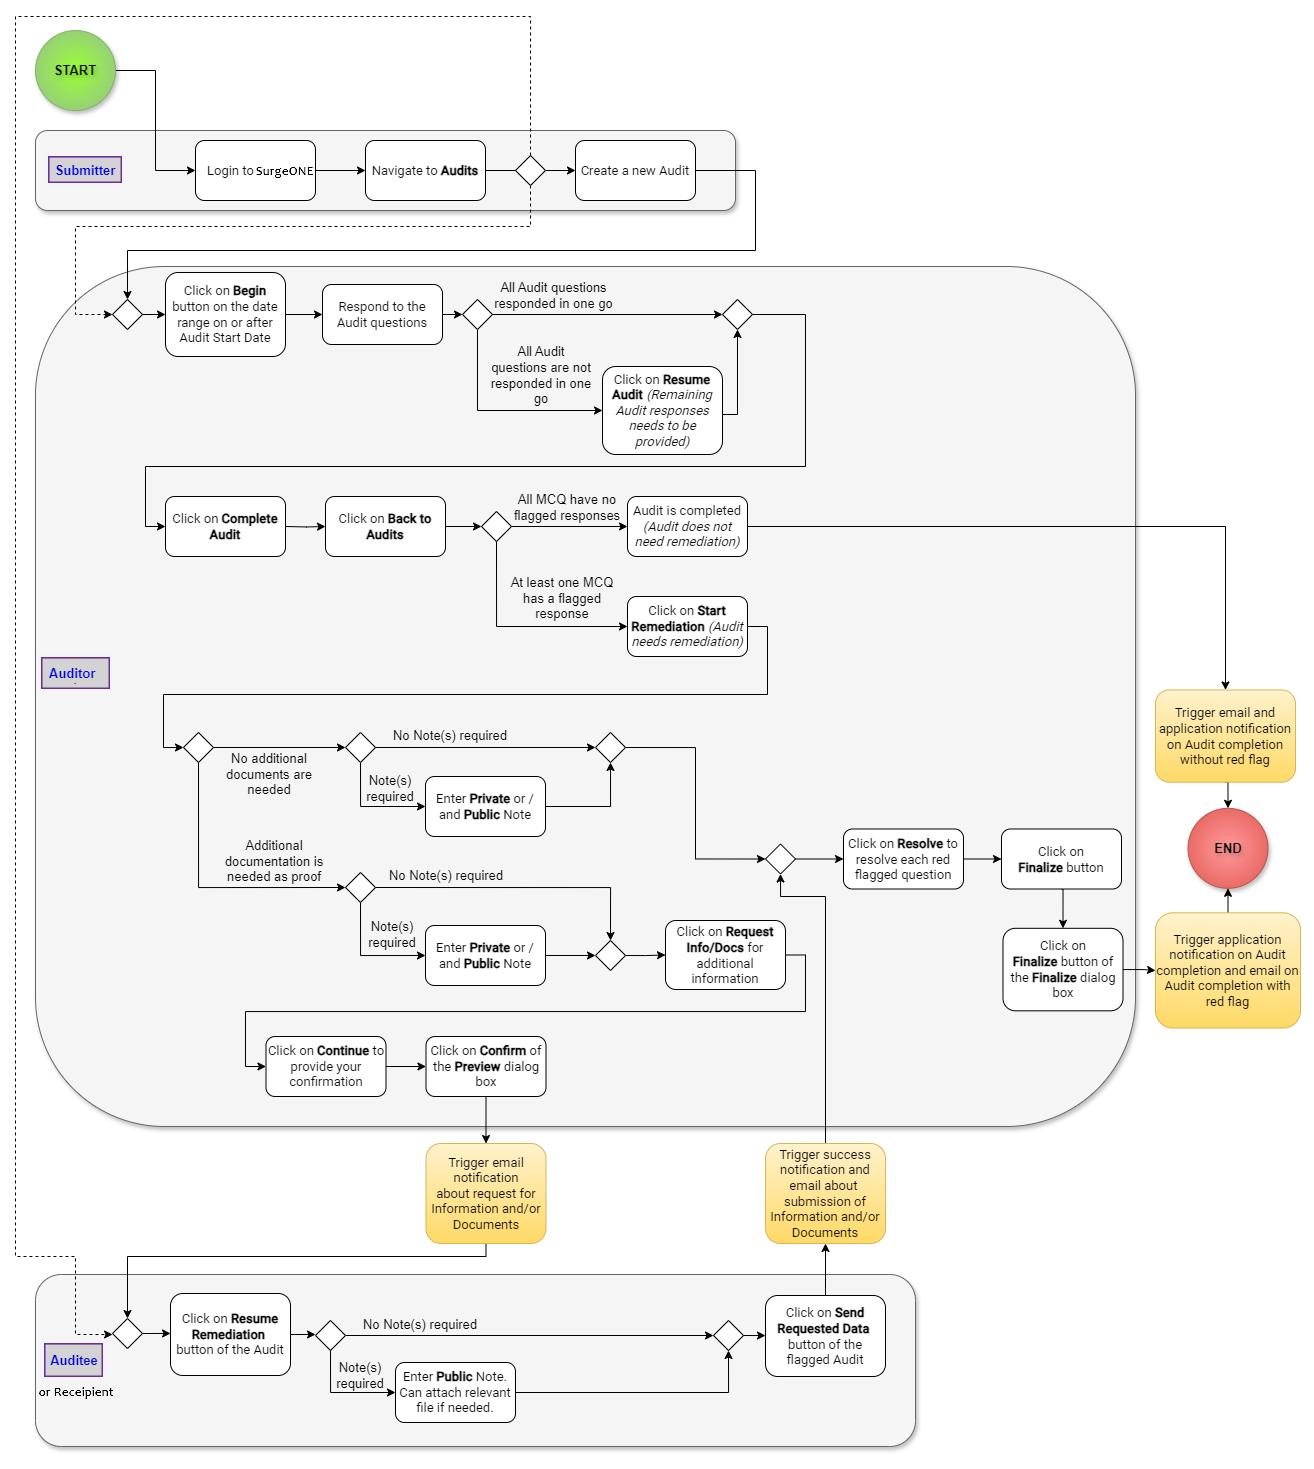 Fig: 94 - SurgeONE audit lifecycle flowchart
NOTE:
It is recommended to save this image and open the downloaded image in a magnified view, since the on-hover zoom might not be enough for ease of visibility.