
 This online help page is dedicated to the SurgeONE Attestations screen and its associated functionalities. Simplify the attestation process and effortlessly gain real-time insights into your compliance status.
The accessibility and functionalities of the different sections of the Attestations module, as well as its reports are dependant on the role based access controls / permissions set for the logged-in user. For more details refer to the Roles online help.
1. Navigating to the Attestations page
Accessing the attestations page provides users with a centralized platform to initiate, monitor, and manage attestation activities. For organizations operating in regulated environments or managing client assets, this entry point ensures streamlined access to compliance workflows and supports consistent oversight of attestation responsibilities.
Click on the Attestations menu of the left panel. The following screenshot displays the Attestations screen which loads after clicking on this menu item. The page lists the attestations that are created for your organization in the system.
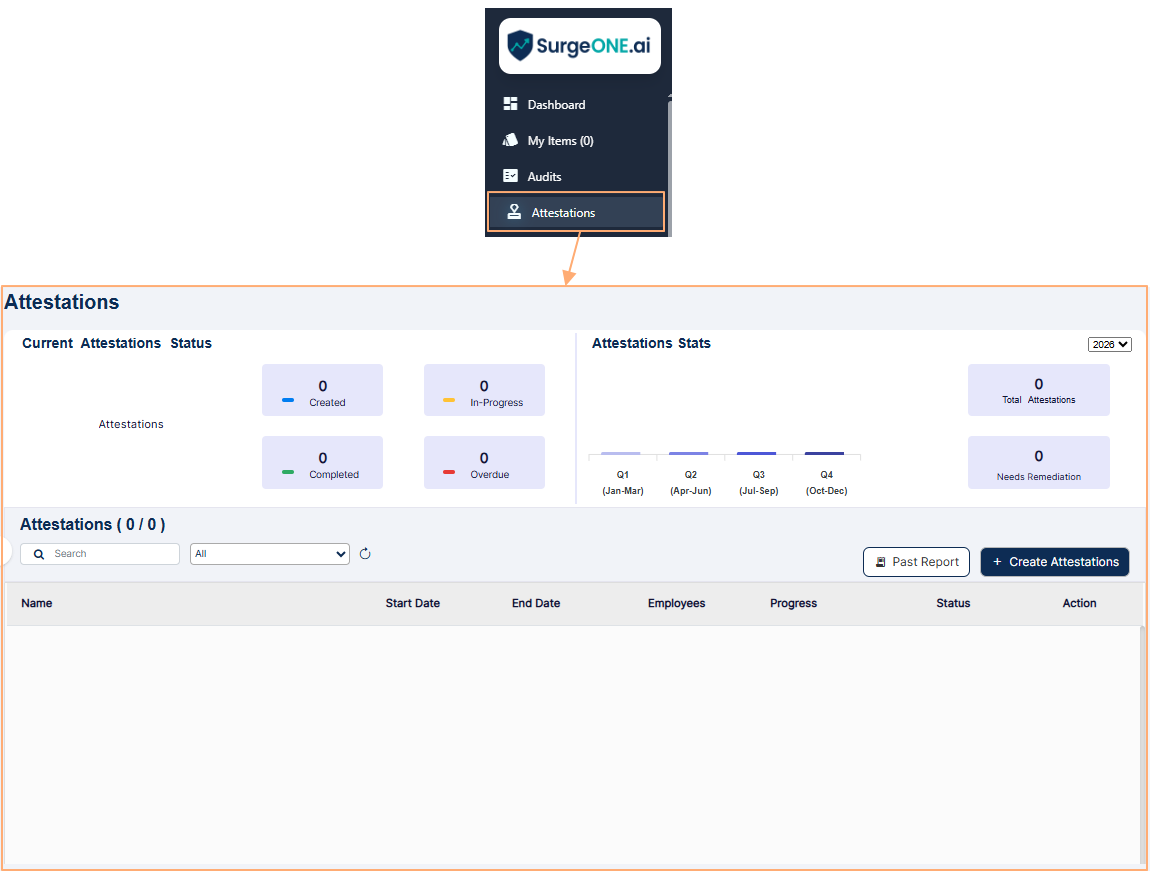 Fig: 1 - Attestations page
 NOTE:
NOTE:
- Only a Attestation Access or Attestation Admin role user can access the Attestations menu item or page. For any other roles, the menu is hidden or page access is revoked.
- The page must be enabled in the Customize Menu page to be visible in the left panel menu area.
2. Understanding the Various Elements of the Attestations page
Familiarity with the components of the attestations page enables users to navigate the interface with clarity and purpose. Each element is designed to simplify the management of attestation activities, allowing users in attestation related roles to efficiently track created attestations progress, analyze the data, and take timely action.
Refer to the following screenshot which is marked with numerical values that correspond to the below stated points.
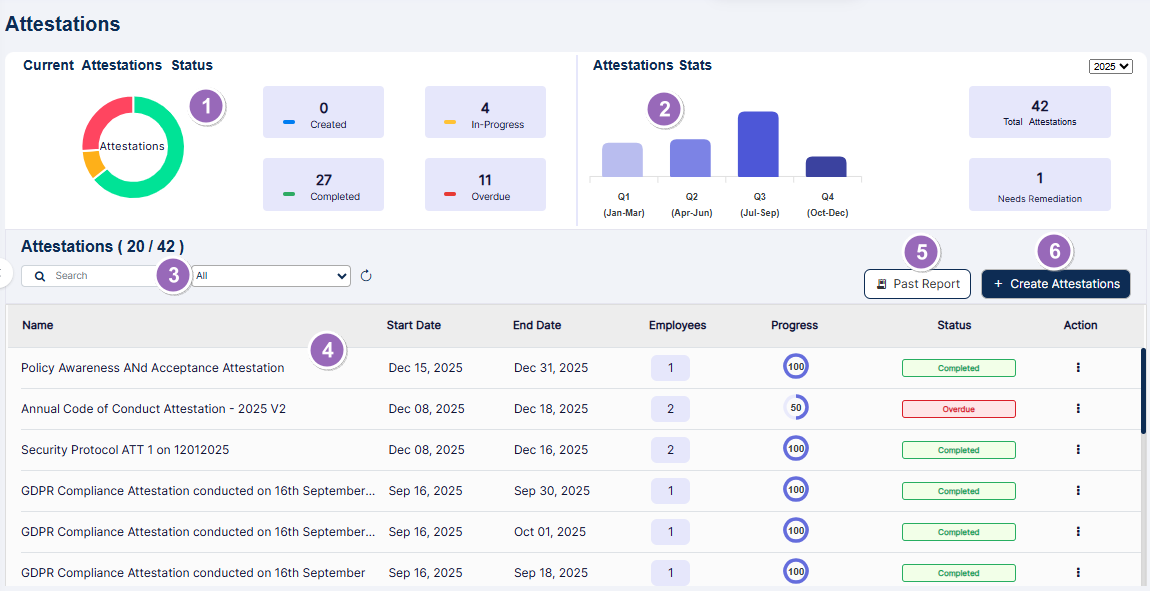 Fig: 2 - Understanding the Attestations page
2.1. Current Attestation Status
The current status indicator offers immediate visibility into the lifecycle of each attestation. Users can quickly identify which attestations are pending, active, or completed, enabling proactive follow-up and ensuring that compliance obligations are met without delay.
A pie chart representation denotes upto four different statuses of any existing attestation. The count of attestations residing in each such status is displayed beside it. The statuses are Created, In-Progress, Overdue and Completed.
To facilitate ease of application usage, unique color coding is implemented for each of the statuses. Created is blue, In-Progress is orange, Overdue is red and Completed is green.
Hover your mouse pointer over any section of the pie chart to load applicable color coded tooltip over that section. It displays the count of attestations belonging to that status or category.
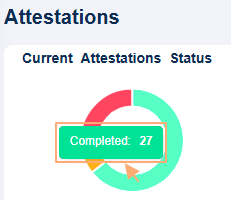 Fig: 3 - Color coded Status tooltip over pie chart getting displayed on mouse pointer hover
2.2. Attestation Stats
Statistical summaries provide users with a high-level view of attestation performance across the organization. These metrics are valuable for identifying trends, measuring engagement, and evaluating the effectiveness of compliance initiatives, particularly in environments where regulatory adherence and client trust are paramount.
A bar chart representation shows the existing attestations belonging to each of the four different quarters of the selected year. The count of all attestations and count of all attestations requiring remediation are displayed beside it. The labels are Total Attestations and Need Remediation respectively.
A year selection dropdown is present at the top right of the section. By default, the current year is set. You can select other year(s), only if there is created attestation(s) for that year.
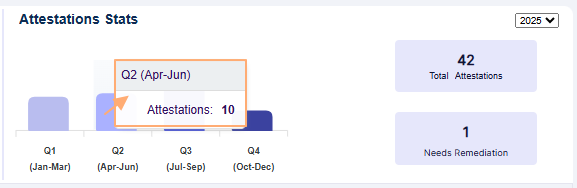 Fig: 4 - Attestations count of the quarter tooltip getting displayed over bar chart on mouse pointer hover
Hover your mouse pointer over any bar chart to load applicable tooltip over that. It displays the count of attestations belonging to that quarter.
2.3. Attestations search bar
The search functionality allows users to locate specific attestations using relevant keywords. This feature enhances operational efficiency by reducing time spent on manual navigation and supports quick access to critical records.
Use the search bar to enter text and find matching attestations (by the name of the existing attestation).
Filter out listed attestations using the Status selection dropdown. The All option is set as default. You can select any one of the other options viz. Created, In Progress, Overdue, Completed, Need Remediation and Remediation In Progress are provided as the dropdown options.
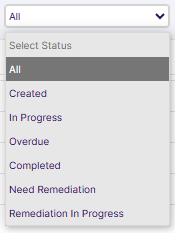 Fig: 5 - Searching filter dropdown options
Based on the selection made here, or both the filters set, matching attestations are listed out.
 Fig: 6 - Search result generated based on filters set
2.4. Attestations grid view
The grid view presents attestation data in a structured and sortable format, allowing users to analyze entries with ease. This layout supports better decision-making by enabling comparisons, filtering, and focused review of attestation activities across departments or teams.
Existing attestations are listed out on the grid view (below the search bar). The following columns are present:
- ID - shows the serial number of the attestation row entry
- NAME - displays the name of the attestation row entry
- START DATE - shows the starting date of the attestation row entry
- END DATE - shows the ending date of the attestation row entry. If any attestation is not started and this end date is crossed, then system sets the attestation status as Overdue.
- EMPLOYEES - shows the count of the assinged employee(s) of the attestation row entry
- Progress - displays the percentage of completion of the attestation row entry. It is set as zero by default.
- STATUS - shows the current status of the attestation row entry. The applicable statuses are color coded as per the type. Various types of statuses are - Created, In Progress, Overdue, Remediation In Progress, etc.
- ACTION - usually contains the vertical ellipsis
 icon against an attestation row entry. Click on it to load the row context menu. The loaded context menu items vary depending on the role of the user.
For example, depending on the role permissions set, the user can find the Edit, Delete, Send Reminder and View More context menu options.
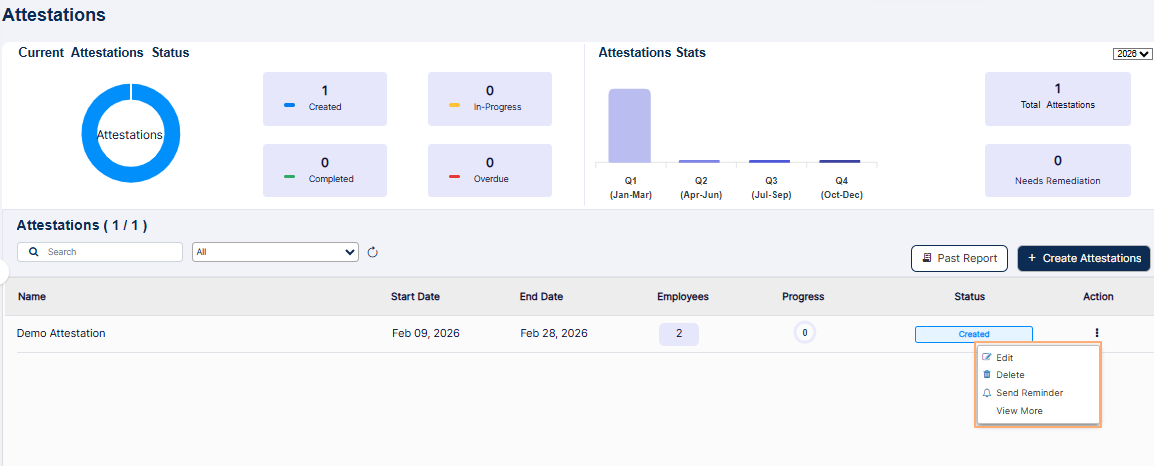 Fig: 7 - Permitted user view of context menu option against an attestation
Whereas the attestation assigned employee can find the Start, Resume and Resume Remediation context menu options when the attestation is yet to be started, was started but not submitted and was being remediated respectively. .
NOTE:
- The assigned employee(s) can perform attestation processing tasks such as start or resume attestation, resume remediation, etc.
-
Edit an attestion (if it is yet to be started after its creation)
Permitted user can edit or delete an attestation only if if it yet to be started by all of the assigned employees. While editing - the following four fields data can be updated: Attestation Name, Start Date, End Date and Description.
- View its information (any created attestation)
-
Send reminder (if attestation is overdue)
The Send Reminder context menu is present only when the attestation grid view STATUS column is Created, Overdue or Need Remediation. When it is used, an email remimder is triggered to the assigend employee(s) with the subject as Request for Attestation Completion.
-
Delete an existing attestation (if it is yet to be started after its creation)
While deleting - a confirmation prompt loads to obtain user confirmation. Once it is provided, the attestation gets removed from the system. It cannot be found on the Attestations grid view.
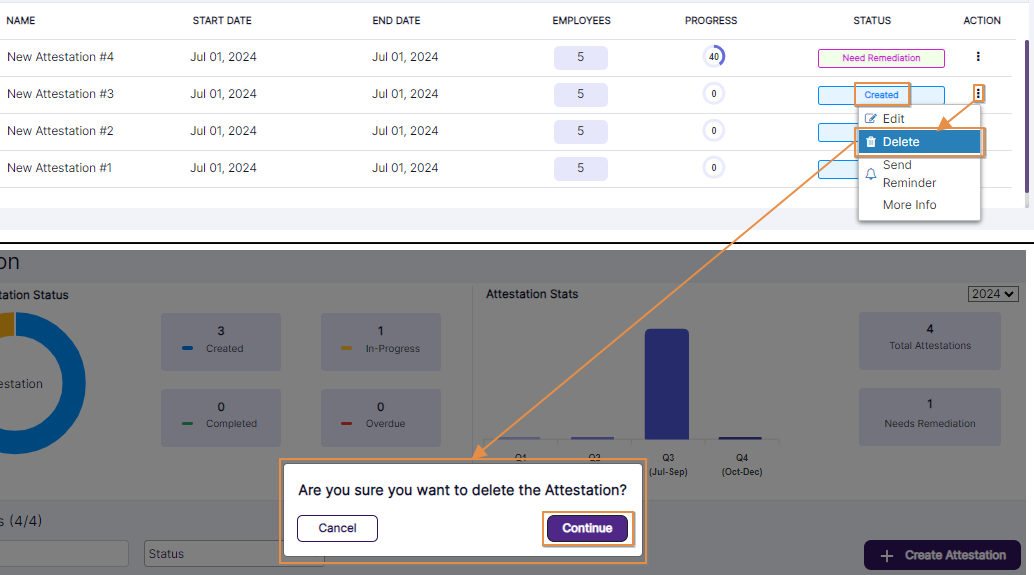 Fig: 9 - Confirmation prompt after clicking on the Delete context menu option
- Perform remediation activity of flagged attestation. Can provide public or private note during remediation process, request for additional information or document or resolve a flagged questionnaire response.
Supported Activities Based on Permissions Granted
The vertical ellipsis icon (to load the context menu) of the ACTION column is present with only the View More when the attestation is completed.
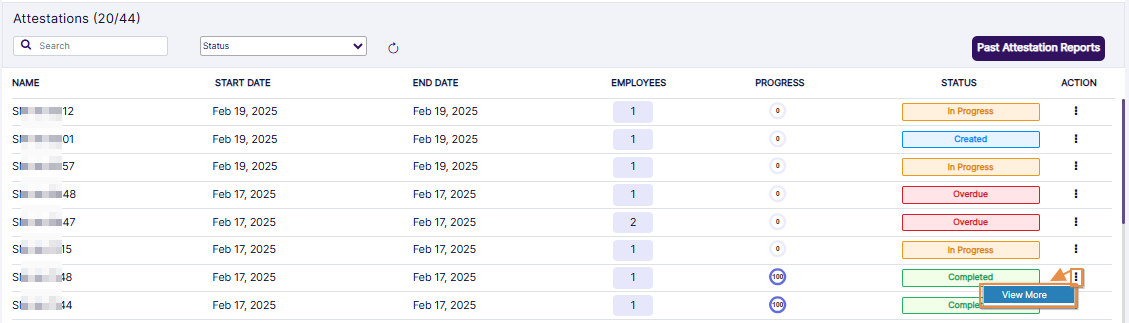 Fig: 8 - ACTION column vertical ellipsis menu contains only View More menu option when attestation is completed
2.5. Past Report
Access to historical attestation reports provides a reliable archive of completed compliance actions. These records are crucial for demonstrating regulatory adherence, supporting internal audits, and maintaining transparency in organizational operations.
Click on the Past Report button to navigate to the attestations report page.
NOTE:
- Depending on the user permissions granted, the Past Report button is visible beside the Create Attestations button. For example, this is applicable for a user who is assigned with the Attestation Admin or Company / Branch Admin role.
- The Create Attestations button may be hidden and only the Past Report button is present (above the grid view). For example, this is applicable for a user who is assigned with the Attestation Access role.
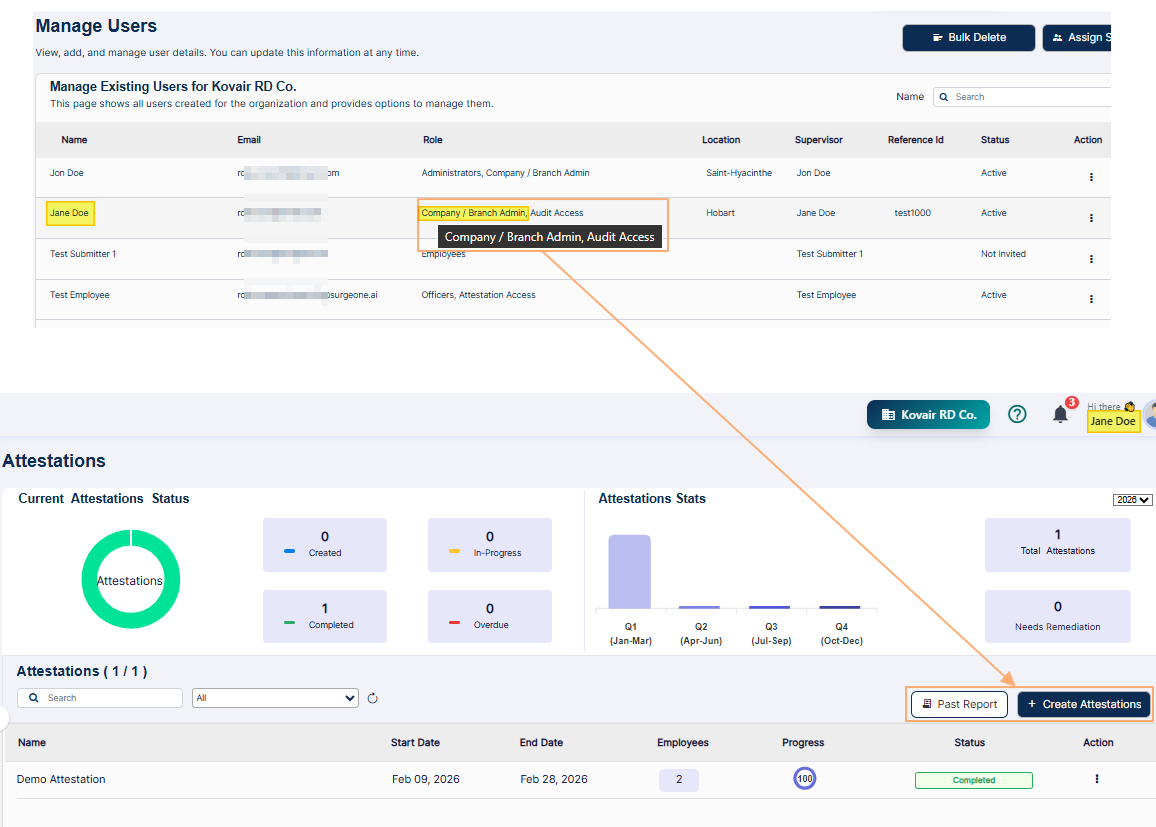 Fig: 10 - Both buttons visible
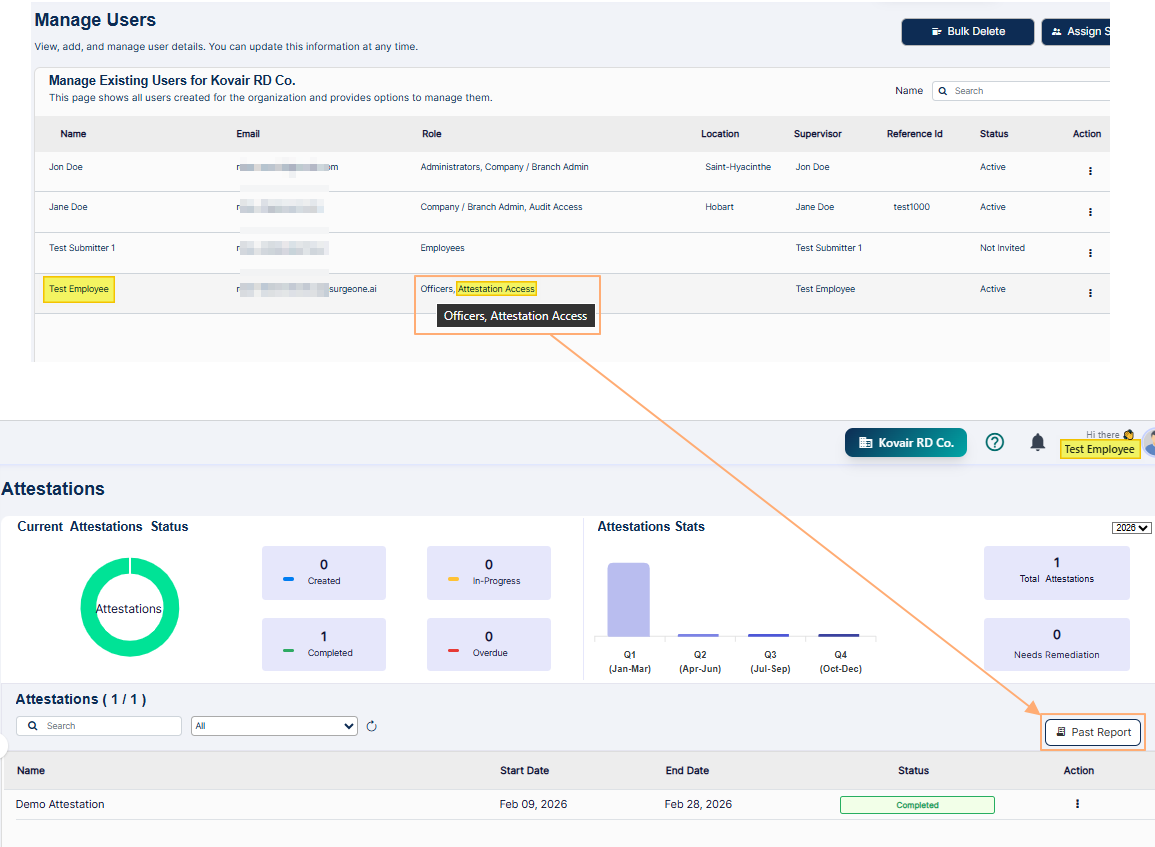 Fig: 11 - Only Past Report button visible
Here is the view of the report page. The report displays row entries of only the attestations which are completed.
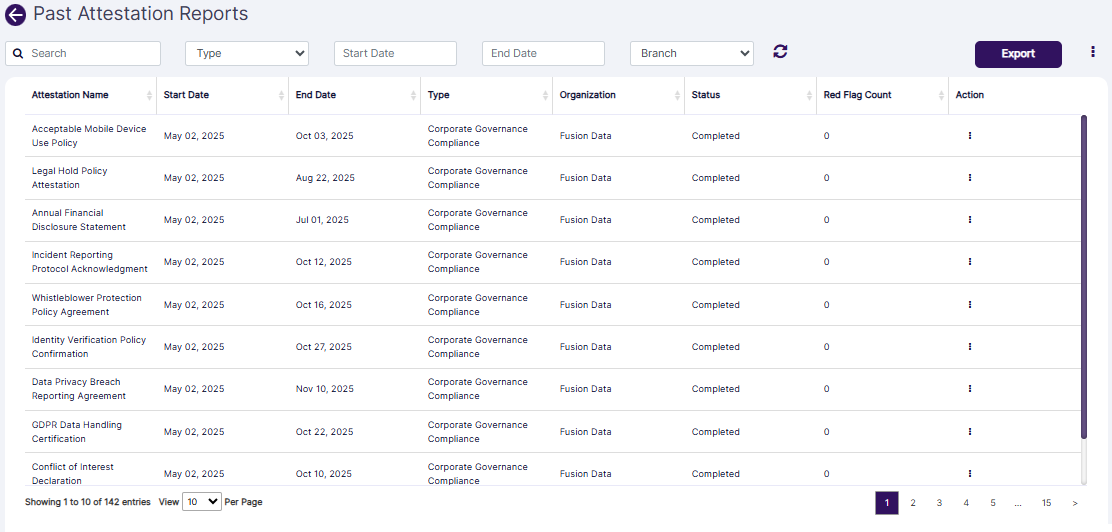 Fig: 12 - Past Attestation Report view
The following filters are present in the report grid view.
- Search bar
- Category selection Type dropdown
- Start Date calendar
- End Date calendar
- Branch dropdown
 Fig: 13 - Past Attestation Report filters
Let us illustrate each filter one by one.
1. Search bar
The search capability enables users to locate specific attestation records swiftly by entering relevant keywords or phrases. This targeted approach minimizes time spent navigating through extensive datasets and enhances productivity. It is particularly useful for users managing large volumes of attestations, allowing them to pinpoint entries based on names, descriptions, or other identifiers. By facilitating quick access to precise information, this feature supports informed decision-making and efficient follow-up actions.
Enter the text based on which you want to execute the attestation search by. If matching entry is found, it will populate the report grid view.
 Fig: 14 - Report result fetched by search bar query
2. Category selection dropdown
Category-based filtering allows users to refine report results by selecting specific attestation types. This segmentation helps users analyze performance and compliance within distinct operational areas. It also aids in identifying trends, gaps, or recurring issues, enabling more strategic planning and targeted interventions. By narrowing the scope of data, users gain a clearer understanding of how different attestation categories contribute to overall organizational compliance.
The category selection dropdown labeled as Type is set to All by default. Based on the categories of the completed attestation(s) present in the system, this dropdown is populated. You can make a dropdown selection to filter the report results based on an attestation category (provided that category entry populates the report results).
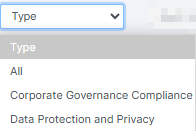 Fig: 15 - Category selection dropdown options
3. Start Date calendar
The Start Date filter empowers users to view attestations initiated within a defined timeframe, offering valuable insights into the scheduling and rollout of compliance activities. This temporal control is essential for tracking the initiation of campaigns, aligning attestations with project timelines, and evaluating the responsiveness of teams. It also supports historical comparisons and helps users assess the consistency of attestation practices over time.
You can filter report results based on the attestation starting date by selecting a calendar date from the Start Date filter.
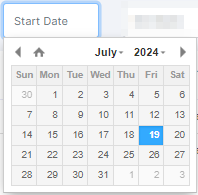 Fig: 16 - Start Date filter
4. End Date calendar
Filtering by End Date allows users to focus on attestations that concluded within a specific period, which is crucial for evaluating completion rates and ensuring timely adherence to compliance requirements. This feature supports deadline management, helps identify delays or bottlenecks, and provides a basis for internal reviews.
Similarly, you can filter report results based on the attestation ending date by selecting a calendar date from the End Date filter.
 Fig: 17 - End Date filter
5. Branch dropdown
Branch-level filtering offers users the flexibility to view attestation data specific to different organizational units or geographic locations. This is particularly beneficial for multi-branch or hierarchical organizations, as it enables localized oversight and tailored compliance monitoring. Users can compare performance across branches, identify location-specific challenges, and implement targeted improvements. This granular view enhances governance and supports decentralized management strategies.
The Branch dropdown filter has the All option, alongwith the name of the firm (or parent company and its hierarchical companies, if created).
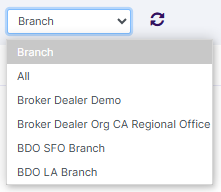 Fig: 18 - Branch filter
The report results are generated based on the filters set. Refer to the following screenshot to understand better.
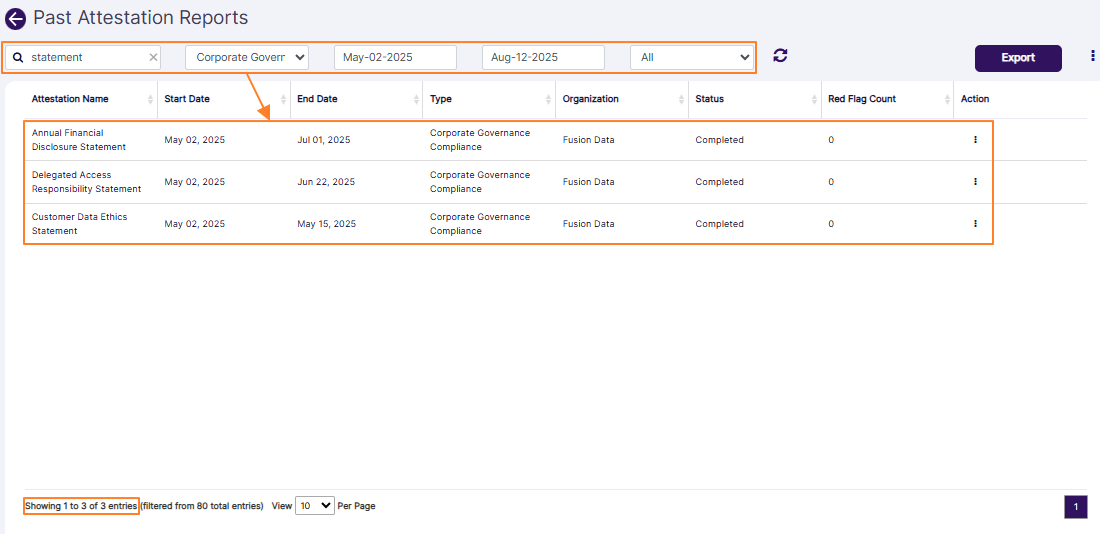 Fig: 19 - Report results generated based on filters set
The following columns are present in the report grid view.
- Attestation Name
- Start Date
- End Date
- Type
- Organization
- Status
- Red Flag Count
- Action
NOTE:
All the columns except for the ACTION column are sortable.
6. Reset icon
The reset functionality allows users to clear all applied filters and revert to the default report view effortlessly. This ensures a smooth and intuitive user experience by enabling quick reconfiguration of search parameters. It is especially useful when users need to conduct multiple searches or explore different perspectives. By simplifying navigation, this feature supports dynamic exploration and reduces the risk of overlooking critical information due to residual filters.
You can click on the reset  icon to reset the report filters.
 Fig: 20 - Reset icon
7. Export button
The export feature enables users to download attestation reports in universally accepted formats such as CSV and PDF, facilitating offline access, archival, and sharing with stakeholders. This capability supports documentation for audits, compliance reviews, and executive reporting. Users can integrate exported data into other analytical tools or systems, enhancing cross-functional collaboration and strategic planning. The timestamped file naming convention also aids in version control and traceability.
Click on the Export button to load the export options (to download a local copy the generated report). Two options labeled as CSV and PDF load below the button. Click on the former to download an excel file or on the latter to download a .pdf copy.
 Fig: 21 - Export button
You can also click on the vertical ellipsis icon of the ACTION column against any listed attestation to load the View Details menu option. Click on the option to load the modal window which displays the status-wise breakdown of employee contributions towards the attestation completion in the form of row entries. An Action column is present at the right side of a row entry in it. Click on vertical ellipsis icon within it to load the View Details menu option. Another modal window loads which displays the attestation questions and responses.
An Export button is present at its bottom. Click on it to download the .pdf copy of this attestation report.
8. Customizing the grid view columns
Customizing the columns displayed in the grid view allows users to tailor the interface to their specific operational needs. By selecting relevant attributes and hiding non-essential ones, users can streamline their workflow and focus on the most critical data points. This personalization enhances usability and improves decision-making by presenting information in a contextually relevant manner. The flexibility to adjust the view ensures that users can adapt the reporting interface to evolving priorities and analytical requirements.
- To alter the columns of the view, you can click on the vertical ellipsis
 icon at the right of the Export button.
- Make permissible checkbox selections under the Attestation Schedule header to set the grid view according to your preference. The checkbox selections which cannot be modified are greyed-out.
- Click on the Save button to store changes made and close this modal window.
An Attestation Attributes modal window loads to display the list of columns and its current selection (in a collapsed state by default). The columns of the grid view which are visible by default are pre-selected in this modal window. You can customize and control the columns displayed in the grid view. However, you cannot control the greyed-out column labels. This feature enables you to tailor the grid view to show data which enhance user experience by providing flexibility and control, making it easier to focus on the most pertinent details.
The following selectable items (column labels) are displayed in the loaded modal window. Refer to the following table:
| Sl. No. | Column Label |
|---|---|
| 1 | Attestation Name |
| 2 | Start Date |
| 3 | End Date |
| 4 | Type |
| 5 | Organization |
| 6 | Description |
| 7 | Status |
| 8 | Year |
| 9 | Actual Start Date |
| 10 | Actual End Date |
| 11 | Red Flag Count |
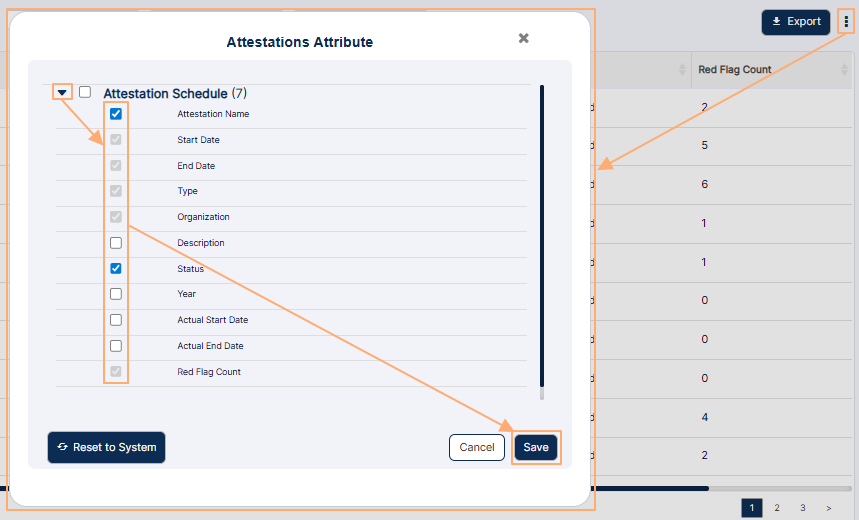 Fig: 22 - Customizing the report grid view column display
NOTE: If you click on the Reset to System button, then the checkbox selections are restored to the default state.
2.6. Create Attestation
The ability to initiate new attestations equips users with a strategic tool to drive focused compliance initiatives across the organization. By launching targeted campaigns, users can ensure that specific policies, operational protocols, and ethical guidelines are actively acknowledged and adhered to by relevant stakeholders. This function plays a vital role in reinforcing a culture of accountability, where individuals are regularly reminded of their responsibilities and expected standards of conduct. In regulatory environments, it helps demonstrate proactive governance and readiness for audits by capturing formal confirmations of compliance. In wealth management, it safeguards fiduciary integrity by validating that employees understand and follow procedures related to client interactions, investment practices, and data confidentiality. Overall, initiating attestations enables organizations to maintain operational discipline, reduce risk exposure, and uphold trust with regulators and clients alike.
Click on this button to create a new attestation. There are four stages that are applicable to create a new attestation. For more details, refer to the following sub-section.
NOTE:
The Create Attestations button visibility depends on the user permissions set in the Roles page.
3. Creating a New Attestation
Creating a new attestation begins with navigating to the designated section and initiating the process through the appropriate action. The creation process is structured into four key stages: entering attestation details, selecting a suitable template, previewing the chosen template, and assigning it to relevant employees. Each stage is designed to ensure clarity, consistency, and alignment with regulatory or organizational standards. This structured approach supports the effective rollout of attestation initiatives, helping organizations maintain accountability and meet governance requirements.
Let us assume that you are permitted to create a new attestation, you have navigated to the Attestations page, and clicked on the + Create Attestations button to proceed to create a new attestation.
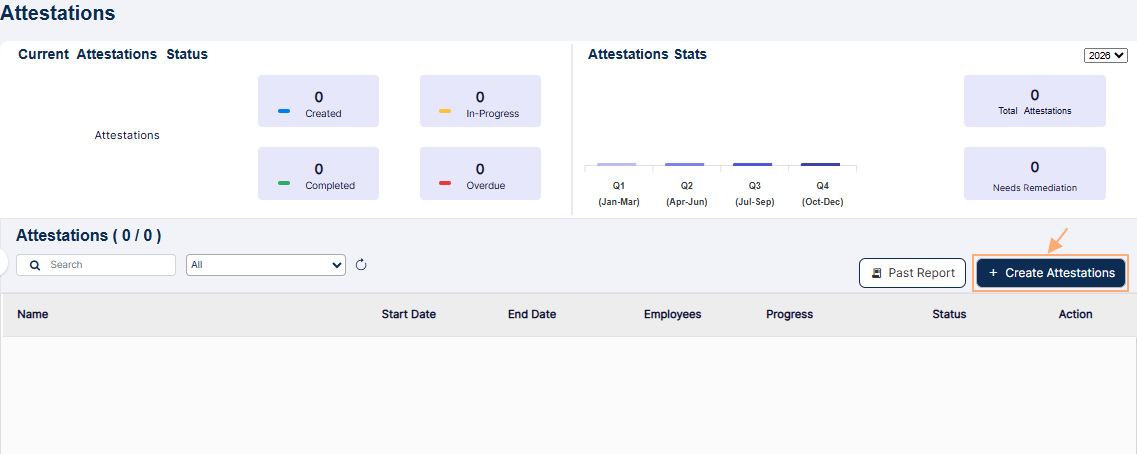 Fig: 23 - Create Attestations button
NOTE:
- Only an Attestation Access or Attestation Admin role user can access the Attestations menu item or page. For any other roles, the menu is hidden or page access is revoked.
- Only an Attestation Admin or Company / Branch Admin role user can create an attestation. For any other roles, the + Create Attestations button is hidden on the Attestations page.
- There are four stages labeled as follows: Attestation Details, Template Selection, Template Preview and Employee Selection. Each stage has been briefly described in the following sub-sections.
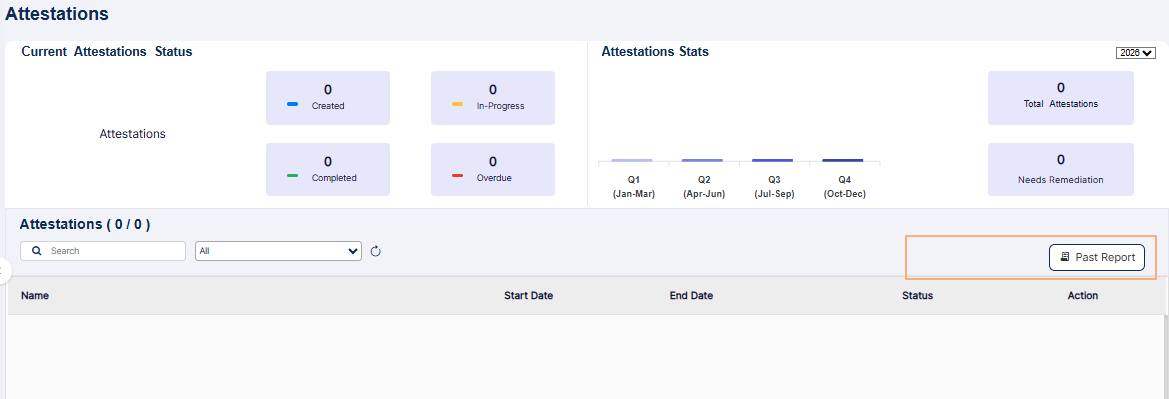 Fig: 24 - Attestation Access role user cannot create new attestation
3.1. Step #1 - Providing Attestation Details
Defining the scope and parameters of an attestation is a critical first step that ensures the activity aligns with organizational goals and regulatory standards. By entering specific details such as a unique attestation name, scheduled start and end dates, and an optional description, users establish a clear framework for execution. These inputs help maintain consistency, enforce validation rules, and support accountability throughout the process. Ensuring that dates are properly sequenced and names are distinct prevents errors and promotes clarity. This structured approach lays the foundation for a reliable and compliant attestation workflow.
Enter attestation-specific details here. Perform the following activities to provide necessary details in the Attestation Details tab:
- Enter an appropriate name for the new attestation in the Attestation Name field. Validation is employed in the name of the attestations.
- The Status field is disabled and set as Created by default.
- Choose the date on which the attestation is to be scheduled to begin from. Click on the Start Date field to load the calendar and make a date selection accordingly. You can only select an upcoming calendar date and not a past date.
- Similarly, choose the date on which the attestation is intended to be completed. Click on the End Date field to load the calendar and make a date selection accordingly. You can only select an upcoming calendar date and not a past date and the date must be later than the attestation start date.
- You may enter a suitable attestation description in the Description field. It is an optional field.
- Click on the Next button to proceed to the Template Selection tab.
NOTE: The attestation Start Date must be earlier than the attestation End Date. Otherwise, the system will prompt the tootip - Start Date cannot be greater than End Date.
 Fig: 25 - Start Date cannot be greater than End Date validation tooltip
 Fig: 26 - Next button to proceed
NOTE: You can proceed only if all the field validations are met on this page. Otherwise, the system will prompt appropriate validation tooltips below the field(s).
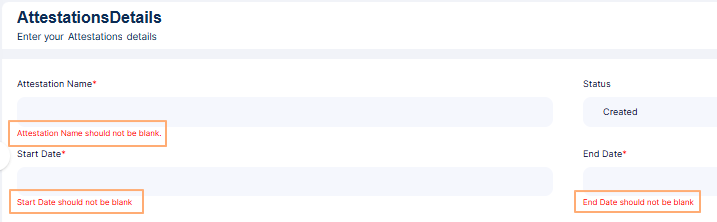 Fig: 27 - Field validations
3.2. Step #2 - Selecting Attestation Template
Using predefined templates streamlines the attestation creation process by offering a structured and consistent framework. This eliminates the need to build content from scratch, saving time and reducing the likelihood of errors or omissions. Templates are designed to reflect industry best practices, ensuring that the language, format, and scope of each attestation meet regulatory expectations and internal standards. It helps maintain client trust by ensuring that all communications and confirmations are clear, professional, and aligned with fiduciary responsibilities. Overall, system-defined and customized templates selection ability enhances flexibility, accuracy, and credibility across attestation workflows.
-
Proceed to choose a pre-built attestation template in the redirected Template Selection tab.
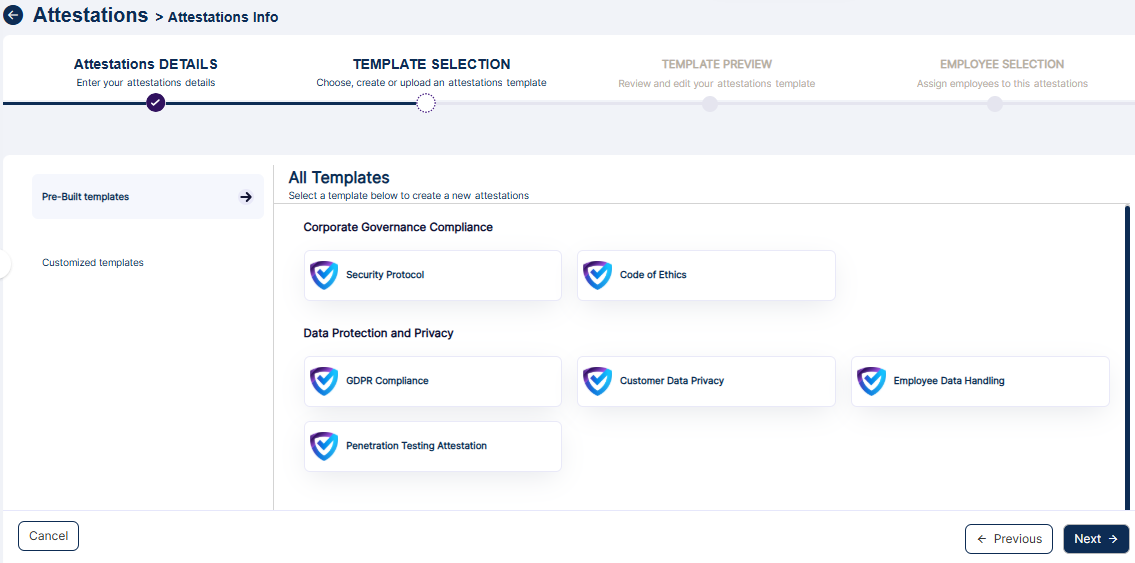 Fig: 28 - Available Attestation Templates
- Corporate Governance Compliance
- Security Protocol
- Code of Ethics
- Data Protection and Privacy
- GDPR Compliance
- Customer Data Privacy
- Employee Data Handling
- Penetration Testing Attestation
-
Click on the Next button (at the bottom right) to proceed to the third stage.
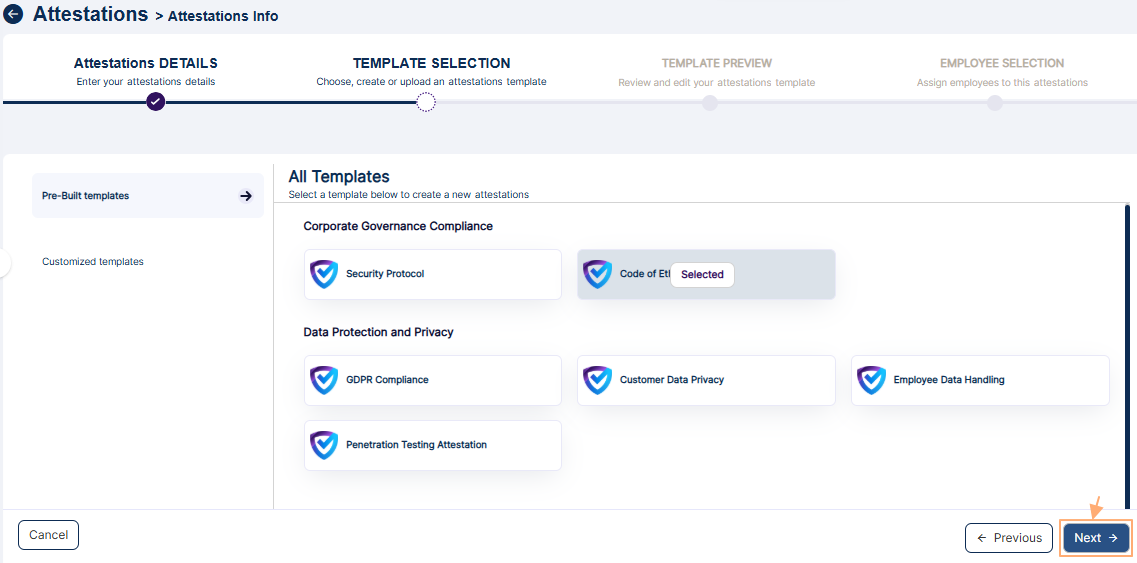 Fig: 31 - Next button to proceed
NOTE:
You can select only one out of the available six templates. A Selected label can be seen above the selected template type.
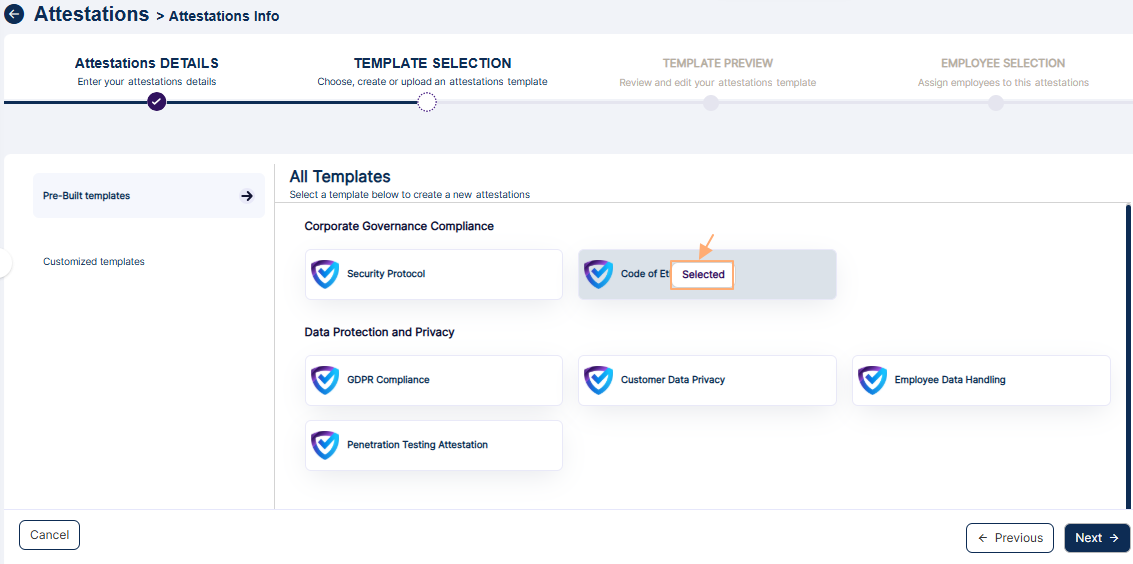 Fig: 29 - Selected label displayed over chosen attestation template
The following templates are provided (at the time of writing this guide):
NOTE: You can also select custom templates. Click on the Customized templates label of the left panel (below the Pre-Built templates label) and select any custom template, if already created.
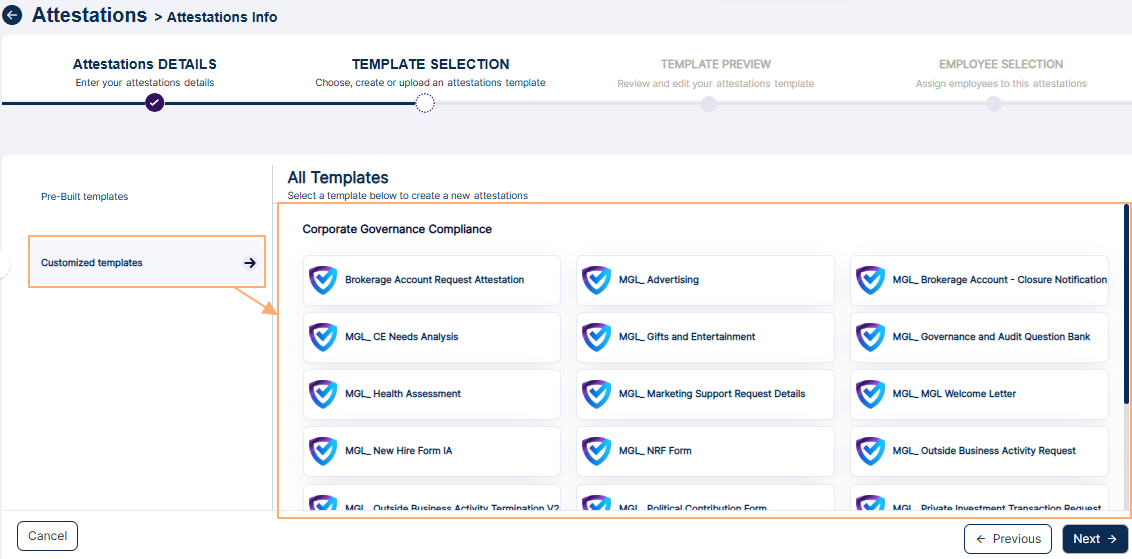 Fig: 30 - Customized templates
3.3. Step #3 – Previewing Attestation Template
Previewing the template allows users to verify the structure and content before deployment. This step minimizes errors, ensures clarity, and enhances the quality of communication, contributing to more effective compliance engagement and attestations management.
- In the Template Preview stage, you can view the template email content.
- Click on the Next button (at the bottom right) to proceed.
-
Based on the template selected in the Template Selection stage, attestation questions are loaded.
Click on the Next button (at the bottom right) to proceed to the final stage of new attestation creation.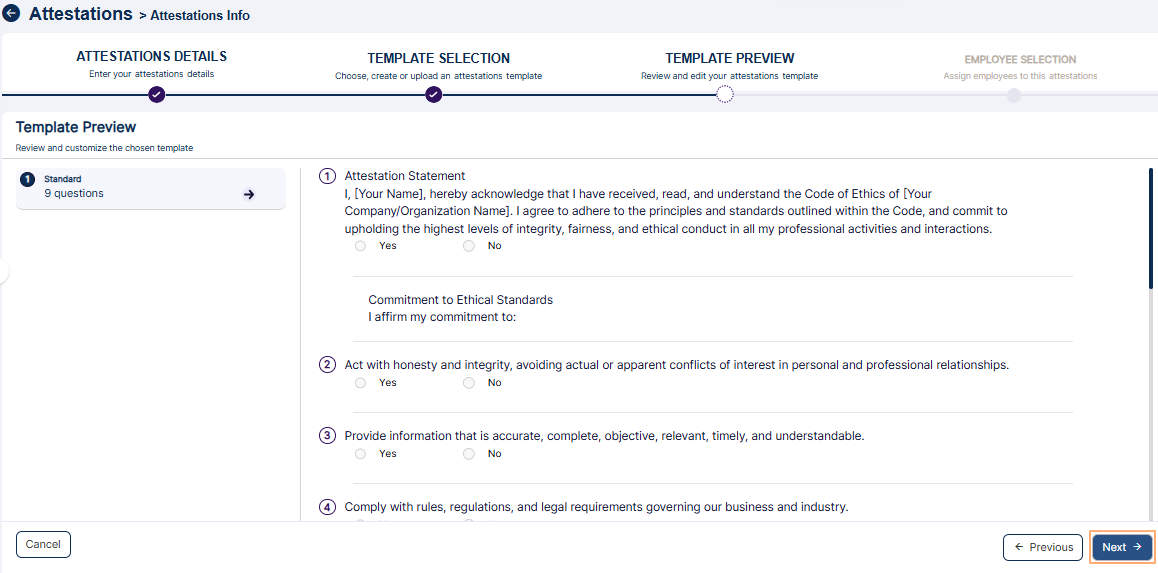 Fig: 34 - Next button to proceed to Employee Selection stage
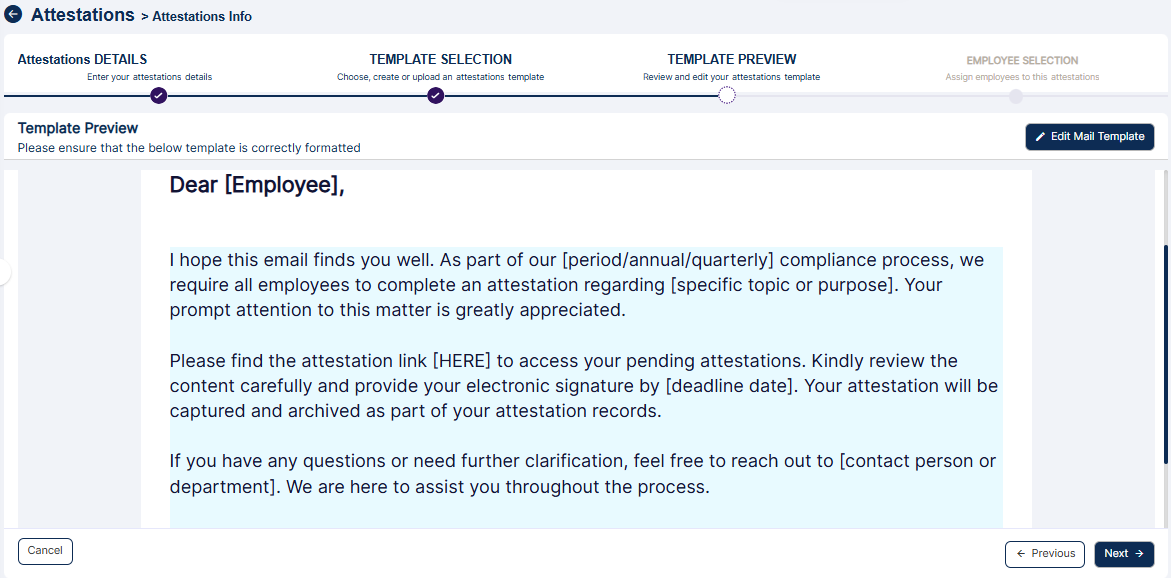 Fig: 32 - Template Preview
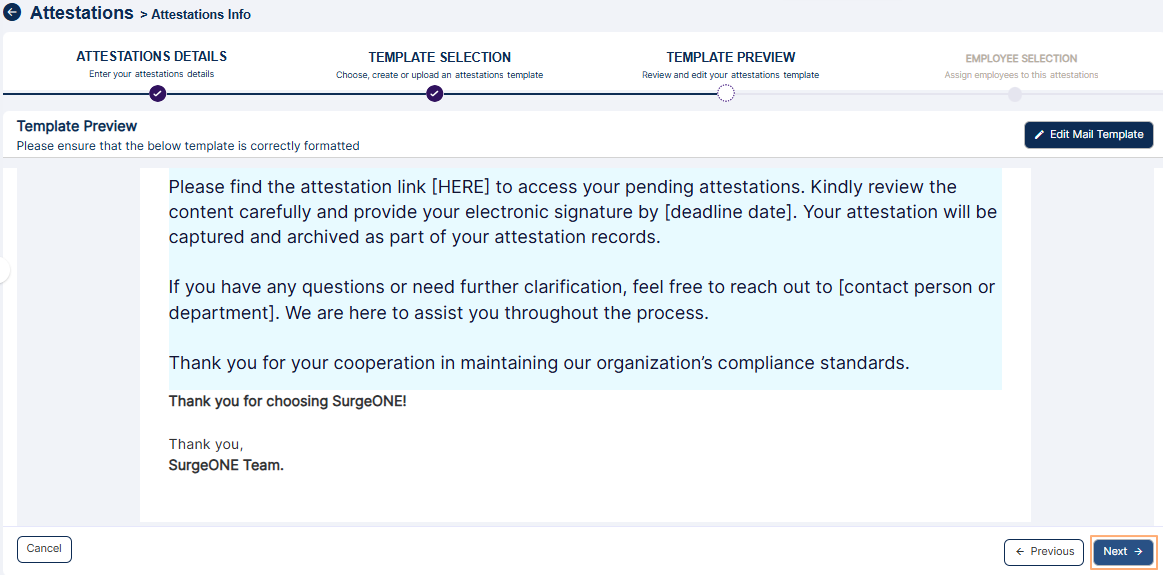 Fig: 33 - Next button to proceed to view the template questions
NOTE: You can click on the Edit Mail Template button to make any requisite modifications in the selected template. Click on Save to record any changes made.
 Fig: 35 - Making changes to the template content
3.4. Step #4 – Selecting Employee(s)
Assigning attestations to the appropriate individuals ensures that each participant understands their specific role in fulfilling compliance requirements. This targeted allocation of responsibility promotes ownership and accountability. By directing attestations to relevant team members based on their function or expertise, organizations can ensure that compliance efforts are not only thorough, but also strategically distributed. This approach minimizes gaps in coverage, enhances operational efficiency, and supports a culture of integrity where every individual contributes to maintaining regulatory standards and safeguarding client interests.
- In the fourth stage titled as Employee Selection, you can select a created user (who has necessary permissions granted). Click on the checkbox to make your selection. Multiple user selections are allowed. The checkbox at the top can be used to select all of the listed users at one go.
- Click on the Submit button (at the bottom right) to create the attestation.
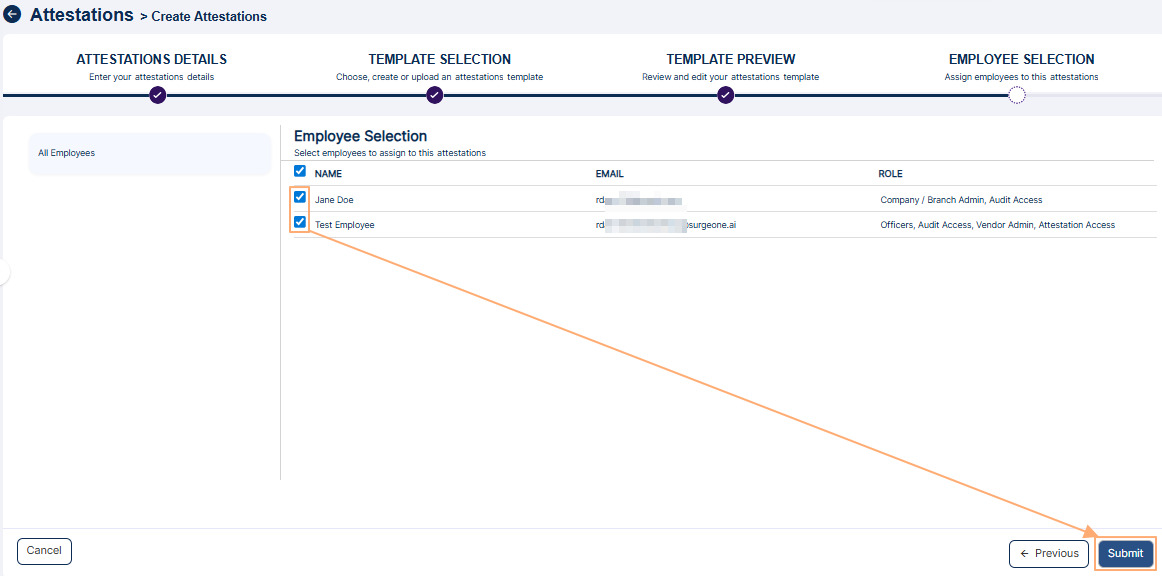 Fig: 37 - Submit button to create the attestation
- You will be redirected to the Attestations page. The created attestation can be found listed on the grid view.
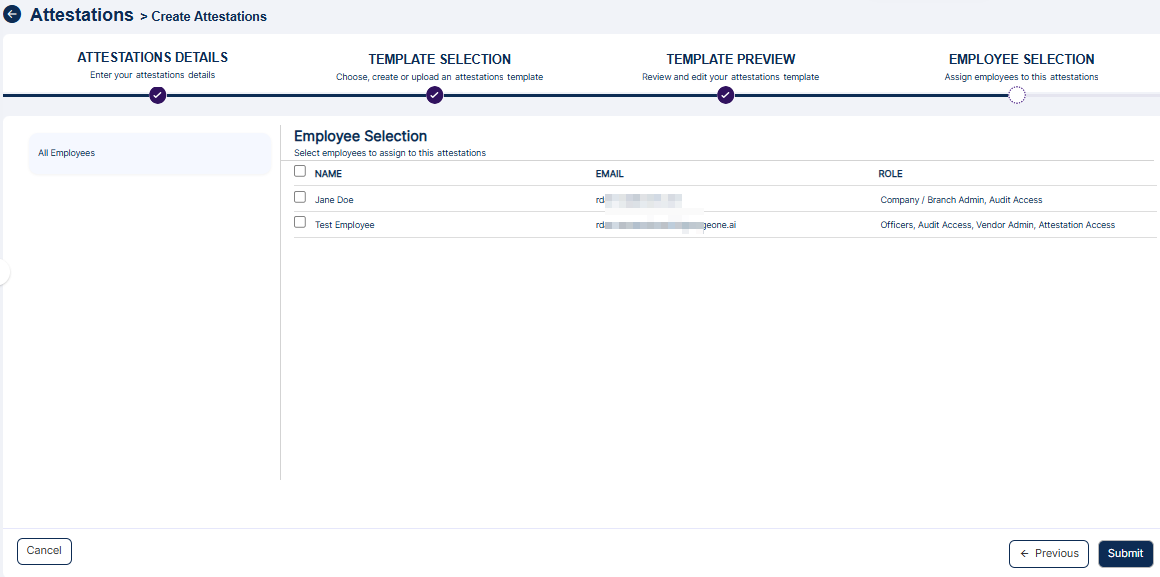 Fig: 36 - Employee Selection stage view
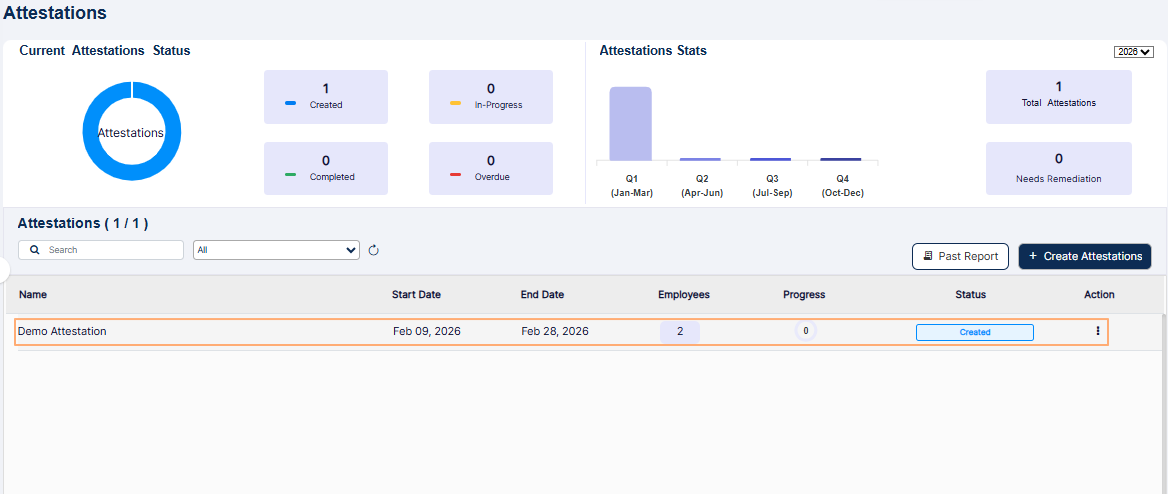 Fig: 38 - View of the created attestation
NOTE:
- If you click on the Submit button before selecting any listed employee, the system will prompt the following validation message.
- A system generated email will get triggered to the assigned user(s) (as well as the attestation creator / submitter) about the created attestation.
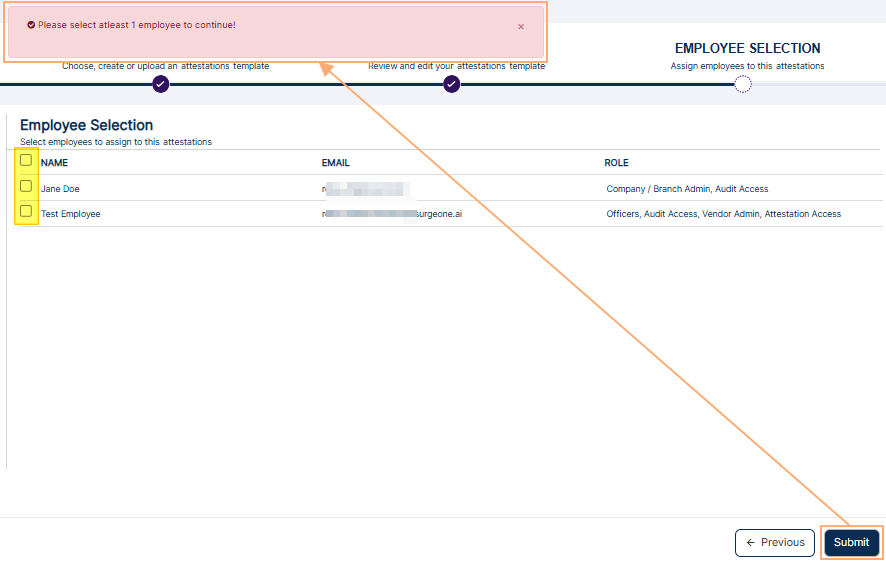 Fig: 39 - Employee selection validation prompt
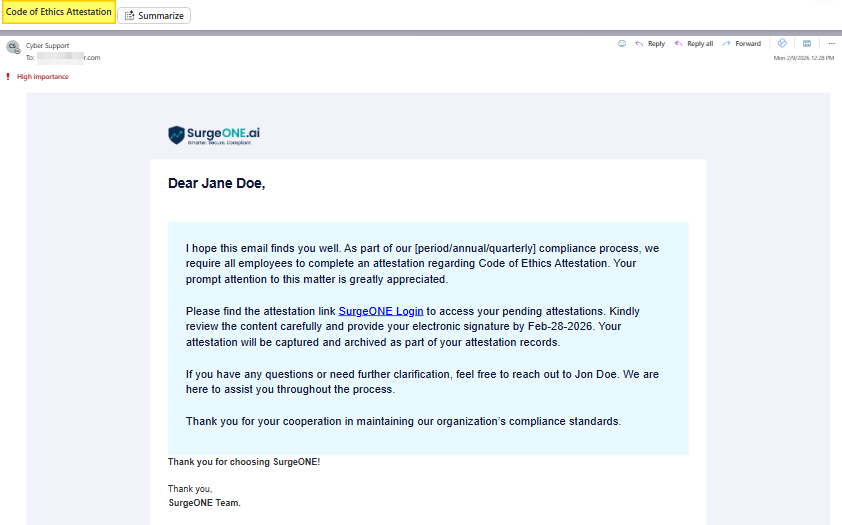 Fig: 40 - Email triggered to the email address of the assigned user
4.1. Step-by-Step Description of the Entire Attestation Process
A detailed overview of the attestation process equips users with a comprehensive understanding of each step involved, from initial setup to final completion. This clarity ensures that attestors can follow a structured approach, reducing ambiguity and minimizing the risk of procedural errors. In regulatory compliance and wealth management contexts, such guidance is especially valuable, as it promotes uniform execution across teams and supports adherence to critical standards. By outlining the process in a clear and logical manner, attestors gain confidence in managing attestations effectively, ensuring that all required remediations and confirmations are captured accurately and on time.
- Let us first assume that the permitted user proceeds to create an attestation.
- The assigned employee receives a system triggered email to initiate the attestation that is assigned.
- The assigned employee finds the attestation with Created status.
- The assigned employee needs to click on the vertical ellipsis icon under the Action column to load the row context menu option against the attestation with Created or Overdue label under its Status column (on the Attestations grid view).
- The Start menu option is expanded. The assigned employee needs to click on it to navigate to attestation page, showing the questions, which are part of the attestation template. There can be multiple sections, with questions within each section depending on the template which was chosen at the time of the attestation creation.
- If the assigned employee clicks on the Cancel button at the bottom left of the Attestation Info page, then the page closes and user gets redirected to the Attestations page.
- The assigned employee needs to click again on the vertical ellipsis icon under the Action column to load the row context menu option against the attestation with Created or Overdue label under its Status column (on the Attestations grid view).
- The Start menu option is expanded. The assigned employee can click on it to navigate back to the attestation page. Here, the employee needs to respond to the various questions that are present. Clicking on the Submit button either submits the attestation when all questions are provided with answers, or throws an error for not answering all the questions. Unanswered questions are also marked in red. The Cancel button saves the activity. Consider that the employee clicks on the Cancel button after responding to some of the questions. A confirmation prompt loads. Click on the Yes buttono of the prompted modal window.
- The Created label changes to In Progress. Click again on the Action column against the attestation under its Status column (on the Attestations grid view) to reveal the row context menu.
- It changes from Start to Resume. The employee needs to click on it to resume responding to the attestation questions. If the employee provides responses to all of the attestation questions and all of the responses are not positive (at least one No radio button is selected), and then clicks on the Submit button, then the page closes and the user gets redirected to the Attestations page.
- Users who can start a remediation will have to click on Action column vertical ellipsis icon to load the View More menu option and then click on Need Remediation label for the specific employee within the loaded modal window.
- Since only one employee was assigned the attestation, the progress value changed from zero to hundred on attestation submission with any need for remediation. If multiple employees were assigned for the attestation, and if one employee submitted with only positive responses to the template questions, then the progress value will be appropriately calculated (instead of 100).
- There is no remediation stage for this attestation due to absence of any flagged response(s).
- The permitted user can find this attestation in the Attestations grid view. The Status is displayed as Need Remediation. The assigned user needs to click on the Action column vertical ellipsis icon to load the View More context menu.
- A dialog box loads for the attestation. The STATUS column of the dialog box shows a color-coded Need Remediation option. The permitted user needs to click on it to load the attestation remediation page.
- Now, the permitted user can proceed in two ways. He/she can either resolve and finalize the attestation or request for additional information or documentation.
Let us consider that the permitted user clicks on the Resolve button against a flagged response. - A confirmation dialog box loads. The permitted user needs to click on the Resolve button to confirm.
- The percentage value and the numeric value of the top-left Red Flag Questions Remediated label gets appropriately updated
- The numeric value of the left panel questions remediated label also gets updated likewise
- The button label changes from Resolve to Unresolve
- The permitted user can click on the ACTION column vertical ellipsis icon to reveal the row context menu option View More.
- If further remediation or information is required (as deemed necessary) to be furnished by the assigned employee, then the permitted user can click on the Request Info/Docs button.
- After the permitted user clicks on the Request Info/Docs button, a confirmation prompt loads. Click on its Continue button to load the PREVIEW dialog box view.
- The permitted user provides confirmation in the PREVIEW dialog box view. The attestation gets routed back to the attestation assigned employee(s).
- A success notification is shown at the top.
- If the permitted user clicks on the Resolve button against a flagged response, then a confirmation dialog box loads. After confirming, the flagged response is resolved. This way the permitted user resolves all flagged responses and then clicks on the Finalize button.
- Then a confirmation prompt loads and the permitted user clicks on Finalize button of the confirmation prompt. The attestation gets completed. The status of the attestation changes to Completed.
- The assigned employee receives a triggered email about the request to provide additional information.
- The STATUS at the assinged employee end also gets updated from Need Remediation to Remediation in Progress. The employee needs to click on the Action column vertical ellipsis icon to load the Resume Remediation context menu and click on it.
- The employee can then provide required information (about the response(s) that are flagged). Public Note(s) can be posted where attachment(s) can be uploaded.
- The employee can then click on the Send Requested Data button (to route the attestation remediation back again to the designated/permitted user).
- A success notification is displayed at the top of the Attestation Info page. The employee gets redirected to the Attestations page.
- An email is triggered about the requisite information that has been provided and for attestation resolution.
- The permitted user can use the above link or login and find this attestation in the Attestations grid view. The Status is displayed as Remediation in Progress. He /she needs to click on the Action column vertical ellipsis icon to load the View More context menu and click on that.
- The attestation dialog box loads. The permitted user needs to click on the Remediation in Progress option displayed under the STATUS column of the dialog box.
- After proceeding to the attestation questions screen, the permitted user needs to click on the Resolve button against the remediated response(s). The Public Note and relevant attachment, if provided by the assigned employee can be seen here.
Resolution here refers to the process of remediation of negative responses to an attestation. - After resolving the all of the flagged responses (the Resolve button label of each changes to Unresolve), the permitted user needs to click on the Finalize button.
- A confirmation dialog box loads. The permitted user/attestation creator needs to click on the Finalize button.
- The remediation gets completed, you get redirected to the Attestations page and and the Status is displayed as Completed in the grid view.
Stage #1: Activity of user who can create the attestation
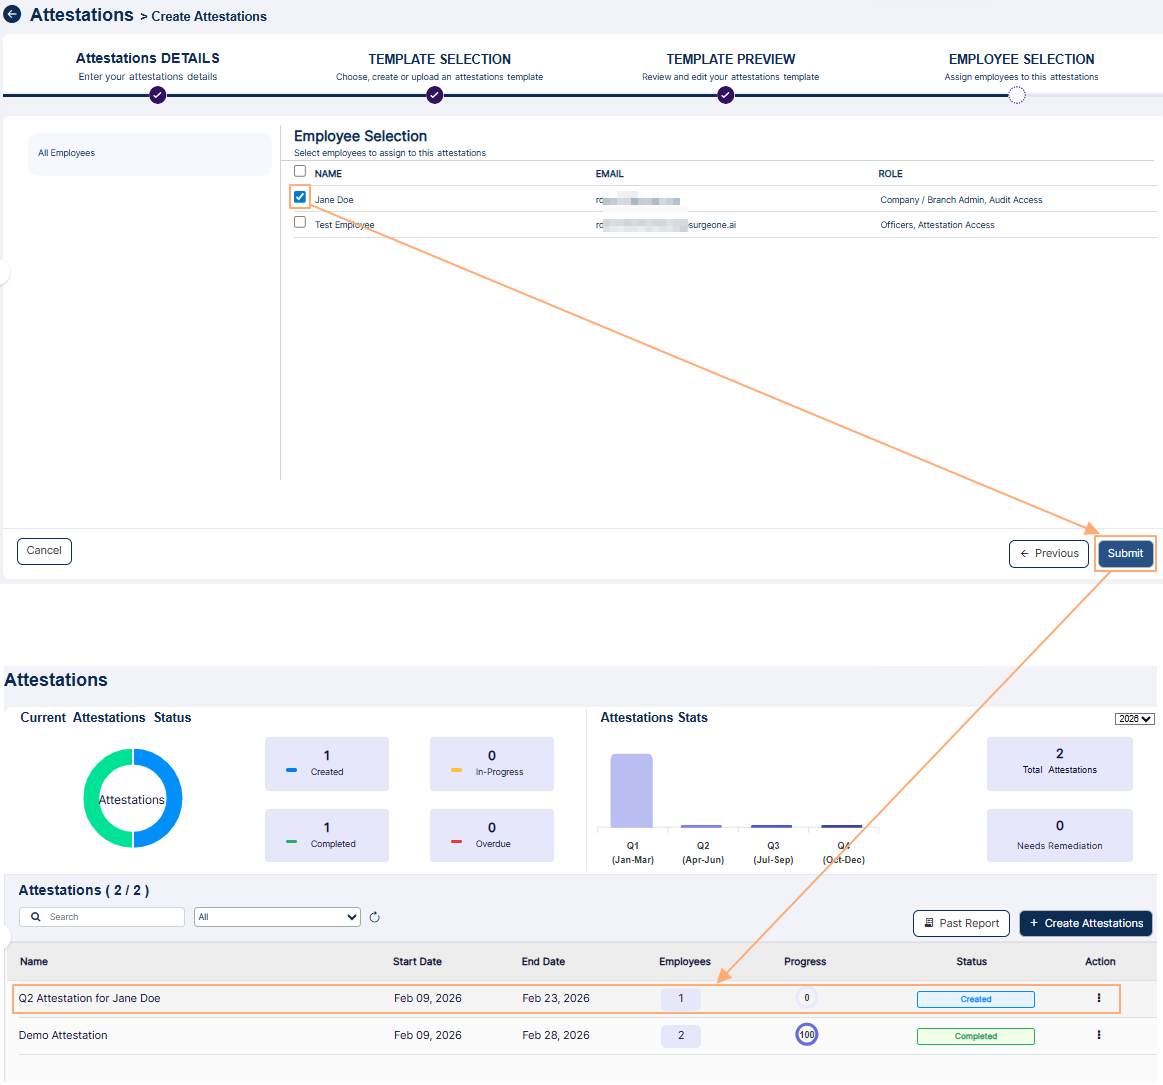 Fig: 41 - Attestation created and displayed on the Attestations grid view
Stage #2: Activity of user who is assigned to perform attestation
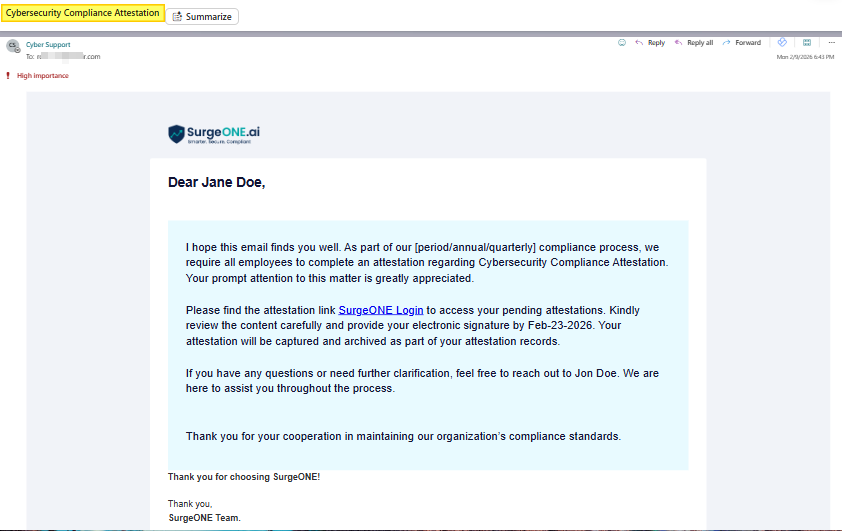 Fig: 42 - Email to initiate the attestation that is assigned
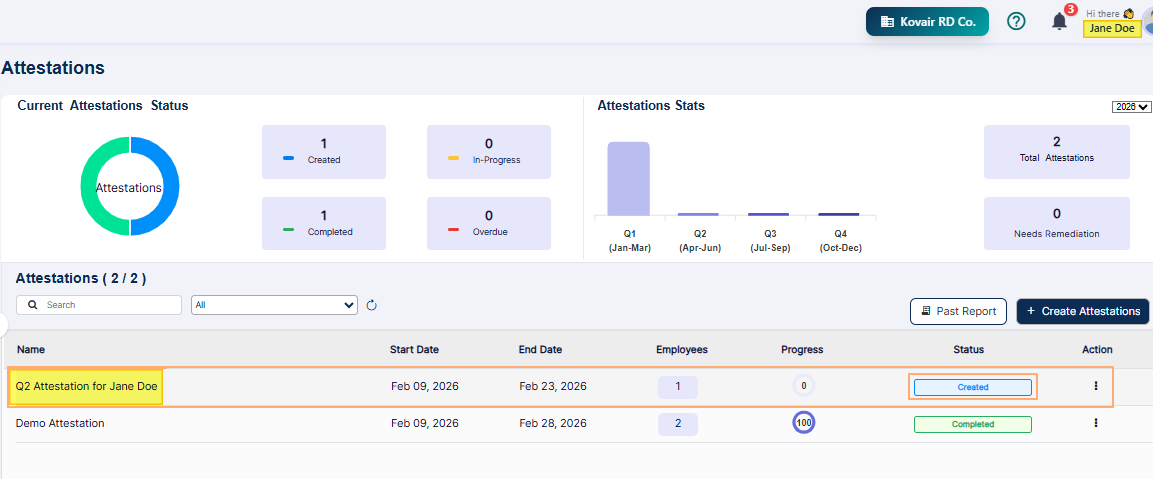 Fig: 43 - Created Status label
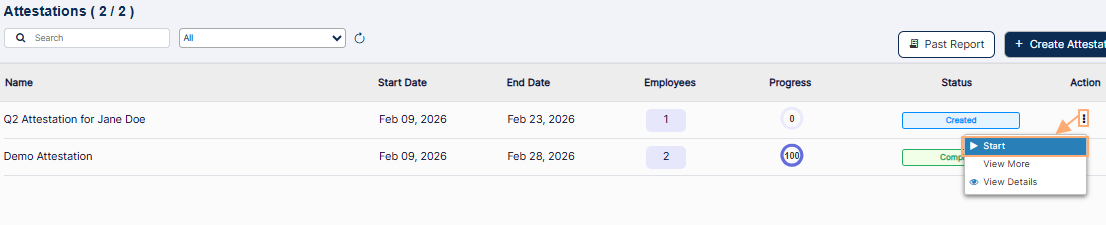 Fig: 44 - Expanded row context menu option labeled as Start
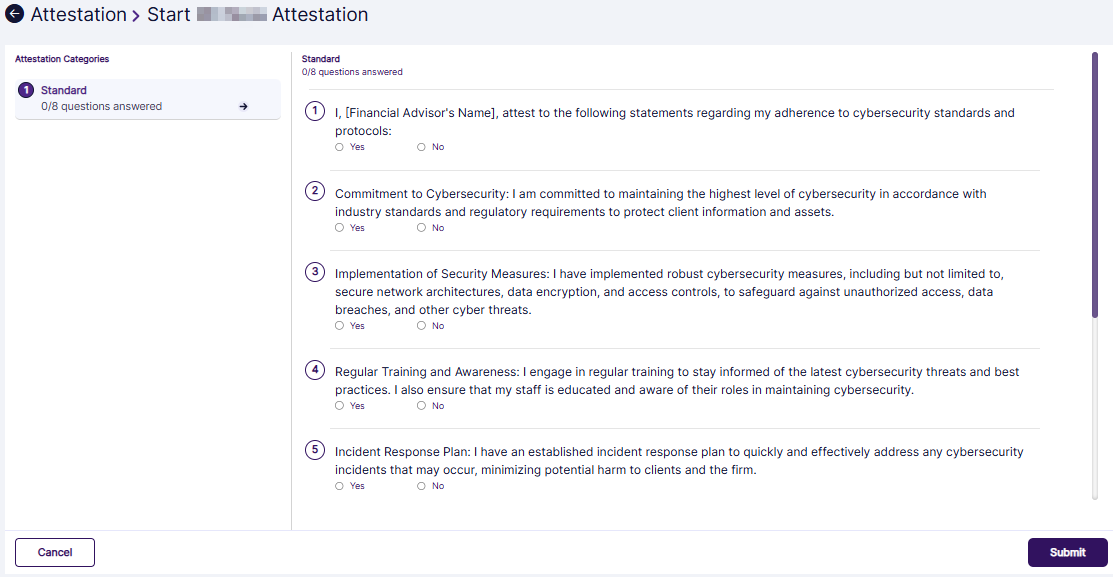 Fig: 45 - Attestation questions view
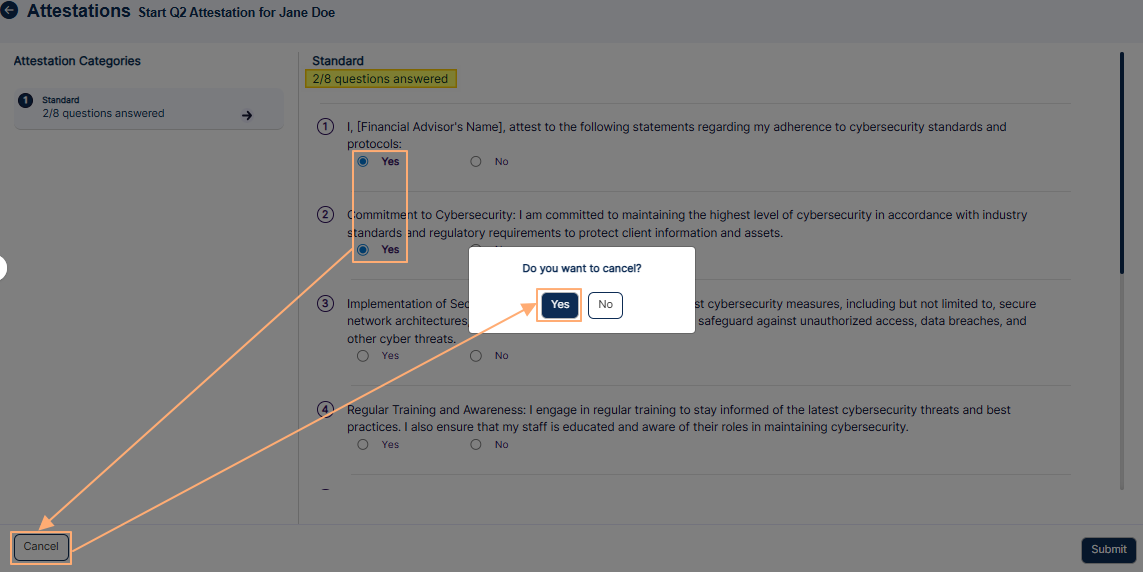 Fig: 46 - Responding to some of the questions
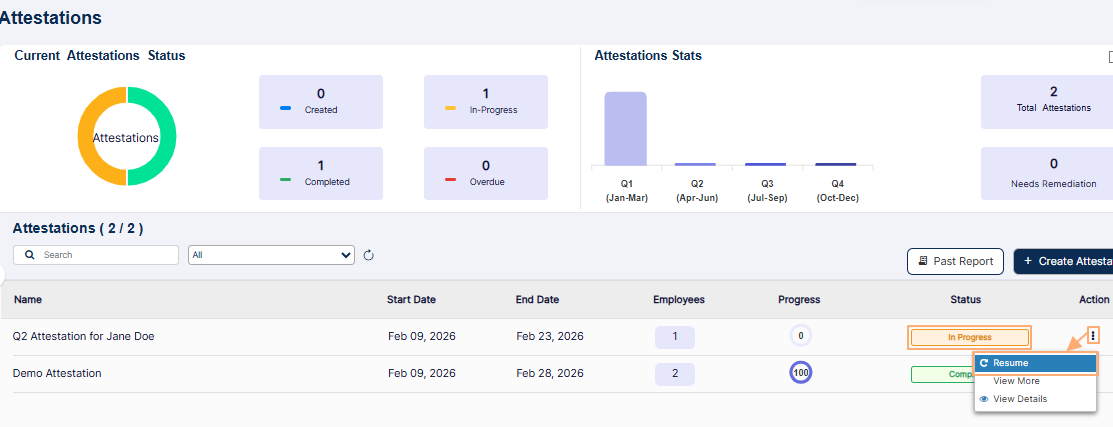 Fig: 47 - Expanded row context menu Resume option
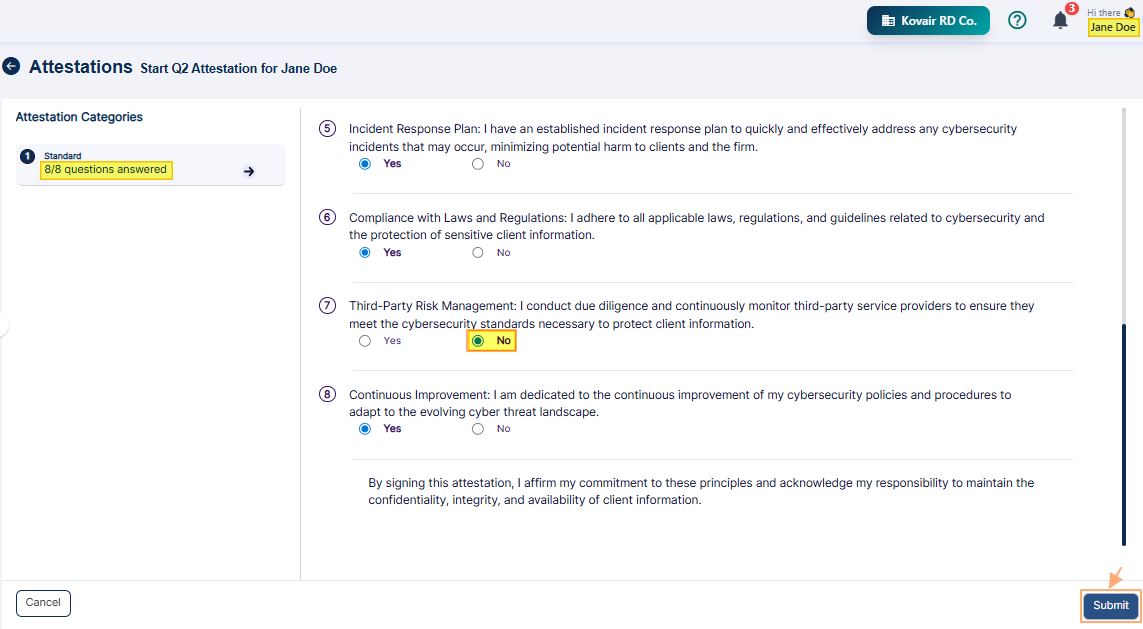 Fig: 48 - Submitting an attestation with a negative response
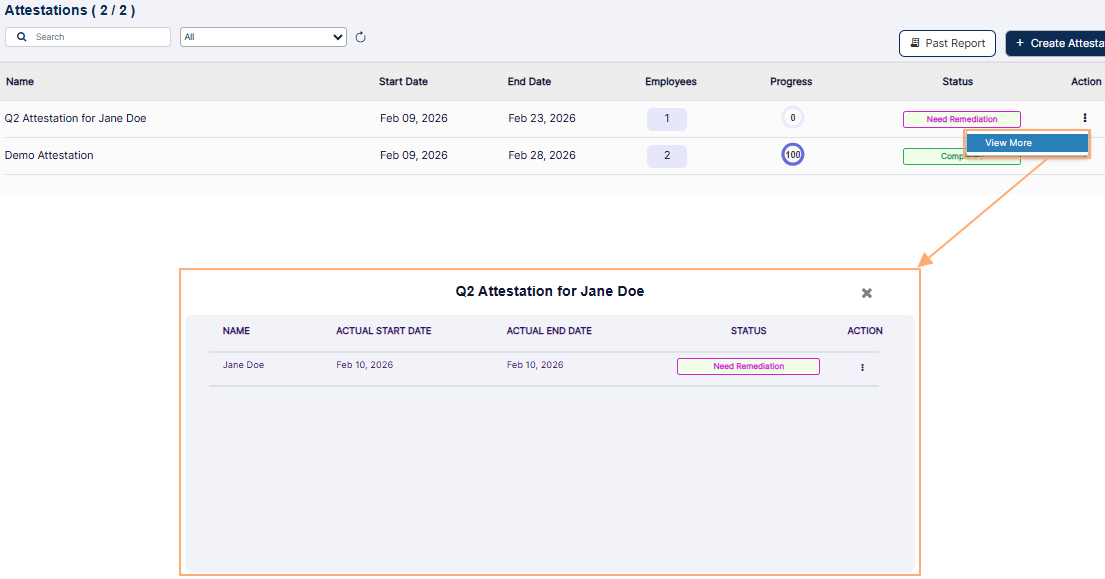 Fig: 49 - Updated Status label and row context menu option
Stage #2.1: Assigned Employee conditional activity
If the assigned employee provides responses to all of the attestation questions and all of the responses are positive (Yes radio button selected for each), and then clicks on the Submit button, then the page closes and the user gets redirected to the Attestations page.
The In Progress label changes to Completed. The Progress column value is shown as 100 to denote the attestation completion (100 is shown since only one employee was assigned). For a completed attestation, the action button shows either a View More option, or a View Details option, or both depending of the role of the logged in user and the role of the user in the attestation.
 Fig: 50 - Completed attestation with no flagged response
NOTE:
Stage #3: Activity of user who will perform remediation
 Fig: 51 - Expanded View More row context menu option
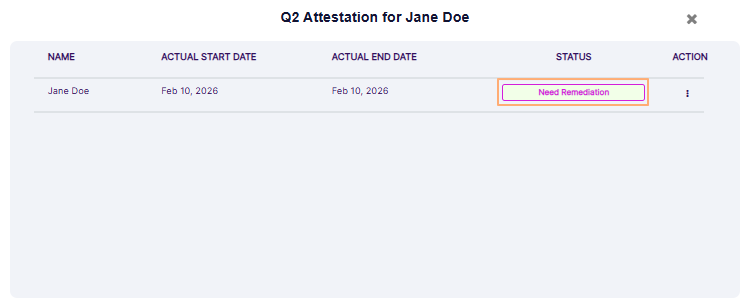 Fig: 52 - Need Remediation option of the attestation dialog box
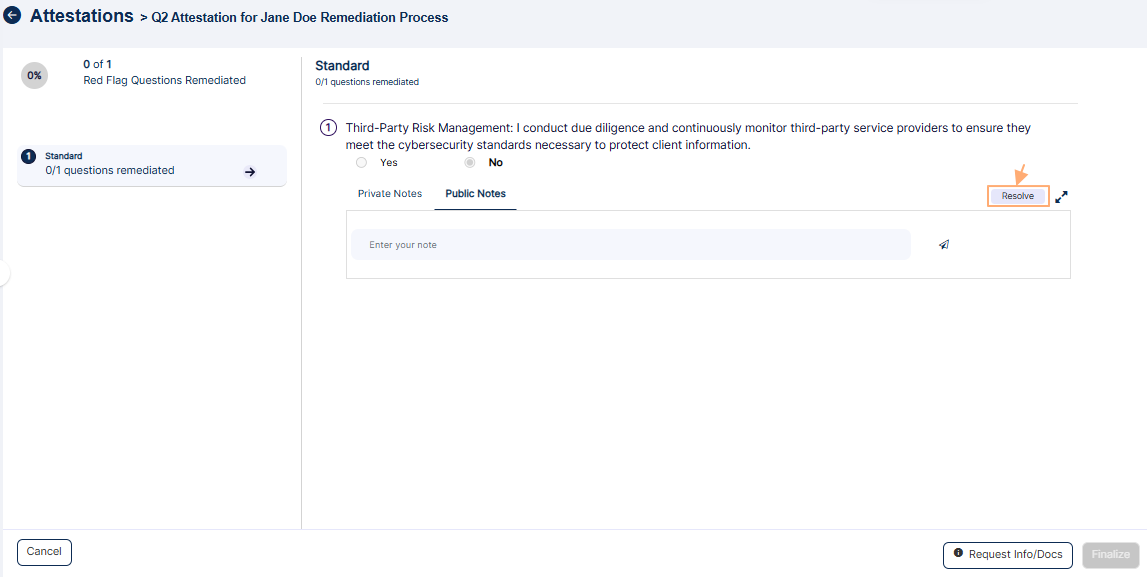 Fig: 53 - Resolving a flagged response
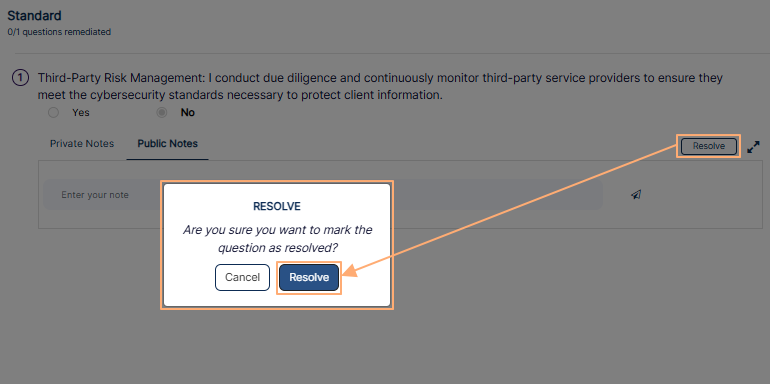 Fig: 54 - Confirmation prompt
The following changes occur, as indicated in the below screenshot.
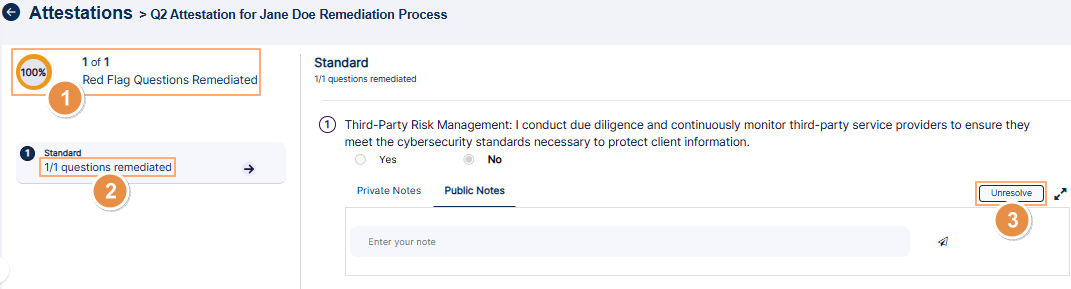 Fig: 55 - Unresolve button label
The permitted user can enter own notes if required. There are two options in the form of tabs labeled as Private Notes and Public Notes. Select the appropriate tab to click on the user input field with the placeholder Enter your note. Enter custom note and click on the paper plane  icon to post it into the system. The former is visible to self, while the latter is visible to the assigned employee if the attestation is not yet completed at the assigned employee end. After a note is posted, an attachment(s) can be uploaded using the attach
  icon.
icon.
The permitted user can click on the Cancel button to navigate back to the attestations grid view. There, the Status column displays Remediation In Progress (updated from Need Remediation).
 Fig: 56 - Status updates to Remediation In Progress
 Fig: 57 - View More context menu
After clicking on it, the attestation dialog box loads to display the status as Remediation In Progress. The permitted user needs to click on it to again view the remediation screen.
 Fig: 58 - Remediation In Progress option
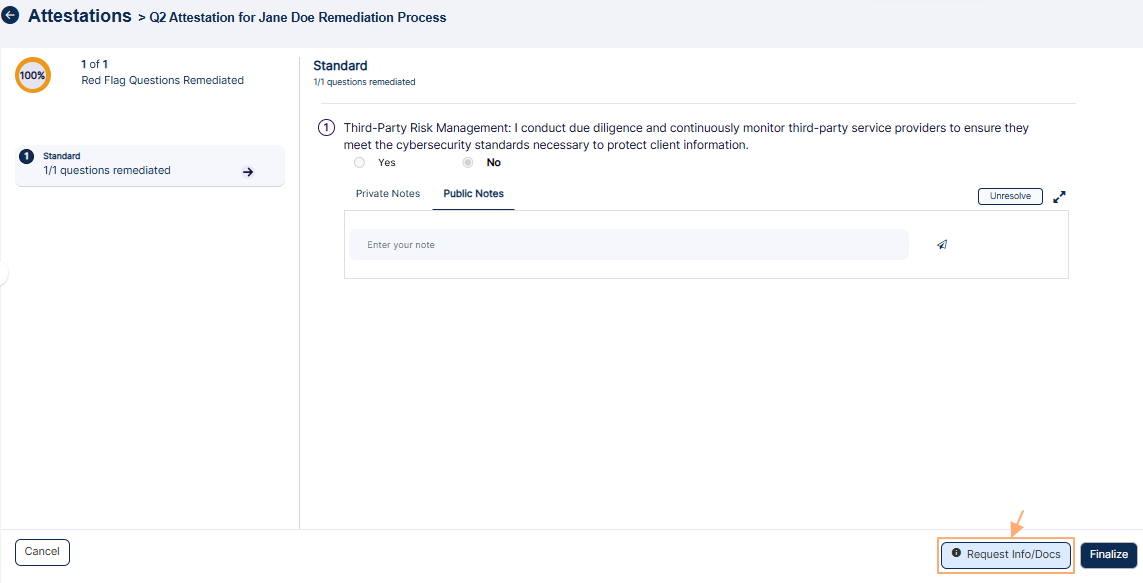 Fig: 59 - Request Info/Docs button
 Fig: 60 - Request confirmation prompt
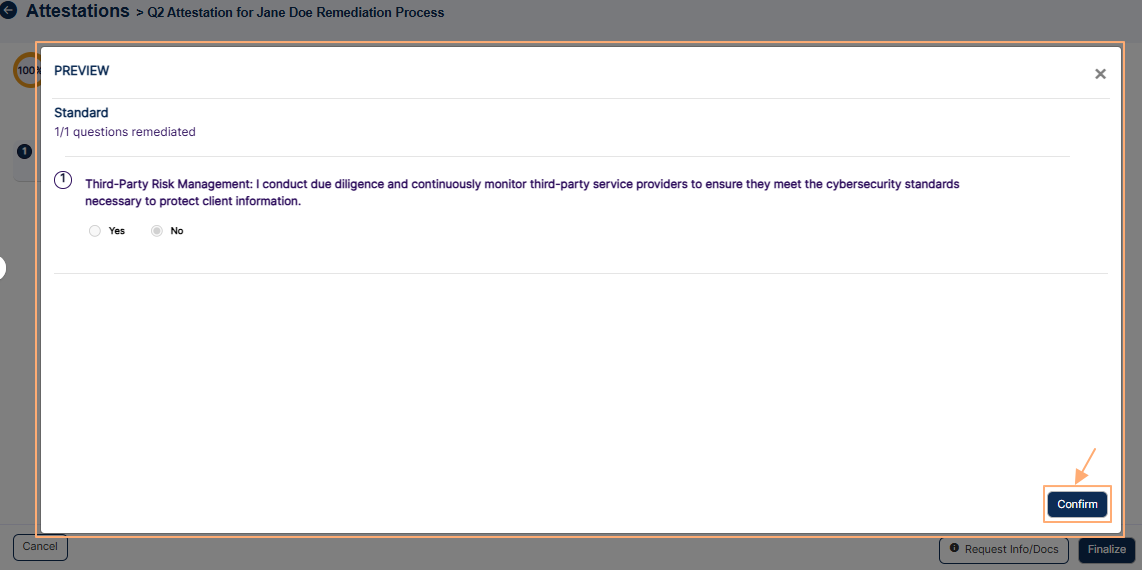 Fig: 61 - Confirming in the dialog box
NOTE:
 Fig: 62 - Finalizing attestation
 Fig: 63 - Completed attestation has only View More row context menu for the permitted user
Stage #4: Assigned Employee activity
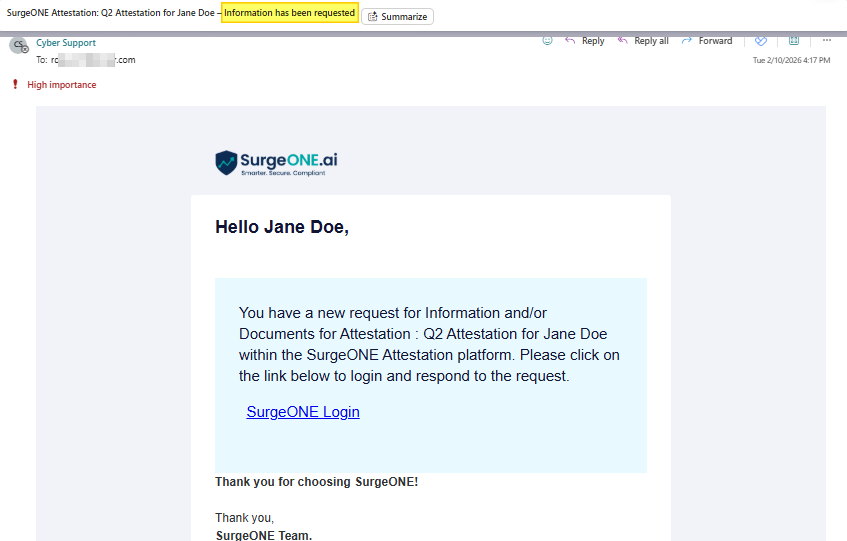 Fig: 64 - Triggered email to provide additional information
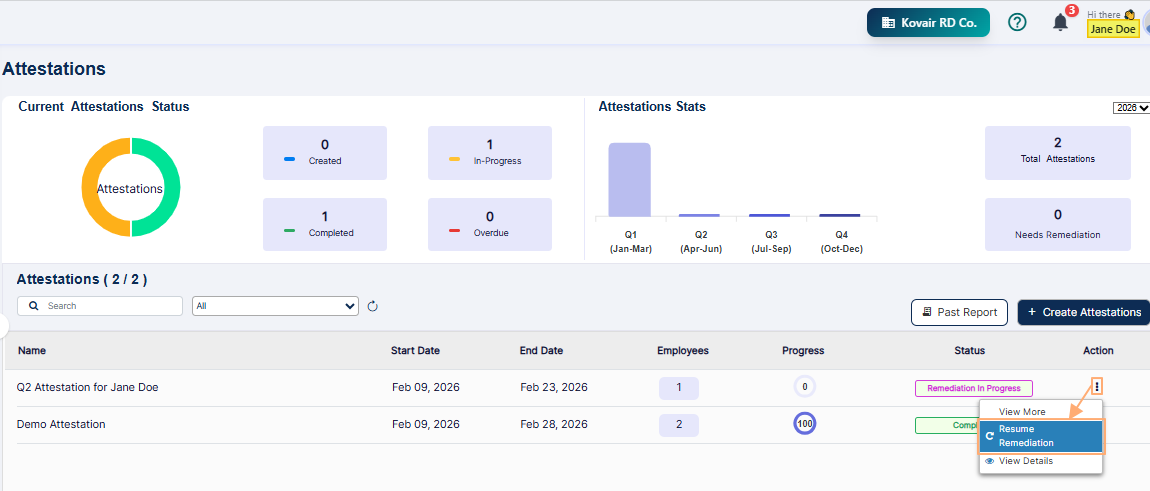 Fig: 65 - Expanded Resume Remediation context menu of the assigned employee for attestation remediation
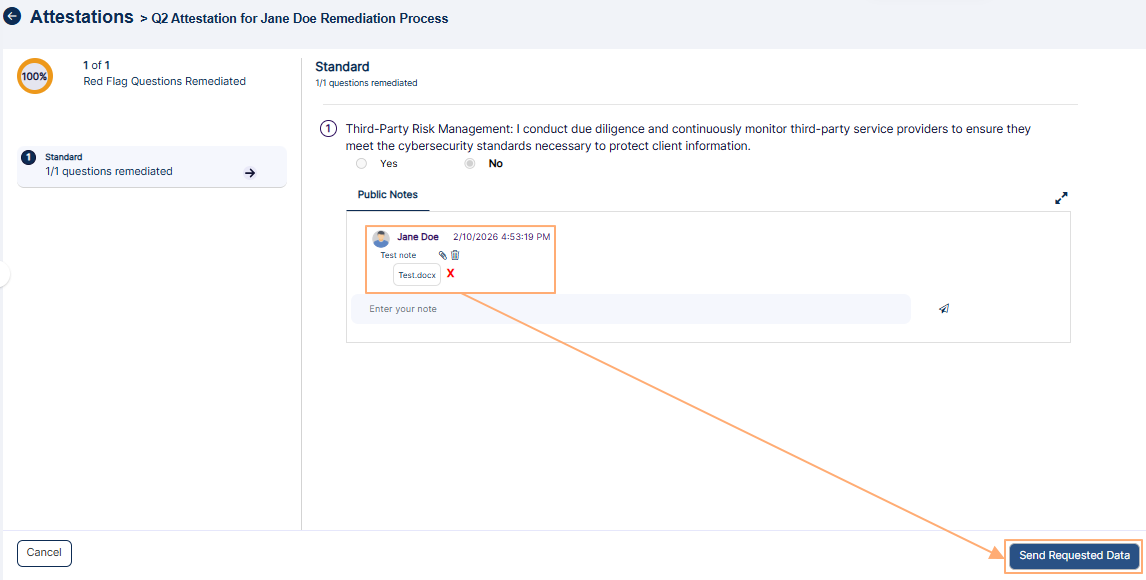 Fig: 66 - Sending Public Note, attachment as requested data for attestation remediation
 Fig: 67 - View of the success notification
Stage #5: Activity of user who is assigned / permitted for attestation resolution
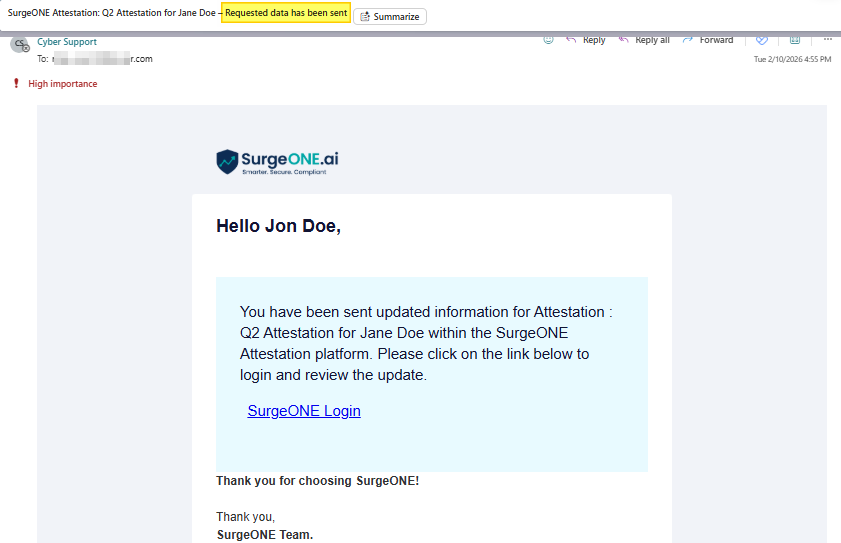 Fig: 68 - Triggered email about forwarded remediation info
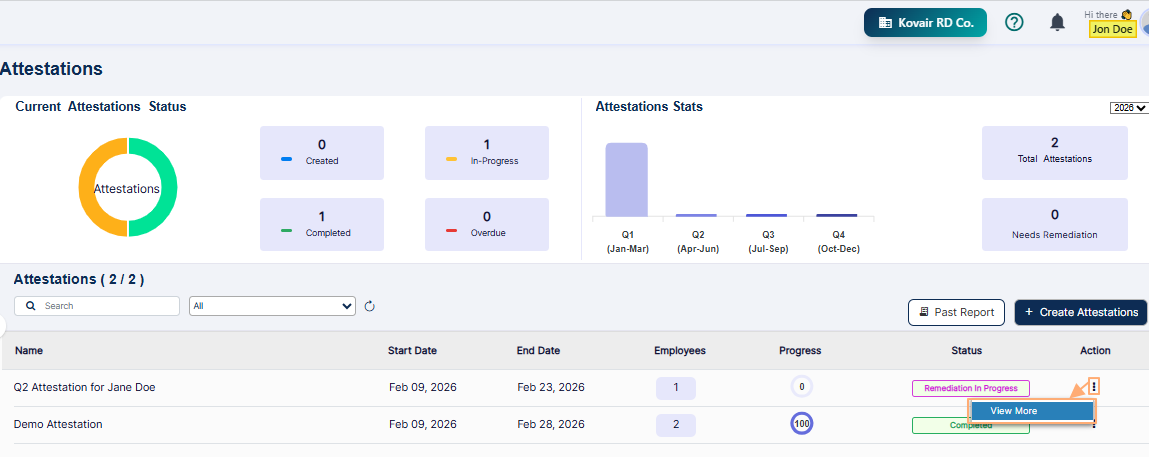 Fig: 69 - Expanded view of the row context menu option View More
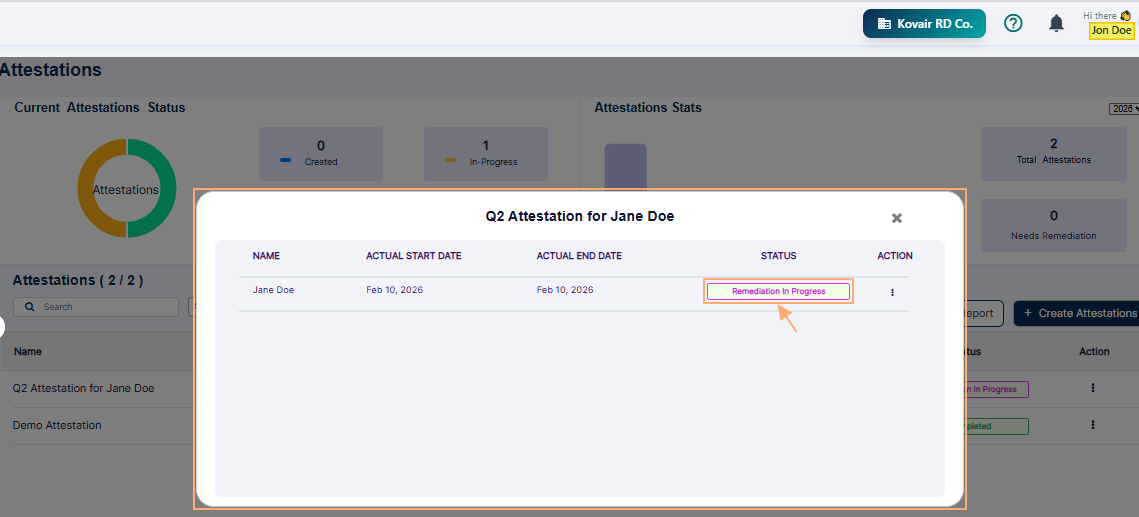 Fig: 70 - Remediation in Progress option
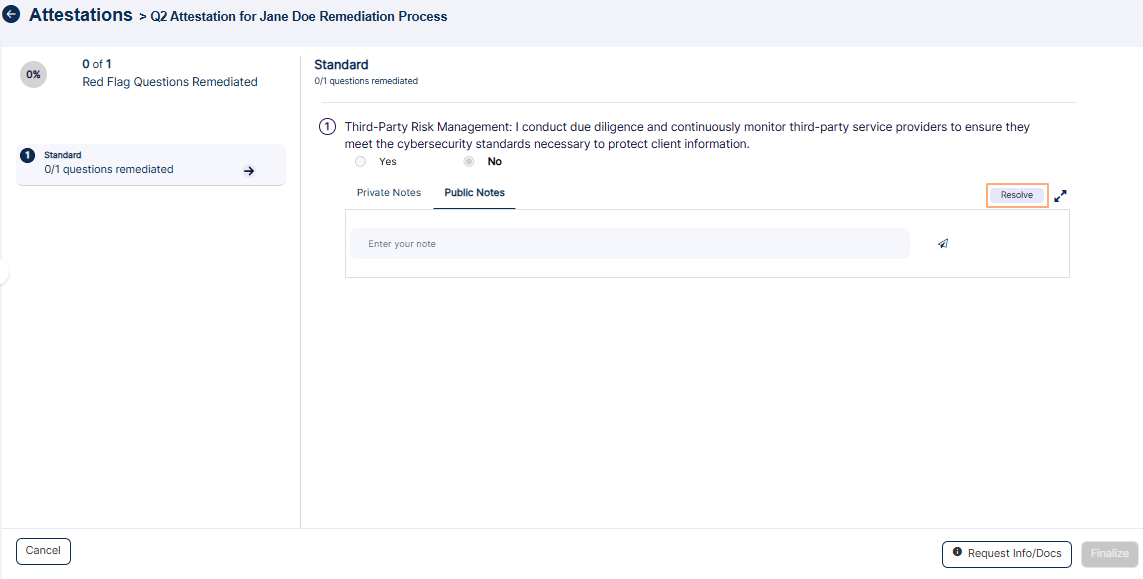 Fig: 71 - Resolve button
NOTE: When 100 percent of the red flagged responses are resolved, the Finalize button gets enabled.
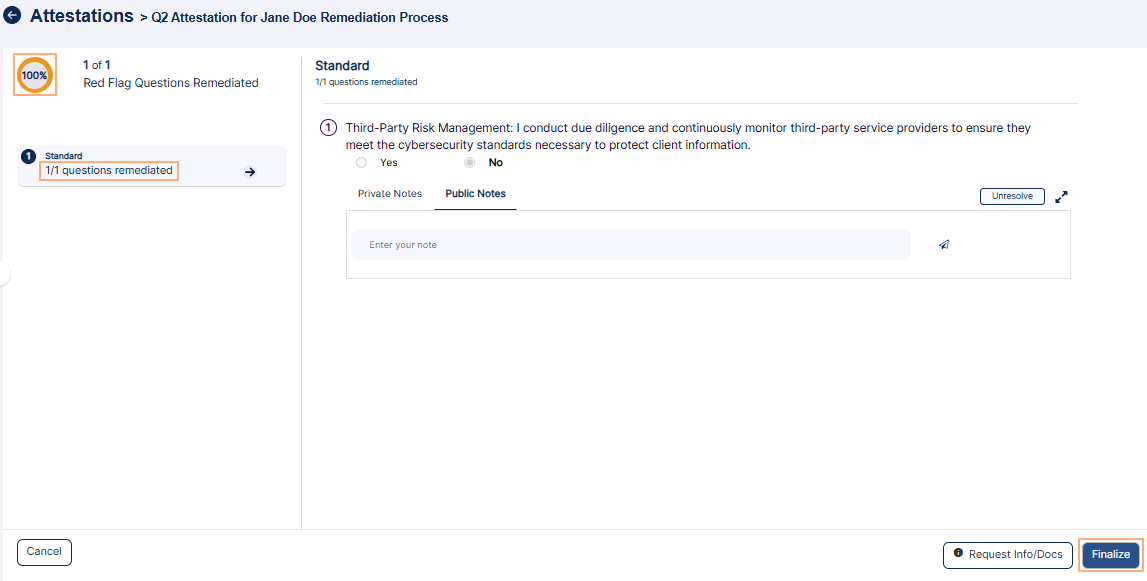 Fig: 72 - Enabled Finalize button
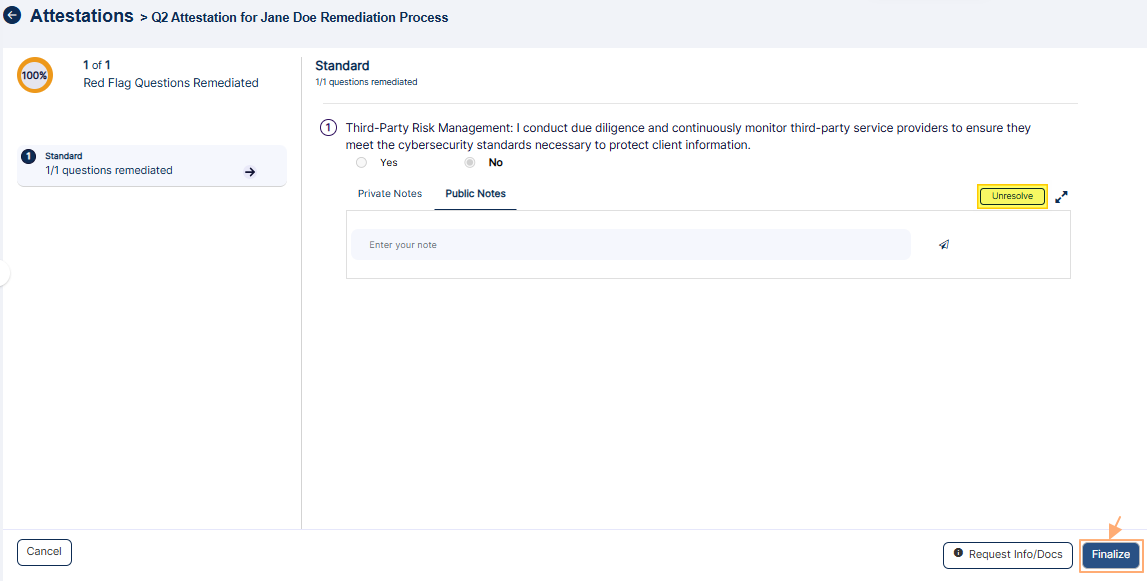 Fig: 73 - Finalize button to complete the attestation
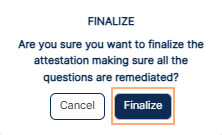 Fig: 74 - Confirming attestation finalization
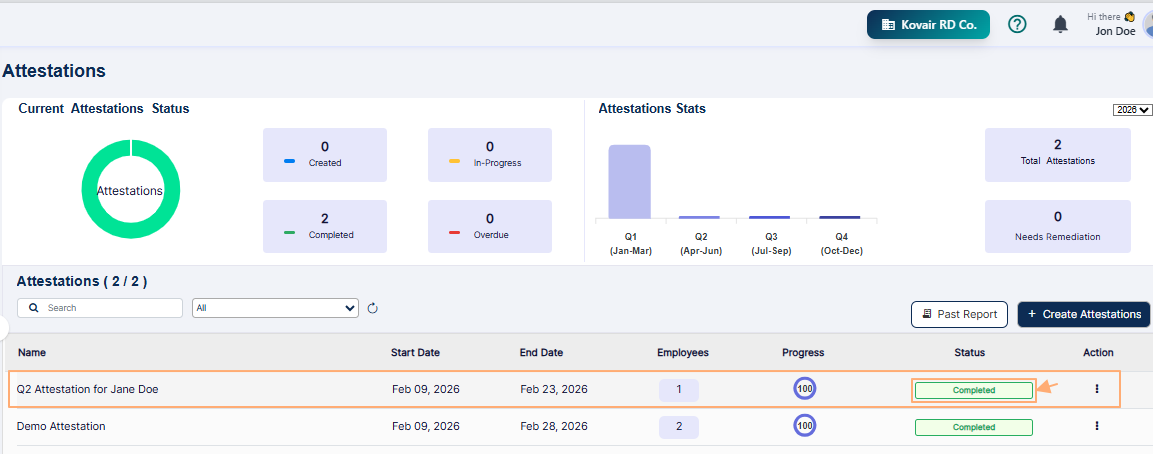 Fig: 75 - Attestations grid view showing the completed attestation
NOTE: Each of the attestation statuses are color-coded differently for ease of understanding and usage.
4.2. Attestation Process Brief Overview When Multiple Employees are Assigned
When multiple attestors are involved in an attestation activity, having a summarized view of the process becomes essential for maintaining clarity and control. This consolidated perspective allows users to track individual and collective progress, identify bottlenecks, and ensure that all participants are aligned with the attestation timeline and objectives. It enables attestation admins to oversee participation without micromanaging, while still ensuring that every attestor fulfills their responsibility. This level of coordination supports timely completion, reduces the risk of oversight, and reinforces a structured approach to meeting regulatory and operational standards.
- Only an Attestation Admin or Company / Branch Admin role user can create a new attestation. Let us first assume that the permitted user proceeds to create a new attestation. Two employees are assigned to the new attestation. Refer to following screenshot.
- Both of the assigned employees receive a system triggered email to initiate the attestation that is assigned. They can use the embedded link to perform attestation.
- Let us consider that the assigned employee (indicated in screenshot as ''Test Employee'') finds the attestation in the Attestations grid view. The Progress column value is displayed as 0 (zero).
- Now consider that this assigned employee proceeds to provide responses to of the template questions with at least one negative answer. Once done, the employee clicks on the Submit button.
- Now, let us consider that the other assigned employee (indicated in screenshot as ''Jane Doe'') finds the attestation in the Attestations grid view. The Progress column value is displayed as 0 (zero), since the other user has submitted the attestation, but the single negative response requires remediation. Suppose that the employee (indicated in screenshot as ''Jane Doe'') proceeds to provide positive responses to each of the template questions. Once done, the employee clicks on the Submit button.
- The employee gets directed to the Attestations page. The Status column's label changes to Completed. Since there were two employees assigned to perform the attestation, and since this user has completed the assigned attestation, the value of the Progress column updates from 0 to 50.
- The second employee (indicated in screenshot as ''Test Employee'') who previously submitted the attestation with one negative response, can navigate to the Attestations page. The STATUS label changes to Need Remediation. Since there were two employees assigned to perform the attestation, and since the other user (''Jane Doe'') has successfully completed the assigned attestation, the value of the Progress column can be seen updated from 0 to 50.
- The permitted user can find the attestation in the grid view with half progress done. The View More menu option is expanded after clicking on the vertical ellipsis icon. The permitted user clicks on it to load the attestation dialog box.
- The attestation modal window loads to show the attestation statuses of various assigned employees. Here is the view of both of the activities done by the two assigned employees.
- Clicking on the Need Remediation option under the STATUS column loads the attestation remediation view.
Stage #1: Employee activity who is permitted to create the attestation
 Fig: 76 - Selecting two employees to perform the attestation
Here is the view of the created attestation. As visible in the below image, two employees are assigned. These assigned employees must be assigned with at least the Attestation Access role (if not Attestation Admin or Company / Branch Admin role).
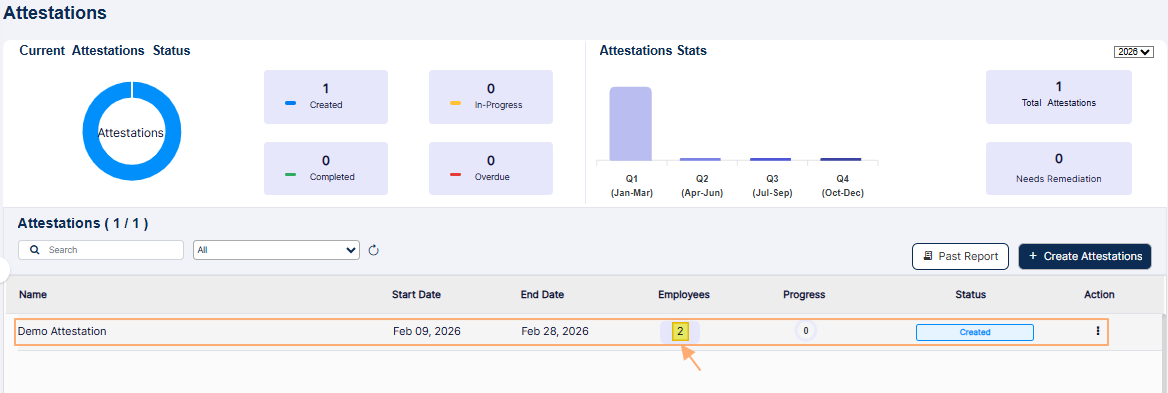 Fig: 77 - Two employees to perform the created attestation
Stage #2: Assigned Employee #1 and #2 activity
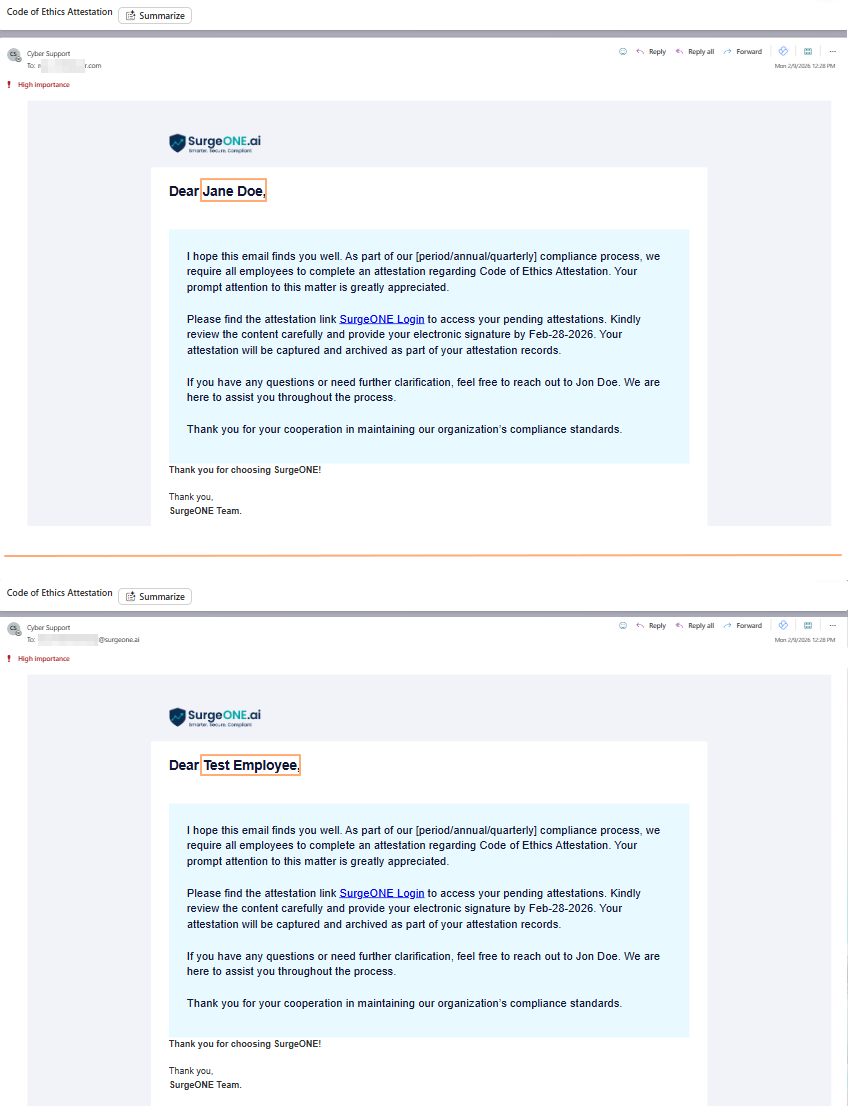 Fig: 78 - Email to initiate the attestation that is assigned
Stage #3: Assigned Employee #2 activity
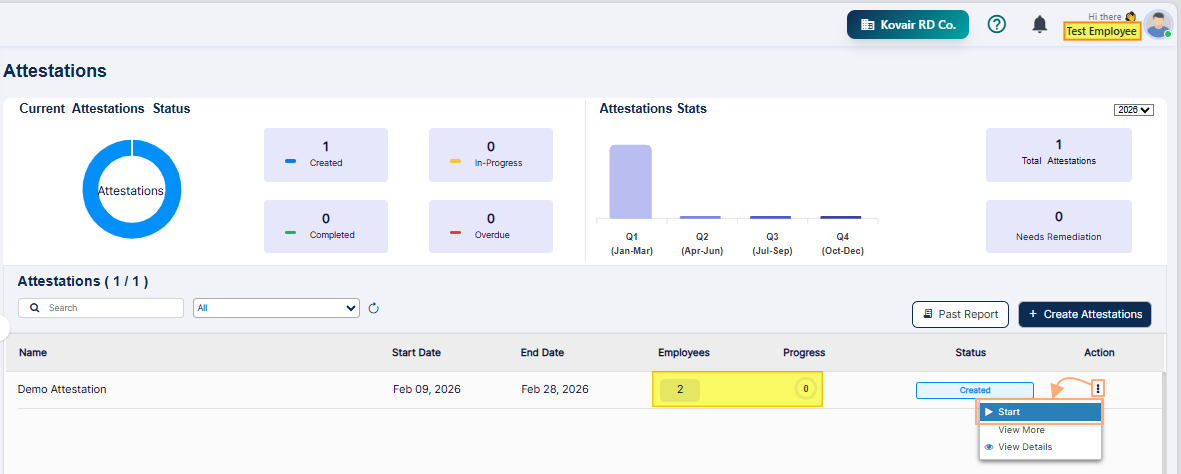 Fig: 79 - Created Status label and Start context menu
NOTE: The user must have the Attestation Admin or Company / Branch Admin role assigned to him / her to be able to view the Progress column in the Attestations page grid view.
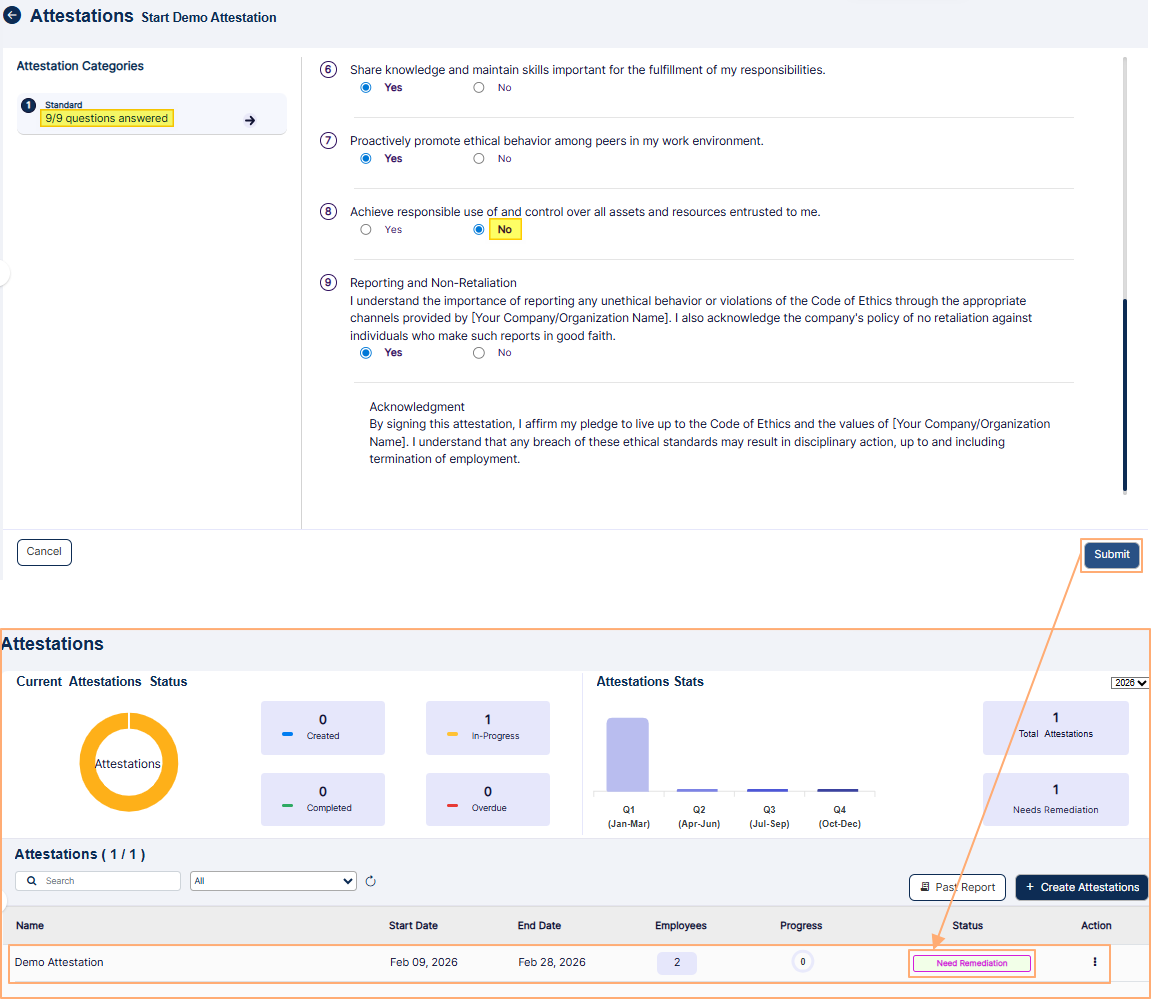 Fig: 80 - Submitting at least one negative response
Stage #4: Assigned Employee #1 activity
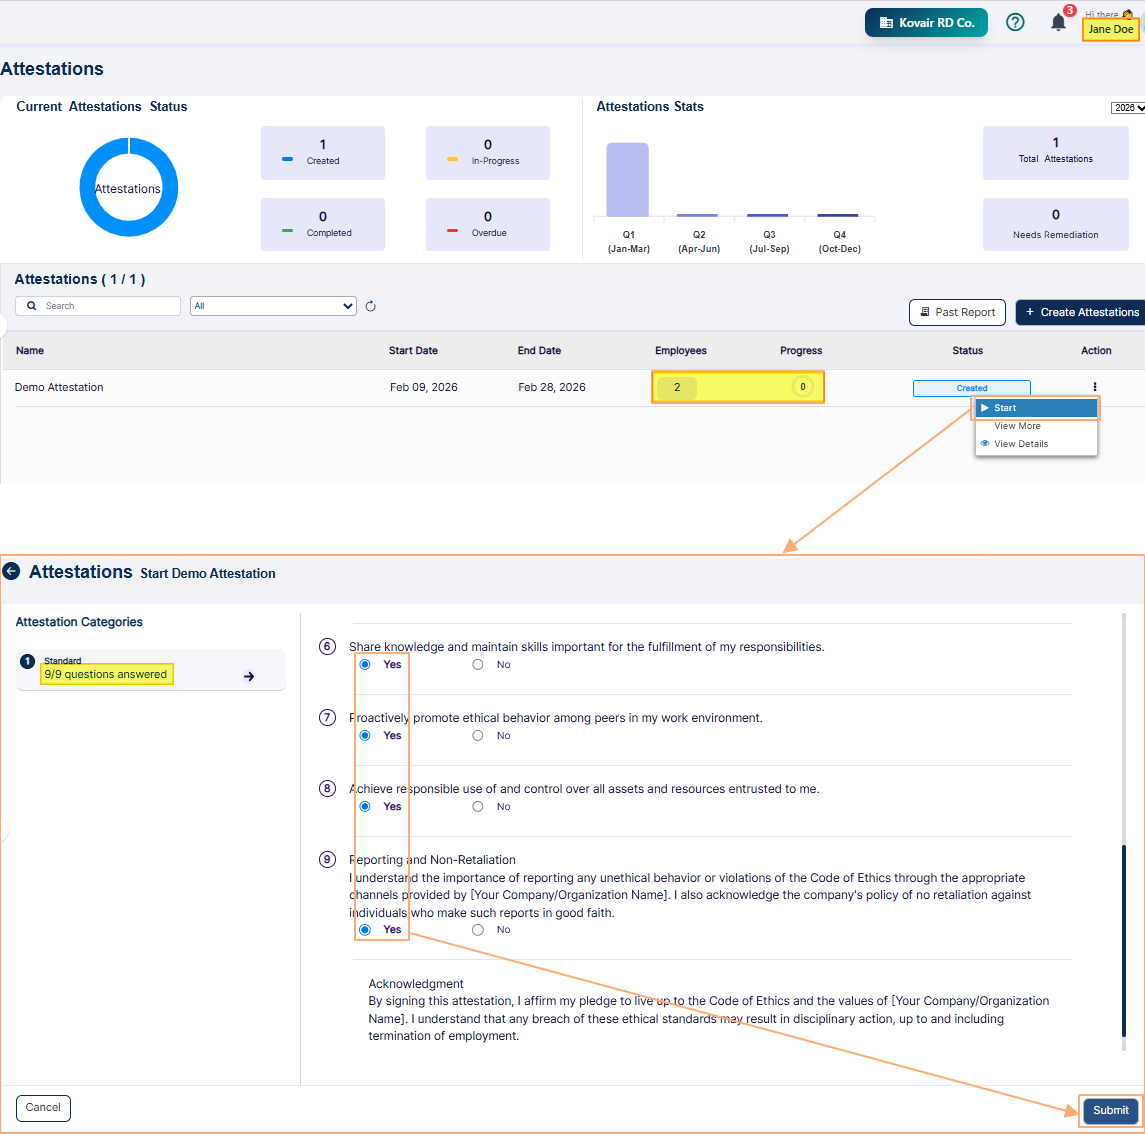 Fig: 81 - Clicking on the expanded Start context menu and then submitting attestation after providing positive responses
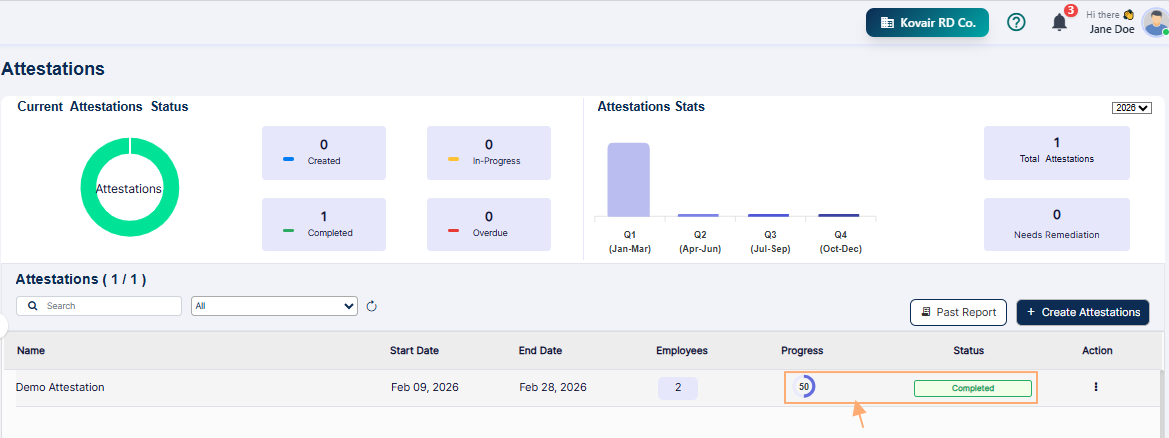 Fig: 82 - Attestation entry updated in grid view
Stage #5: Assigned Employee #2 activity
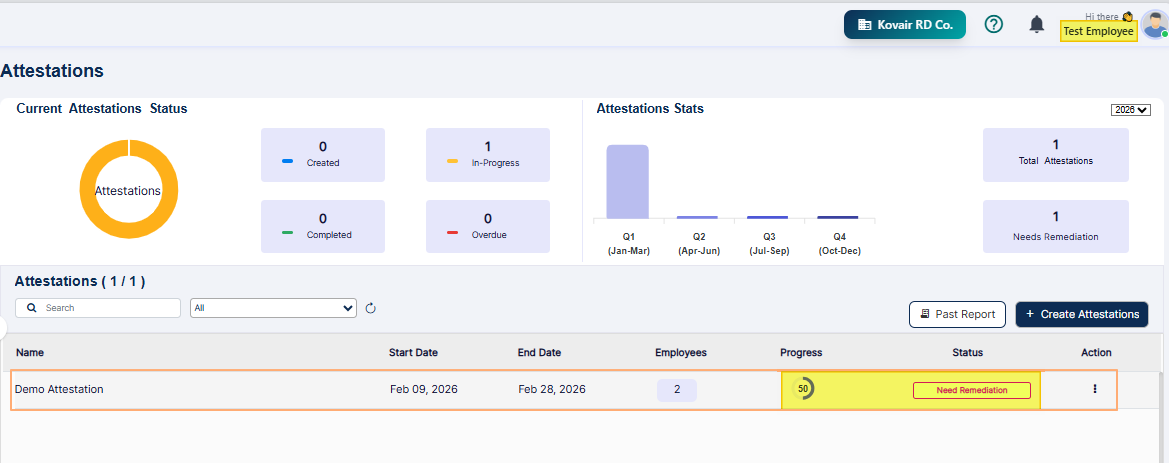 Fig: 83 - Attestation Info view
Stage #6: Remediation activity
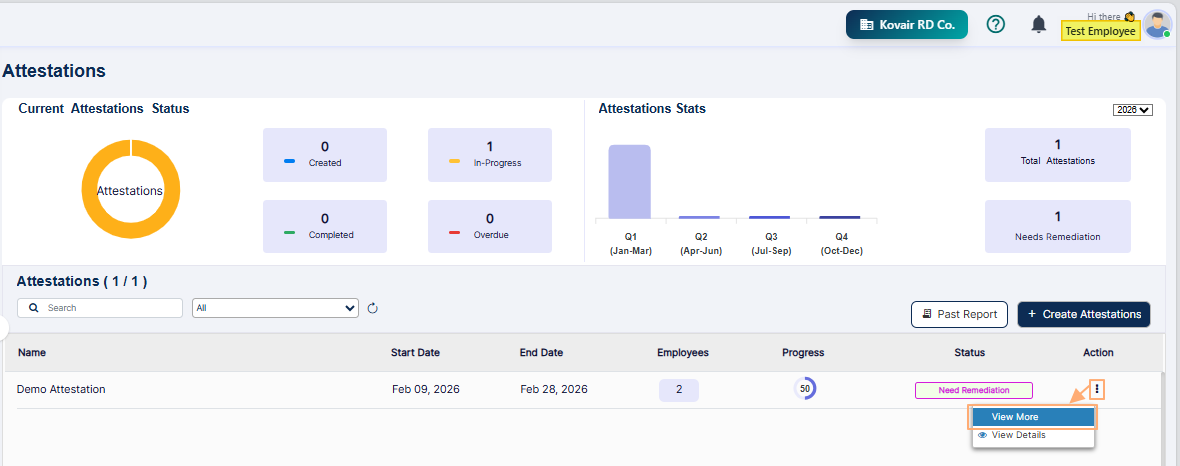 Fig: 84 - View More menu option
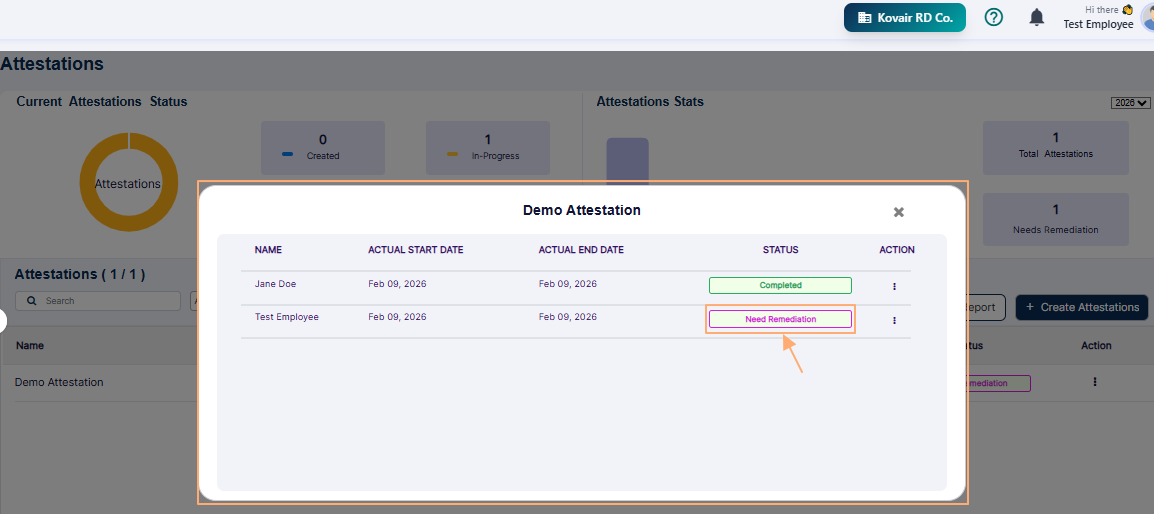 Fig: 85 - Attestation modal window with option to begin remediation
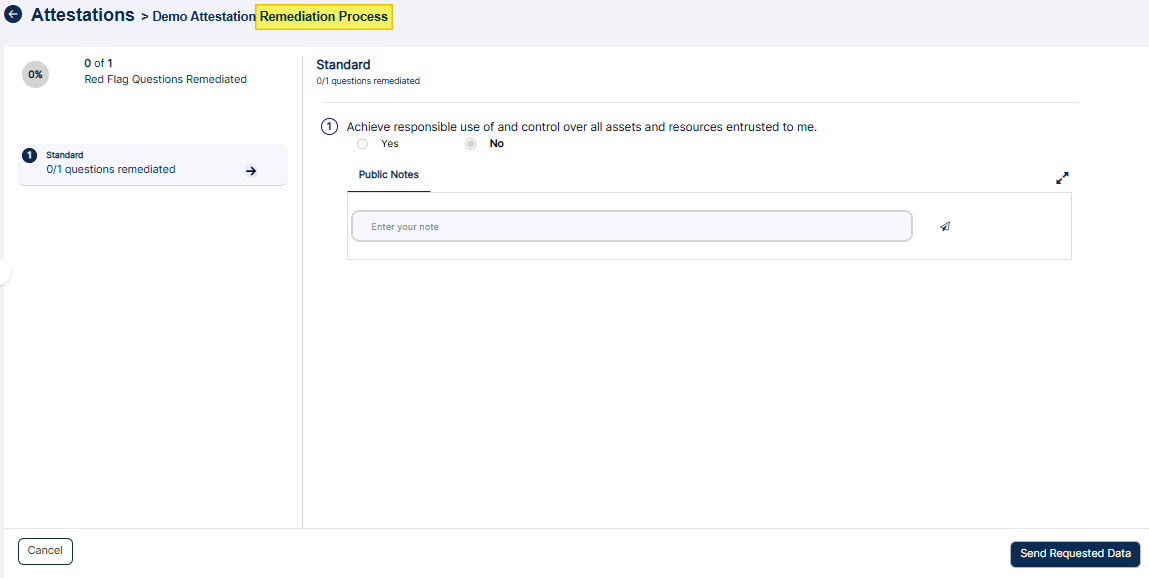 Fig: 86 - Attestation remediation process page view
Let us try to understand the various activities that can be performed here:
A. Providing Notes
Provide the necessary response in the form of a note. Notes are essential when you want to convey certain information to another person who has access to it.
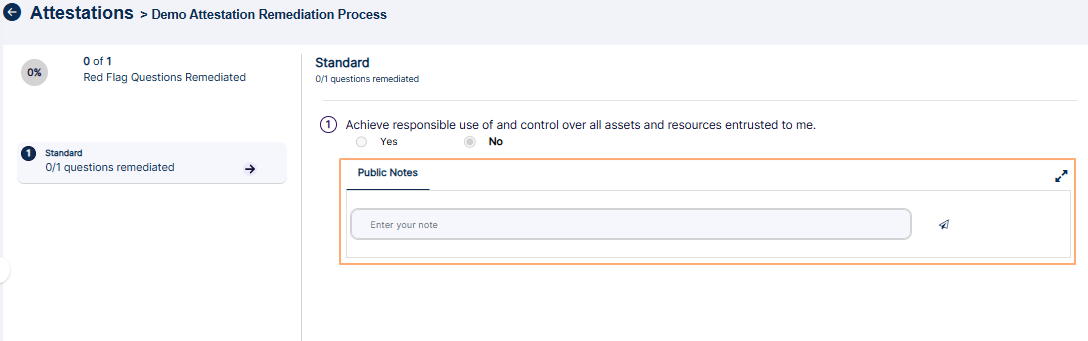 Fig: 87 - View of Public Notes posting area
This is useful when the assigned employees need to be informed or updated. Conversely, the assigned employees can also convey important information back to the permitted user who will provide resolution. The user profile picture preview and full name is displayed above the posted note. The posting date and time is also visible next to it.
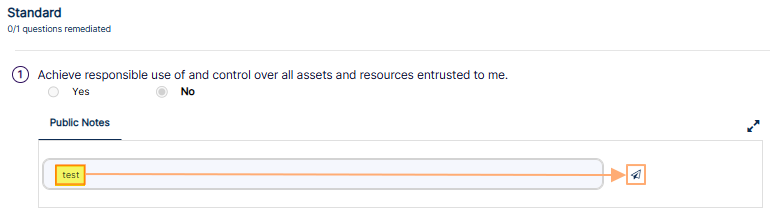 Fig: 88 - Posting Public Note
Here is the view of a couple of sample public notes posed.
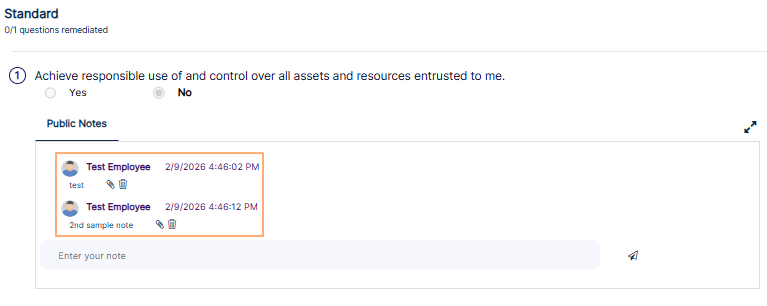 Fig: 89 - Public Notes posted
B. Providing Attachments
Attachments can be uploaded along with a note using the attach icon. If there is no note, attachment cannot be uploaded. An uploaded attachment can be removed if required by clicking on the red cross icon beside the filename.
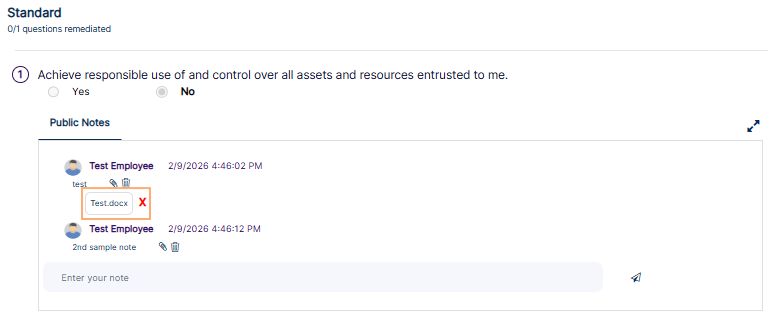 Fig: 90 - Uploaded attachment
C. Requesting for Additional Information or Documents
Depending on the attestation template and the employee responses provided, the permitted user who had created the attestation may deem it necessary that additional info is furnished or proper documentation is uploaded as proof of attestation. This user can request for it by clicking on the Request Info/Docs button. A system generated email is triggered to the assigned employees after that. The email contains an embedded link for the assigned user to use that to navigate to SurgeONE.
Note that the notes posted by the assigned employee is visible to the creator. The attestation creator get the facility to post public notes as well. Private notes can also be posted only by the attestation creator, which are only visible to him / her.
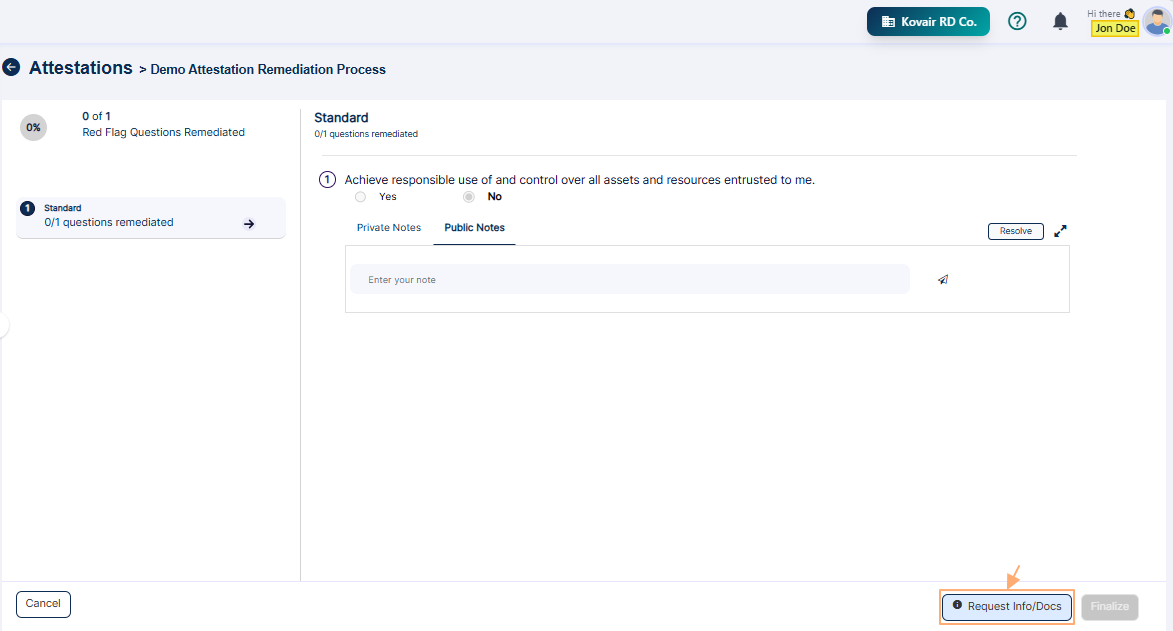 Fig: 91 - Request Info/Docs button visible only to the attestation creator
After the attestation creator clicks on the Request Info/Docs button, a confirmation prompt loads. Click on its Continue button to load the PREVIEW dialog box view.
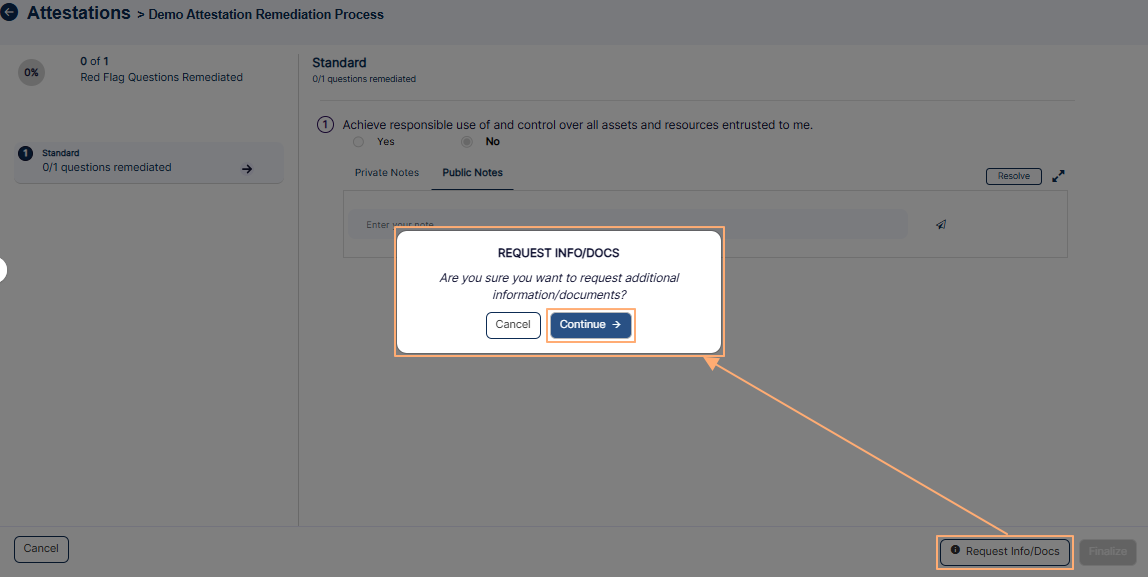 Fig: 92 - Request confirmation prompt
The attestation creator needs to click on the Confirm button of the PREVIEW dialog box view. A system generated email will be triggered to the assigned employee(s) (whose response needs remediation) informing him / her / them about the request for additional information or documentation.
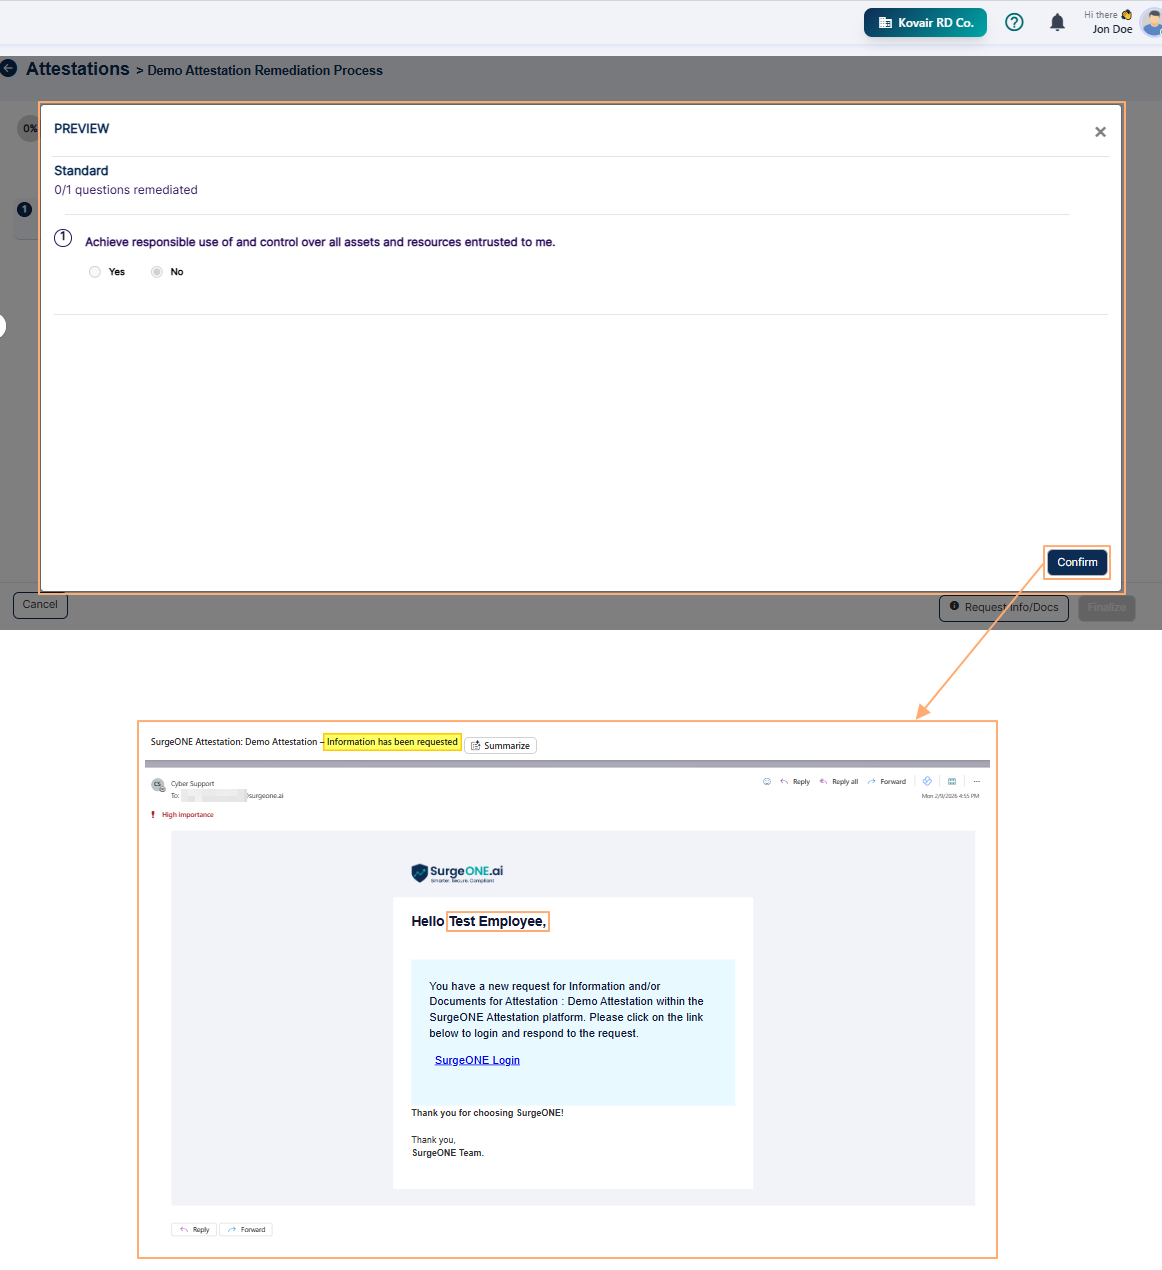 Fig: 93 - PREVIEW dialog box view
The assigned employee needs to click on the Send Requested Data button of after providing the requested additional information or documentation in the form of public notes or attachments. An email gets triggered to the attestation creator regarding the submission of requisite information by the assigned employee.
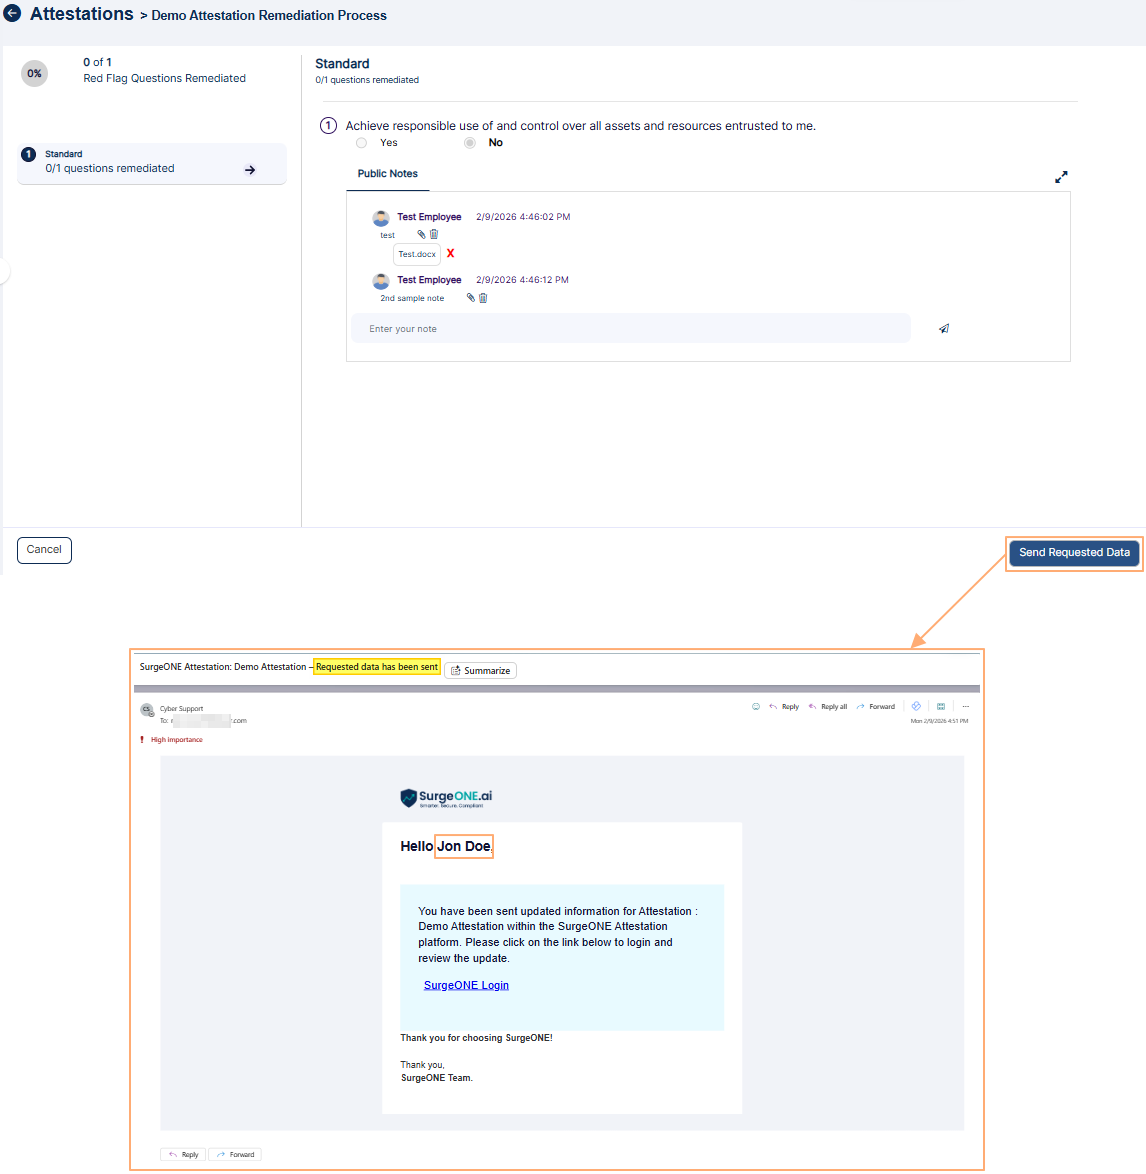 Fig: 94 - Send Requested Data button visible to assigned user
D. Resolving for Flagged Questions' Remediation
If the attestation assigned employee(s) has/have provided a question response as No, then the response gets flagged by the system. At the right of a flagged response, a Resolve button can be seen by the attestation creator. He / she needs to click on it to provide own resolution as per of the attestation remediation process.
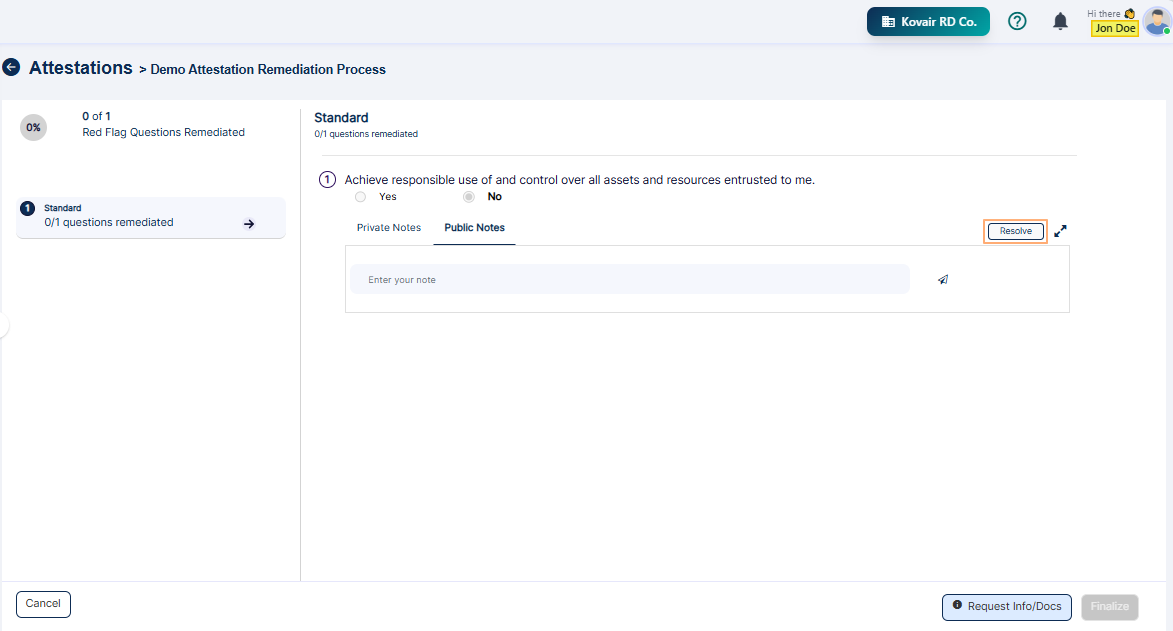 Fig: 95 - Attestation creator resolving flagged response
A confirmation prompt dialog box loads. Click on the Resolve button to confirm. This activity is very important since the system does not permit attestation finalization with even one flagged response, unless that is resolved manually.
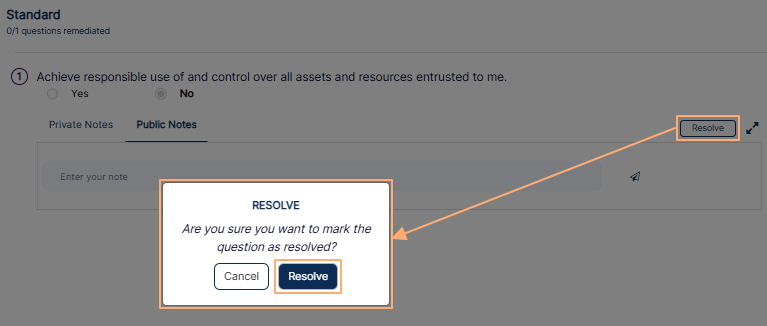 Fig: 96 - Resolving flagged response
NOTE:
- A resolved response can be unresolved. The resolved response has an Unresolve button. Click on it to unresolve the resolved response.
- The attestation cannot be finalized or have a completed status if any resolved response is unresolved or if there are any unresolved negative responses.
Stage #7: Finalizing Attestation
The attestation creator can click on the Finalize button of the attestation remediation screen when the remediation percentage reaches 100 percent (displayed at the top-left of the attestation remediation process page). A confirmation dialog box loads. Click on the Finalize button within the modal window.
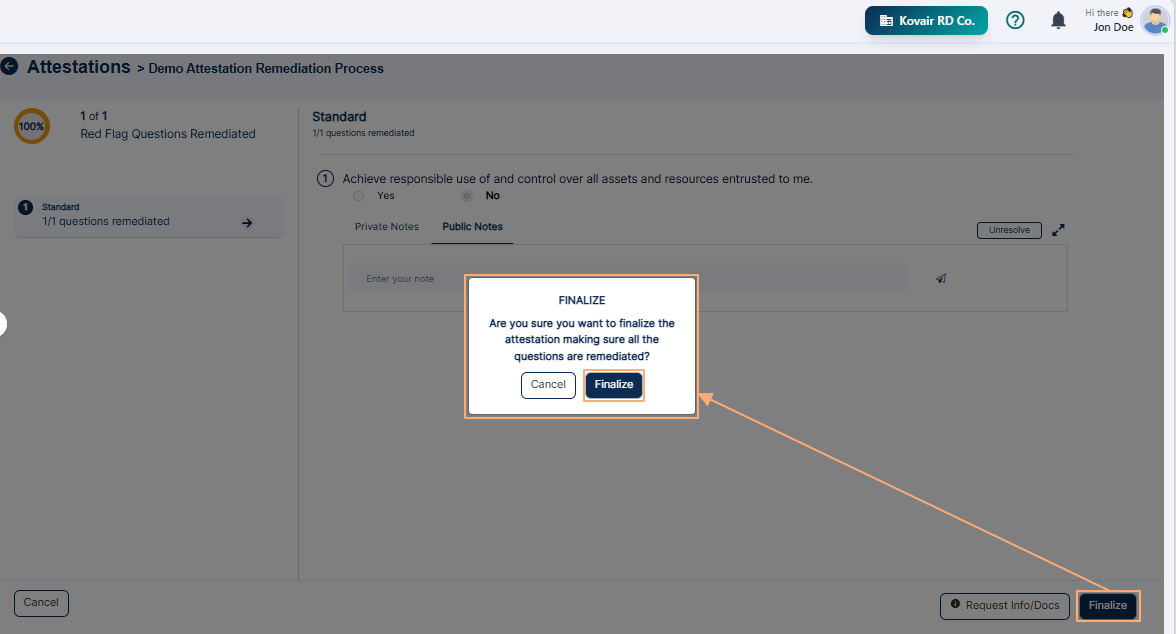 Fig: 97 - Clicking on Finalize button to complete the attestation loads the attestation finalization confirmation prompt
The attestation STATUS gets displayed as Completed as you get redirected to the Attestations page.
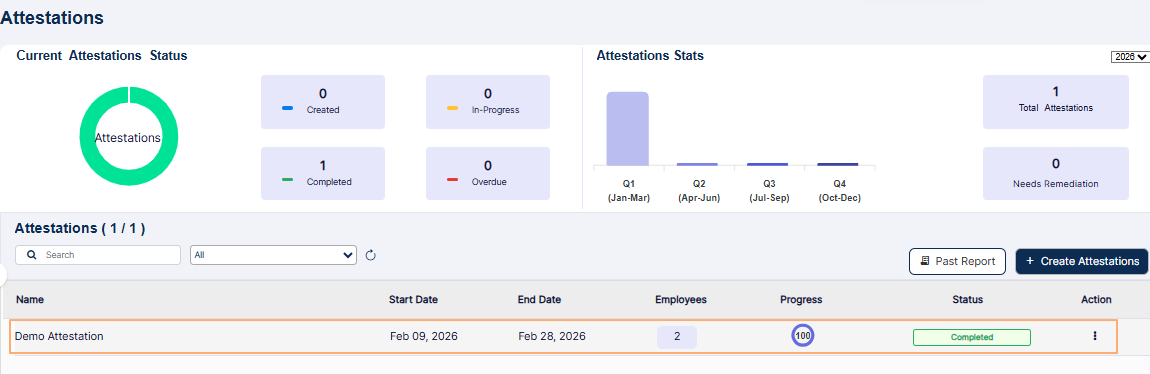 Fig: 98 - Completed attestation
The attestation details modal window (which loads after clicking on the View More menu option of the Action column) also shows the respective employee-wise Completed statuses.
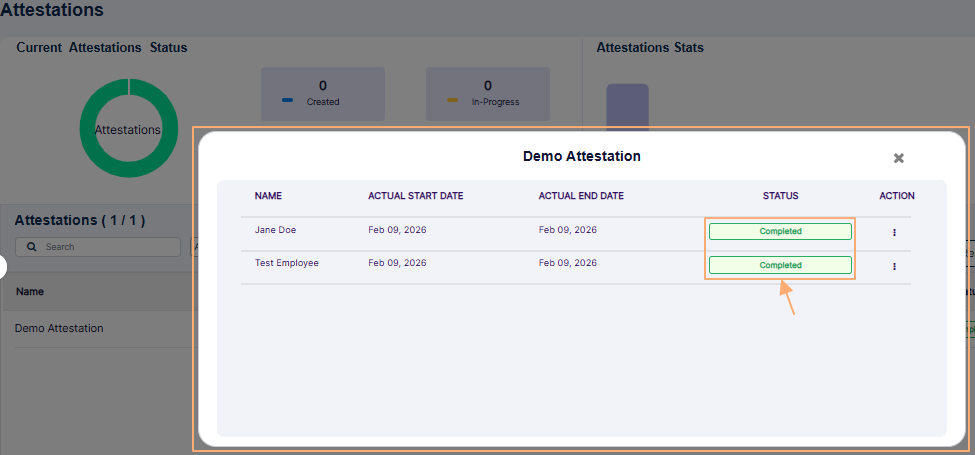 Fig: 99 - Completed statuses visible for each assigned employees in detailed view
NOTE:
- It is the last stage while processing an attestation prior to its completion.
- This can only be performed by the permitted user, and only when all flagged responses of an attestation are resolved, or there are no flagged responses.
Using the View Details menu option of the Attestations grid view Action column
NOTE: This section is applicable ONLY to user(s) who are assigned to perform an attestation. The attestation creator or submitter will NOT have the visibility of the menu option.
Click on the vertical ellipsis icon of the Action column of the Attestations grid view. The respective menu options get expanded. Depending on the status of the attestation various options can be displayed, but the View More and the View Details menu options are always displayed. Click on the latter.
 Fig: 100 - View Details menu option
A scrollabled modal window titled as ATTESTATION DETAILS loads after clicking on toggled the View Details menu option. The following fields are displayed:
- Title - Displays the title which was entered to create the attestation
- Date - Displays the date range of the starting and ending dates
- Submitter - Shows the full name of the attestation creator
- Attestor - Shows the full name of the user(s) who are assigned to execute this attestation
- Status - Displays the status of the attestation
- All of the questions which are part of the attestation (as per the chosen template at the time of attestation creation) and the responses provided by the attestor is displayed
 Fig: 101 - ATTESTATION DETAILS modal window partial view
NOTE:
- Any red-flagged response(s) is visible in red colored font. Any note(s) provided or any attachment title(s) which were posted are also visible in this modal window.
- You can click on the attachment title which is hyperlinked. Clicking on it loads a new tab on your web browser which displays the attached file's contents.
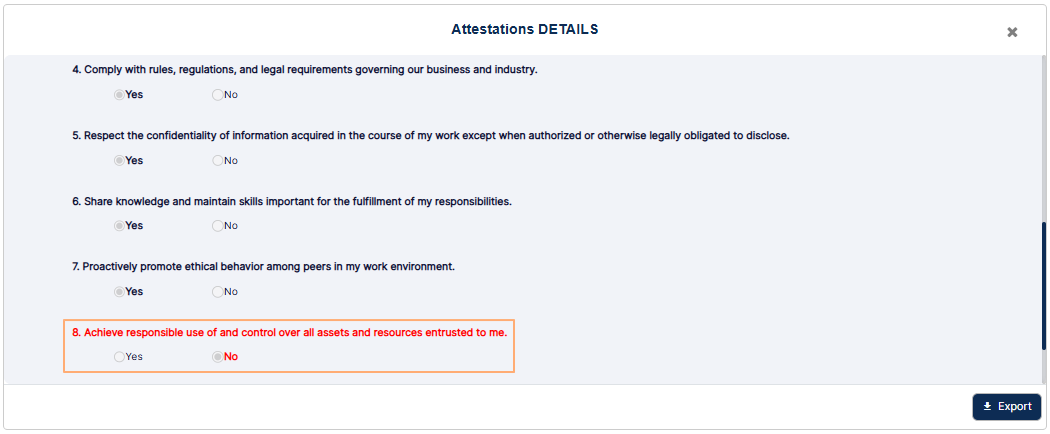 Fig: 102 - View of the color-coded red-flagged question and response, Note and Attachment title with hyperlink
You can click on the Export button at the bottom-right of this modal window to download a .pdf file. The following image displays sample contents of one such downloaded file.
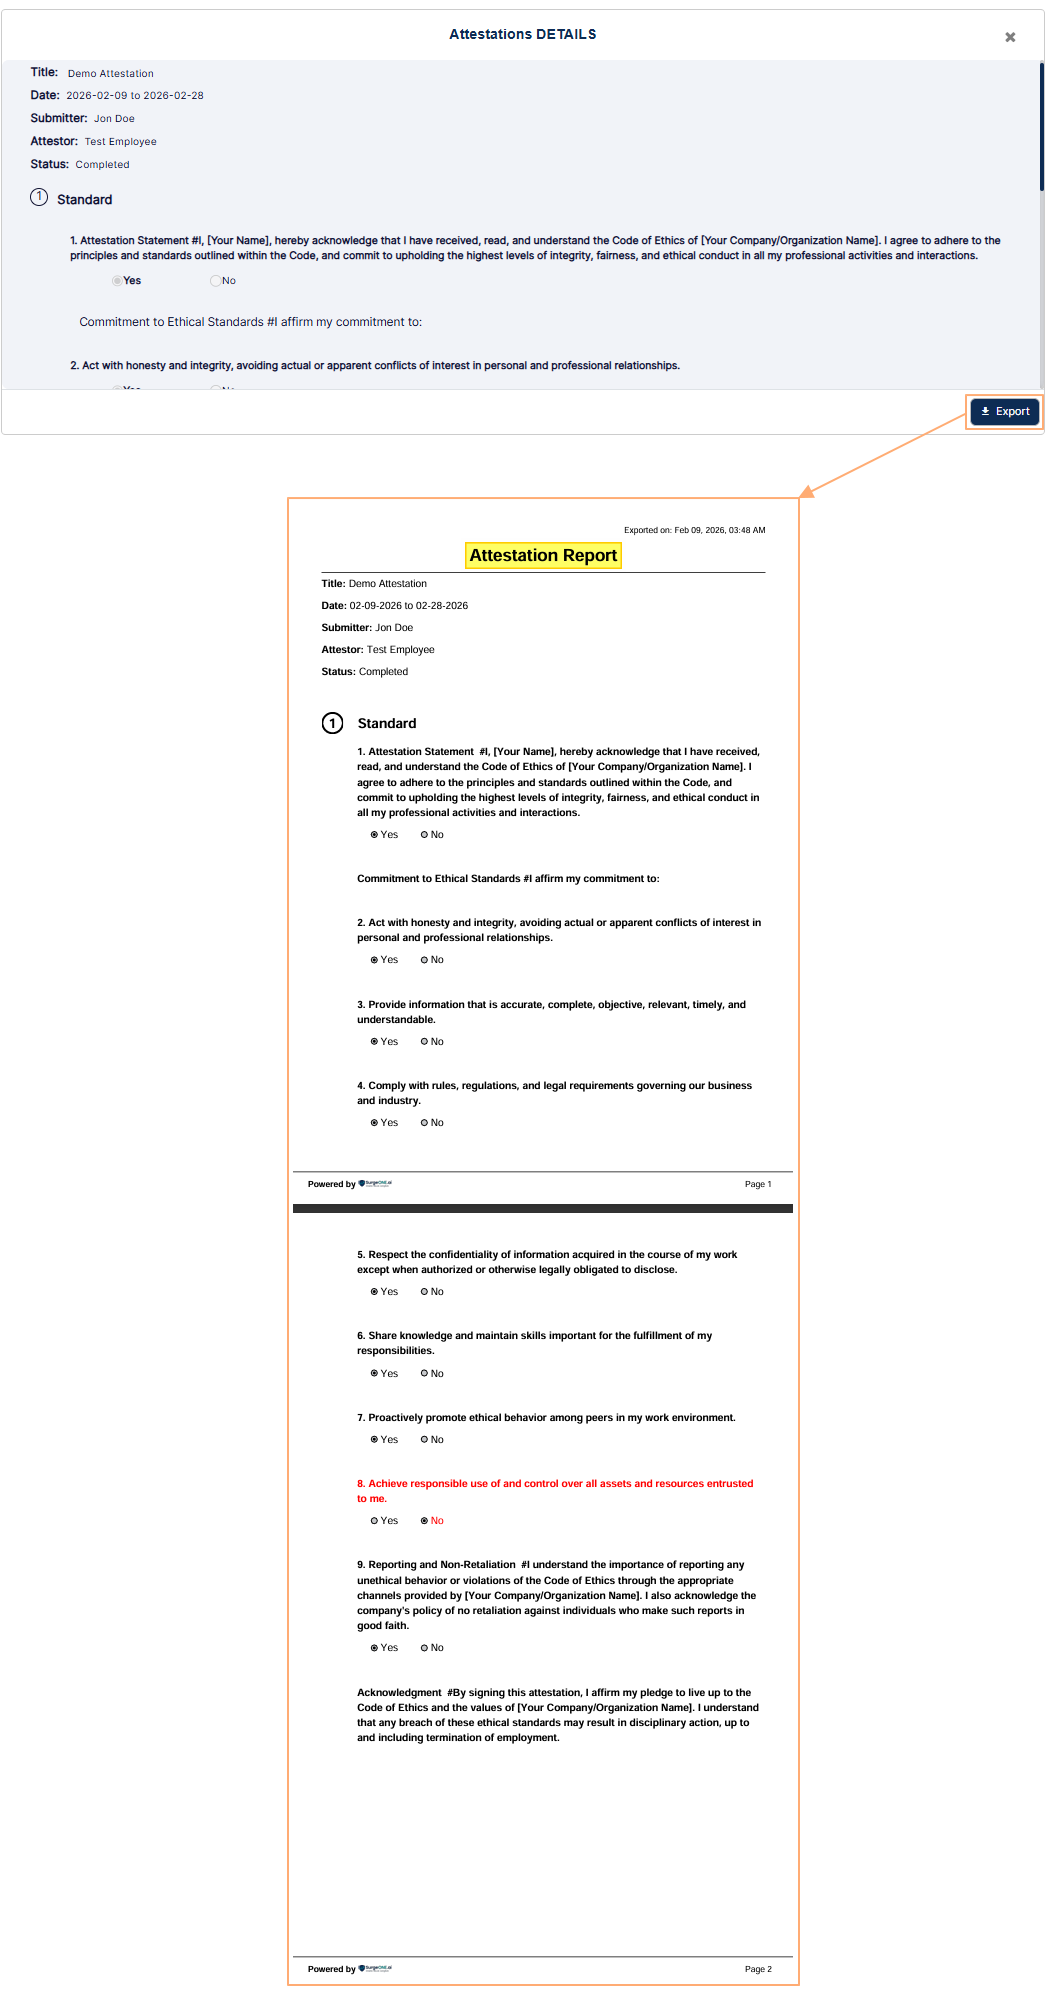 Fig: 103 - View of the contents of the opened sample pdf file